HTMCS v2 SAMPLE kho tài liệu bách khoa
Bạn đang xem bản rút gọn của tài liệu. Xem và tải ngay bản đầy đủ của tài liệu tại đây (1.91 MB, 104 trang )
How to Master CCNP SWITCH
All contents copyright C 2002-2013 by René Molenaar. All rights reserved. No part of this
document or the related files may be reproduced or transmitted in any form, by any means
(electronic, photocopying, recording, or otherwise) without the prior written permission of
the publisher.
Limit of Liability and Disclaimer of Warranty: The publisher has used its best efforts in
preparing this book, and the information provided herein is provided "as is." René Molenaar
makes no representation or warranties with respect to the accuracy or completeness of the
contents of this book and specifically disclaims any implied warranties of merchantability or
fitness for any particular purpose and shall in no event be liable for any loss of profit or any
other commercial damage, including but not limited to special, incidental, consequential, or
other damages.
Trademarks: This book identifies product names and services known to be trademarks,
registered trademarks, or service marks of their respective holders. They are used
throughout this book in an editorial fashion only. In addition, terms suspected of being
trademarks, registered trademarks, or service marks have been appropriately capitalized,
although René Molenaar cannot attest to the accuracy of this information. Use of a term in
this book should not be regarded as affecting the validity of any trademark, registered
trademark, or service mark. René Molenaar is not associated with any product or vendor
mentioned in this book.
GNS3Vault.com – René Molenaar
Page 2 of 339
How to Master CCNP SWITCH
Introduction
One of the things I do in life is work as a Cisco Certified System Instructor (CCSI) and after
teaching CCNP for a few years I‟ve learned which topics people find difficult to understand.
This is the reason I created where I offer free Cisco labs and videos to
help people learn networking. The problem with networking is that you need to know what
you are doing before you can configure anything. Even if you have all the commands you
still need to understand what and why you are typing these commands. I created this book
to give you a compact guide which will provide you the answer to what and why to help you
master the CCNP exam.
CCNP is one of the well-known certifications you can get in the world of IT. Cisco is the
largest supplier of networking equipment but also famous for its CCNA, CCNP and CCIE
certifications. Whether you are new to networking or already in the field for some time,
getting a certification is the best way to prove your knowledge on paper! Having said that, I
also love routing & switching because it‟s one of those fields in IT that doesn‟t change
much…some of the protocols you are about to learn are 10 or 20 years old and still alive
and kicking!
I have tried to put all the important keywords in bold. If you see a term or concept in
bold it‟s something you should remember / write down and make sure you understand it
since its core knowledge for your CCNP!
One last thing before we get started. When I‟m teaching I always advise students to create
mindmaps instead of notes. Notes are just lists with random information while mindmaps
show the relationship between the different items. If you are reading this book on your
computer I highly suggest you download “Xmind” which you can get for free here:
If you are new to mindmapping, check out “Appendix A – How to create mindmaps” at the
end of this book where I show you how I do it.
Enjoy reading my book and good luck getting your CCNP certification!
P.S. If you have any questions or comments about this book, please let me know:
E-mail:
Website:
Facebook:
Twitter:
Youtube:
gns3vault.com
facebook.com/gns3vault
twitter.com/gns3vault
youtube.com/gns3vault
GNS3Vault.com – René Molenaar
Page 3 of 339
How to Master CCNP SWITCH
Index
Introduction .............................................................................................................. 3
1. Lab Equipment ....................................................................................................... 5
2. VLANs (Virtual LANs) .............................................................................................. 8
3. Private VLANs ...................................................................................................... 49
4. STP (Spanning Tree Protocol)................................................................................. 64
5. Rapid Spanning Tree ........................................................................................... 129
6. MST (Multiple Spanning Tree) .............................................................................. 162
7. Spanning Tree Toolkit ......................................................................................... 184
8. Etherchannel (Link Aggregation) .......................................................................... 203
9. InterVLAN routing............................................................................................... 212
10. Gateway Redundancy (VRRP, GLBP, HSRP) .......................................................... 239
11. Switch Security ................................................................................................ 268
12. VoIP and Video on a switched network ................................................................ 306
13. Wireless .......................................................................................................... 323
14. Final Thoughts.................................................................................................. 338
Appendix A – How to create mindmaps ..................................................................... 339
GNS3Vault.com – René Molenaar
Page 4 of 339
How to Master CCNP SWITCH
1. Lab Equipment
Before we are going to start on our switching journey we are going to take a look at the lab
equipment you will need. GNS3 is a very useful tool but it only supports the emulation of
routers. You are unable to emulate a switch in GNS3 like a Cisco Catalyst 2950, 2960, 3550,
3560 or 3750.
The closest you can get to emulate a switch in
GNS3 is inserting this NM16-ESW Etherswitch
module in your virtual router.
It adds 16 switch ports to your virtual router
and supports basic trunking and spanning-tree
features. Unfortunately this module is very
limited and it doesn‟t cut it for CCNP SWITCH
labs.
Courtesy of Cisco Systems, Inc. Unauthorized use not permitted.
So what do we need? My advice is to buy some real physical switches. Don‟t be
scared…I‟m not going to advise you to buy ultra-high tech brand new switches! We are
going to buy used Cisco switches that are easy to find and they won‟t burn a hole in your
wallet…
“If I had eight hours to chop down a tree, I'd spend six hours sharpening my ax”
~Abraham Lincoln
Without further ado…here are our candidates:
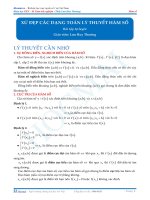
Cisco Catalyst 2950: This is a
layer 2 switch that can do all the
vlan, trunking and spanning-tree
stuff we need for CCNP SWITCH.
Cisco Catalyst 3550: This is a
layer 3 switch. It offers pretty much
the same features as the 2950 but it
also supports routing.
Courtesy of Cisco Systems, Inc. Unauthorized use not permitted.
If you look at eBay you can find the Cisco Catalyst 2950 for around $50, the Cisco Catalyst
3550 is around $100. It doesn‟t matter if you buy the 8, 24 or 48 port model. Not too bad
right? Keep in mind you can sell them once you are done with CCNP without losing (much)
money.
GNS3Vault.com – René Molenaar
Page 5 of 339
How to Master CCNP SWITCH
3550
SwitchA
13
0/
14
0/
Fa
Fa
Fa0
Fa0
/
Fa0 13
/14
16
17
0/
2950
SwitchB
ComputerA
0/
ComputerB
Fa
Fa0/16
Fa0/17
Fa0/2
Fa
/
Fa0 13
/14
Fa0/1
Fa0/16
Fa0/17
Fa0/3
ComputerC
2950
SwitchC
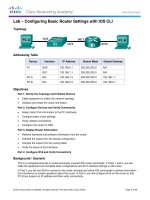
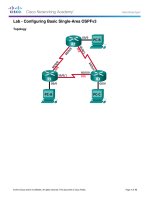
This is the topology I will be using throughout (most of) the book and I advise you to build
it so you can do all the labs in this book by yourself. I did my best so you don‟t have to recable that often. We need one Cisco Catalyst 3550 because it can do routing; the other two
Cisco Catalyst 2950 switches are sufficient for all the other stuff.
What about other switch models? Anything else we can use? Sure!
The Cisco Catalyst 2960 is the successor of the Cisco Catalyst 2950, it‟s a great layer
2 switch but more expensive.
The Cisco Catalyst 3560 is the successor of the Cisco Catalyst 3550, it also offers
layer 3 features and it‟s quite more expensive…around $300 on eBay.
The Cisco Catalyst 3750 is a layer 3 switch that is suitable for CCNP SWITCH.
I don‟t recommend buying the Cisco Catalyst 2960 because it doesn‟t offer anything extra
compared to the Cisco Catalyst 2950 that‟ll help you beat the exam.
The Cisco Catalyst 3560 does offer two features that might justify buying it:
It can do private vlans which is a CCNP SWITCH topic. It‟s impossible to configure it
on a Cisco Catalyst 3550! It‟s a small topic though and personally I don‟t think it‟s
worth the additional $200 just to configure private vlans.
QoS (Quality of Service) is different on the Cisco Catalyst 3560 compared to the
Cisco Catalyst 3550. If you intend to study QoS in the future I would recommend
buying this switch. You won‟t need it for the CCNP SWITCH exam.
GNS3Vault.com – René Molenaar
Page 6 of 339
How to Master CCNP SWITCH
Are there any switches that you should NOT buy?
Don‟t buy the Cisco Catalyst 2900XL switch; you‟ll need at least the Cisco Catalyst
2950 switch. Many features are not supported on the Cisco Catalyst 2900XL switch.
Don‟t buy the Cisco Catalyst 3500XL switch, same problem as the one above.
If you studied CCNA you probably know the difference between
straight-through and crossover cables. Modern switches and
network cards support auto-sensing so it really doesn‟t matter
what kind of cable you use.
If you are going to connect these older switches to each other
make sure you buy crossover cables since they don‟t support
auto-sensing!
I also like to use one of these. It‟s a USB
connector with 4x RS-232 serial connectors
you can use for your blue Cisco console
cables to connect to your switches.
It saves the hassle of plugging and
unplugging your console cable between your
switches.
The one I‟m using is from KÖNIG and costs
around $30. Google for “USB 4x RS-232”
and you should be able to find something
similar.
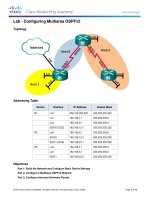
In my topology picture you saw that I have three computers connected to my switches. For
most of the labs I‟m only using those computers to generate some traffic or send some
pings so don‟t worry if you only have one computer, you can also use a cisco router if you
have one.
GNS3Vault.com – René Molenaar
Page 7 of 339
How to Master CCNP SWITCH
2. VLANs (Virtual LANs)
In this chapter we will take a look at the configuration of VLANs, Trunks, Etherchannels and
Private VLANs. If you studied CCNA then the first part of this chapter should be familiar to
you.
Let‟s start off by looking at a picture of a network:
Internet
Management
Helpdesk
Finance
Security
Engineering
Human
Resource
Sales
Research
Look at this picture for a minute, we have many departments and each department has its
own switch. Users are grouped physically together and are connected to their switch. What
do you think of it? Does this look like a good network design? If you are unsure let me ask
you some questions to think about:
What happens when a computer connected to the Research switch sends a broadcast
like an ARP request?
What happens when the Helpdesk switch fails?
Will our users at the Human Resource switch have fast network connectivity?
How can we implement security in this network?
Now let me explain why this is a bad network design. If any of our computers sends a
broadcast what will our switches do? They flood it! This means that a single broadcast frame
will be flooded on this entire network. This also happens when a switch hasn‟t learned about
a certain MAC address, the frame will be flooded.
GNS3Vault.com – René Molenaar
Page 8 of 339
How to Master CCNP SWITCH
If our helpdesk switch would fail this means that users from Human Resource are “isolated”
from the rest and unable to access other departments or the internet, this applies to other
switches as well. Everyone has to go through the Helpdesk switch in order to reach the
Internet which means we are sharing bandwidth, probably not a very good idea
performance-wise.
Last but not least, what about security? We could implement port-security and filter on MAC
addresses but that‟s not a very secure method since MAC addresses are very easy to spoof.
VLANs are one way to solve our problems.
Two more questions I‟d like to ask you to refresh your knowledge:
How many collision domains do we have here?
How many broadcast domains do we have here?
Each port on a switch is a separate collision domain so in this picture we have a LOT of
collision domains…more than 20.
What about broadcast domains? If a computer from the Sales switch would send a
broadcast frame we know that all other switches will forward it.
Routers don‟t forward broadcast frames so they effectively “limit” our broadcast domain. Of
course on the right side of our router where we have an Internet connection this would be
another broadcast domain…so we have 2 broadcast domains here.
3rd Floor
2nd Floor
1st Floor
Research Engineering
Sales
When you work with switches you have to keep in mind there‟s a big difference between
physical and logical topology. Physical is just the way our cables are connected while logical
is how we have configure things „virtually‟. In the example above we have 4 switches and I
have created 3 VLANs called Research, Engineering and Sales. A VLAN is a Virtual LAN so
it‟s like having a “switch inside a switch”.
GNS3Vault.com – René Molenaar
Page 9 of 339
How to Master CCNP SWITCH
What are the advantages of using vlans?
A VLAN is a single broadcast domain which means that if a user in the research VLAN
sends a broadcast frame only users in the same VLAN will receive it.
Users are only able to communicate within the same VLAN (unless you use a router).
Users don‟t have to be grouped physically together, as you can see we have users in
the Engineering vlan sitting on the 1st, 2nd and 3rd floor.
In my example I grouped different users in different VLANs but you can also use VLANs to
separate different traffic types. Perhaps you want to have all printers in one VLAN, all
servers in a VLAN and all the computers in another. What about VoIP? Put all your Voice
over IP phones in a separate Vlan so its traffic is separated from other data (more on VoIP
later!)
VLAN 10
VLAN 10
VLAN 20
Trunk
VLAN 20
VLAN 30
VLAN 30
Let‟s take a look at the example above. There are three computers on each side belonging
to three different VLANs. VLAN 10,20 and 30. There are two switches connecting these
computers to each other.
Our switches will forward traffic but how do they know to which vlan our traffic belongs?
Let‟s take a look at an Ethernet frame:
Preamble
SOF
Dest
Source
Length
802.2
Header/Data
FCS
Do you see any field where we can specify to which vlan our Ethernet frame belongs? Well
there isn‟t! That‟s why we need a trunking protocol to help us.
GNS3Vault.com – René Molenaar
Page 10 of 339
How to Master CCNP SWITCH
Between switches we are going to create a trunk. A trunk connection is simply said an
interface that carries multiple VLANs.
VLAN 10
VLAN 10
Trunk
VLAN 20
VLAN 20
Trunk
VLAN 30
VLAN 30
There are two trunking protocols we can use:
IEEE 802.1Q: An open standard that is supported on switches from many vendors
and most NICs.
Cisco ISL (Inter-Switch Link): An old Cisco proprietary protocol that is only
supported on some Cisco switches. If you bought some old Cisco catalyst 2950
switches you‟ll notice they only support 802.1Q.
802.1Q FRAME
Preamble
Dest Mac
Source Mac
Ethertype 0x8100
Priority
Tag
CFI
Type/Length
Data
CRC
VLAN Identifier
Let‟s start by looking at 802.1Q. In the picture you see an example of an 802.1Q Ethernet
frame. As you can see it‟s the same as a normal Ethernet frame but we have added a tag in
the middle (that‟s the blue field). In our tag you will find a “VLAN identifier” which is the
VLAN to which this Ethernet frame belongs.
This is how switches know to which VLAN our traffic belongs. There‟s also a field called
“Priority” which is used for QoS (Quality of Service). Keep in mind 802.1Q is a standard
GNS3Vault.com – René Molenaar
Page 11 of 339
How to Master CCNP SWITCH
and supported on switches from many different vendors. You can also use 802.1Q on many
NICs.
ISL FRAME
ISL Header
DA
Preamble
Type
Dest Mac
User
DA
Source Mac
Length
Snap
Type/Length
HSA
Data
CRC
VLAN Identifier BPDU Index
FCS
RES
This is an example of an ISL Frame. The difference between 802.1Q and ISL is that 802.1
tags the Ethernet frame while ISL encapsulates the Ethernet Frame. You can see in the
picture that ISL adds a new header in front of the Ethernet Frame and it adds a FCS (Frame
Check Sequence). The header contains the “VLAN identifier” so we know to which VLAN this
Ethernet Frame belongs. The user field is used for QoS (Quality of Service).
If you studied CCNA you might recall the “native VLAN”. On a Cisco switch this is
VLAN 1 by default. The difference between 802.1Q and ISL concerning the native
VLAN is that 802.1Q will not tag the native VLAN while ISL does tag the native
VLAN.
Enough theory for now, let‟s take a look at the configuration of VLANs and trunks.
GNS3Vault.com – René Molenaar
Page 12 of 339
How to Master CCNP SWITCH
Fa0/2
ComputerB
192.168.1.2 /24
Fa0/1
ComputerA
192.168.1.1 /24
3550
SwitchA
Let‟s start with a simple example. ComputerA and ComputerB are connected to SwitchA.
First we will look at the default VLAN configuration on SwitchA:
SwitchA#show vlan
VLAN Name
Status
Ports
---- -------------------------------- --------- -----------------------------1
default
active
Fa0/1, Fa0/2, Fa0/3, Fa0/4
Fa0/5, Fa0/6, Fa0/7, Fa0/8
Fa0/9, Fa0/10, Fa0/11, Fa0/12
Fa0/13, Fa0/14, Fa0/15,
Fa0/22
Fa0/23, Fa0/24, Gi0/1, Gi0/2
1002 fddi-default
act/unsup
1003 token-ring-default
act/unsup
1004 fddinet-default
act/unsup
1005 trnet-default
act/unsup
Interesting…VLAN 1 is the default VLAN and you can see that all interfaces are parked in
VLAN 1.
VLAN information is not saved in the running-config or startup-config but in a
separate file called vlan.dat on your flash memory. If you want to delete the VLAN
information you should delete this file by typing delete flash:vlan.dat.
GNS3Vault.com – René Molenaar
Page 13 of 339
Do you enjoy reading this sample of How to Master CCNP SWITCH ?
Click on the link below to get the full version.
Get How to Master CCNP SWITCH Today
How to Master CCNP SWITCH
I configured an IP address on ComputerA and ComputerB so they are in the same subnet.
C:\Documents and Settings\ComputerA>ping 192.168.1.2
Pinging 192.168.1.2 with 32 bytes of data:
Reply
Reply
Reply
Reply
from
from
from
from
192.168.1.2:
192.168.1.2:
192.168.1.2:
192.168.1.2:
bytes=32
bytes=32
bytes=32
bytes=32
time<1ms
time<1ms
time<1ms
time<1ms
TTL=128
TTL=128
TTL=128
TTL=128
Ping statistics for 192.168.1.2:
Packets: Sent = 4, Received = 4, Lost = 0 (0% loss),
Approximate round trip times in milli-seconds:
Minimum = 0ms, Maximum = 0ms, Average = 0ms
Even with the default switch configuration ComputerA is able to reach ComputerB. Let‟s see
if I can create a new VLAN for ComputerA and ComputerB:
SwitchA(config)#vlan 50
SwitchA(config-vlan)#name Computers
SwitchA(config-vlan)#exit
This is how you create a new VLAN. If you want you can give it a name but this is optional.
I‟m calling my VLAN “Computers”.
SwitchA#show vlan
VLAN Name
Status
Ports
---- -------------------------------- --------- -----------------------------1
default
active
Fa0/1, Fa0/2, Fa0/3, Fa0/4
Fa0/5, Fa0/6, Fa0/7, Fa0/8
Fa0/9, Fa0/10, Fa0/11, Fa0/12
Fa0/13, Fa0/14, Fa0/15,
Fa0/23, Fa0/24, Gi0/1, Gi0/2
50
Computers
active
VLAN 50 was created on SwitchA and you can see that it‟s active. However no ports are
currently in VLAN 50. Let‟s see if we can change this…
SwitchA(config)interface fa0/1
SwitchA(config-if)#switchport mode access
SwitchA(config-if)#switchport access vlan 50
SwitchA(config)interface fa0/2
SwitchA(config-if)#switchport mode access
SwitchA(config-if)#switchport access vlan 50
First I will configure the switchport in access mode with the “switchport mode access”
command. By using the “switchport access vlan” command we can move our interfaces
to another VLAN.
GNS3Vault.com – René Molenaar
Page 14 of 339
How to Master CCNP SWITCH
SwitchA#show vlan
VLAN Name
Status
Ports
---- -------------------------------- --------- -----------------------------1
default
active
Fa0/3, Fa0/4
Fa0/5, Fa0/6, Fa0/7, Fa0/8
Fa0/9, Fa0/10, Fa0/11, Fa0/12
Fa0/13, Fa0/14, Fa0/15,
Fa0/23, Fa0/24, Gi0/1, Gi0/2
50
Computers
active
Fa0/1, Fa0/2
Excellent! Both computers are now in VLAN 50. Let‟s verify our configuration by checking if
they can ping each other:
C:\Documents and Settings\ComputerA>ping 192.168.1.2
Pinging 192.168.1.2 with 32 bytes of data:
Reply
Reply
Reply
Reply
from
from
from
from
192.168.1.2:
192.168.1.2:
192.168.1.2:
192.168.1.2:
bytes=32
bytes=32
bytes=32
bytes=32
time<1ms
time<1ms
time<1ms
time<1ms
TTL=128
TTL=128
TTL=128
TTL=128
Ping statistics for 192.168.1.2:
Packets: Sent = 4, Received = 4, Lost = 0 (0% loss),
Approximate round trip times in milli-seconds:
Minimum = 0ms, Maximum = 0ms, Average = 0ms
Our computers are able to reach each other within VLAN 50. Besides pinging each other we
can also use another show command to verify our configuration:
SwitchA#show interfaces fa0/1 switchport
Name: Fa0/1
Switchport: Enabled
Administrative Mode: static access
Operational Mode: static access
Administrative Trunking Encapsulation: negotiate
Operational Trunking Encapsulation: native
Negotiation of Trunking: Off
Access Mode VLAN: 50 (Computers)
Trunking Native Mode VLAN: 1 (default)
SwitchA#show interfaces fa0/2 switchport
Name: Fa0/1
Switchport: Enabled
Administrative Mode: static access
Operational Mode: static access
Administrative Trunking Encapsulation: negotiate
Operational Trunking Encapsulation: native
Negotiation of Trunking: Off
Access Mode VLAN: 50 (Computers)
Trunking Native Mode VLAN: 1 (default)
GNS3Vault.com – René Molenaar
Page 15 of 339
How to Master CCNP SWITCH
By using the “show interfaces switchport” command we can see that the operational mode
is “static access” which means it‟s in access mode. We can also verify that the interface is
assigned to VLAN 50.
Fa0/14
Fa0/1
ComputerA
192.168.1.1 /24
Fa0/14
3550
SwitchA
Fa0/2
2950
SwitchB
ComputerB
192.168.1.2 /24
Let‟s continue our VLAN adventure by adding SwitchB to the topology. I also moved
ComputerB from SwitchA to SwitchB.
SwitchB(config)#vlan 50
SwitchB(config-vlan)#name Computers
SwitchB(config-vlan)#exit
SwitchB(config)#interface fa0/2
SwitchB(config-if)#switchport access vlan 50
I just created VLAN 50 on SwitchB and the interface connected to ComputerB is assigned to
VLAN 50.
Next step is to create a trunk between SwitchA and SwitchB:
SwitchA(config)#interface fa0/14
SwitchA(config-if)#switchport mode trunk
Command rejected: An interface whose trunk encapsulation is "Auto" can not be
configured to "trunk" mode.
SwitchB(config)#interface fa0/14
SwitchB(config-if)#switchport mode trunk
Command rejected: An interface whose trunk encapsulation is "Auto" can not be
configured to "trunk" mode.
I try to change the interface to trunk mode with the “switchport mode trunk” command.
Depending on the switch model you might see the same error as me. If we want to change
the interface to trunk mode we need to change the trunk encapsulation type. Let‟s see what
options we have:
SwitchA(config-if)#switchport trunk encapsulation ?
dot1q
Interface uses only 802.1q trunking encapsulation when trunking
isl
Interface uses only ISL trunking encapsulation when trunking
negotiate Device will negotiate trunking encapsulation with peer on
interface
Aha…so this is where you can choose between 802.1Q and ISL.
GNS3Vault.com – René Molenaar
Page 16 of 339
How to Master CCNP SWITCH
By default our switch will negotiate about the trunk encapsulation type.
SwitchA(config-if)#switchport trunk encapsulation dot1q
SwitchB(config-if)#switchport trunk encapsulation dot1q
Let‟s change it to 802.1Q by using the “switchport trunk encapsulation” command.
SwitchA#show interfaces fa0/14 switchport
Name: Fa0/14
Switchport: Enabled
Administrative Mode: dynamic auto
Operational Mode: static access
Administrative Trunking Encapsulation: dot1q
SwitchB#show interfaces fa0/14 switchport
Name: Fa0/14
Switchport: Enabled
Administrative Mode: dynamic auto
Operational Mode: static access
Administrative Trunking Encapsulation: dot1q
As you can see the trunk encapsulation is now 802.1Q.
SwitchA(config)#interface fa0/14
SwitchA(config-if)#switchport mode trunk
SwitchB(config)#interface fa0/14
SwitchB(config-if)#switchport mode trunk
Now I can successfully change the switchport mode to trunk.
SwitchA#show interfaces fa0/14 switchport
Name: Fa0/14
Switchport: Enabled
Administrative Mode: trunk
Operational Mode: trunk
Administrative Trunking Encapsulation: dot1q
Operational Trunking Encapsulation: dot1q
SwitchB#show interfaces fa0/14 switchport
Name: Fa0/14
Switchport: Enabled
Administrative Mode: trunk
Operational Mode: trunk
Administrative Trunking Encapsulation: dot1q
Operational Trunking Encapsulation: dot1q
We can confirm we have a trunk because the operational mode is “dot1q”.
GNS3Vault.com – René Molenaar
Page 17 of 339
How to Master CCNP SWITCH
Let‟s try if ComputerA and ComputerB can reach each other:
C:\Documents and Settings\ComputerA>ping 192.168.1.2
Pinging 192.168.1.2 with 32 bytes of data:
Reply
Reply
Reply
Reply
from
from
from
from
192.168.1.2:
192.168.1.2:
192.168.1.2:
192.168.1.2:
bytes=32
bytes=32
bytes=32
bytes=32
time<1ms
time<1ms
time<1ms
time<1ms
TTL=128
TTL=128
TTL=128
TTL=128
Ping statistics for 192.168.1.2:
Packets: Sent = 4, Received = 4, Lost = 0 (0% loss),
Approximate round trip times in milli-seconds:
Minimum = 0ms, Maximum = 0ms, Average = 0ms
Excellent! ComputerA and ComputerB can reach each other! Does this mean we are done?
Not quite yet…there‟s more I want to show to you:
SwitchB#show vlan
VLAN Name
Status
Ports
---- -------------------------------- --------- -----------------------------1
default
active
Fa0/1, Fa0/3, Fa0/4, Fa0/5
Fa0/6, Fa0/7, Fa0/8, Fa0/9
Fa0/10, Fa0/11, Fa0/12,
Fa0/13
Fa0/15, Fa0/22, Fa0/23,
Fa0/24
Gi0/1, Gi0/2
50
Computers
active
Fa0/2
First of all, if we use the show vlan command we don‟t see the Fa0/14 interface. This is
completely normal because the show vlan command only shows interfaces in access
mode and no trunk interfaces.
SwitchB#show interface fa0/14 trunk
Port
Fa0/14
Mode
on
Encapsulation
802.1q
Status
trunking
Native vlan
1
Port
Fa0/14
Vlans allowed on trunk
1-4094
Port
Fa0/14
Vlans allowed and active in management domain
1,50
Port
Fa0/14
Vlans in spanning tree forwarding state and not pruned
50
The show interface trunk is very useful. You can see if an interface is in trunk mode,
which trunk encapsulation protocol it is using (802.1Q or ISL) and what the native VLAN is.
We can also see that VLAN 1 – 4094 are allowed on this trunk.
GNS3Vault.com – René Molenaar
Page 18 of 339
How to Master CCNP SWITCH
We can also see that currently only VLAN 1 (native VLAN) and VLAN 50 are active. Last but
not least you can see something which VLANs are in the forwarding state for spanning-tree
(more on spanning-tree later!).
SwitchB(config-if)#switchport trunk allowed vlan ?
WORD
VLAN IDs of the allowed VLANs when this port is in trunking mode
add
add VLANs to the current list
all
all VLANs
except all VLANs except the following
none
no VLANs
remove remove VLANs from the current list
For security reasons it might be a good idea not to allow all VLANs on your trunk link. We
can change this by using the switchport trunk allowed vlan command.
SwitchB(config-if)#switchport trunk allowed vlan remove 1-4094
SwitchB(config-if)#switchport trunk allowed vlan add 1-50
I just removed all allowed VLANs from the trunk and now only VLAN 1 – 50 are allowed.
SwitchB#show interface fa0/14 trunk
Port
Fa0/14
Mode
on
Encapsulation
802.1q
Port
Fa0/14
Vlans allowed on trunk
1-50
Status
trunking
Native vlan
1
Verify this by using the show interface trunk command.
SwitchB#show interfaces trunk
Port
Fa0/14
Fa0/16
Mode
on
auto
Port
Fa0/14
Fa0/16
Vlans allowed on trunk
1-50
1-4094
Port
Fa0/14
Fa0/16
Vlans allowed and active in management domain
1,50
1,50
Port
Fa0/20
Fa0/21
Vlans allowed and active in management domain
1,50
1,50
Port
Fa0/14
Fa0/16
Vlans in spanning tree forwarding state and not pruned
50
50
GNS3Vault.com – René Molenaar
Encapsulation
802.1q
n-isl
Status
trunking
trunking
Native vlan
1
1
Page 19 of 339
How to Master CCNP SWITCH
You can also use the show interfaces trunk command to get an overview of all your trunk
interfaces. Besides our Fa0/14 interface you can see I got a couple of other interfaces that
are in trunk mode.
Besides “access” and “trunk” mode we also have two “dynamic” methods. Let me show you
what I mean:
SwitchB#show interface fa0/2 switchport
Name: Fa0/2
Switchport: Enabled
Administrative Mode: static access
Operational Mode: static access
An interface can be in access mode or in trunk mode. The interface above is connected to
ComputerB and you can see that the operational mode is “static access” which means it‟s in
access mode.
SwitchB#show interfaces fa0/14 switchport
Name: Fa0/14
Switchport: Enabled
Administrative Mode: trunk
Operational Mode: trunk
This is our trunk interface which is connected to SwitchA. You can see the operational mode
is trunk mode.
SwitchB(config-if)#switchport mode ?
access
Set trunking mode to ACCESS unconditionally
dot1q-tunnel set trunking mode to TUNNEL unconditionally
dynamic
Set trunking mode to dynamically negotiate access or trunk
private-vlan Set private-vlan mode
trunk
Set trunking mode to TRUNK unconditionally
If I go to the interface configuration to change the switchport mode you can see I have
more options than access or trunk mode. There is also a dynamic method. Don‟t worry
about the other options for now.
SwitchB(config-if)#switchport mode dynamic ?
auto
Set trunking mode dynamic negotiation parameter to AUTO
desirable Set trunking mode dynamic negotiation parameter to DESIRABLE
We can choose between dynamic auto and dynamic desirable. Our switch will
automatically find out if the interface should become an access or trunk port. So what‟s the
difference between dynamic auto and dynamic desirable? Let‟s find out!
GNS3Vault.com – René Molenaar
Page 20 of 339
How to Master CCNP SWITCH
Fa0/14
Fa0/14
3550
SwitchA
2950
SwitchB
I‟m going to play with the switchport mode on SwitchA and SwitchB and we‟ll see what the
result will be.
SwitchA(config)#interface fa0/14
SwitchA(config-if)#switchport mode dynamic auto
SwitchA(config)#interface fa0/14
SwitchB(config-if)#switchport mode dynamic auto
First I‟ll change both interfaces to dynamic auto.
SwitchA(config-if)#do show interface f0/14 switchport
Name: Fa0/14
Switchport: Enabled
Administrative Mode: dynamic auto
Operational Mode: static access
SwitchB(config-if)#do show interface f0/14 switchport
Name: Fa0/14
Switchport: Enabled
Administrative Mode: dynamic auto
Operational Mode: static access
Our administrative mode is dynamic auto and as a result we now have an access port.
SwitchA(config)#interface fa0/14
SwitchA(config-if)#switchport mode dynamic desirable
SwitchB(config)#interface fa0/14
SwitchB(config-if)#switchport mode dynamic desirable
SwitchA#show interfaces fa0/14 switchport
Name: Fa0/14
Switchport: Enabled
Administrative Mode: dynamic desirable
Operational Mode: trunk
GNS3Vault.com – René Molenaar
Page 21 of 339
How to Master CCNP SWITCH
SwitchB#show interfaces fa0/14 switchport
Name: Fa0/14
Switchport: Enabled
Administrative Mode: dynamic desirable
Operational Mode: trunk
Once we change both interfaces to dynamic desirable we end up with a trunk link. What do
you think will happen if we mix the switchport types? Maybe dynamic auto on one side and
dynamic desirable on the other side? Let‟s find out!
SwitchA(config)#interface fa0/14
SwitchA(config-if)#switchport mode dynamic desirable
SwitchB(config)#interface fa0/14
SwitchB(config-if)#switchport mode dynamic auto
SwitchA#show interfaces f0/14 switchport
Name: Fa0/14
Switchport: Enabled
Administrative Mode: dynamic desirable
Operational Mode: trunk
SwitchB#show interfaces fa0/14 switchport
Name: Fa0/14
Switchport: Enabled
Administrative Mode: dynamic auto
Operational Mode: trunk
It seems our switch has a strong desire to become a trunk. Let‟s see what happens with
other combinations!
SwitchA(config)#interface fa0/14
SwitchA(config-if)#switchport mode dynamic auto
SwitchB(config)#interface fa0/14
SwitchB(config-if)#switchport mode trunk
SwitchA#show interfaces f0/14 switchport
Name: Fa0/14
Switchport: Enabled
Administrative Mode: dynamic auto
Operational Mode: trunk
SwitchB#show interfaces fa0/14 switchport
Name: Fa0/14
Switchport: Enabled
Administrative Mode: trunk
Operational Mode: trunk
Dynamic auto will prefer to become an access port but if the other interface has been
configured as trunk we will end up with a trunk.
GNS3Vault.com – René Molenaar
Page 22 of 339
How to Master CCNP SWITCH
SwitchA(config)#interface fa0/14
SwitchA(config-if)#switchport mode dynamic auto
SwitchB(config)#interface fa0/14
SwitchB(config-if)#switchport mode access
SwitchA#show interfaces f0/14 switchport
Name: Fa0/14
Switchport: Enabled
Administrative Mode: dynamic auto
Operational Mode: static access
SwitchB#show interfaces fa0/14 switchport
Name: Fa0/14
Switchport: Enabled
Administrative Mode: static access
Operational Mode: static access
Configuring one side as dynamic auto and the other one as access and the result will be an
access port.
SwitchA(config)#interface fa0/14
SwitchA(config-if)#switchport mode dynamic desirable
SwitchB(config)#interface fa0/14
SwitchB(config-if)#switchport mode trunk
SwitchA#show interfaces f0/14 switchport
Name: Fa0/14
Switchport: Enabled
Administrative Mode: dynamic desirable
Operational Mode: trunk
SwitchB#show interfaces fa0/14 switchport
Name: Fa0/14
Switchport: Enabled
Administrative Mode: trunk
Operational Mode: trunk
Dynamic desirable and trunk mode offers us a working trunk.
What do you think will happen if I set one interface in access mode and the other one as
trunk? Doesn‟t sound like a good idea but let‟s push our luck:
SwitchA(config)#interface fa0/14
SwitchA(config-if)#switchport mode access
SwitchB(config)#interface fa0/14
SwitchB(config-if)#switchport mode trunk
GNS3Vault.com – René Molenaar
Page 23 of 339
How to Master CCNP SWITCH
SwitchA#show interfaces f0/14 switchport
Name: Fa0/14
Switchport: Enabled
Administrative Mode: static access
Operational Mode: trunk
SwitchB#show interfaces fa0/14 switchport
Name: Fa0/14
Switchport: Enabled
Administrative Mode: trunk
Operational Mode: trunk
SwitchA#
%SPANTREE-7-RECV_1Q_NON_TRUNK: Received 802.1Q BPDU on non trunk
FastEthernet0/14 VLAN1.
%SPANTREE-7-BLOCK_PORT_TYPE: Blocking FastEthernet0/14 on VLAN0001.
Inconsistent port type.
%SPANTREE-2-UNBLOCK_CONSIST_PORT: Unblocking FastEthernet0/14 on VLAN0001.
Port consistency restored.
As soon as I change the switchport mode I see these spanning-tree error messages on
SwitchA. Spanning-tree receives an 802.1Q BPDU on an access port and doesn‟t like it. The
interface goes into blocking mode for VLAN 1 and only 14 seconds later its unblocking VLAN
1 again. Does this mean we have connectivity even though this smells fishy?
SwitchA#show interfaces fa0/14 switchport
Name: Fa0/14
Switchport: Enabled
Administrative Mode: static access
Operational Mode: static access
SwitchB#show interfaces fa0/14 switchport
Name: Fa0/14
Switchport: Enabled
Administrative Mode: trunk
Operational Mode: trunk
This doesn‟t look good; let‟s continue by looking at the trunk…
GNS3Vault.com – René Molenaar
Page 24 of 339