Place & Route
Bạn đang xem bản rút gọn của tài liệu. Xem và tải ngay bản đầy đủ của tài liệu tại đây (235.42 KB, 10 trang )
CHAPTER
16
Place and Route
This chapter discusses the process of implementing the
synthesis netlist of the CPU design into a target FPGA
device. The place and route tools read the netlist, extract
the components and nets from the netlist, place the compo-
nents on the target device, and interconnect the components
using the specified interconnections. After the place and
route process is complete, the designer has an imple-
mentation of the design in the target technology. The im-
plementation still needs to be verified for logical and tim-
ing correctness.
16
Chapter Sixteen
370
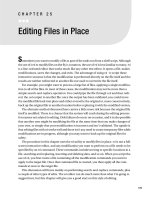
Place and Route Process
The place and route process places each macro from the synthesis netlist
into an available location on the target silicon and connects the macros
using routing resources available on the target silicon. The place and
route process is shown in Figure 16-1.
The synthesis netlist is input to the placement process. The placement
process analyzes all of the macros used in the design and their connectivity
to try to determine an optimal placement for the macros. The placement
algorithms take into account a number of technology-specific factors of the
target technology to determine whether a particular placement is good or
not. After a trial placement and signal route is attempted, the design is
analyzed with respect to timing constraints. If the timing constraints are
not met, the place and route software continues to try different placements
and signal routing to try to meet the constraints.
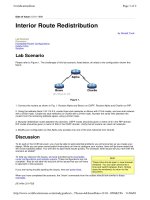
Typical target devices have areas of the chip where logical functions
are placed, and areas where interconnect signals are routed to connect the
logical functions. This is shown in Figure 16-2.
The device is split into a number of logic areas with routing channels
that surround the logic areas. Logic areas contain the logical gates to
implement the boolean function of the design. Routing channels contain
the signals that are used to connect the logical gates together. For FPGA
devices, the routing channels contain programmable interconnect wires.
FPGA devices use an onboard RAM to store the value of programmable
switches that are used to form the signal interconnections. By enabling
the proper sets of pass transistor gates, signal interconnections between
logic gates can be formed as shown in the example in Figure 16-3.
To make a connection from logic block 1 to logic block 3, all of the
switches shown need to be enabled with a logic 1 value. The logic gates of
the devices are connected to local routing signals that can be connected
to more global routing signals by pass transistors that bridge the two
signals. The control signals of the pass transistors are stored in a loadable
Constraints
Met?
Synthesis
Netlist
Placement Routing
Yes
No
Figure 16-1
Place and Route
Process.
371
Place and Route
RAM. The place and route tool generates the RAM image to be loaded into
the RAM on the device.
The routing channels contain vertical and horizontal lines. The hori-
zontal wires connect devices within a row, while the vertical lines allow
connections across rows. Most routing channels contain wires of different
Logic
Block 1
Logic
Block 2
Logic
Block 3
1 1
1 1
Figure 16-3
Logic Block
Interconnection.
Logic
Area
Logic
Area
Logic
Area
Logic
Area
Logic
Area
Logic
Area
Logic
Area
Logic
Area
Logic
Area
Routing Channels
Figure 16-2
FPGA Chip
Architecture.
lengths that allow connections to adjacent logic areas. Sometimes, longer
connections are needed, and either a longer line must be used or shorter
lines must be connected together to form the connection. This is shown in
Figure 16-4.
The job of the place and route tool is to create the programming files
that will be used to specify the logic function of the logic macros in the logic
areas and the switch programming of the wires used to connect the macros
together. Too many switches on a routed signal can cause some negative
performance effects. Each switch adds capacitance and resistance to the
routed signal. After only a few connections, signals start to slow signifi-
cantly because of the capacitance and resistance of the line.
The place and route tool, therefore, must try to minimize long connections
and the number of switches for a particular signal to create designs with
the highest speed. To get the highest utilization, the place and route
tools need to pack as many of the logical functions into a logic area as
possible and then use as much local routing resources as possible to connect
these functions.
The place and route tools can make tradeoffs if the speed-critical signals
are known ahead of time and are implemented using the highest speed
interconnect signals. The placement algorithm also tries to place logical
gates on the critical path close to each other so that local interconnect can
be used to connect the gates. Local interconnect is usually very fast because
the wires are short. Short wires have less capacitance and resistance and,
therefore, can operate at much higher speeds.
Chapter Sixteen
372
1
10
2
11
9
18
8
17
3
12 13
4
14
5
15
6 7
Connects short
segments together
Figure 16-4
Vertical and Horizon-
tal Routing.
Placing and Routing the Device
The target device for the CPU design, as mentioned in earlier chapters,
is an FPGA device. The device used is the Apex 20KE architecture from
Altera. The place and route tools used with the Apex 20KE architecture
are in the Quartus toolset. Quartus is a set of tools that includes not only
place and route, but VHDL entry, VHDL simulation, gate-level simulation,
and timing analysis. The first step in the process is to compile the design
into the place and route environment.
Setting Up a Project
Most tools that work on a design with multiple data descriptions have a
project manager to keep all of the files for that design in one place. This
facilitates file management of the design. The first step in the place and
route process is to set up a project. In the case of the Quartus environment,
the project is usually named the same as the output EDIF file from syn-
thesis. The Quartus user interface is shown in Figure 16-5.
Selecting the
File Project Wizard
menu item will bring up a wizard
that walks the user through the creation of a new project. The first pane
373
Place and Route
Figure 16-5
Quartus User
Interface.