Low-Level Web UI Testing
Bạn đang xem bản rút gọn của tài liệu. Xem và tải ngay bản đầy đủ của tài liệu tại đây (441.63 KB, 50 trang )
Low-Level Web UI Testing
7.0 Introduction
The techniques in this chapter show you how to perform Web application UI testing by mak-
ing calls to low-level API functions. These techniques are closely related to those in Chapter 6,
which manipulate the client area of a Web application using JavaScript calls to the Internet
Explorer Document Object Model (IE DOM). The techniques in this chapter are more power-
ful, meaning they give you greater control and flexibility over your test automation. This
allows you to perform more complex UI testing. The heart of these low-level techniques is
calling directly into the mshtml.dll and shdocvw.dll libraries to access and manipulate
HTML objects in the client area of IE. Although these techniques have been available for
several years, before .NET your only option was to write fairly complex COM code. The .NET
environment greatly simplifies writing test automation code using this low-level technique.
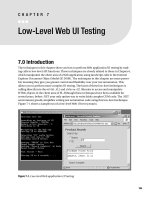
Figure 7-1 shows a sample run of a low-level Web UI test scenario.
Figure 7-1. Low-level Web application UI testing
185
CHAPTER 7
■ ■ ■
6633c07.qxd 4/3/06 1:55 PM Page 185
If you examine Figure 7-1, you’ll see that the test harness is a console application. The test
harness launches an instance of the IE browser and attaches to it, loads the Web AUT into the
browser, manipulates the browser, simulates a user exercising a product-search Web applica-
tion, and checks the application state to determine a test scenario pass or fail result.
Many of the techniques in this chapter make reference to the Web application shown in the
foreground of Figure 7-1. The application was created using Visual Studio .NET 2003 and has
the default WebForm1.aspx name. The application has three Label controls, a RadioButtonList
control, a TextBox control, a Button control, and a ListBox control. For simplicity, all the names
of the controls are the Visual Studio defaults: Label1, Label2, Button1, and so on. Obviously, your
Web AUTs will be more complex than this, but the demonstration application has all the key fea-
tures necessary to illustrate low-level Web application UI testing. The Web application searches
through a data store of product information, filtering by product name or product ID. A realistic
Web application would likely search through a SQL database of product information. However,
the demonstration application searches through a local data store implemented as an ArrayList
of Product objects. The local Product class is defined as
class Product
{
public string name;
public string id;
public double price;
public Product(string name, string id, double price)
{
this.name = name;
this.id = id;
this.price = price;
}
}
and the data store is created when the Web application loads
private System.Collections.ArrayList al =
new System.Collections.ArrayList();
private void Page_Load(object sender, System.EventArgs e)
{
Product p1 = new Product("widgets", "1A11A", 11.11);
Product p2 = new Product("gadgets", "2B22B", 22.22);
Product p3 = new Product("foozles", "3C33C", 33.33);
al.Add(p1);
al.Add(p2);
al.Add(p3);
Label3.Visible = false; // "Search Complete" message
}
CHAPTER 7
■
LOW-LEVEL WEB UI TESTING186
6633c07.qxd 4/3/06 1:55 PM Page 186
The key code for the Web AUT search functionality is
private void Button1_Click(object sender, System.EventArgs e)
{
ListBox1.Items.Clear();
string filter = TextBox1.Text;
ListBox1.Items.Add("ProdName ProdID Price");
ListBox1.Items.Add("=====================");
if (RadioButtonList1.SelectedValue == "Name")
{
foreach (Product p in al)
{
if (p.name.IndexOf(filter) >= 0)
ListBox1.Items.Add(p.name + ", " + p.id + ", " + p.price);
}
}
else if (RadioButtonList1.SelectedValue == "ID")
{
foreach (Product p in al)
{
if (p.id.IndexOf(filter) >= 0)
ListBox1.Items.Add(p.name + ", " + p.id + ", " + p.price);
}
}
Label3.Visible = true;
}
When testing an application through its UI, it does not particularly matter where or how
the new application state is determined. In other words, in UI testing, you don’t care if the
application is searching through a SQL database, a text file, or a local data store. Each user
action on the application (for example, clicking on the Search button) ultimately causes the
state of the application to change, which will be reflected in the UI (for example, the text dis-
played in the ListBox control). Testing situations like this, in which you do not have access to
the source code of the AUT/SUT, are often referred to as black box testing. If you have full
access to the source code, the situation is often called white box testing. These two terms,
along with variations such as gray box and clear box testing, are probably the most overused
terms in software testing. The terms themselves are not important, but the principles behind
them help you identify the limitations on the types of testing you can perform. For example, in
a black box testing situation, you must rely on general testing principles when creating test
cases; however, in a white box testing situation, you can create test cases specifically designed
to exercise a particular code path in the SUT.
Related but higher-level techniques to test a Web application through its UI were presented
in Chapter 6. Those techniques access the client area of a Web application using the IE DOM.
You can think of the IE DOM as essentially a wrapper around functions in the mshtml.dll and
shdocvw.dll libraries. The techniques in this chapter are called low-level because they call
CHAPTER 7
■
LOW-LEVEL WEB UI TESTING 187
6633c07.qxd 4/3/06 1:55 PM Page 187
directly into mshtml.dll and shdocvw.dll functions, in effect operating at one level of abstraction
lower than the techniques presented in Chapter 6. The techniques in this chapter, combined
with those in Chapter 3, allow you to access all areas of a Web application—the client area, the
browser shell, and external windows. The test harness that produced the test run shown in
Figure 7-1 is presented in Section 7.9.
7.1 Launching and Attaching to IE
Problem
You want to launch an instance of an IE browser and attach to it in a way that will allow you to
programmatically manipulate, synchronize, and examine the Web AUT.
Design
Launch an instance of IE using the Process.Start() method and retrieve the returned process
object. Then instantiate an InternetExplorer object and associate the InternetExplorer object
handle to the process handle.
Solution
try
{
InternetExplorer ie = null;
Console.WriteLine("\nLaunching an instance of IE");
Process p = Process.Start("iexplore.exe", "about:blank");
if (p == null)
throw new Exception("Could not launch IE");
Console.WriteLine("Process handle = " + p.MainWindowHandle.ToString());
SHDocVw.ShellWindows allBrowsers = new SHDocVw.ShellWindows();
Console.WriteLine("Number active browsers = " + allBrowsers.Count);
if (allBrowsers.Count == 0)
throw new Exception("Cannot find IE");
Console.WriteLine("Attaching to IE");
int i = 0; // attach to correct browser
while (i < allBrowsers.Count && ie == null)
{
InternetExplorer e = (InternetExplorer)allBrowsers.Item(i);
if (e.HWND == (int)p.MainWindowHandle)
ie = e;
++i;
}
CHAPTER 7
■
LOW-LEVEL WEB UI TESTING188
6633c07.qxd 4/3/06 1:55 PM Page 188
if (ie == null)
throw new Exception("Failed to attach to IE");
}
catch(Exception ex)
{
Console.WriteLine("Fatal error: " + ex.Message);
}
You can use the static Process.Start() method from the System.Diagnostics namespace to
launch the IE program. However, you now have two different processes, and the test harness
cannot directly communicate with the Web browser. To solve this problem, you instantiate an
InternetExplorer object from the shdocvw.dll library and then assign the process handle of
the IE program/process to the InternetExplorer object. This allows you to directly access the
IE program from your test harness.
Comments
You begin by calling Process.Start() with arguments "iexplore.exe" and "about:blank".
Notice you must fetch the return value from Start() into a Process object. Instead of loading
the virtual page "about:blank", you could load the Web AUT at this time. However, experience
has shown that you are less likely to run into problems with your test automation if you load
the AUT only after you have attached to the IE program. Additionally, if IE fails to launch at
this point in your automation, you know that the AUT was not the source of the error.
After launching an instance of the IE program, you instantiate and fetch a collection of all
active browser objects using the ShellWindows() method. The ShellWindows() method is housed
in the shdocvw.dll API library. To access ShellWindows() you must add a project reference to your
test automation harness that points to the Microsoft Internet Controls component in the classic
COM list of references. (Notice that unlike using .NET references, determining the name of the
COM component that houses a particular DLL or function is sometimes not obvious.) The .NET
Framework marshals shdocvw.dll to a .NET namespace aliased to SHDocVw; this lets you add
using SHDocVw;
to your test harness if you want to avoid fully qualifying the InternetExplorer class and other
classes and objects you use from the shdocvw.dll library.
The collection of browser objects returned by ShellWindows() includes the instance of IE
you just launched, any previously launched IE programs, and running instances of Windows
Explorer. You must iterate through the collection to find exactly which one is your test
instance. To do this, you first instantiate an InternetExplorer object. This object is also
defined in the SHDocVw namespace. The solution here loops through the shell windows collec-
tion using an index variable initialized to 0 and a while loop:
while (i < allBrowsers.Count && ie == null)
The loop exits if all available shell window objects have been examined but the test IE
program was not found or if the InternetExplorer object is not null. In the first case, a fatal
logic flaw exists in the test harness, and you can throw an exception. In the second case, you
have successfully found the test IE program. The actual attaching of the InternetExplorer
object to the running IE program occurs when a match is found between the HWND (handle to
CHAPTER 7
■
LOW-LEVEL WEB UI TESTING 189
6633c07.qxd 4/3/06 1:55 PM Page 189
window) of the current shell window object being examined and the MainWindowHandle prop-
erty of the test IE process:
if (e.HWND == (int)p.MainWindowHandle)
ie = e;
Notice that because shdocvw.dll is a pre-.NET unmanaged library, the HWND member of an
InternetExplorer object is a handle that is really just an alias for an integer. But the .NET process
object’s MainWindowHandle is type IntPtr, which is a platform-specific .NET type used to repre-
sent either a pointer (memory address) or a handle. To make these two values comparable with
the == operator, you cast the IntPtr type to an int.
In some testing situations, you may want to set a precondition that no other instances of IE
or other browsers may be running. This prevents any possible browser interaction side effects.
If this is the case, after launching an IE process, you can check to make sure no other browser
instances are active and then attach to the single item in the ShellWindows collection:
InternetExplorer ie = null;
if (allBrowsers.Count > 1)
throw new Exception("Other browser instances found");
else
ie = (InternetExplorer)allBrowsers.Item(0);
7.2 Determining When the Web AUT Is Fully
Loaded into the Browser
Problem
You want to determine whether the Web AUT is completely loaded into the test IE browser.
Design
Register a DWebBrowserEvents2 interface event handler and synchronize the handler with a
class-scope AutoResetEvent object and class-scope method delegate.
Solution
class Class1
{
static AutoResetEvent documentComplete = new AutoResetEvent(false);
static void Main(string[] args)
{
SHDocVw.InternetExplorer ie = null;
// launch Internet Explorer program - see Section 7.1
// attach object ie to IE program process - see Section 7.1
CHAPTER 7
■
LOW-LEVEL WEB UI TESTING190
6633c07.qxd 4/3/06 1:55 PM Page 190
ie.DocumentComplete += new
DWebBrowserEvents2_DocumentCompleteEventHandler(ie_DocumentComplete);
Console.WriteLine("\nNavigating to the Web app");
object nil = new object();
ie.Navigate("http://server/path/WebApp.aspx", ref nil, ref nil,
ref nil, ref nil);
documentComplete.WaitOne();
} // Main()
private static void ie_DocumentComplete(object pDisp, ref object URL)
{
documentComplete.Set();
}
} // class
A surprisingly tricky task when writing low-level Web application UI automation is determin-
ing exactly when the AUT is completely loaded into the test IE browser. This is essential because
otherwise your automation may attempt to manipulate the AUT before it’s ready, which almost
certainly causes an exception to be thrown. The InternetExplorer object in the shdocvw.dll
library contains a DocumentComplete event, which is associated with the DWebBrowserEvents2
interface. (This interface replaces an older, obsolete DWebBrowserEvents interface.) It designates
an event sink interface that your automation harness can implement to receive event notifica-
tions from the IE program. The second piece of the solution is to use an AutoResetEvent object
to synchronize your test automation control flow.
Comments
After you’ve created an InternetExplorer object and attached it to a running IE process (as
described in Section 7.1), you can register an event handler using the DWebBrowserEvents2
interface and associate it with the InternetExplorer.DocumentComplete event. The constructor
accepts a method delegate that is an alias for a real method to transfer control to when the
DocumentComplete event fires. In this solution, you transfer control to a method that just sets an
AutoResetEvent synchronizing object to signaled. In other words, when the IE process finishes
loading its HTTP response page, the DocumentComplete event fires and control transfers to the
method delegate that sets the AutoResetEvent object to signaled. So, you can pause your test
automation at any point by inserting an AutoResetEvent.WaitOne() call. The thread of execu-
tion is blocked until AutoResetEvent.Set() is called, which only happens when the current
document in IE has finished loading completely. Notice that as written, your automation could
wait forever if there is a problem, and your Web AUT never finishes loading. To avoid this, you
can pass an integer argument and a Boolean flag to the WaitOne() method, which will specify a
maximum timeout in milliseconds and determine whether or not to exit the synchronization
domain for the context before the wait. For example:
documentComplete.WaitOne(9000, true);
A common, but incorrect way to attempt to pause test automation until a Web AUT is
completely loaded into the test IE browser, is to insert Thread.Sleep() statements. Because,
CHAPTER 7
■
LOW-LEVEL WEB UI TESTING 191
6633c07.qxd 4/3/06 1:55 PM Page 191
with few exceptions, IE runs under a single thread of execution, Thread.Sleep() will cause
both the test automation and IE to halt.
With a mechanism for making sure that a Web page is fully loaded in hand, you can navi-
gate to the AUT using the InternetExplorer.Navigate() method. For example:
object nil = new object();
ie.Navigate("http://server/path/WebApp.aspx", ref nil, ref nil,
ref nil, ref nil);
The Navigate() method accepts five arguments. The first argument is required and is the
URL of the application to navigate to. The other four parameters are optional. In most cases,
you can pass references to a dummy object for the other four arguments as you’ve done here.
The first optional parameter is a reference to an object holding a constant that specifies
whether to add the resource to the history list, whether to read from or write to the cache, and
whether to display the resource in a new window. The second optional parameter is a refer-
ence to an object holding a string that specifies which frame to display. The third optional
parameter is a reference to an object holding a string that is HTTP POST data (typically that
data contained in an HTML form element). The fourth optional parameter is a reference to an
object holding a string that specifies additional HTTP headers to send to the Web server.
Because your automation manipulates IE through its UI, you do not need to pass any of these
optional arguments. For example, instead of using the argument that directly sends HTTP
POST data, you just simulate a click on the submit button associated with a form element.
7.3 Manipulating and Examining the IE Shell
Problem
You want to programmatically manipulate and examine the test IE browser to simulate user
actions such as resizing the browser and reading the status bar.
Design
Use the methods and properties of the InternetExplorer object such as Height, Width, and
StatusText.
Solution
InternetExplorer ie = null;
// attach ie to test Internet Explorer process - see Section 7.1
Console.WriteLine("Setting IE to size 450x360");
ie.Width = 450;
ie.Height = 360;
Thread.Sleep(1000);
CHAPTER 7
■
LOW-LEVEL WEB UI TESTING192
6633c07.qxd 4/3/06 1:55 PM Page 192
if (ie.StatusText.IndexOf("Done") == -1)
Console.WriteLine("Could not find 'Done' in status bar");
else
Console.WriteLine("Found 'Done' in status bar as expected");
Thread.Sleep(1000);
Console.WriteLine("Moving IE to position (50,100)");
ie.Left = 50;
ie.Top = 100;
Thread.Sleep(1000);
Console.WriteLine("Checking address bar value");
if (ie.LocationURL != "http://server/path/WebApp.aspx")
pass = false;
Comments
When writing Web application UI test automation, there are three different areas of IE to take
into account—the client area, which holds the Web page under test; the shell area, which
holds IE controls such as the Address bar and the Back button; and the windows, such as alert
boxes, which are separate from IE altogether. The InternetExplorer object has methods and
properties you can use to manipulate the shell (to simulate user actions) and to examine the
shell (to determine a test scenario pass/fail result). These properties and methods are fully
documented, but here are nine of the most useful ways to manipulate the shell:
• GoBack(): Navigate backward one item in the history list.
• GoForward(): Navigate forward one item in the history list.
• GoHome(): Navigate to the current home page.
• Refresh(): Refresh the page currently loaded in IE.
• Quit(): Close IE.
• Height, Width: Set the height/width of the shell (in pixels).
• Top, Left: Set the top/left location of the shell (in pixels).
In addition to the methods and properties listed here, following are five useful properties
you can use to determine a test scenario pass/fail result:
• FullScreen: Returns true if IE is in full-screen mode.
• MenuBar: Returns true if the IE menu bar is visible.
• Resizable: Returns true if IE is resizable.
• LocationURL: Returns the URL of the current page being displayed in IE.
• StatusText: Returns the text in the IE status bar.
CHAPTER 7
■
LOW-LEVEL WEB UI TESTING 193
6633c07.qxd 4/3/06 1:55 PM Page 193
7.4 Manipulating the Value of an HTML Element on
the Web AUT
Problem
You want to manipulate an HTML input element on the Web AUT to simulate user actions
such as typing data into a text field and clicking on buttons.
Design
Create a reference to the Web application document body using the Document property of the
InternetExplorer object. Then use the getElementById() method from the mshtml.dll library
to get a reference to the HTML element you want to manipulate and set the value or other
appropriate property of the element object to the desired value.
Solution
HTMLDocument theDoc = (HTMLDocument)ie.Document;
Console.WriteLine("\nSelecting 'Name' radio button");
HTMLInputElement radioButton =
(HTMLInputElement)theDoc.getElementById("RadioButtonList1_0");
radioButton.@checked = true;
Console.WriteLine("Setting text box to 'foo'");
HTMLInputElement textBox =
(HTMLInputElement)theDoc.getElementById("TextBox1");
textBox.value = "foo";
Console.WriteLine("Setting dropdown list to 'blue'");
HTMLSelectElement dropdown =
(HTMLSelectElement)theDoc.getElementById("DropDownList1");
dropdown.value = "blue";
Console.WriteLine("Clicking search button");
HTMLInputElement butt =
(HTMLInputElement)theDoc.getElementById("Button1");
butt.click();
documentComplete.WaitOne(); // see Section 7.2
This example assumes you have created and attached to an InternetExplorer object as
described in Sections 7.1 and 7.2. You declare an HTMLDocument object and assign it to a reference
to the application document body. The HTMLDocument type is defined in the mshtml.dll library.
To access this library, you can add a project reference to the .NET Microsoft.mshtml component.
This managed code library maps to the mshtml namespace, so you can add the statement
using mshtml;
CHAPTER 7
■
LOW-LEVEL WEB UI TESTING194
6633c07.qxd 4/3/06 1:55 PM Page 194
to your test harness to avoid having to fully qualify the HTMLDocument type and other classes
you want to use. After you have an HTMLDocument object, you can obtain a reference to an
HTML element that has an ID string by using the getElementByID() method. After you have
this object, you can simulate a user manipulating the element by assigning a value using the
value property. In the preceding solution, to simulate a user checking the radio button con-
trol, you must use @checked because checked is a keyword in the C# language.
Comments
The technique to manipulate controls on your Web AUT is relatively simple in the .NET program-
ming environment, at least compared with doing the same task using unmanaged code. Notice
that because the getElementById() method is used to obtain a reference to the element/control
you want to manipulate, the control must have an ID attribute that uniquely identifies it. If your
Web AUT is created by Visual Studio .NET UI designer, this is not a problem because all controls
receive an ID attribute. However, ID attributes are optional, so Web applications created manu-
ally, using Notepad for example, may need to be modified to include an ID attribute to use the
technique presented here.
A key tool to help you understand and extend this solution is the Object Browser in Visual
Studio .NET. If you point the Object Browser to the mshtml reference and expand the tree control,
you’ll see literally thousands of classes and methods that are available to you. There is far more
data here than you can possibly memorize, but fortunately, very few of these classes are needed
to write effective test automation. To determine which object interface in the mshtml namespace
you need to use, probe an object on your Web application. For example, notice that in the pre-
ceding solution, both a button control and a text box control are type HTMLInputElement but a
drop-down control is type HTMLSelectElement. Just how can you know this? You can determine
the correct class to use with code like this:
object o1 = (object)theDoc.getElementById("TextBox1");
Console.WriteLine("The textbox has type "+ o1.GetType().ToString());
object o2 = (object)theDoc.getElementById("DropDownList1");
Console.WriteLine("The dropdown has type " + o2.GetType().ToString());
The techniques in this section manipulate only controls in the client area of the IE browser.
To manipulate menu bar items or windows that are not part of the client area, you can use the
techniques in Chapter 3.
7.5 Verifying the Value of an HTML Element on the
Web AUT
Problem
You want to verify that an HTML element on the Web AUT has a certain value so you can set a
test scenario pass/fail result to the appropriate value.
CHAPTER 7
■
LOW-LEVEL WEB UI TESTING 195
6633c07.qxd 4/3/06 1:55 PM Page 195
Design
Create a reference to the Web application document body using the Document property of the
InternetExplorer object. Then use the getElementsByTagName() method from the mshtml.dll
library to get a collection of HTML elements, followed by the item() method to get the partic-
ular element you want to examine. You can then retrieve the actual value of the HTML
element using the InnerText property.
Solution
Suppose, for example, a Web AUT has several <p> elements, a <div> element with ID "div2",
and a single <select> element. This code will look for "aloha" in the <p> element, "adios" in
the <div> element, and "ciao" in the <select> element:
bool pass = true;
// get HTMLDocument object theDoc -- see Section 7.4
Console.WriteLine("Seeking 'aloha' in <p>[2]");
HTMLParaElement paraElement =
(HTMLParaElement)theDoc.getElementsByTagName("p").item(2, null);
if (paraElement.innerText.ToString().IndexOf("aloha") >= 0)
{
Console.WriteLine("Found target 'aloha");
}
else
{
Console.WriteLine("*Target string not found*");
pass = false;
}
Console.WriteLine("Seeking 'adios' in <div id='div2'>");
HTMLDivElement divElement =
(HTMLDivElement)theDoc.getElementsByTagName("div").item("div2", null);
if (divElement.innerText.ToString().IndexOf("adios") >= 0)
{
Console.WriteLine("Found target 'adios'");
}
else
{
Console.WriteLine("*Target string not found*");
pass = false;
}
Console.WriteLine("\nSeeking 'ciao' in list box");
HTMLSelectElement selElement =
(HTMLSelectElement)theDoc.getElementsByTagName("select").item(0, null);
if (selElement.innerText.ToString().IndexOf("ciao") >= 0)
CHAPTER 7
■
LOW-LEVEL WEB UI TESTING196
6633c07.qxd 4/3/06 1:55 PM Page 196
{
Console.WriteLine("Found target 'ciao'");
}
else
{
Console.WriteLine("*Target string not found*");
pass = false;
}
The parameters to the item() method are a bit tricky. The first parameter can be either an
integer that is interpreted as a 0-based index value, or the parameter can be a string that is inter-
preted as the tag name. The second argument to item() is also an index value, but it is only used
when the item() method returns a collection instead of an atomic object. In the preceding solu-
tion, the code
getElementsByTagName("p").item(2, null);
gets a collection of all the <p> elements, and then returns the particular <p> element that has
index [2], that is, the third <p> element.
Comments
You’ll often need to programmatically examine HTML element values on the document body
of the AUT that are not part of any child HTML element. Here’s one way to do that:
Console.WriteLine("Seeking 'howdy' in body");
HTMLBody body =
(HTMLBody)theDoc.getElementsByTagName("body").item(0, null);
if (body.createTextRange().findText("howdy", 0, 0) == true)
{
Console.WriteLine("Found target 'howdy'");
}
else
{
Console.WriteLine("*Target string not found*");
pass = false;
}
You get a reference to the document body and use the textRange object and its findText()
method to search for a target string. The findText() method accepts two optional arguments
after a required target string argument. The first optional argument specifies the number of
characters to search. A positive value means to search forward from the beginning of the
textRange. A negative value means to search backwards from the end. A value of 0 means to
search the entire textRange from the beginning. The second optional argument to findText()
is a flag that indicates the search type according to Table 7-1.
CHAPTER 7
■
LOW-LEVEL WEB UI TESTING 197
6633c07.qxd 4/3/06 1:55 PM Page 197
Table 7-1. Search-Type Flags for findText()
Value Meaning
0
Match partial words (default)
1
Match backwards
2
Match whole words only
4
Case-sensitive matching
131072
Match by comparing byte values
536870912
Match diacritical marks
1073741824
Match Kashida characters
2147483648
Match AlefHamza characters
These flag values may be combined. So the call
bool result = body.createTextRange().findText("foo", 0, 6);
will perform a case-sensitive, whole-word search of the entire body object. Notice that passing
a positive-valued first optional argument (meaning to search forward a certain number of char-
acters) is inconsistent with passing 1 as the second optional argument (meaning to search
backwards).
7.6 Creating an Excel Workbook to Save Test
Scenario Results
Problem
You want to create an Excel workbook to act as a data store to hold the results of test scenario
runs.
Design
Use an OleDbConnection object from the System.Data.OleDb namespace to connect to the target
machine where you want to store data. Then use an OleDbCommand object, with an appropriate
CommandText property, and the ExecuteNonQuery() method.
Solution
Console.WriteLine("\nCreating Excel database");
string connStr = "Provider=Microsoft.Jet.OLEDB.4.0;" +
"Data Source=C:\\Results\\results.xls;" +
"Extended Properties=\"Excel 8.0;HDR=YES\"";
CHAPTER 7
■
LOW-LEVEL WEB UI TESTING198
6633c07.qxd 4/3/06 1:55 PM Page 198
OleDbConnection conn = new OleDbConnection();
conn.ConnectionString = connStr;
conn.Open();
OleDbCommand cmd = new OleDbCommand();
cmd.Connection = conn;
cmd.CommandText = "CREATE TABLE tblResults (ScenarioID char(5),
Result char(4), WhenRun char(19))";
cmd.ExecuteNonQuery();
conn.Close();
This example creates a new Excel file named results.xls with a single worksheet named
tblResults. The worksheet has three columns with headers named ScenarioID (in cell A1),
Result (in cell B1), and WhenRun (in cell C1).
Comments
You may sometimes want to store your test scenario results in an Excel workbook instead of a
text file, SQL database, or other more usual data stores. If so, you must create an Excel work-
book in such a way that the workbook can programmatically accept data. The easiest way to
programmatically interoperate between .NET and Excel is by using OLE DB technology. You
start by creating a connection string. You have to be somewhat careful with the syntax. Notice
that in the DataSource attribute, you use the double backslash sequence (to represent a single
backslash), and in the Extended Properties attribute, you use a \" sequence to embed a double
quote character into the connection string. The HDR=YES part of the connection string means to
create a header in the first row of the Excel workbook. The "Excel 8.0" part does not directly
refer to the version of the Excel spreadsheet program on your computer; it refers to the Jet data-
base ISAM (Indexed Sequential Access Methods) format installed. You can verify the version on
the test client machine by viewing system registry setting HKEY_LOCAL_MACHINE\Software\
Microsoft\Jet\4.0\ISAM Formats.
After creating an appropriate connection string, you create an OleDbCommand object that
will create a worksheet in the workbook specified in the connection string. The creation of the
file is implicit—you don’t use a Create() or similar method as you might expect. Notice that
OLE DB data types are assigned to each column. In this example, you have five characters for a
test scenario ID ("12345", for example), four characters for a scenario result ("pass" or "fail"),
and 19 characters for information about when the scenario was run ("2006-10-27T13:42:25",
for example). You can specify other OLE DB data types, such as int, date, and so on, but gen-
erally you are better off making all your data columns type char. Three different data models
are in play—C# data types, OLE DB data types, and Excel data types. Experience has shown
that using just char data avoids a lot of potential data type conversion problems when you
insert test scenario results. If you intend to perform numerical analysis of your test results
directly in the Excel results workbook, however, you may want to consider storing directly as
type int and so on. For example
cmd.CommandText = "CREATE TABLE tblResults (ScenarioID int,
Result char(4), WhenRun date)";
will create the scenario ID column as a column of integers, the result column as text, and the
time when run column as a date (stripping away the time part of the WhenRun variable).
CHAPTER 7
■
LOW-LEVEL WEB UI TESTING 199
6633c07.qxd 4/3/06 1:55 PM Page 199
The solution assumes that file results.xls does not already exist. If it does exist, an
exception will be thrown. The solution also assumes the existence of folder C:\Results. When
storing test results into an Excel workbook, you can use several organizational strategies. First,
you can create just one Excel results file and insert the results of many different test scenario
runs into the file. Alternatively, you can create a new Excel results file for each test run. If you
are creating many Excel results files, check whether a file with the same name already exists by
using the File.Exists() method from the System.IO namespace.
Several of the techniques in Chapter 1 show how to time-stamp the file name of a results
file and how to create a time-stamped folder to hold results files. You can use those same tech-
niques with Excel data files.
7.7 Saving Test Scenario Results to an Excel
Workbook
Problem
You want to save your test scenario result into an existing Excel workbook.
Design
Use the OleDbConnection and OleDbCommand classes in the System.Data.OleDb namespace, com-
bined with a CommandText property set to an appropriate insert statement.
Solution
// run test scenario here
// determine pass/fail result, save in string variable 'result'
string id = "00001";
string whenRun = DateTime.Now.ToString("s");
string connStr = "Provider=Microsoft.Jet.OLEDB.4.0;" +
"Data Source=C:\\Results\\results.xls;" +
"Extended Properties=\"Excel 8.0;HDR=YES\"";
conn.ConnectionString = connStr;
conn.Open();
OleDbCommand cmd = new OleDbCommand();
cmd.Connection = conn;
cmd.CommandText = "INSERT INTO tblResults (ScenarioID, Result, WhenRun)
values ('" + id + "', '" + result + "', '" + whenRun + "')";
cmd.ExecuteNonQuery();
conn.Close();
CHAPTER 7
■
LOW-LEVEL WEB UI TESTING200
6633c07.qxd 4/3/06 1:55 PM Page 200
This code assumes you have created an Excel file named results.xls, which has a work-
sheet named tblResults and a header row with labels ScenarioID, Result, and WhenRun. (See
Section 7.6 for details.) After opening a connection to the Excel existing data store, you create
an INSERT command where the Excel workbook name acts as a table name, and where the
Excel headers act as column names.
Comments
It’s very easy to make syntax mistakes when constructing the INSERT string for the OleDbCommand
object. For example, suppose an INSERT statement with two literals looks like:
INSERT INTO table (col1, col2) values ('abc', 'xyz')
If the values for col1 and col2 are stored in variables, you need to break the INSERT statement
into five parts: the part up to the first single quote character, the value for col1, the part from the
second single quote to the third single quote, the value for col2, and finally the part from the
fourth single quote to the end of the statement:
string part1 = "INSERT INTO table (col1, col2) values ('";
string part2 = col1Value.ToString();
string part3 = "', '";
string part4 = col2Value.ToString();
string part5 = "')";
There is no shortcut to crafting INSERT statements; you just have to be careful.
7.8 Reading Test Results Stored in an Excel
Workbook
Problem
You want to programmatically read test results that have been stored in an Excel workbook.
Design
Create an OleDbConnection object that points to the workbook, then create an OleDbCommand
object that has a SELECT statement, and then use an OleDbDataReader object to iterate through
the workbook one row at a time.
Solution
string connStr = "Provider=Microsoft.Jet.OLEDB.4.0;" +
"Data Source=C:\\Results\\results.xls;" +
"Extended Properties=\"Excel 8.0;HDR=YES;IMEX=0\"";
OleDbConnection conn = new OleDbConnection();
conn.ConnectionString = connStr;
conn.Open();
CHAPTER 7
■
LOW-LEVEL WEB UI TESTING 201
6633c07.qxd 4/3/06 1:55 PM Page 201
OleDbCommand cmd = new OleDbCommand();
cmd.CommandText = "SELECT * FROM tblResults";
cmd.Connection = conn;
OleDbDataReader rdr = cmd.ExecuteReader();
while (rdr.Read() == true)
{
Console.WriteLine(rdr.GetString(0) + " " + rdr.GetString(1) + " " +
rdr.GetString(2));
}
rdr.Close();
conn.Close();
Here you select all the data columns from an Excel worksheet/table named tblResults.
You can also select just some columns using SQL syntax like this:
SELECT ScenarioID, Result FROM tblResults WHERE Result='Pass'
This pulls out just the ScenarioID values and the Result values for rows of data where the
Result value is "Pass". Notice the IMEX=0 part of the Extended Properties attribute portion of
the connection string. Using IMEX is optional and specifies the import/export mode. IMEX can
take one of three possible values:
• 0 = Export mode (used when reading from Excel)
• 1 = Import mode (used when inserting into Excel)
• 2 = Linked mode (used for full Excel update capabilities)
If all the data in Excel is type text, then specifying an IMEX has no effect. But if you have
mixed data types, you should use an IMEX value. The interaction between data types through
the ISAM driver can be very complex, so in a test automation scenario, you are generally bet-
ter off by simply making all data text for import/output purposes.
Comments
As an alternative to using an OleDbDataReader solution for programmatically reading data from
an Excel workbook, you can read all data into an in-memory DataSet object. For example:
string connStr = "Provider=Microsoft.Jet.OLEDB.4.0;" +
"Data Source=C:\\Results\\results.xls;" +
"Extended Properties=\"Excel 8.0;HDR=YES;IMEX=0\"";
OleDbConnection conn = new OleDbConnection(connStr);
string select = "SELECT * FROM tblResults";
OleDbDataAdapter oda = new OleDbDataAdapter(select, conn);
DataSet ds = new DataSet();
oda.Fill(ds);
CHAPTER 7
■
LOW-LEVEL WEB UI TESTING202
6633c07.qxd 4/3/06 1:55 PM Page 202
foreach (DataRow dr in ds.Tables[0].Rows)
{
Console.WriteLine(dr["ScenarioID"] + " " + dr["Result"] +
" " + dr["WhenRun"]);
}
conn.Close();
The DataSet class is defined in the System.Data namespace. You can essentially read the
entire Excel worksheet into memory and then iterate through the result set. This technique
has more system overhead than using an OleDbDataReader object but is useful if you want to
perform some processing of the Excel data. Having your data in a DataSet object is also useful
if you need to make a backward pass through the data because an OleDbDataReader object is a
forward-only reader.
In addition to saving test scenario results into an Excel workbook, you may also want to
store your test case input data in Excel and programmatically read from the workbook. The
basic techniques for reading test case input data are exactly the same as reading test results
data. As discussed previously in the context of result data, you should probably store all test
case input data as type char. Then you can read the char test case input data and convert to
other types if necessary. The situation is very similar to reading test case data from a text file
as described in several of the sections in Chapter 1.
7.9 Example Program: LowLevelUITest
This program combines several of the techniques in this chapter to create a lightweight test
automation harness to test an ASP.NET Web application through its UI (see Listing 7-1). When
run, the output will be as shown in Figure 7-1 earlier in this chapter.
Listing 7-1. Program LowLevelUITest
using System;
using SHDocVw; // COM component = Microsoft Internet Controls. IE object
using mshtml; // .NET component = Microsoft.mshtml. HTML interfaces
using System.Diagnostics; // Process
using System.Threading; // Sleep()
namespace RunTest
{
class Class1
{
static AutoResetEvent documentComplete = new AutoResetEvent(false);
CHAPTER 7
■
LOW-LEVEL WEB UI TESTING 203
6633c07.qxd 4/3/06 1:55 PM Page 203
[STAThread]
static void Main(string[] args)
{
try
{
Console.WriteLine("\nStarting test run");
bool pass = true; // assume test run will pass
SHDocVw.InternetExplorer ie = null;
Console.WriteLine("\nLaunching an instance of IE");
Process p = Process.Start("iexplore.exe", "about:blank");
if (p == null)
throw new Exception("Could not launch IE");
Console.WriteLine("Process handle = " + p.MainWindowHandle.ToString());
SHDocVw.ShellWindows allBrowsers = new SHDocVw.ShellWindows();
Console.WriteLine("Number active browsers = " + allBrowsers.Count);
if (allBrowsers.Count == 0)
throw new Exception("Cannot find IE");
Console.WriteLine("Attaching to IE");
int i = 0;
while (i < allBrowsers.Count && ie == null)
{
InternetExplorer e = (InternetExplorer)allBrowsers.Item(i);
if (e.HWND == (int)p.MainWindowHandle)
ie = e;
++i;
}
if (ie == null)
throw new Exception("Failed to attach to IE");
ie.DocumentComplete += new
DWebBrowserEvents2_DocumentCompleteEventHandler(ie_DocumentComplete);
Console.WriteLine("\nNavigating to the Web app");
object nil = new object();
ie.Navigate("http://localhost/TestAuto/Ch7/WebForm1.aspx",
ref nil, ref nil, ref nil, ref nil);
documentComplete.WaitOne();
CHAPTER 7
■
LOW-LEVEL WEB UI TESTING204
6633c07.qxd 4/3/06 1:55 PM Page 204