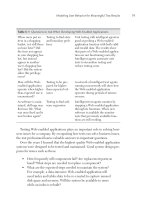
Java Sockets and URLs
Bạn đang xem bản rút gọn của tài liệu. Xem và tải ngay bản đầy đủ của tài liệu tại đây (140.35 KB, 40 trang )
even find them); the printer had its own drivers built in and made them available to
the network.
Chapter 3. Java Sockets and URLs
•
Sockets and Interprocess Communication
•
Client/Server Methodology
•
The Pizza Order Protocol (TPOP)
•
The TPOP Server
•
The TPOP Client
Sockets and Interprocess Communication
At the heart of everything we discuss in this book is the notion of interprocess
communication (IPC). In this chapter, we will look at some examples using Java
mechanisms for interprocess communication. IPC is a fancy way of saying "two or
more Java programs talking with each other." Usually the programs execute on
different computers, but sometimes they may execute on the same host.
Introduction to IPC
When you call Charles Schwab to check on your stock portfolio, you dial a telephone
number. Once connected, you press some telephone buttons to request various
services and press other buttons to send parameters, such as the numeric codes for
stock symbols in which you are interested. You may think of your account as an
object with different methods that you can invoke to purchase or to sell stocks, to get
current quotes, to get your current position in a stock, or to request a wire transfer to a
Swiss bank. You are a client and the other end is a server, providing the services
(methods) you request.
Of course, the server also provides services to many other clients. You can be a client
of other servers, such as when you order a pizza with a push button telephone.
Sometimes a server can be a client as well. A medical records query server may have
to send a request to two or three hospitals to gather the information you request for a
patient. Thus your server becomes a client of the hospital servers it queries on your
behalf.
All these situations are examples of interprocess communication. Each client and each
server reside in different processes. Sometimes you, the individual, are the client;
other times it is a computer. Sometimes the server is an application that listens in on
what you type on your telephone pad and processes the information; other times it
will be a program, perhaps written in Java as we will do later in this chapter. IPC is
how our applications communicate, but it also refers to the mechanism we use. This
chapter explores the fundamentals of IPC using something called a socket.
Sockets
The communication construct underneath all this communication is more than likely a
socket. Each program reads from and writes to a socket in much the same way that
you open, read, write to, and close a file. Essentially, there are two types of sockets:
•
One is analogous to a telephone (a connection-oriented service, e.g.,
Transmission Control Protocol)
•
One is analogous to a mailbox (a connectionless "datagram" service, e.g., User
Datagram Protocol)
An important difference between TCP connection sockets and UDP datagram sockets
is that TCP makes sure that everything you send gets to the intended destination; UDP,
on the other hand, does not. Much like mailing a letter, it is up to you, the sender, to
check that the recipient received it. The difference between the two protocols is very
similar to comparing the differences between using the phone to talk to friends and
writing them letters.
When we call a friend using a telephone, we know at all times the status of the
communication. If the phone rings busy, we know that we have to try later; if
someone answers the phone, we have made a connection and are initiating the
message transfer; if the person that answered the phone is the right person, we talk to
them thereby transferring whatever information we intended to deliver.
Had we written a letter, we know that we would have initiated an information transfer
after we dropped it off at the mailbox. This is where our knowledge of the transfer, in
most cases, ends. If we get a letter back and it starts out with "Thanks for your letter,"
we know that our letter was received. If we never again hear from the person, there is
some doubt that they ever received our letter.
Sometimes when you use the postal service, your letter becomes "lost in the mail."
When the letter absolutely, positively has to be there, you may need a more reliable
form of postage. Similarly, your choice between using a datagram or a connection
socket is easily determined by the nature of your application. If all your data fits in an
8K datagram and you do not need to know if it was received at the other end, then a
UDP datagram is fine. Mailing party invitations is one example where UDP is more
appropriate than TCP. If the length of service warrants the expense of establishing a
connection (three handshake packets), or it is necessary that all the packets be
received in the same order as they were sent, such as transferring a file that is more
than 8K bytes long, then a TCP socket must be used. Likewise, if we were to mail our
important package using something like Federal Express, we would be able to track
the package and know when it arrives at its destination.
Here is another way to look at this. Suppose we have a server that is somewhere on
the network but we don't know where. To communicate with this type of server, we
must first announce our presence, listen for an answer, and then carry on the
conversation in lockstep where first one end sends then listens while the other end
listens then talks. This is like a student walking into the reserve room of a college
library and, upon not seeing the librarian right away, saying, "Is there anyone here?"
and then listening for a response.
"Good afternoon, I'll be with you in a moment."
"I'd like the book Prof. Steflik put on reserve for CS-341."
"Here it is. Please leave your Student ID card."
We announced our presence and started listening. The server was listening, heard us,
replied with an implied go ahead, and returned to listening. We heard the server's
response, announced what we wanted, and returned to listening. The server (librarian)
heard our request, retrieved the information (the book), and delivered it. This back
and forth type of communication is known as half duplex, where only one endpoint
talks at a time; contrast this with full duplex, where both endpoints can talk and listen
at the same time.
NOTE
A socket is sometimes called a "pipe" because there are two ends (or points as we
occasionally refer to them) to the communication. Messages can be sent from
either end. The difference, as we will soon see, between a client and a server
socket is that client sockets must know beforehand that information is coming,
whereas server sockets can simply wait for information to come to them. It's sort
of like the difference between being recruited for a job and actively seeking one.
In this chapter, we will write an online ordering application, using TCP, and a
broadcast communication application, using UDP. These applications will use the
following classes from the java.net package, as illustrated in Table 3-1.
Table 3-1. Java.net.* Types and Their Corresponding Protocol
Mechanism
Description
Socket
TCP endpoint (a "telephone")
ServerSocket
TCP endpoint (a "receptionist")
DatagramSocket
UDP endpoint (a "mailbox")
DatagramPacket
UDP packet (a "letter")
URL
Uniform Resource Locator (an "address")
URLConnection
An active connection to an Internet object (e.g., a CGI-bin script, a DayTime
service)
What Are Sockets?
At the root of all TCP and UDP communications is a virtual device called a socket or
a port; the terms are pretty much interchangeable. Sockets are a visualization
mechanism for a software buffering scheme that is implemented deep in the bowels of
the transport layer of the TCP/IP stack. The term "socket" actually comes from the
old-fashioned telephone switchboard that Lily Tomlin's character Ernestine, the
telephone operator, uses. The concept is pretty similar: Each socket in the switchboard
represents a person or service that an incoming call can be routed to; when an
incoming call is answered, the operator connects it to the appropriate socket, thereby
completing the connection between the client (the caller) and the server (person being
called). In the telephone switchboard each socket represented a specific person or
service; in TCP/IP certain sockets are dedicated to specific agreed-upon services.
If we were to look at the packet level, we would see that a socket is really identified
by a 16-bit number thereby giving us about 65,000 possible sockets. The first 1024
sockets are dedicated to specific agreed-upon services and are therefore called well-
known ports. For each of the services provided on the well-known ports, there is a
corresponding protocol that defines the manner in which clients and servers using that
port should communicate. The protocols themselves are arrived at through a process
known as the RFC process. Table 3-2 lists some of the more common TCP/IP services,
their "well-known" ports, and their respective RFCs. Every Internet standard starts out
as a "Request for Comment" or RFC. Through an interactive process an RFC, if
"worthy," will be refined and developed by the Internet community into a standard.
Exploring Some of the Standard Protocols
When starting to understand sockets programming, it's always best to start out by
examining the "trivial" protocols first and then move on to the more complex and
finally to our own, application-specific protocols. The trivial protocols are a subset of
Internet protocols that are simple, straightforward, and easy to implement.
Table 3-2. Some Well-Known Port Services
Port
Protocol
RFC
13
DayTime
RFC 867
7
Echo
RFC 862
25
SMTP (e-mail)
RFC 821 (SMTP)
RFC 1869 (Extnd SMTP)
RFC 822 (Mail Format)
RFC 1521 (MIME)
110
Post Office Protocol
RFC 1725
20
File Transfer Protocol (data)
RFC 959
80
Hypertext Transfer Protocol
RFC 2616
Daytime
The Daytime service is usually provided on TCP and UDP port 13. Assuming that we
have the address of a host that is running the Daytime service, the operation is
straightforward. Using TCP the client connects to the Daytime port (13) on the remote
host; the remote host accepts the connection, returns its current date and time, and
closes the connection. This can be easily demonstrated using the Windows 95 Telnet
client. Open up the Telnet client and click on Connect and the Remote System. Enter
in the address of your host that provides the Daytime service, select the Daytime port,
and click Connect. Notice that a date/timestamp is displayed in the client area and that
a small dialog box indicates that the connection to the host has been lost.
This example is trivial but illustrates two things: First, the Windows Telnet client can
be used to explore standard TCP-based protocols (we'll see this later with other
protocols. Second, we really did demonstrate how the client end of the protocol works;
the client makes a connection to the server, the server sends the timestamp and closes
the connection, and, finally, the client receives the time-stamp. To implement our own
client, understanding what the client needs to do makes the task quite simple. A high-
level design is
Create a socket
Create an input stream and tie it to the socket
Read the data from the input stream and display the reult
To create a socket, define a variable for the socket class and initialize it using the class
constructor:
Socket s = Socket("localhost", 7);
"localhost" is the name assigned to address 127.0.0.1 in your hostsfile; address
127.0.0.1 is known traditionally as your machine's "loop back port," and lets your
machine talk to itself. The line above creates a socket named "s" and connects it to
port 7 on your loop back port. To connect to the Daytime service on any other host,
just replace localhost with a string containing the dotted decimal name or IP address
of whatever host you want to connect to.
This single instruction will create the socket object and attempt to connect it to the
specified host. Because this has a possibility of failing (throwing an exception—a
connection may not be established), we need to code it in a try/catch construct.
import java.io.*;
import java.net.*;
public class DayTimeClient{
public static final port = 13;
public static void main(String args[])
{
Socket s = null;
String timestamp;
try
{
// create the socket to the remote host
s = new Socket(args[0], port);
// create an input stream and tie it to the socket
InputStream in = s.getInputStream();
BufferedReader in =
new BufferedReader(new InputStreamReader(in));
// tell user they are connected
System.out.println("Connected to : " +
s.getInetAddress() + "on port " + s.getPort()) ;
while (true) {
// read the timestamp
timestamp = in.readLine();
if (timestamp == null) {
System.out.println("Server closed connection");
break;
}
System.out.println("Daytime : " + timestamp);
}
}
catch (IOException e) { System.out.println(e);}
finally
{
//force the connection closed in case it's open
try
{ if (s != null) s.close(); }
catch (IOException e2)
{ }
}
}
}
The code follows our high-level design pretty closely. We first create a socket and
then create a stream and tie the two together. Notice that all I/O is done in a try
construct so that all I/O problems (socket or stream) are automatically caught as
exceptions. In fact, especially notice that the finally clause of the main
try/catch/finally uses a nested try to catch the fact that if the connection is already
closed so that we can terminate the program gracefully in the null catch statement.
Now that we've mastered the most trivial of the protocols, let's move on to something
a little more complicated.
Echo
"Well-known port" 7 on most hosts provides a service called echo. Echo is pretty
much a diagnostic service and works as follows (see RFC 862 on the companion
CDROM for a fuller description):
1. The client connects to the server on port 7 and proceeds to send data.
2. The server returns everything it receives to the client. This may be done on a
character-by-character basis or a line-by-line basis depending on the
implementation of the server.
Let's start out our examination of echo by first writing a non-sockets-based version of
Echo just to get a feel for what it is that we want to do.
public class EchoTest
{
public static void main (Stringargs[])
{
BufferedReader in = new BufferedReader
New InputStreamReader(System.in));
String line;
while(true)
{
line="";
try
{
line = in.readLine();
}
catch (IOException e)
{
System.err.println(e.getMessage());
}
System.out.println(line);
}
}
}
The program is quite simple and straightforward. First, we define an input stream and
connect it to the standard input keyboard (System.in); then we define a string for our
only program variable, which will hold the string we read from the keyboard and print
on the Java console. Finally, we put the read and write in a do forever loop.
Remember, in Java it is not only considered good form to provide try/catch constructs
when doing I/O it is necessaary.
You can execute the program that we created by doing the following, and get similar
results:
%prompt% javacEchoTest.java
%prompt% javaEchoTest
abc input…
abc …output
def input…
def …output
xyz input…
xyz …output
^C
%prompt%
Moving EchoTest to Sockets
Taking another step toward proficiency using Java sockets, we modify our echo
program to do the following:
1. Read a line from the keyboard.
2. Write it to a socket connected to TCP port 7.
3. Read the reply from the socket connection.
4. Print the line from the socket to the screen.
A socket object is created as follows:
Socket s = Socket("localhost", 7);
The two arguments to the
Socket
constructor are hostname and port number. We use
"localhost" to keep it simple. The hostname is passed as a
String
variable, typically
from the command line and the port number as an
int.
Here is a simple TCP client written in Java. First, we must create the
EchoClient
class and import all the Java libraries that we will use in our program.
import java.io.*;
import java.net.*;
public class EchoClient
{
}
Now, we must create a function in which we will place a loop similar to the one we
created with our Java-only client. This loop must have two objects on which to act—
the BufferedReader from the socket from which it will get data and the PrintStream
from the socket to which it will write data. We assumed this was standard input and
standard output for our Java-only client, but we will not make that assumption here:
import java.io.*;
import java.net.*;
public class EchoClient
{
public static void echoclient(BufferedReader in;
PrintStream out)
throws IOException
{
}
}
Now, we must get an input stream for the keyboard. For this we'll use another
BufferedReader tied to System.in. We will also add the loop here. The loop will first
get input from the keyboard using the stream we just created. Then it will write that
data directly to the socket.
import java.io.*;
import java.net.*;
public class EchoClient
{
public static void echoclient(BufferedReader in;
PrintStream out)
throws IOException
{
kybd = new BufferedReader(
new InputStreamReader(System.in);
String line;
while(true)
{
line="";
// read keyboard and write to the socket
try
{
line = kybd.readLine();
out.println( line );
}
catch (IOException e)
{
System.err.println(e.getMessage());
}
}
}
}
To finish up, we now read the activity on the socket and stick it on the screen by
writing to the Java console using the System object.
public class EchoClient
{
public static void echoclient(BufferedReader in,
PrintStream out)
Throws IOException
{
// make a stream for the keyboard
BufferedReader kybd = new BufferedReader(
new InputStreamReader(
System.in));
Stringline; //for reading into
while(true)
{
line="";
// read keyboard and write to TCP socket
try
{
line = kybd.readLine();
out.println( line );
}
catch (IOException e)
{
System.err.println(e.getMessage());
}
// read TCP socket and write to java console
try
{
line = sin.readLine();
System.out.println(line);
}
catch (IOException e)
{
System.err.println(e.getMessage());
}
}
}
}
Finally, we can create our main application. In our main application, we will create
the socket first and then get a BufferedReader and a PrintStream based on it. This
enables us to read and write to the socket easily, as well as pass it on to the function
we created earlier. Once we are finished, we must close the connection to the socket.
CAUTION
As we will discuss later, too many open connections are a system liability. If a
connection is not in use, but is still open, other applications may not be able to
connect to the port to which you are connected.
import java.io.*;
import java.net.*;
public class EchoClient
{
public static void echoclient(BufferedReader in,
PrintStream out)
throws IOException
{
// make a stream for reading the keyboard
BufferedReader kybd = new BufferedReader(
new InputStreamReader(
System.in));
Stringline;
while(true)
{
line="";
// read keyboard and write to TCP socket
try
{
line = kybd.readLine();
out.println(line);
}
catch(IOException e)
{
System.err.println(e.getMessage());
}
// read TCP socket and write to console
try
{
line = in.readLine();
System.out.println(line);
}
catch(IOException e)
{
System.err.println(e.getMessage());
}
}
}
public static void main(String[] args)
{
Sockets=null;
try
{
// Create a socket to communicate with "echo"
// on the specified host
s = new Socket(args[0], 7);
// Create streams for reading and writing
// lines of text from and to this socket.
BufferedReader in = new BufferedReader(
new InputStreamReader(
s.getInputStream()));
PrintStream out = new(
PrintStream(s.getOutputStream());
// Tell the user that we've connected
System.out.println("Connected to " +
s.getInetAddress() + ":" + s.getPort());
echoclient(in, out);
}
catch (IOException e)
{
System.err.println(e);
}
// Always be sure the socket gets closed
finally
{
try
{
if(s != null) s.close();
}
catch (IOException exc)
{ ; /* terminate gracefully */}
}
}
}
When we execute our program, we send a message to the Echo socket, read whatever
information comes back on the socket, and then print it. Because the echo socket
merely takes whatever input it gets and bounces it right back to the port, what we get
in return on the socket is exactly what we sent. The output is displayed next. If you
need to connect to another host, substitute its name for localhost.
%prompt%
java EchoClient localhost
Connected to localhost/127.0.0.1:7
abc request…
abc …reply
xyz request…
xyz …reply
^C
This service (and most others) can be tested using the Telnet client that is available as
an application with most TCP/IP stacks. In this case, the Telnet program acts in the
same manner as our client, sending information to the port and reading whatever it
gets back.
%prompt% telnet localhost 7
Trying 127.0.0.1…
Connected to localhost.
Escape character is '^]'.
abc request…
abc …reply
^C
xyz request…
xyz …reply
^] control-right-bracket
telnet> quit
Connection closed.
URL and URL Connection
Before we leave the topic of using sockets to connect existing Internet servers, let's
look at using some of the more common and popular services provided on the Internet.
We need to examine a couple of other members of java.net: URL and URL
Connection.
A Uniform Resource Locator (URL) is a string that identifies a resource on the
Internet. RFC 1738 gives an in-depth description of everything you would ever want
to know about URLs. Table 3-3 is a brief description of the various things that make
up a URL.
Table 3-3. Makeup of a URL
Protocol
An identifier (usually an acronym) that specifies the protocol to use to access the
resource
Host name
The name of the host or domain where the resource is located
(www.binghamton.edu, localhost)
Port
number
The TCP/IP port number that the service is being provided on
Filename
Path- and filename of resource
Reference
#anchorname
The URL class gives us the ability to construct URL objects and a number of "getter"
methods that let us extract the various parts of a URL. From a networking standpoint,
the methods of getContent(), openConnection(), and openStream() provide us with
some very useful tools that we can use to interface with a number of protocol servers.
To retrieve a file from a Web server, all we really need to know is its URL:
Class GetURL
{
try
{
String host = "watson2.cs.binghamton.edu";
String file = "~steflik/index.html";
String line;
BufferedReader in;
URL u = new URL("http://"+host+"/"+file);
Object content = u.getContent();
System.out.println("class: " + content.getClass());
System.out.println("content: " + content.toString());
In = new BufferedReader
(new InputStreamReader(u.openStream()));
while ((line = in.readLine() != null)
{
System.out.println(line);
}
}
catch (MalformedURLException e) {e.printStackTrace();}
catch (IOException e) {e.printStackTrace();}
}
All we had to do was create a URL object and then use the openStream() method to
create an InputStream and eventually a BufferedReader that we can use to retrieve the
file. At this point all that is needed is a loop to read the lines out of the file.
This technique can be exploited for doing things like populating selection lists in an
applet-based shopping cart application with data from a set of pricing files kept on the
Web server. This technique can also be used to run scripts stored on a Web server.
Summary of Sockets
We have shown you what, in the most basic sense, sockets are and how they are used
in Java to build client applications that communicate, using well-defined protocols
with standards-based (developed using the RFC process) servers. The subsequent
sections in this chapter build on this material and show you how to create an entire
client/server system using only sockets. The rest of this book showcases several other
Java communication technologies that use sockets as their underlying mechanism to
transfer data across networks. In the large of it, applications use protocols to direct the
way they talk to one another and protocols use sockets as their network interface.
Client/Server Methodology
In the previous section we developed client applications for servers that already exist.
This isn't the way that we would necessarily approach developing a sockets-based
client/server application. In the next few pages we will examine a client/server
application for an Internet-based pizza ordering/delivery service that will be made up
of a client (that pizza lovers around the community can install on the home computers
to order a pizza), a server (running at the store), and a protocol that directs the
information exchange between the client and the server.
Suppose that you are at home with your cronies watching the Super Bowl, and, as
luck would have it, the Washington Redskins are playing. As invariably happens,
you've run out of nachos and dip before half time, so you decide to replenish the
nutrition supply by ordering a pizza. Today, when you want to order that pizza, you
pick up the phone and call your favorite pizzaria to request a delivery.
A few years ago, a small start-up company in the Silicon Valley called the Santa Cruz
Operation (SCO) developed an Internet pizza-ordering application. By today's
standards, it was quite low-tech, based solely on HTML forms and requiring someone
to read the information manually on the other end via e-mail. The nifty thing about
this Internet Pizza Hut was the idea that you could simply use your computer to
communicate with a faraway place and get a pizza. In this sense, SCO was pretty well
ahead of the game—they were among the first to genuinely use the Internet, not the
corporate intranet, to conduct business with remote users.
In this section, we will develop our own pizza client/server system as an ultra-hip
high-tech alternative to the telephone and publish it to the world. This time, however,
we will use Java and implement our
PizzaServer
using sockets.
The Pizza Order Protocol (TPOP)
To design the protocol we need to examine what information must be passed from the
client to the server and vice versa. If the user interface for our client application is as
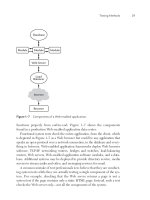
shown in Figure 3-1 we can readily see that to constitute an order we need to send the
name, address, phone number, pizza size (small, medium, or large) , and which
topping (Veggies, Meat, or California) is to be added to a standard cheese pizza.
Figure 3-1. A sample GUI for the PizzaTool.
The protocol that is required to place an order is pretty simple, as shown in Table 3-4.
Let us further decide that, since we're in this early part of design, all data exchanged
between the client and the server is to be as plain old text strings (in the true tradition
of the Internet), each of which is to be delimited by the "|" character.
The next decision we need to make is which component we will develop first: the
client or the server. If we choose to develop the client first, we won't be able to test it
until we develop the server and then end up with the possibility of having to use two
untested pieces of software to test each other. Realizing the possible disaster that can
occur if this avenue is followed, let's think about developing the server first. If the
server is running, we can always test it using our Telnet client. To do this, all we do is
start up our Telnet client, connect to port 8205 of the server, type in the data separated
by "|" characters, and press Enter. The server will process the data, send back the price
information, and, close the connection. This approach helps set us up for success
rather than failure.
Table 3-4. TPOP
Client
Server
Start server listening on port 8205
Connect to port 8205 of the server
Accept the connection and spawn a thread to handle the
connection data
Send the order information and
then wait for the price to display
Receive the order, print it out, calculate the price, return
price to client application, and break the connection
Display the price
The TPOP Server
Server Methodology
For every client there must somewhere be a server. In an attempt to make server
creation as simple as possible, Java provides a Server Socket class as part of java.net.
Server Sockets, once created, listen on their assigned port for client connection
requests. As requests are received, they are queued up in the Server Socket. The
Server Socket accepts the connection request; as part of this acceptance the Server
Socket creates a new socket, connects it to the client, and disconnects the connection
on the Server Socket port, leaving it open for more connection requests. The client
and server now talk back and forth on the new socket connection, and the server
listens for connection requests on the Server Socket.
This all sounds pretty simple, but we haven't mentioned anything about threads yet.
One of the basic ideas of client/server methodology is that one server should service
as many clients as possible. To do this there must be something in the recipe that
provides parallelism. That something is threads. The Thread class provides Java with
a consistent, operating system neutral way of using the threading capabilities of the
host operating system.
Java threads, sockets, and AWT components are similar in that the classes
provided are really interfaces to the threads, sockets, and GUI widgets
supplied by the operating system that is hosting the Java virtual machine.
This means that if you are on Windows, you are really interacting with the
TCP/IP protocol stack provided by winsock.dll; if you are on a UNIX
platform, you are most likely using Berkley sockets. If you are on a Sun
Solaris, you are using the threading provided by the Solaris operating system.
If you are on Windows 98 using AWT widgets, you are really using the
widgets provided by Windows. Used this way by Java, these components are
known as peer components or objects. The adding of the Swing components
to Java 1.1 starts to get away from this by providing 100% Java GUI
components.
A typical TCP application opens a "well-known" port to receive connection requests,
and then it spawns a child process or a separate thread of execution to perform the
requested service. This ensures that the server is always ready for more invocations. A
single-threaded server must poll the sockets constantly. When it detects activity, it
must spawn a new process to handle the incoming request. Our multithreaded server
can simply wait for information on a socket and spawn a thread to handle incoming
requests.
The
PizzaServer
that we will implement will hang on port 8205 and wait for
information. When the client sends its bar-delimited request, the server will spawn a
thread to handle the request. The thread reads the information, processes it, and sends
a reply.
Setting Up the Server
We must create the
PizzaServer
object itself. The
PizzaServer
is a stand-alone
Java application with its own application main (on the accompanying CD, two
versions of the server are provided—one with a GUI interface and one without). We
must also create a
PizzaThread
that inherits from the Java
Thread
class. This
threaded object will be created every time we detect activity on the port. As we
discussed in our Chapter 1 section on threads, it is one of two ways we could have
implemented the server object. We leave the other threaded version as an exercise to
the reader.
import java.net.*;
import java.io.*;
import java.lang.*;
import java.util.*;
public class PizzaServer
{
public static void main(Stringargs[])
{
}
// threaded pizza!
class PizzaThread extends Thread
{
}
Initializing the Server Socket