Windows Server 2008 Inside Out- P5
Bạn đang xem bản rút gọn của tài liệu. Xem và tải ngay bản đầy đủ của tài liệu tại đây (1.81 MB, 50 trang )
4. When you are fi nished adding snap-ins to folders, click OK to close the Add Or
Remove Snap-Ins dialog box and return to the console you are creating.
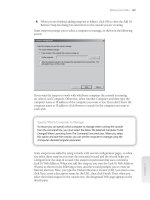
Some snap-ins prompt you to select a computer to manage, as shown in the following
screen:
If you want the snap-in to work with whichever computer the console is running
on, select Local Computer. Otherwise, select Another Computer, and then type the
computer name or IP address of the computer you want to use. If you don’t know the
computer name or IP address, click Browse to search for the computer you want to
work with.
Specify Which Computer to Manage
To ensure you can specify which computer to manage when running the console
from the command line, you must select the Allow The Selected Computer To Be
Changed When Launching From The Command Line check box. When you select
this option and save the console, you can set the computer to manage using the
/Computer=RemoteComputer parameter.
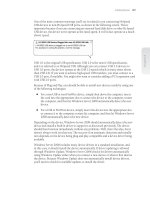
Some snap-ins are added by using wizards with several confi guration pages, so when
you select these snap-ins you start the associated wizard and the wizard helps you
confi gure how the snap-in is used. One snap-in in particular that uses a wizard is
Link To Web Address. When you add this snap-in, you start the Link To Web Address
Wizard, as shown in the following screen, and the wizard prompts you to create an
Internet shortcut. Here, you type the Uniform Resource Locator (URL) you want to use,
click Next, enter a descriptive name for the URL, then click Finish. Then, when you
select the related snap-in in the console tree, the designated Web page appears in the
details pane.
Specify Which Computer to Manage
To ensure you can specify which computer to manage when running the console
from the command line, you must select the Allow The Selected Computer To Be
Changed When Launching From The Command Line check box. When you select
this option and save the console, you can set the computer to manage using the
/Computer=RemoteComputer parameter.r
Building Custom MMCs 167
Chapter 6
Please purchase PDF Split-Merge on www.verypdf.com to remove this watermark.
While you are adding snap-ins, you can also examine the available extensions for snap-
ins. In the Add Or Remove Snap-Ins dialog box, choose a previously selected snap-in
and then click Edit Extensions. In the Extensions For … dialog box, all available exten-
sions are enabled by default, as shown in the following screen. So, if you want to change
this behavior, you can select the Enable Only Selected Extensions option and then clear
the individual check boxes for extensions you want to exclude.
Figure 6-6 shows the example console with snap-ins organized using the previously
discussed folders:
General
Containing Active Directory Users And Computers, Active Directory
Sites And Services, and Active Directory Domains Aand Trusts
Policy
Containing Group Policy Management and Resultant Set of Policy
Chapter 6
168 Chapter 6 Windows Server 2008 MMC Administration
Please purchase PDF Split-Merge on www.verypdf.com to remove this watermark.
Security
Containing Security Templates and Security Confi guration And Analysis
Support
Containing links to Microsoft Knowledge Base, Microsoft Tech Support,
and Windows Server Home Page
Figure 6-6 A custom console with snap-ins organized into four folders.
Step 3: Saving the Finished Console
When you are fi nished with the design, you are ready to save your custom console
tool. Before you do this, however, there are a couple of fi nal design issues you should
consider:
What you want the initial console view to be
Which user mode you want to use
Which icon you want to use
What you want to name the console tool and where you want it to be located
Setting the Initial Console View Before Saving
By default, the MMC remembers the last selected node or snap-in and saves this as
the initial view for the console. In the example tool created, if you expand the General
folder, select Active Directory Users And Computers, and then save the console, this
selection is saved when the console is next opened.
Keep in mind that subsequent views depend on user selections.
Note
Only the folder with the selected snap-in is expanded in the saved view. If you use fold-
ers and select a snap-in within a folder, the expanded view of the folder is saved with the
snap-in selected. If you expand other folders, the console is not saved with these folders
expanded.
Note
Only the folder with the selected snap-in is expanded in the saved view. If you use fold-
ers and select a snap-in within a folder, the expanded view of the folder is saved with the
snap-in selected. If you expand other folders, the console is not saved with these folders
expanded.
Building Custom MMCs 169
Chapter 6
Please purchase PDF Split-Merge on www.verypdf.com to remove this watermark.
Setting the Console Mode Before Saving
When you are fi nished authoring the console tool, select Options on the File menu. In
the Options dialog box, as shown in the screen on the following page, you can change
the console mode so that it is ready for use.
In most cases, you’ll want to use User Mode—Full Access. Full access has the following
characteristics:
Users have a Window menu that allows them to open new windows, and they can
also right-click a node or snap-in and choose New Window From Here to open a
new window.
Users can right-click and choose New Taskpad View to create a new taskpad view.
With user mode set to Limited Access, Multiple Window, the console has the following
characteristics:
Users have a Window menu that allows them to arrange windows, and they can
also right-click a node or snap-in and choose New Window From Here to open a
new window.
Users cannot right-click and choose New Taskpad View to create a new taskpad
view.
User mode set to Limited Access, Single Window has the following characteristics:
Users do not have a Window menu and cannot right-click a node or snap-in and
choose New Window From Here to open a new window.
Users cannot right-click and choose New Taskpad View to create a new taskpad
view.
To prevent user selections from changing the view, you’ll fi nd two handy options when
you select Options from the File menu:
Do Not Save Changes To This Console
Select this check box to prevent the user
from saving changes to the console. Clear this check box to change the view auto-
matically based on the user’s last selection in the console before exiting.
Allow The User To Customize Views
Select this check box to allow users to add
windows focused on a selected item in the console. Clear this check box to pre-
vent users from adding customized views.
Chapter 6
170 Chapter 6 Windows Server 2008 MMC Administration
Please purchase PDF Split-Merge on www.verypdf.com to remove this watermark.
Setting the Console Icon Before Saving
While you are working in the Options dialog box, you might consider setting custom
icons for your console tools. All the console tools developed by Microsoft have their
own icons. You can use these icons for your console tools as well, or you could use
icons from other Microsoft programs quite easily. In the Options dialog box (which is
displayed when you select Options on the File menu), click Change Icon. This displays
the Change Icon dialog box, as shown in the following screen:
Building Custom MMCs 171
Chapter 6
Please purchase PDF Split-Merge on www.verypdf.com to remove this watermark.
In the Change Icon dialog box, click Browse. By default, the Open dialog box should
open with the directory set to %SystemRoot%\System32. In this case, type shell32.dll
as the File Name, and click Open. You should now see the Change Icon dialog box with
the Shell32.dll selected, which will allow you to choose one of several hundred icons
registered for use with the operating system shell (see the following screen). Choose an
icon, click OK, and then click OK to close the Options dialog box. From then on, the
icon will be associated with your custom console tool.
Saving the Console Tool to the Desktop, the Start Menu, or a Folder
After you set the user mode, you can save the console tool. The console tool can appear
as one of the following:
A desktop icon
Select Save As on the File menu, and then navigate the folder
structure to %SystemRoot%\Users\%UserName%\Desktop. Here, %UserName% is
the name of the user who will work with the tool. After you type a name for the
console, click Save.
A menu option on the Start menu for all users
Select Save As on the File menu,
and then navigate the folder structure to %SystemRoot%\ProgramData\Micro-
soft\Windows\Start Menu\Programs\Administrative Tools. After you type a
name for the console, click Save.
A menu option on the Start menu for a specifi c user
Select Save As on the
File menu, and then navigate the folder structure to %SystemRoot%\Users\
%UserName%\AppData\Roaming\Microsoft\Windows\Start Menu\Programs\
Administrative Tools. Here, %UserName% is the name of the user who will work
with the tool. After you type a name for the console, click Save.
A folder icon
Select Save As on the File menu, and then navigate to the folder
where you want the console tool to reside. After you type a name for the console,
click Save.
Chapter 6
172 Chapter 6 Windows Server 2008 MMC Administration
Please purchase PDF Split-Merge on www.verypdf.com to remove this watermark.
Change Tool Names Using the Options Dialog Box
By default, the name shown on the console tool’s title bar is set to the fi le name you des-
ignate when saving it. As long as you are in author mode, you can change the console
tool name using the Options dialog box. Select Options on the File menu, and then type
the name in the box provided at the top of the Console tab.
Designing Custom Taskpads for the MMC
When you want to simplify administration or limit the available tasks for junior admin-
istrators or Power Users, you might want to consider adding a taskpad to a console
tool. By using taskpads, you can create custom views of your console tools that contain
shortcuts to menu commands, shell commands, and navigation components.
Getting Started with Taskpads
Basically, taskpads let you create a page of tasks that you can perform quickly by click-
ing the associated shortcut links rather than using the existing menu or interface
provided by snap-ins. You can create multiple taskpads in a console, each of which
is accessed as a taskpad view. If you’ve worked with Windows XP or Windows Vista,
you’ve probably seen the revised Control Panel, which is a taskpad view of Control
Panel. As with most taskpads, Control Panel has two purposes: It provides direct access
to the commands or tasks so that you don’t have to navigate menus, and it limits your
options to a set of predefi ned tasks that you can perform.
You create taskpads when you are working with a console tool in author mode. Task-
pads can contain the following items:
Menu commands
Menu commands are used to run the standard menu options of
included snap-ins.
Shell commands
Shell commands are used to run scripts or programs or to open
Web pages.
Navigation components
Navigation components are used to navigate to a saved
view on the Favorites menu.
Taskpad commands are also called tasks. You run tasks simply by clicking their links.
In the case of menu commands, clicking the links runs the menu commands. For shell
commands, clicking the links runs the associated scripts or programs. For navigation
components, clicking the links displays the designated navigation views. If you have
multiple levels of taskpads, you must include navigation components to allow users to
get back to the top-level taskpad. The concept is similar to having to create a home link
on Web pages.
Change Tool Names Using the Options Dialog Box
By default, the name shown on the console tool’s title bar is set to the fi le name you des-
ignate when saving it. As long as you are in author mode, you can change the console
tool name using the Options dialog box. Select Options on the File menu, and then type
the name in the box provided at the top of the Console tab.
Designing Custom Taskpads for the MMC 173
Chapter 6
Please purchase PDF Split-Merge on www.verypdf.com to remove this watermark.
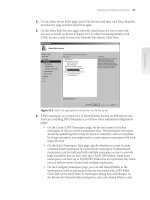
Figure 6-7 shows a taskpad created for the Active Directory Users And Computers snap-
in that has been added to the custom tool created earlier in the chapter.
Figure 6-7 A custom console with a taskpad that uses a vertical list.
As you can see, the task page view is labeled AD Management, and it provides the fol-
lowing commands:
Create Computer
Used to start the New Object—Computer Wizard
Find Objects
Used to open the Find Users, Contacts, And Groups dialog box
Create Group
Used to start the New Object—Group Wizard
Create User
Used to start the New Object—User Wizard
Connect To Domain
Used to select the domain to work with
Create Advanced Query
Used to defi ne an Active Directory query and save it so
that it can be reused
Note
You could also add a Connect To Domain Forest option that would be used to select the
domain forest to work with. We haven’t used the taskpad to limit the options; rather,
we’ve simply provided quick access shortcuts to commonly run tasks. In the next section,
you’ll learn how to limit user options.
Understanding Taskpad View Styles
Taskpads can be organized in several different ways. By default, they will have two
views: an extended taskpad view and a standard view. The extended view contains the
list of tasks that you’ve defi ned and can also contain the console items being managed.
The standard view contains only the console items being managed. When you create
the taskpad, you have the option of hiding the standard view simply by selecting the
Hide Standard Tab check box.
Note
You could also add a Connect To Domain Forest option that would be used to select the
domain forest to work with. We haven’t used the taskpad to limit the options; rather,
we’ve simply provided quick access shortcuts to commonly run tasks. In the next section,
you’ll learn how to limit user options.
Chapter 6
174 Chapter 6 Windows Server 2008 MMC Administration
Please purchase PDF Split-Merge on www.verypdf.com to remove this watermark.
The extended view of the taskpad can be organized using a vertical list, a horizontal
list, or no list. In a vertical list as shown previously in Figure 6-7, taskpad commands
are listed to the left of the console items they are used to manage. This organization
approach works well when you have a long list of tasks and you still want users to be
able to work with the related snap-ins.
With a horizontal list, as shown in Figure 6-8, the console items managed by the task-
pad are listed above the taskpad commands. This organization style is best when you
want to display multiple columns of taskpad commands and still be able to work with
the related snap-ins.
Figure 6-8 A custom console with a taskpad that uses a horizontal list.
In some cases, you might not want to show the console items being managed by the
taskpad in the same view as the tasks. In this case, you can specify that no list should
be used. When you choose the No List option, the taskpad commands are shown by
themselves on the taskpad tab (AD Management in the example), and users can click
the Standard tab to access the related console items.
As discussed, you can limit the options users have in console tools by selecting both the
No List option and the Hide Standard Tab check box. Keep in mind that if the console
tool doesn’t include a taskpad for a snap-in, users will still be able to manage the snap-in
in the usual way. For example, the taskpad shown in Figure 6-8 doesn’t defi ne any tasks
that manage policy or security, so the snap-ins in these folders will be fully accessible.
To make it so users can’t work with these snap-ins directly, you must defi ne taskpads for
those snap-ins or add tasks that use menu commands from those snap-ins to the current
taskpad or another taskpad.
SIDE OUT
Limiting user options in taskpads
As discussed, you can limit the options users have in console tools by selecting both the
No List option and the Hide Standard Tab check box. Keep in mind that if the console
tool doesn’t include a taskpad for a snap-in, users will still be able to manage the snap-in
in the usual way. For example, the taskpad shown in Figure 6-8 doesn’t defi ne any tasks
that manage policy or security, so the snap-ins in these folders will be fully accessible.
To make it so users can’t work with these snap-ins directly, you must defi ne taskpads for
those snap-ins or add tasks that use menu commands from those snap-ins to the current
taskpad or another taskpad.
Designing Custom Taskpads for the MMC 175
Chapter 6
Please purchase PDF Split-Merge on www.verypdf.com to remove this watermark.
When you select the No List option, you can limit users’ options to the tasks you’ve
defi ned and not allow users to access the console items being managed. To do this, you
specify that the Standard tab should be hidden. From then on, when working with the
console items being managed, users can perform only the tasks defi ned on the taskpad,
such as those shown in Figure 6-9.
Figure 6-9. By using the No List style and hiding the Standard tab, you can limit user options.
Creating and Managing Taskpads
Any console tool that has at least one snap-in can have an associated taskpad. To create
a taskpad, you must open the console in author mode, then follow these steps:
1. In your custom MMC, right-click the folder or console item that you want to
work with, choose Action, and then choose New Taskpad View to start the New
Taskpad View Wizard. Keep in mind that a single taskpad can be used to manage
multiple console items.
2. In the New Taskpad View Wizard, click Next, and then confi gure the taskpad
display (see Figure 6-10 for an example). Select the style for the details page as
Vertical List, Horizontal List, or No List, and set the task description style as
Text or InfoTip. You can also choose to hide the Standard tab (which only limits
the tasks that can be performed if you also select the No List style). As you make
selections, the wizard provides a depiction of what the results will look like as a
fi nished taskpad. Click Next to continue.
3. On the Taskpad Reuse page (shown in Figure 6-11), you must decide whether to
apply the taskpad view to the selected tree item only (the item you right-clicked)
or to any other tree item of the same type. If you choose the latter option, you also
have the option to change the default display for any items used in the taskpad
to the taskpad view. Typically, you’ll want to do this to standardize the view,
especially if you’ve hidden the Standard tab and don’t want users to have other
options. Click Next.
Chapter 6
176 Chapter 6 Windows Server 2008 MMC Administration
Please purchase PDF Split-Merge on www.verypdf.com to remove this watermark.
Figure 6-10 Configure the taskpad display in the New Taskpad View Wizard.
Figure 6-11 Specify a taskpad target.
Note
Basically, all snap-ins are of the same type. So, if you apply the taskpad to any other tree
item of the same type, the taskpad view can include any snap-in that you have added to
the console.
Note
Basically, all snap-ins are of the same type. So, if you apply the taskpad to any other tree
item of the same type, the taskpad view can include any snap-in that you have added to
the console.
Designing Custom Taskpads for the MMC 177
Chapter 6
Please purchase PDF Split-Merge on www.verypdf.com to remove this watermark.
4. Next, you set the name and description for the taskpad. The name appears at the
top of the taskpad and on the tab at the bottom of the taskpad. The description
appears at the top of the taskpad under the taskpad name. Click Next.
5. On the fi nal wizard page, you can click Finish to create the taskpad. The Add
New Tasks To This Taskpad After The Wizard Closes check box is selected by
default, so if you click Finish without clearing this option, the New Task Wizard
starts and helps you create tasks for the taskpad.
If you want to create multiple taskpads, you can repeat this procedure. For the example
console, you might want to have a taskpad for each folder and so in that case would
create three additional taskpads. Any additional taskpads you create can be placed at
the same place in the console tree or at a different part of the console tree. You access
multiple taskpads placed at the same part of the console tree by using the tabs provided
in the details pane.
As long as you are in author mode, any taskpad you created can easily be edited or
removed. To edit a taskpad view, right-click the item where you defi ned the taskpad,
and then select Edit Taskpad View from the shortcut menu. This opens a Properties dia-
log box containing two tabs:
General
Use the options on the General tab shown in the following screen to con-
trol the taskpad style as well as to display or hide the Standard tab. Click Options
to specify to which items the taskpad view is applied.
Tasks
Use the Tasks tab to list current tasks defi ned for the taskpad. Use the
related options to create new tasks or manage the existing tasks.
Chapter 6
178 Chapter 6 Windows Server 2008 MMC Administration
Please purchase PDF Split-Merge on www.verypdf.com to remove this watermark.
Creating and Managing Tasks
You create tasks by using the New Task Wizard. By default, this wizard starts automati-
cally when you fi nish creating a taskpad view. You can start the wizard using the task-
pad Properties dialog box as well. On the Tasks tab, click New. Alternatively, in your
MMC, right-click the folder or console item where you defi ned the taskpad, and then
select Edit Taskpad View from the shortcut menu.
After the New Task Wizard is started, click Next, and then select the command type as
follows:
Choose Menu Command to run the standard menu options of included snap-ins.
Choose Shell Command to run scripts or programs or to open Web pages.
Choose Navigation to navigate to a saved view on the Favorites menu.
The subsequent screens you see depend on the type of task you are creating.
Creating Menu Command Tasks
After choosing to create a menu command, select a source for the command, as shown
in Figure 6-12. You specify the source of the command as a node from the console tree
or from the list in the results pane for the item selected when you started the wizard.
If you choose Node In The Tree as the source, select a snap-in in the console tree, and
then choose one of the available commands for that snap-in. The commands available
change based on the snap-in you’ve selected.
Figure 6-12 Select a command source and then choose a command from the list of available
commands.
Designing Custom Taskpads for the MMC 179
Chapter 6
Please purchase PDF Split-Merge on www.verypdf.com to remove this watermark.
Next, you set the name and description for the task. The name is used as the shortcut
link designator for the task. The description is displayed as text under the shortcut link
or as an InfoTip, depending on the way you confi gured the taskpad.
On the Task Icon page, you can choose an icon for the task. Select Icons Provided By
MMC to choose any of the icons provided by the MMC. Click an icon to select it and to
display what the icon symbolizes and its alternate meanings. If you want to use a dif-
ferent set of icons, select Custom Icon, and then click Browse. This displays the Change
Icon dialog box. Click Browse to display the Open dialog box. By default, the Open dia-
log box should open with the directory set to %SystemRoot%\System32. In this case,
type shell32.dll as the File Name, and click Open. You should now see the Change Icon
dialog box with the Shell32.dll selected, which will allow you to choose one of several
hundred icons registered for use with the operating system shell.
When you click Next again, the wizard confi rms the task creation and shows a current
list of tasks on the taskpad provided you click Finish to fi nalize the creation of the cur-
rent task. If you want to create another task, select the When I Click Finish, Run This
Wizard Again check box, and then repeat this process. Otherwise, just click Finish.
Creating Shell Command Tasks
After choosing to create a shell command, specify the command line for the task, as
shown in Figure 6-13.
Figure 6-13 Set the command line for the script or program you want to run.
Chapter 6
180 Chapter 6 Windows Server 2008 MMC Administration
Please purchase PDF Split-Merge on www.verypdf.com to remove this watermark.
The options are as follows:
Command
The full fi le or Universal Naming Convention (UNC) path to the com-
mand you’ve chosen to run, such as C:\Scripts\Checkpol.bat or \\Corpserver01\
Scripts\Checkpol.bat. The command can be a shell or batch script or a program.
If you don’t know the path to use, click Browse, and then use the Open dialog box
to fi nd the program that you want to run.
Parameters
The command-line parameters you want to pass to the script or pro-
gram. Click the right arrow beside the Parameters fi eld to display variables that
you can use (these are related to the snap-in you selected originally when creating
the taskpad). Select a variable to add it to the list of command-line parameters.
Start In
The startup (or base) directory for the script or program you’ve chosen,
such as C:\Temp.
Run
The type of window the script or program should run within, either a nor-
mal, minimized, or maximized window.
Next, you set the name and description for the task. The name is used as the shortcut
link designator for the task. The description is displayed as text under the shortcut link
or as an InfoTip, depending on the way you confi gured the taskpad.
Next, you can choose an icon for the task. As discussed previously, you can select Icons
Provided By MMC or Custom Icon. If you use custom icons, you probably want to use
the Shell32.dll in the %SystemRoot%\System32 directory to provide the custom icon.
When you click Next again, the wizard confi rms the task creation and shows a current
list of tasks on the taskpad provided you click Finish to fi nalize the creation of the cur-
rent task. If you want to create another task, select the When I Click Finish, Run This
Wizard Again check box, and then repeat this process. Otherwise, just click Finish.
Creating Navigation Tasks
Navigation tasks are used to create links from one taskpad to another or from a taskpad
to a saved console view. Before you can create navigation tasks, you must save a console
view or a view of a particular taskpad to the Favorites menu. To do this, while in author
mode, navigate down the console tree until the taskpad or item to which you want to
navigate is selected, and then select Add To Favorites on the Favorites menu. In the Add
To Favorites dialog box, shown in Figure 6-14, type a name for the favorite, and then
click OK. Then you can create a navigation task on a selected taskpad that uses that
favorite.
Designing Custom Taskpads for the MMC 181
Chapter 6
Please purchase PDF Split-Merge on www.verypdf.com to remove this watermark.
Figure 6-14 Save the current view of the console tool to the Favorites menu.
You create the navigation task using the New Task Wizard. In the New Task Wizard,
choose Navigation as the task type. Next, select the favorite to which you want users to
navigate when they click the related link. As shown in Figure 6-15, the only favorites
available are the ones you’ve created as discussed previously.
Figure 6-15 Select the previously defined favorite that you want to use.
Next, you set the name and description for the task. The name is used as the shortcut
link designator for the task. The description is displayed as text under the shortcut link
or as an InfoTip, depending on the way you confi gured the taskpad. If you are creating a
link to the main console tool page, you might want to call it Home.
Next, you can choose an icon for the task. As discussed previously, you can select Icons
Provided By MMC or Custom Icon. If you created a link called Home, there is a Home
icon provided by the MMC to use. If you use custom icons, you probably want to use the
Shell32.dll in the %SystemRoot%\System32 directory to provide the custom icon.
Chapter 6
182 Chapter 6 Windows Server 2008 MMC Administration
Please purchase PDF Split-Merge on www.verypdf.com to remove this watermark.
When you click Next again, the wizard confi rms the task creation and shows a current
list of tasks on the taskpad provided you click Finish to fi nalize the creation of the cur-
rent task. If you want to create another task, select the When I Click Finish, Run This
Wizard Again check box, and then repeat this process. Otherwise, just click Finish.
Arranging, Editing, and Removing Tasks
As long as you are in author mode, you can edit tasks and their properties by using the
taskpad Properties dialog box. To display this dialog box, right-click the folder or item
where you defi ned the taskpad, and then select Edit Taskpad View from the shortcut
menu. On the Tasks tab shown in Figure 6-16, you can do the following:
Arrange tasks
To arrange tasks in a specifi c order, select a task, and then click
Move Up or Move Down to set the task order.
Create new tasks
To create a new task, click New, and then use the New Task
Wizard to defi ne the task.
Edit existing tasks
To edit a task, select it, and then click Modify.
Remove tasks
To remove a task, select it, and then click Remove.
Figure 6-16 Use the Tasks tab in the taskpad Properties dialog box to arrange, create, edit, and
remove tasks.
Designing Custom Taskpads for the MMC 183
Chapter 6
Please purchase PDF Split-Merge on www.verypdf.com to remove this watermark.
Publishing and Distributing Your Custom Tools
As you’ve seen, the MMC provides a complete framework for creating custom tools
that can be tailored to the needs of a wide range of users. For administrators, you
could create custom consoles tailored for each individual specialty, such as security
administration, network administration, or user administration. For junior adminis-
trators or advanced users with delegated privileges, you could create custom consoles
that include taskpads that help guide them by providing lists of common commands,
and you can even restrict this list so that these individuals can perform only these
commands.
Because custom consoles are saved as regular fi les, you can publish and distribute them
as you would any other fi le. You could put the consoles on a network fi le server in a
shared folder. You could e-mail the consoles directly to those who will use them. You
could use Active Directory to publish the tools. You could even copy them directly to
the Start menu on the appropriate computer as discussed previously.
In any case, users need appropriate access permissions to run the tasks and access the
snap-ins. These permissions must be granted for a particular computer or the network.
Keep in mind also that the MMC version shipped with Windows Server 2003 and pre-
vious versions of the Windows operating system will not run tools created using the
MMC version that ships with Windows Server 2008 (MMC 3.0). Unless a computer has
been updated specifi cally to use MMC 3.0, this version runs on only Windows Server
2008 and Windows Vista.
Chapter 6
184 Chapter 6 Windows Server 2008 MMC Administration
Please purchase PDF Split-Merge on www.verypdf.com to remove this watermark.
W
indows Server 2008 has different confi guration architecture than its predeces-
sors. You prepare servers for use by installing and confi guring the following
components:
Server roles
Server roles are related sets of software components that allow serv-
ers to perform a specifi c function for users and other computers on networks. A
computer can be dedicated to a single role, such as Active Directory Domain Ser-
vices, or a computer can provide multiple roles.
Role services
Role services are software components that provide the functional-
ity of server roles. Each server role has one or more related role services. Some
server roles, such as Domain Name Service (DNS) and Dynamic Host Confi gura-
tion Protocol (DHCP), have a single function and installing the role installs this
function. Other roles, such as Network Policy And Access Services and Active
Directory Certifi cate Services, have multiple role services that you can install.
With these server roles, you can choose which role services to install.
Features
Features are software components that provide additional functionality.
Features, such as WINS and Windows Server Backup, are installed and removed
separately from roles and role services. A computer can have multiple features
installed or none, depending on its confi guration.
You confi gure roles, role services, and features using the Server Manager console.
Server Manager has a command-line counterpart, called ServerManagerCmd.exe, which
you can install as a feature.
Using Roles, Role Services, and Features
Before modifying a server’s confi guration, you should carefully plan how adding or
removing a role, role service, or feature will affect a server’s overall performance.
Although you typically want to combine complementary roles, doing so increases the
workload on the server, so you’ll need to optimize the server hardware accordingly.
Also, keep in mind that roles, role services, and features can be dependent on other
roles, role services, and features. When you install roles, role services, and features,
Server Manager prompts you to install any additional roles, role services, or features
that are required. If you try to remove a required component of an installed role, role
service, or feature, Server Manager warns that you cannot remove the component
unless you also remove the other role, role service, or feature.
Using Roles, Role Services, and Features . . . . . . . . . . . 185
Making Supplemental Components Available . . . . . . . 190
Installing Components with Server Manager . . . . . . . . 191
Installing Components at the Command Line . . . . . . . 200
CHAPTER 7
Confi guring Roles, Role Services,
and Features
185
Please purchase PDF Split-Merge on www.verypdf.com to remove this watermark.
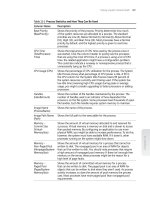
Table 7-1 provides an overview of the primary roles and the related role services that
you can deploy on a server running Windows Server 2008. In addition to roles and fea-
tures that are included with Windows Server 2008 by default, Server Manager enables
integration of additional roles and features that are available on the Microsoft Down-
load Center as optional updates to Windows Server 2008.
Table 7-1 Primary Roles and Related Role Services for Windows Server 2008
Role Description
Active Directory
Certifi cate Services
(AD CS)
AD CS provides functions necessary for issuing and revoking
digital certifi cates for users, client computers, and servers.
Includes these role services: Certifi cation Authority, Certifi cation
Authority Web Enrollment, Online Certifi cate Status Protocol, and
Microsoft Simple Certifi cate Enrollment Protocol (MSCEP).
Active Directory
Domain Services
(AD DS)
AD DS provides functions necessary for storing information about
users, groups, computers, and other objects on the network and
makes this information available to users and computers. Domain
controllers give network users and computers access to permitted
resources on the network.
Active Directory
Federation Services
(AD FS)
AD FS complements the authentication and access management
features of AD DS by extending them to the World Wide Web.
Includes these role services and subservices: Federation Service,
Federation Service Proxy, AD FS Web Agents, Claims-Aware Agent,
and Windows Token-Based Agent.
Active Directory
Lightweight Directory
Services (AD LDS)
AD LDS provides a data store for directory-enabled applications
that do not require AD DS and do not need to be deployed on
domain controllers. Does not include additional role services.
Active Directory
Rights Management
Services (AD RMS)
AD RMS provides controlled access to protected e-mail messages,
documents, intranet Web pages, and other types of fi les. Includes
these role services: Active Directory Rights Management Server
and Identity Federation Support.
Application Server Application Server allows a server to host distributed applications
built using ASP.NET, Enterprise Services, and .NET Framework 3.0.
Includes more than a dozen role services, which are discussed
in detail in Internet Information Services (IIS) 7.0 Administrator’s
Pocket Consultant (Microsoft Press, 2007).
DHCP Server DHCP provides centralized control over Internet Protocol (IP)
addressing. DHCP servers can assign dynamic IP addresses and
essential TCP/IP settings to other computers on a network. Does
not include additional role services.
DNS Server DNS is a name resolution system that resolves computer names
to IP addresses. DNS servers are essential for name resolution
in Active Directory domains. Does not include additional role
services.
Fax Server Fax Server provides centralized control over sending and receiving
faxes in the enterprise. A fax server can act as a gateway for faxing
and allows you to manage fax resources, such as jobs and reports,
and fax devices on the server or on the network. Does not include
additional role services.
Chapter 7
186 Chapter 7 Configuring Roles, Role Services, and Features
Please purchase PDF Split-Merge on www.verypdf.com to remove this watermark.