Windows Server 2008 Inside Out- P6
Bạn đang xem bản rút gọn của tài liệu. Xem và tải ngay bản đầy đủ của tài liệu tại đây (1.32 MB, 50 trang )
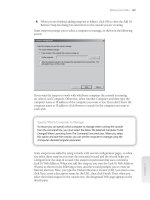
One of the more common warnings you’ll see is related to you connecting Hi-Speed
USB devices to non-Hi-Speed USB ports, as shown in the following screen. This is
important because if you are connecting an external hard disk drive or other Hi-Speed
USB device, the device won’t operate at the rated speed. It will in fact operate at a much
slower speed.
USB 1.0 is the original USB specifi cation. USB 2.0 is the newer USB specifi cation,
and it is referred to as Hi-Speed USB. Although you can connect USB 2.0 devices to
USB 1.0 ports, the devices operate at the USB 1.0 speed (which is many times slower
than USB 2.0). If you want to achieve high-speed USB transfers, you must connect to a
USB 2.0 port, if available. You might also want to consider adding a PCI expansion card
with USB 2.0 ports.
Because of Plug and Play, you should be able to install new devices easily by using one
of the following techniques:
For a non-USB or non-FireWire device, simply shut down the computer, insert
the card into the appropriate slot or connect the device to the computer, restart
the computer, and then let Windows Server 2008 automatically detect the new
device.
For a USB or FireWire device, simply insert the device into the appropriate slot
or connect it to the computer, restart the computer, and then let Windows Server
2008 automatically detect the new device.
Depending on the device, Windows Server 2008 should automatically detect the new
device and install a built-in driver to support it as discussed previously. The device
should then function immediately without any problems. Well, that’s the idea, but it
doesn’t always work out that way. The success of an automatic detection and installa-
tion depends on the device being plug and play compatible and a device driver being
available.
Windows Server 2008 includes many device drivers in a standard installation, and
in this case, it should install the device automatically. If driver updating is allowed
through Windows Update, Windows Server 2008 checks for drivers automatically
using Windows Update either when you connect a new device or when it fi rst detects
the device. Because Windows Update does not automatically install device drivers,
you’ll need to check for available updates to install the driver.
Installing Devices 217
Chapter 8
Please purchase PDF Split-Merge on www.verypdf.com to remove this watermark.
All device drivers provided through Windows Update have been thoroughly tested in the
Windows Hardware Quality Labs (WHQL), and you should be able to count on them not
to cause your system to crash or become unstable. However, just because driver updates
are available doesn’t mean you should install them. In a production environment, you’ll
rarely want to download and install new device drivers without thoroughly testing them
yourself fi rst. Better safe than sorry—always. Typically, you install new device drivers
because you are experiencing problems with the old drivers or looking for new function-
ality. If you aren’t experiencing problems or don’t require the additional functionality,
you might not want to update the drivers.
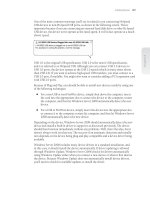
If Windows Server 2008 detects a Plug and Play device after you’ve connected it but
cannot locate a suitable driver, it displays a warning that a problem occurred during
installation, as shown in the following screen:
Sometimes when this happens, you must install the hardware device manually as you
do with non–Plug and Play devices. See “Adding Non–Plug and Play Hardware” on page
235 for details.
More typically, Windows Server 2008 starts the Driver Software Installation compo-
nent, which in turn starts the Found New Hardware Wizard. In this case, you can com-
plete the installation by following these steps:
1. In the Found New Hardware Wizard, click Locate And Install Driver Software
(Recommended) to continue with the installation.
2. The Driver Software Installation component will then search for preconfi gured
drivers. If it doesn’t fi nd a preconfi gured driver, you are prompted to insert the
disc that came with the hardware device.
3. Use one of the following techniques to continue:
If you have an installation disc for the device, insert it and then follow the
prompts. The device should then be installed properly. Skip the remaining
steps.
If you don’t have an installation disc, click I Don’t Have The Disk. Show Me
Other Options and then follow the remaining steps in this procedure.
4. On the next wizard page, click Browse My Computer For Driver Software.
5. Click Browse to select a search location.
SIDE OUT
Installing new drivers
All device drivers provided through Windows Update have been thoroughly tested in the
Windows Hardware Quality Labs (WHQL), and you should be able to count on them not
to cause your system to crash or become unstable. However, just because driver updates
are available doesn’t mean you should install them. In a production environment, you’ll
rarely want to download and install new device drivers without thoroughly testing them
yourself fi rst. Better safe than sorry—always. Typically, you install new device drivers
because you are experiencing problems with the old drivers or looking for new function-
ality. If you aren’t experiencing problems or don’t require the additional functionality,
you might not want to update the drivers.
Chapter 8
218 Chapter 8 Managing and Troubleshooting Hardware
Please purchase PDF Split-Merge on www.verypdf.com to remove this watermark.
6. In the Browse For Folder dialog box, select the start folder for the search and then
click OK. Because all subfolders of the selected folder are searched automatically,
you can select the drive root path, such as C, to search an entire drive.
7. Click Next. The wizard will search for and install any appropriate driver. If
the wizard can’t fi nd an appropriate driver, you’ll need to obtain one and then
follow the procedure in “Installing and Updating Device Drivers” on page 228 to
complete the installation.
Note
If the wizard is fails to install the device, there might be a problem with the device itself
or the driver, or a confl ict with existing hardware. For additional details on adding hard-
ware and troubleshooting, see “Managing Hardware” on page 235.
After you’ve successfully installed a device, you’ll need to perform maintenance tasks
periodically for the device and its drivers. When new drivers for a device are released,
you might want to test them in a development or support environment to see whether
the drivers resolve problems that users have been experiencing or include the new
functionality you are looking for. If the drivers install without problems and resolve out-
standing issues, you might then want to install the updated drivers on computers that
use this device. On a server operating system, you can implement the driver update
procedure as follows:
1. Check the device and driver information on each system prior to installing the
new driver. Note the location, version, and fi le name of the existing driver.
2. Install the updated driver and reboot the computer. If the computer and the
device function normally after the reboot, consider the update a success.
3. If the computer or the device malfunctions after the driver installation, roll back
to the previously installed driver using the standard Device Manager utilities. If
you cannot restart the computer and restore the driver, you might need to start
the computer in Safe Mode or use Startup Repair to restore the system.
Viewing Device and Driver Details
You use Device Manager to view and confi gure hardware devices. You’ll spend a lot of
time working with this tool, so you should get to know it before working with devices.
To open Device Manager and obtain a detailed list of all the hardware devices installed
on a system, follow these steps:
1. Click Server Manager on the Quick Launch toolbar, or click Start, then
Administrative Tools, and then Server Manager.
Note
If the wizard is fails to install the device, there might be a problem with the device itself
or the driver, or a confl ict with existing hardware. For additional details on adding hard-
ware and troubleshooting, see “Managing Hardware” on page 235.
Installing Devices 219
Chapter 8
Please purchase PDF Split-Merge on www.verypdf.com to remove this watermark.
2. In Server Manager, expand the Diagnostics node. This expands the node to
display its tools.
3. Select the Device Manager node. As shown in Figure 8-1, you should now see a
complete list of devices installed on the system. By default, this list is organized
by device type.
Figure 8-1 Use Device Manager to work with hardware devices.
4. Expand a device type to see a list of the specifi c instances of that device type.
After you access Device Manager, you can work with any of the installed devices. If you
right-click a device entry, a shortcut menu is displayed. The available options depend
on the device type, but they include the following:
Properties
Displays the Properties dialog box for the device
Uninstall
Uninstalls the device and its drivers
Disable
Disables the device but doesn’t uninstall it
Enable
Enables a device if it’s disabled
Update Driver Software
Starts the Hardware Update Wizard, which you can use to
update the device driver
Scan For Hardware Changes
Tells Windows Server 2008 to check the hardware con-
fi guration and determine whether there are any changes
Note
The device list shows warning symbols if there are problems with a device. A yellow
warning symbol with an exclamation point indicates a problem with a device. A red X
indicates a device that was improperly installed or disabled by the user or the administra-
tor for some reason.
Note
The device list shows warning symbols if there are problems with a device. A yellow
warning symbol with an exclamation point indicates a problem with a device. A red X
indicates a device that was improperly installed or disabled by the user or the administra-
tor for some reason.
Chapter 8
220 Chapter 8 Managing and Troubleshooting Hardware
Please purchase PDF Split-Merge on www.verypdf.com to remove this watermark.
You can use the options on the View menu in Server Manager to change the defaults for
which types of devices are displayed and how the devices are listed. The options are as
follows:
Devices By Type
Displays devices by the type of device installed, such as disk drive or
printer. The connection name is listed below the type. This is the default view.
Devices By Connection
Displays devices by connection type, such as audio and video
codecs.
Resources By Type
Displays the status of allocated resources by type of device using
the resource. Resource types are direct memory access (DMA) channels, input/
output (I/O) ports, interrupt requests (IRQ), and memory addresses.
Resources By Connection
Displays the status of all allocated resources by connection
type rather than device type.
Show Hidden Devices
Displays non–plug and play devices as well as devices that
have been physically removed from the computer but haven’t had their drivers
uninstalled.
You can use Computer Management to view and work with settings on remote comput-
ers. Right-click Computer Management in the console tree and then select Connect To
Another Computer on the shortcut menu. In the Select Computer dialog box, choose
Another Computer, and then type the fully qualifi ed name of the computer you want to
work with, such as entdc01.microsoft.com, where entdc01 is the computer name and
microsoft.com is the domain name. If you don’t know the computer name, click Browse
to search for the computer you want to work with.
If you want detailed driver lists for multiple computers, you can do this using the Driver-
query command-line utility. Use the /V parameter to get verbose output about all drivers
or the /SI parameter to display properties only for signed drivers, such as driverquery
/v or driverquery /si. If you want to write the information to a fi le, use the output redi-
rection symbol (>) followed by the name of the fi le, such as driverquery /si > system-
devices.txt.
To list devices on remote computers, use the /S parameter followed by a computer
name or Internet Protocol (IP) address to specify a remote computer to query. You can
also specify the Run As permissions by using /U followed by the user name and /P fol-
lowed by the user’s password. Here’s an example: driverquery /v /s corpserver01 /u
wrstanek /p 49iners.
SIDE OUT
View and save device settings for local and remote computers
You can use Computer Management to view and work with settings on remote comput-
ers. Right-click Computer Management in the console tree and then select Connect To
Another Computer on the shortcut menu. In the Select Computer dialog box, choose
Another Computer, and then type the fully qualifi ed name of the computer you want to
work with, such as entdc01.microsoft.com, where entdc01 is the computer name and
microsoft.com is the domain name. If you don’t know the computer name, click Browse
to search for the computer you want to work with.
If you want detailed driver lists for multiple computers, you can do this using the Driver-
query command-line utility. Use the /V parameter to get verbose output about all drivers
or the /SI parameter to display properties only for signed drivers, such as driverquery
/v or driverquery /si. If you want to write the information to a fi le, use the output redi-
rection symbol (>) followed by the name of the fi le, such as driverquery /si > system-
devices.txt.
To list devices on remote computers, use the /S parameter followed by a computer
name or Internet Protocol (IP) address to specify a remote computer to query. You can
also specify the Run As permissions by using /U followed by the user name and /P fol-
lowed by the user’s password. Here’s an example: driverquery /v /s corpserver01 /u
wrstanek /p 49iners.
Installing Devices 221
Chapter 8
Please purchase PDF Split-Merge on www.verypdf.com to remove this watermark.
Working with Device Drivers
Each hardware component installed on a computer has an associated device driver.
The job of the device driver is to describe how the operating system uses the hardware
abstraction layer (HAL) to work with a hardware component. The HAL handles the low-
level communication tasks between the operating system and a hardware component.
By installing a hardware component through the operating system, you are telling the
operating system about the device driver it uses. From then on, the device driver loads
automatically and runs as part of the operating system.
Device Driver Essentials
Windows Server 2008 includes an extensive library of device drivers. In the base instal-
lation of the operating system, these drivers are maintained in the fi le repository of the
driver store. Some service packs you install will also include updates to the driver store.
You can fi nd drivers in the FileRepository folder under %SystemRoot%\System32\
DriverStore. The DriverStore folder also contains subfolders for localized driver infor-
mation. You’ll fi nd a subfolder for each language component confi gured on the system.
For example, for localized U.S. English driver information, you’ll fi nd a subfolder called
en-US.
Every device driver in the driver store is certifi ed to be fully compatible with Windows
Server 2008 and is also digitally signed by Microsoft to assure the operating system
of its authenticity. When you install a new Plug andPlay compatible device, Windows
Server 2008 checks the driver store for a compatible device driver. If one is found, the
operating system automatically installs the device.
Every device driver has an associated Setup Information fi le. This fi le, which ends with
the .inf extension, is a text fi le containing detailed confi guration information about the
device being installed. The information fi le identifi es any source fi les used by the driver
as well. Source fi les have the .sys extension. Drivers are also associated with a compo-
nent manifest (component.man) fi le. The manifest fi le is written in Extensible Markup
Language (XML), includes details on the driver’s digital signature, and might also
include plug and play information used by the device to confi gure itself automatically.
Every driver installed on a system has a source (.sys) fi le in the %SystemRoot%\Sys-
tem32\Drivers folder. When you install a new device driver, the driver is written to a
subfolder of %SystemRoot%\System32\Drivers, and confi guration settings are stored
in the Registry. The driver’s .inf fi le is used to control the installation and write the Reg-
istry settings. If the driver doesn’t already exist in the driver store, it does not already
have an .inf fi le or other related fi les on the system. In this case, the driver’s .inf fi le and
other related fi les are written to a subfolder of %SystemRoot%\System32\DriverStore\
FileRepository when you install the device.
Chapter 8
222 Chapter 8 Managing and Troubleshooting Hardware
Please purchase PDF Split-Merge on www.verypdf.com to remove this watermark.
Using Signed and Unsigned Device Drivers
Speaking of new device drivers, Microsoft recommends that you use signed device driv-
ers whenever possible. Every device driver in the driver cache is digitally signed, which
certifi es the driver as having passed extensive testing by the Windows Hardware Qual-
ity Lab (WHQL). A device driver with a digital signature signed by Microsoft should
not cause your system to crash or become unstable. The presence of a digital signature
signed by Microsoft also ensures that the device driver hasn’t been tampered with.
If a device driver doesn’t have a digital signature signed by Microsoft, it hasn’t been
approved for use through testing, or its fi les might have been modifi ed from the origi-
nal installation by another program. This means that unsigned drivers are much more
likely than any other program you’ve installed to cause the operating system to freeze
or the computer to crash.
The assurances you get with digitally signed drivers aren’t applicable to unsigned
device drivers. When you install an unsigned driver, there is no guarantee that it has
been tested, and if the driver is poorly written, it is much more likely to cause the oper-
ating system to freeze or the server to crash than any other program you’ve installed.
That said, there are times when you might have to use an unsigned device driver. In
some situations, you might fi nd that a particular device doesn’t have a signed device
driver. Here, you should check the manufacturer’s Web site to see whether a signed
driver is available because sometimes there is a signed driver, but it’s just not distrib-
uted with the device or on the Windows Server 2008 distribution discs. If a signed
driver isn’t available, you might fi nd that you have to use an unsigned driver.
Note
If you have to install an unsigned driver, proceed cautiously and remember to monitor
the system closely. If you fi nd that the system is inexplicably freezing or crashing, the
unsigned driver is probably to blame and should be rolled back or uninstalled. Remem-
ber, any type of faulty driver can cause the system to fail, even a driver for a display
adapter, a network adapter, or a sound card.
To prevent problems with unsigned drivers, Windows Server 2008 warns you by
default when you try to install an unsigned device driver. You can also confi gure
Windows to eliminate this warning or to prevent unsigned drivers from being installed
altogether. To manage device driver settings for computers throughout the organization,
you can use Group Policy. When you do this, Group Policy specifi es the least secure set-
ting using one of three confi guration settings:
Ignore
Use this setting to allow users to install any unsigned driver without having to
see and respond to a warning prompt.
Note
If you have to install an unsigned driver, proceed cautiously and remember to monitor
the system closely. If you fi nd that the system is inexplicably freezing or crashing, the
unsigned driver is probably to blame and should be rolled back or uninstalled. Remem-
ber, any type of faulty driver can cause the system to fail, even a driver for a display
adapter, a network adapter, or a sound card.
Working with Device Drivers 223
Chapter 8
Please purchase PDF Split-Merge on www.verypdf.com to remove this watermark.
Warn
Use this setting to prompt users each time either to continue with the installa-
tion of an unsigned driver or to stop the installation.
Block
Use this setting to prevent users from installing unsigned driver software.
Note
When Group Policy is set to Ignore or Warn, you can install unsigned drivers. When
Group Policy is set to Block, unsigned device drivers can’t be installed without fi rst over-
riding Group Policy.
You can confi gure device driver–signing settings on a per-user basis using the Code
Signing For Device Drivers policy. This policy is located in User Confi guration\Admin-
istrative Templates\System\Driver Installation. When you enable this policy, you can
specify the action to take as Ignore, Warn, or Block. After you enable it, the system
doesn’t implement any setting less secure than the established setting.
Viewing Driver Information
To view detailed information about a device, right-click the device and select Proper-
ties or simply double-click the related entry in Device Manager. This opens the device’s
Properties dialog box, as shown in Figure 8-2. Most devices have at least two tabs,
either General and Properties or General and Driver.
The most important information on the General tab is the device status. If the device
is working properly, this is specifi cally stated. Otherwise, the error status of the device
is shown, and you can click Check For Solutions to start the device troubleshooter. If
the device is disabled, you have an option to enable the device instead (as shown in
Figure 8-3).
You can temporarily disable a device by selecting Disable on the Driver tab. If you later
want to enable the device, click the Enable Device button on the General tab and then
when the troubleshooting wizard starts, click Next and then click Finish.
The Driver tab, shown in Figure 8-4, provides basic information about the driver pro-
vider, creation date, version, and digital signature. You should be wary of any drivers
that list the provider as Unknown as well as drivers that are listed as Not Digitally
Signed. Drivers signed by Microsoft are listed as being signed by Microsoft Windows or
Microsoft Windows Hardware Compatibility Publisher.
You can view additional information about the driver by clicking Driver Details. If no
driver fi les are required or have been loaded for the device, you’ll see a message stat-
ing this. Otherwise, you’ll see the names and locations of all associated fi les, includ-
ing an icon that indicates the signing status of each individual fi le. Selecting a fi le in
this list displays details for that fi le in the lower section of the dialog box, as shown in
Figure 8-5.
Note
When Group Policy is set to Ignore or Warn, you can install unsigned drivers. When
Group Policy is set to Block, unsigned device drivers can’t be installed without fi rst over-
riding Group Policy.
Chapter 8
224 Chapter 8 Managing and Troubleshooting Hardware
Please purchase PDF Split-Merge on www.verypdf.com to remove this watermark.
Figure 8-2 Use the device’s Properties dialog box to obtain essential information
about a device, including whether it is functioning properly.
Figure 8-3 Disabled devices are listed with an error status because they aren’t
functioning; you can enable them by clicking Enable Device.
Working with Device Drivers 225
Chapter 8
Please purchase PDF Split-Merge on www.verypdf.com to remove this watermark.
Figure 8-4 Use the Driver tab to determine the driver provider,
creation date, version, and digital signature.
Figure 8-5 The Driver File Details dialog box displays information
on the driver file locations, the provider, and the file versions.
Chapter 8
226 Chapter 8 Managing and Troubleshooting Hardware
Please purchase PDF Split-Merge on www.verypdf.com to remove this watermark.
Viewing Advanced, Resources, and Other Settings
Devices often have other tabs, such as Advanced, Resources, and Power Management.
Most network adapters have an Advanced tab. As shown in Figure 8-6, these options
can control transmission options. You should change these options only if you are
trying to resolve specifi c performance or connectivity issues as directed by the device
manufacturer or a Microsoft Knowledge Base article. The setting that causes the most
problems is Speed & Duplex. Most of the time, you’ll want this set to Auto Detect or
Auto Negotiation. Sometimes, however, to correct a specifi c problem, you must use a
preset speed and duplex setting, such as 100 Mbps Half Duplex or 1000 Mbps Full
Duplex. You should do this, however, only when this setting is recommended based on
your network confi guration or the issue you are trying to troubleshoot.
Figure 8-6 You’ll find that most network adapters have an Advanced tab for setting
transmission options.
Any device that uses system resources will have a Resources tab like the one shown in
Figure 8-7.
The Resources tab options show the device resources that are currently assigned and
their settings. There are four types of device resources:
DMA
The DMA channel used by the device. Values are shown as integers, such
as 02.
Memory Range
The range of memory addresses used by the device. Values are
shown in hexadecimal format, such as E8206000–E8206FFF.
Working with Device Drivers 227
Chapter 8
Please purchase PDF Split-Merge on www.verypdf.com to remove this watermark.
I/O Range
The range of I/O ports used by the device. Values are shown in hexa-
decimal format, such as 5400–543F.
IRQ Line
IRQ line used by the device. Values are shown as integers, such as 10.
Figure 8-7 Any device that uses system resources has a Resources tab.
Devices can use multiple I/O and memory ranges. For example, the Video Graphics
Adapter (VGA) adapter on one of our computers used three I/O ranges and three mem-
ory ranges. Additionally, multiple PCI devices can share the same IRQs when using the
Advanced Confi guration and Power Interface (ACPI) BIOS. This is because the ACPI
BIOS allows IRQ sharing. To learn more about resource sharing and confi guration
options, see “Resolving Resource Confl icts” on page 240.
Installing and Updating Device Drivers
Device drivers are essential to the proper operation of Windows Server 2008. A faulty
device driver can cause many problems on your systems—everything from unexpected
restarts to application hangs to blue screens. To make it easier to detect and diagnose
problems, you should maintain an inventory of all installed device drivers on systems
you manage. Previously, we talked about using the Driverquery command to obtain a
list of drivers for computers throughout the network. Ideally, the driver information
should be stored on a centralized network share rather than on individual comput-
ers or could be printed out and placed in a binder where it is easily accessible. You
should then periodically check manufacturer Web sites for known problems with
related device drivers and for updated drivers. Windows Update can also help you
because driver updates are made available through this service and can be installed
automatically.
Chapter 8
228 Chapter 8 Managing and Troubleshooting Hardware
Please purchase PDF Split-Merge on www.verypdf.com to remove this watermark.
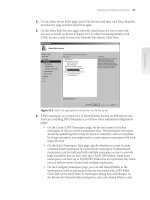
Although you can be fairly certain drivers obtained through Windows Update are
newer than installed versions, this isn’t the case for drivers you download yourself, and
you should always double-check the driver version information before installation. As
discussed previously, the current driver version is displayed in the driver’s Properties
dialog box, as shown in the following screen. Double-click the device in Device Man-
ager to display the driver’s Properties dialog box, then select the Driver tab. Be sure to
check the driver date as well as the driver version.
Next, check the driver version information for the driver you downloaded. To do this,
extract the downloaded driver fi les to a folder. In the folder, you should fi nd .dll or .sys
fi les. Right-click one of these fi les, and choose Properties. Then in the Properties dialog
box, click the Version tab to fi nd the version information.
To continue with the installation of downloaded drivers, check to see whether the
driver download includes a Setup program. If it does, run this program so that the
proper fi les are copied to your system. After you do this, you can install the driver. You
install and update drivers using the Found New Hardware, Add Hardware, and Update
Driver Software Wizards. By default, these wizards can search for updated device driv-
ers in the following locations:
On the local computer
On a hardware installation CD
On the Windows Update site or your organization’s Windows Update server
Working with Device Drivers 229
Chapter 8
Please purchase PDF Split-Merge on www.verypdf.com to remove this watermark.
In Group Policy, several policies control the search possibilities:
Turn Off Access To All Windows Update Features under Computer Confi guration\
Administrative Templates\System\Internet Communication Management\Internet
Communication Settings
If this policy setting is enabled, all Windows Update
features are blocked and not available to users. Users will also be unable to access
the Windows Update Web site.
Turn Off Windows Update Device Driver Searching under Computer Confi guration\
Administrative Templates\System\Internet Communication Management\Inter-
net Communication Settings
By default, Windows Update searching is optional
when installing a device. If you enable this setting, Windows Update will not
be searched when you install a new device. If you disable this setting, Windows
Update will always be searched when a new device is installed if no local drivers
are present.
Turn Off Windows Update Device Driver Search Prompt under Computer Confi gura-
tion\Administrative Templates\System\Driver Installation
If you disable or do not
confi gure the Turn Off Windows Update Device Driver Searching setting, this
policy setting affects whether a search prompt is displayed for Windows Update
of device drivers. If this policy setting is enabled, administrators aren’t prompted
to search Windows Update and the search will or will not take place automati-
cally based on the Turn Off Windows Update Device Driver Searching setting.
Otherwise, administrators will be prompted before Windows Update is searched.
Confi gure Driver Search Locations under User Confi guration\Administrative Templates\
System\Driver Installation
If you enable this policy setting, you can restrict users
from searching fl oppy disk drives, CD drives, Windows Update, or any combina-
tion of these locations.
You can install and update device drivers by following these steps:
1. In Device Manager, select the Device Manager node. You should now see a
complete list of devices installed on the system. By default, this list is organized
by device type.
2. Right-click the device you want to manage and then select Update Driver. This
starts the Update Driver Software wizard.
3. You can specify whether you want to install the drivers automatically or manually
by selecting the driver from a list or specifi c location (see Figure 8-8).
Note
Updated drivers can add functionality to a device, improve performance, and resolve
device problems. However, you should rarely install the latest drivers on a user’s com-
puter without fi rst testing them in a test environment. Test fi rst, then install.
Note
Updated drivers can add functionality to a device, improve performance, and resolve
device problems. However, you should rarely install the latest drivers on a user’s com-
puter without fi rst testing them in a test environment. Test fi rst, then install.
Chapter 8
230 Chapter 8 Managing and Troubleshooting Hardware
Please purchase PDF Split-Merge on www.verypdf.com to remove this watermark.
Figure 8-8 Choose to install drivers automatically or manually.
4. If you elect to install the driver automatically, Windows Server 2008 looks for a
more recent version of the device driver and installs the driver if found. If a more
recent version of the driver is not found, Windows Server 2008 keeps the current
driver. In either case, click Close to complete the process and then skip the
remaining steps.
5. If you chose to install the driver manually, you’ll have the opportunity to do one
of the following, as shown in Figure 8-9:
Search for the driver
If you want to search for drivers, click Browse to select a
search location. Use the Browse For Folder dialog box to select the start
folder for the search and then click OK. Because all subfolders of the
selected folder are searched automatically, you can select the drive root
path, such as C, to search an entire drive.
Choose the driver to install
If you want to choose the driver to install, click Let
Me Pick From A List Of Device Drivers On My Computer. The wizard then
displays a list of common hardware types. Select the appropriate hardware
type, such as Modems or Network Adapters, and then click Next. Scroll
through the list of manufacturers to fi nd the manufacturer of the device and
then choose the appropriate device in the right pane.
Note
If the manufacturer or device you want to use isn’t listed, insert the media containing the
device driver into the fl oppy drive, CD-ROM drive, or USB fl ash drive, and then click Have
Disk. Follow the prompts. Afterward, select the appropriate device.
Note
If the manufacturer or device you want to use isn’t listed, insert the media containing the
device driver into the fl oppy drive, CD-ROM drive, or USB fl ash drive, and then click Have
Disk. Follow the prompts. Afterward, select the appropriate device.
Working with Device Drivers 231
Chapter 8
Please purchase PDF Split-Merge on www.verypdf.com to remove this watermark.
Figure 8-9 Search for or select a driver to install.
6. After selecting a device driver through a search or a manual selection, continue
through the installation process by clicking Next. Click Close when the driver
installation is completed. If the wizard can’t fi nd an appropriate driver, you’ll
need to obtain one and then repeat this procedure. Keep in mind that in some
cases you’ll need to reboot the system to activate the newly installed or updated
device driver.
Restricting Device Installation Using Group Policy
In addition to code signing and search restrictions, you can use Group Policy settings
to allow or prevent installation of devices based on device type. The related policy
settings are found under Computer Confi guration\Administrative Templates\System\
Device Installation\Device Installation Restrictions and include the following:
Allow Administrators To Override Device Installation Restriction Policies
Allow Installation Of Devices Using Drivers That Match These Device Setup
Classes
Prevent Installation Of Drivers Matching These Device Setup Classes
Allow Installation Of Devices That Match Any Of These Device IDs
Prevent Installation Of Devices That Match Any Of These Device Ids
Prevent Installation Of Removable Devices
Prevent Installation Of Devices Not Described By Other Policy Settings
You can confi gure these policies by following these steps:
1. Access the policy for the appropriate site, domain, or organizational unit (OU).
2. Expand Computer Confi guration, then Administrative Templates, then System,
then Device Installation, and then Device Installation Restrictions.
Chapter 8
232 Chapter 8 Managing and Troubleshooting Hardware
Please purchase PDF Split-Merge on www.verypdf.com to remove this watermark.
3. Double-click the appropriate policy to view its Properties dialog box.
4. Set the state of the policy as Not Confi gured if you don’t want the policy to
be applied, Enabled if you want the policy to be applied, or Disabled if you
want to block the policy from being used (all as permitted by the Group Policy
confi guration).
5. If you are enabling the policy and it has a Show option, click Show to use the
Show Contents dialog box to specify which device IDs should be matched to this
policy. Click OK twice.
Rolling Back Drivers
Occasionally, you’ll fi nd that an updated driver doesn’t work as expected. It could
cause problems, such as device failure or system instability. In most cases, this should
occur only when you’ve installed unsigned device drivers as a last resort or beta ver-
sions of new drivers that might have improved performance or some other benefi t that
outweighs their potential to crash the system. However, it can sometimes occur with
signed device drivers—even those published through Windows Update.
If you suspect that an updated driver is causing the system or device problems you are
experiencing, you can attempt to recover the system to the previously installed device
driver. To do this, follow these steps:
1. If you are having problems starting the system, you will need to boot the system
in Safe Mode as discussed in “Resolving Startup Issues” on page 1416.
2. In Device Manager, select the Device Manager node. You should now see a
complete list of devices installed on the system. By default, this list is organized
by device type.
3. Right-click the device you want to manage and then select Properties. This opens
the Properties dialog box for the device.
4. Click the Driver tab and then click Roll Back Driver. When prompted to confi rm
the action, click Yes.
5. Click Close to close the driver’s Properties dialog box.
Note
If the driver fi le hasn’t been updated, a backup drive fi le won’t be available. In this case,
the Roll Back Driver button will be disabled and you will not be able to click it. In this
case, you should check the manufacturer’s Web site for available versions of the driver for
the device.
Note
If the driver fi le hasn’t been updated, a backup drive fi le won’t be available. In this case,
the Roll Back Driver button will be disabled and you will not be able to click it. In this
case, you should check the manufacturer’s Web site for available versions of the driver for
the device.
Working with Device Drivers 233
Chapter 8
Please purchase PDF Split-Merge on www.verypdf.com to remove this watermark.
Removing Device Drivers for Removed Devices
Windows device drivers for Plug and Play devices are loaded and unloaded dynami-
cally. You can remove the driver for a device only when the device is plugged in. This
means the proper way to remove a device from a system is fi rst to uninstall its related
device driver and then to remove the device from the system.
One reason for uninstalling a device is to remove a device that you no longer use or
need. Start by uninstalling the related device driver. Access Device Manager, and then
select the Device Manager node. Right-click the device you want to remove and then
select Uninstall. When prompted, click OK to confi rm that you want to remove the
driver. Windows Server 2008 will then remove the related fi les and Registry settings.
At this point, you can shut down the system and remove the related hardware compo-
nent if you want to. However, you might fi rst want to check to see how the computer
operates without the device in case some unforeseen problem or error occurs. So,
rather than removing the device, you’ll want to disable it. Disabling the device pre-
vents Windows from reinstalling the device automatically the next time you restart the
system. You disable a device by right-clicking it in Device Manager and then selecting
Disable.
Sometimes when you are troubleshooting and trying to get a device to work properly,
you might want to uninstall or unplug the device temporarily. Here, you could disable
the device and then monitor the system to see whether problems previously experi-
enced reoccur, or you could reinstall the device to see whether normal operations are
restored. Uninstalling and then reinstalling the device forces Windows to go back to
the device’s original device and Registry settings, which can sometimes recover the
device.
After you’ve uninstalled a device driver, one way to get Windows Server 2008 to rein-
stall the device is to reboot the computer. You can also try to rescan for devices using
Device Manager by choosing Scan For Hardware Changes on the Action menu. Either
way, the operating system should detect the uninstalled device as new hardware and
then automatically reinstall the necessary device driver. If this doesn’t happen, you
must reinstall the device manually using the Add Hardware Wizard as discussed later
in this chapter.
Uninstalling, Reinstalling, and Disabling Device Drivers
Uninstalling a device driver uninstalls the related device. When a device isn’t working
properly, sometimes you can completely uninstall the device, restart the system, and
then reinstall the device driver to restore normal operations. You can uninstall and
then reinstall a device by following these steps:
1. Access Device Manager, and then select the Device Manager node. You should
now see a complete list of devices installed on the system. By default, this list is
organized by device type.
2. Right-click the device you want to manage and then select Uninstall. When
prompted to confi rm the action, click OK.
Chapter 8
234 Chapter 8 Managing and Troubleshooting Hardware
Please purchase PDF Split-Merge on www.verypdf.com to remove this watermark.
3. Reboot the system. Windows Server 2008 should detect the presence of the
device and automatically reinstall the necessary device driver. If the device isn’t
automatically reinstalled, reinstall it manually as discussed in “Installing and
Updating Device Drivers” on page 228.
To prevent a device from being reinstalled automatically, disable the device instead of
uninstalling it. You disable a device by right-clicking it in Device Manager and then
selecting Disable.
Managing Hardware
Windows Plug and Play technology does a good job of detecting and automatically
confi guring new hardware. However, if the hardware doesn’t support plug and play or
it isn’t automatically detected, you’ll need to enter information about the new hardware
into the Windows Server 2008 system. You do this by using the Add Hardware Wizard
to install the hardware device and its related drivers on the system. You can also use
this wizard to troubleshoot problems with existing hardware.
Adding Non–Plug and Play Hardware
Although Windows Server 2008 doesn’t detect or set up non–Plug and Play devices
automatically, it does maintain a driver cache for these devices. This driver cache has
hundreds of drivers, any one of which you might be able to use. You might also be able
to use an older driver if a Windows Server 2008 device driver isn’t available. In either
case, you install the device using the Add Hardware Wizard. Follow these steps:
1. If the device has a CD or a downloadable Setup program, run it to copy the driver
fi les to your hard disk.
2. Connect the device to the computer. For internal devices, you must shut down the
computer, add the device, and then restart the computer.
3. In Control Panel, click Classic View and then double-click Add Hardware.
Note
You can also start the Add Hardware Wizard from within Device Manager. Simply select
the Add Legacy Hardware option on the Action menu.
4. In the Add Hardware Wizard, read the introductory message and then click Next.
Note
You can also start the Add Hardware Wizard from within Device Manager. Simply select
the Add Legacy Hardware option on the Action menu.
Managing Hardware 235
Chapter 8
Please purchase PDF Split-Merge on www.verypdf.com to remove this watermark.
5. Determine whether the wizard should search for new hardware or whether you
want to select the hardware from a list (see Figure 8-10).
If you choose the search option, the wizard searches for and attempts to
automatically detect the new hardware. The process takes a few minutes to
go through all the device types and options. When the search is complete,
any new devices found are displayed, and you can select one.
If you choose the manual option, or if no new devices are found in the
automatic search, you’ll have to select the hardware type yourself. Select
the type of hardware, such as Modems or Network Adapters, and then click
Next. Scroll through the list of manufacturers to fi nd the manufacturer of
the device and then choose the appropriate device in the right pane.
Figure 8-10 Search for or select the new hardware to install.
6. After you complete the selection and installation process, click Next, and then
click Next again to confi rm that you want to install the hardware.
7. After the wizard installs the drivers for the hardware device, click Finish. The
new hardware should now be available.
Enabling and Disabling Hardware
When a device isn’t working properly, sometimes you’ll want to uninstall or disable it.
Uninstalling a device removes the driver association for the device so that it temporar-
ily appears that the device has been removed from the system. The next time you restart
the system, Windows Server 2008 might try to reinstall the device. Typically, Windows
Server 2008 reinstalls plug and play devices automatically, but does not automatically
reinstall non–plug and play devices.
Chapter 8
236 Chapter 8 Managing and Troubleshooting Hardware
Please purchase PDF Split-Merge on www.verypdf.com to remove this watermark.