Configuring a gateway to gateway VPN is easy using ISA Server
Bạn đang xem bản rút gọn của tài liệu. Xem và tải ngay bản đầy đủ của tài liệu tại đây (588.33 KB, 38 trang )
Configuring a gateway to gateway VPN is easy using ISA Server. The reason why it’s so
easy is that the Local and Remote VPN Wizards make the setup a virtual no-brainer. Well,
it’s a no-brainer when you’re configuring PPTP VPN gateways. But if you’re in the market for
a high security L2TP/IPSec gateway to gateway VPN, you probably have either been trying
to avoid it like the plague or you are pulling your hair out trying to figure out how to make it
work!
Indeed, the certificate infrastructure configuration is a major barrier to entry for those
considering L2TP/IPSec VPNs. The reason for this is that’s its virtually impossible to get the
straight dope on how to install the certificates! Even the highly acclaimed VPN book by
Fortenberry fails to make it clear how to install machine certificates using the Web interface
for machines that are not domain members. He focuses on using the Web interface to get a
user certificate for PPP EAP/TLS authentication. Forget about this! We’ll handle EAP/TLS at
another time. What we want to do right now is to get a L2TP/IPSec link configured and
working.
Attention:
Configuring ISA Server 2000 : Building Firewalls for Windows 2000
By Deb and Tom Shinder
http://www.a
mazon.com/exec/obidos/ASIN/1928994296/isaserver
Amazon.com
The real trick in making the certificate services infrastructure work is the ability to assign
certificates to non-domain member computers. As you’ll see, assigning certificates to
domain members is a snap. Its getting the non-domain members a certificate that can give
you a headache.
In this lab we’ll put together a five computer VMware network that includes two VPN
servers, a domain controller, a stand-alone root CA and a server on the remote network. In
the first part of the article, we’ll get the infrastructure put together; install the servers,
configure the certificate servers, and install certificates on the Local network. In the second
part of the article we’ll install ISA Server, configure the gateway to gateway VPN, and install
the certificates on the remote VPN server and remote file server.
Procedures in this lab include:
Reviewing the Lab Network
Installing Certificate Server on a Domain Controller
Configuring autoenrollment using Group Policy
Confirming Installation of the Machine Certificate
Using the MMC Console to Request a Certificate
Installing a Stand-alone Root CA
Obtaining a Certificate from the Stand-alone Root using the Web Interface
By the end of this two part lab, you’ll be the ISA/VPN L2TP/IPSec gateway to gateway
Wizard!
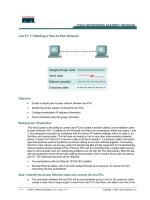
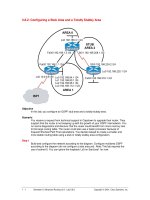
The Lab Network
The graphic below shows the lab network:
Service and IP configuration settings on each machine:
CLIENTDC:
Services:
WINS
DNS
--Accepts dynamic updates
--Configured manually, not via Active Directory Wizard
Active Directory
Domain name: internal.net
[IMAGE PROVIDED with LAB on DVD]
IP Configuration:
Windows 2000 IP Configuration
Host Name . . . . . . . . . . . . : CLIENTDC
Primary DNS Suffix . . . . . . . : internal.net
DNS Suffix Search List. . . . . . : internal.net
Ethernet adapter Local Area Connection:
IP Address. . . . . . . . . . . . : 10.0.0.2
Subnet Mask . . . . . . . . . . . : 255.255.255.0
Default Gateway . . . . . . . . . : 10.0.0.1
DNS Servers . . . . . . . . . . . : 10.0.0.2
Primary WINS Server . . . . . . . : 10.0.0.2
Installation Notes:
Install Windows 2000 Advanced Server into the VM. Use the default settings except add the
WINS and DNS server services and configure the IP settings manually. Create the DNS
zone, internal.net before running DCPROMO. Make sure you create both forward and
reverse lookup zones (reverse lookup zone for network ID 10.0.0./24).
CERTSRV:
Services:
No additional network services on installation
IP Configuration:
Windows 2000 IP Configuration
Host Name . . . . . . . . . . . . : CERTSRV
Primary DNS Suffix . . . . . . . : internal.net
DNS Suffix Search List. . . . . . : internal.net
Ethernet adapter Local Area Connection:
IP Address. . . . . . . . . . . . : 10.0.0.3
Subnet Mask . . . . . . . . . . . : 255.255.255.0
Default Gateway . . . . . . . . . : 10.0.0.1
DNS Servers . . . . . . . . . . . : 10.0.0.2
Primary WINS Server . . . . . . . : 10.0.0.2
Installation Notes:
Install Windows 2000 Advanced Server into the VM using the default settings except for the
manual configuration of the IP settings. Join the machine to the internal.net domain.
INTERNAL VPN:
Services:
No additional network services on installation
IP Configuration:
Windows 2000 IP Configuration
Host Name . . . . . . . . . . . . : INTERNALVPN
Primary DNS Suffix . . . . . . . : internal.net
DNS Suffix Search List. . . . . . : internal.net
Ethernet adapter Local Area Connection (internal adapter):
IP Address. . . . . . . . . . . . : 10.0.0.1
Subnet Mask . . . . . . . . . . . : 255.255.255.0
Default Gateway . . . . . . . . . :
DNS Servers . . . . . . . . . . . : 10.0.0.2
Primary WINS Server . . . . . . . : 10.0.0.2
Ethernet adapter Local Area Connection 2 (external adapter):
IP Address. . . . . . . . . . . . : 192.168.1.125
Subnet Mask . . . . . . . . . . . : 255.255.255.0
Default Gateway . . . . . . . . . :
DNS Servers . . . . . . . . . . . :
Installation Notes:
This machine is dual homed. Use default settings during the Windows 2000 Advanced
Server setup in the VM, except for the manual configuration of IP addressing and joining the
domain.
EXTERNAL VPN:
Services:
No additional network services on installation
IP Configuration:
Windows 2000 IP Configuration
Host Name . . . . . . . . . . . . : EXTERNALVPN
Primary DNS Suffix . . . . . . . :
DNS Suffix Search List. . . . . . :
Ethernet adapter Local Area Connection (internal adapter):
IP Address. . . . . . . . . . . . : 172.16.0.1
Subnet Mask . . . . . . . . . . . : 255.240.0.0
Default Gateway . . . . . . . . . :
DNS Servers . . . . . . . . . . . : 172.16.0.2
Primary WINS Server . . . . . . . : 172.16.0.2
Ethernet adapter Local Area Connection 2 (external adapter):
IP Address. . . . . . . . . . . . : 192.168.1.126
Subnet Mask . . . . . . . . . . . : 255.255.255.0
Default Gateway . . . . . . . . . :
DNS Servers . . . . . . . . . . . :
Installation Notes:
This machine is dual homed. Use default settings during the Windows 2000 Advanced
Server setup in the VM, except for the manual configuration of IP addressing and joining the
domain.
EXTERNALSRV:
Services:
All IIS Services
DNS
--Accepts dynamic updates
WINS
IP Configuration:
Windows 2000 IP Configuration
Host Name . . . . . . . . . . . . : EXTERNALSRV
Primary DNS Suffix . . . . . . . :
DNS Suffix Search List. . . . . . :
Ethernet adapter Local Area Connection:
IP Address. . . . . . . . . . . . : 172.16.0.2
Subnet Mask . . . . . . . . . . . : 255.240.0.0
Default Gateway . . . . . . . . . : 172.16.0.1
DNS Servers . . . . . . . . . . . : 172.16.0.2
Primary WINS Server . . . . . . . : 172.16.0.2
Installation Notes:
Install Windows 2000 Advanced Server into the VM using the default settings except for the
manual configuration of the IP settings.
The order of installation should be (from first to last):
CLIENTDC
CERTSRV
INTERNALVPN
EXTERNALVPN
EXTERNALSRV
Installing Certificate Server on the Domain Controller
To test how to obtain a machine certificate from an Active Directory integrated Enterprise
Root Certificate Server, we’ll install Certificate Server on our domain controller,
ISACLIENTDC.
Perform the following steps to install Certificate Server on the domain controller:
Click Start, point to Settings and then click on Control Panel.
Open the Add/Remove Programs applet.
Click the Add/Remove Windows Components button on the left side of the Add/Remove
Programs applet.
In the Windows Components Wizard dialog box, place a checkmark in the Certificate
Services checkbox. You will get a warning dialog box telling you that you cannot rename the
computer or remove or join a domain. Fine. Click Yes, then click Next.
If the machine is a Terminal Server (and it is in this lab), you’ll see the Terminal Services
Setup dialog box. Select the Remote administration mode and click Next.
On the Certification Authority Type page, select the Enterprise root CA option. This option
required Active Directory. This is correct option because we want to be able to use the
Certificates MMC and/or autoenrollment to install a machine certificate on our ISA/VPN
servers. Click Next.
On the CA Identifying Information page, fill in all the fields as seen in the figure below. In
reality, the only field that’s required is the CA name field. The other’s are optional but it’s a
good idea to fill them all in so that you can easily identify the source and purpose of the
Certificate Server. Click Next.
On the Data Storage Location page, accept the defaults for where you want to put the
Certificate database and Certificate Database Log. You have the option to Store
configuration information in a shared folder, but this is not required unless you want other
CAs in your organization to use this information. Click Next.
You will get a warning dialog box informing you that IIS must be stopped before proceeding.
Click OK.
You will be asked for the Windows 2000 CD ROM. Put the Windows 2000 CD ROM into the
drive and click OK.
When the Wizard is complete, click Finish.
The Certificate Server is now installed and can assign machine (computer) certificates. Now
let’s see how to configure Group Policy to autoenroll machines that are members of the
domain.
Configuring Autoenrollment using Group Policy
Perform the following steps to configure domain Group Policy to autoenroll domain members
so that they automatically receive a machine certificate:
Click Start, point to Programs and point to Administrative Tools. Click on Active Directory
Users and Computers.
In the Active Directory Users and Computers console, right click on your domain and click
Properties.
On the domain Properties dialog box, click on the Group Policy tab.
On the Group Policy tab, click on the Default Domain Policy and click Edit.
Expand the Computer Configuration node, then expand the Windows Settings node, then
expand the Security Settings node, and finally expand the Public Key Policies node.
Right click on the Automatic Certificate Request Settings node, point to New and click on
Automatic Certificate Request.
The Welcome to the Automatic Certificate Request Setup Wizard begins. Click Next.
On the Certificate Template page, select the Computer certificate template and click Next.
On the Certificate Authority page, accept the default and click Next.
On the Completing the Automatic Certificate Request Setup page, click Finish.
After you complete the Wizard, the Certificate Server will automatically assign machine
certificates to all machines in the domain. The machines will obtain a certificate during the
next policy refresh, or when you restart the computer. If you don’t want to wait for the
policy refresh or restart the computer, you can use the secedit utility to force a policy
refresh. Just issue the following command at the command prompt:
secedit /refreshpolicy machine_policy /enforce
Confirming Installation of the Machine Certificate
You want to make sure that all the domain members have a machine certificate before you
continue with configuring the VPN. Make sure that you’ve restarted the machine or used the
secedit command, and then perform the following steps to view the certificate.
Click Start and click the Run command.
In the Run dialog box, type mmc in the Open text box and click OK.
Click the Console menu and then click the Add/Remove Snap-in command.
In the Add/Remove Snap-in dialog box, click the Add button.
In the Add Stand-alone Snap-in dialog box, select Certificates and click Add.