Module 4: Writing XML
Bạn đang xem bản rút gọn của tài liệu. Xem và tải ngay bản đầy đủ của tài liệu tại đây (951.28 KB, 52 trang )
Contents
Overview 1
Lesson: Overview of Generating
XML Documents 2
Lesson: Writing XML 6
Lesson: Generating XML with Namespaces 25
Lesson: Controlling XML Format and
Converting XML 32
Review 41
Lab 4.1: Writing XML 43
Module 4: Writing XML
Information in this document, including URL and other Internet Web site references, is subject to
change without notice. Unless otherwise noted, the example companies, organizations, products,
domain names, e-mail addresses, logos, people, places, and events depicted herein are fictitious,
and no association with any real company, organization, product, domain name, e-mail address,
logo, person, place or event is intended or should be inferred. Complying with all applicable
copyright laws is the responsibility of the user. Without limiting the rights under copyright, no part
of this document may be reproduced, stored in or introduced into a retrieval system, or transmitted
in any form or by any means (electronic, mechanical, photocopying, recording, or otherwise), or
for any purpose, without the express written permission of Microsoft Corporation.
Microsoft may have patents, patent applications, trademarks, copyrights, or other intellectual
property rights covering subject matter in this document. Except as expressly provided in any
written license agreement from Microsoft, the furnishing of this document does not give you any
license to these patents, trademarks, copyrights, or other intellectual property.
©2002 Microsoft Corporation. All rights reserved.
Microsoft, MS-DOS, Windows, Windows NT, Win32, Active Directory, ActiveX, BizTalk,
IntelliSense, JScript, Microsoft Press, MSDN, PowerPoint, SQL Server, Visual Basic, Visual C#,
and Visual Studio are either registered trademarks or trademarks of Microsoft Corporation in the
United States and/or other countries.
The names of actual companies and products mentioned herein may be the trademarks of their
respective owners.
Module 4: Writing XML iii
Instructor Notes
After completing this module, students will be able to:
Use the XmlTextWriter class to write well-formed XML.
Generate namespaces for elements and attributes.
Control indentation and other code format characteristics when generating
XML.
Write XML that preserves characters that are normally represented by using
escape characters.
To teach this module, you need the following materials:
Microsoft
®
PowerPoint
®
file 2663A_04.ppt
Code samples file 2663A_04_Code.htm
To prepare to effectively teach this module:
Read the following Microsoft Visual Studio
®
Help topics:
• Writing XML with the XmlWriter
• XmlWriter Class
• Namespace Features within the XmlTextWriter
• XmlConvert Class
Read the entire module.
Complete the practices and the lab.
Practice delivering the demonstrations.
In this module, some of the PowerPoint slides provide hyperlinks that open a
code samples page in the Web browser. The code samples page provides a way
to show and discuss code samples when there is not enough space for the code
on the PowerPoint slide. It also allows students to copy code samples directly
from the browser window and paste them into a development environment. All
of the linked code samples for this module are in a single .htm file.
To open a code sample, click the appropriate hyperlink on the slide. To navigate
between code samples in a particular language, use the table of contents
provided at the top of the code page. Each hyperlink opens a separate instance
the Web browser, so it is a good practice to click Back in Microsoft
Internet Explorer after you view a code sample. This will close the browser
window and return you to the PowerPoint presentation.
Presentation:
45 minutes
Lab:
45 minutes
Required materials
Preparation tasks
Hyperlinked Code
Examples
iv Module 4: Writing XML
How to Teach This Module
This section contains information that will help you to teach this module.
Lesson: Overview of Generating XML Documents
This section describes the instructional methods for teaching each topic in this
lesson.
Briefly discuss why an application might need to generate data in general and
why it might be advantageous to generate that data in XML.
Briefly describe how XmlTextWriter is a descendent of XmlWriter.
The slide for the topic is a process illustration. Here is one way to talk about
this illustration:
1. First, describe how data might be made available to an application by means
of a connection to an OLE DB source or a file, such as a comma-separated
value (CSV) file. If the data originates from an OLE DB source, it will
likely be processed by using Microsoft ADO.NET classes. If the data
originates from a file format, the application will likely use a stream object
as an intermediary.
2. Next, you might discover that the XML that is being sent to your application
contains XML that is not well-formed. For example, a database application
might send XML elements that contain spaces, because the table names
upon which the XML is based also contain spaces. In such cases, you can
use the XmlConvert() method to process known problems in incoming
XML.
3. Now, you can write the XML by using XmlTextWriter.
Lesson: Writing XML
This section describes the instructional methods for teaching each topic in this
lesson.
This demonstration is followed later in the lesson by a code examination.
Briefly show that the application writes XML.
Show the code that creates an XmlTextWriter.
Show the code that writes the XML document root.
Show the code that writes elements.
Show the code that writes attributes.
Show the code that writes processing instructions, comments, and CDATA
sections.
Why Generate XML?
What Is the
XmlTextWriter Class?
The Process of Writing
XML
Demonstration: Writing
XML
How to Create an
XmlTextWriter Ob
ject
How to Write the XML
Document Root
How to Write Elements
How to Write Attributes
How to Write Processing
Instructions, Comments,
and CDATA
Module 4: Writing XML v
Use the debugging environment to show how the code modifies several objects.
This practice allows students to write the XML parts described in the preceding
topics. Provide learners with plenty of time to complete this practice. Offer
plenty of guidance, because the skills practiced here are fundamental.
Lesson: Generating XML With Namespaces
This section describes the instructional methods for teaching each topic in this
lesson.
Briefly summarize the main benefits of using XML namespaces and the
technical problems they are used to solve. Learners should already know this
information, so this topic is a review.
Show the code that generates elements with namespaces.
Show the code that generates attributes with namespaces.
Lesson: Controlling XML Format and Converting XML
This section describes the instructional methods for teaching each topic in this
lesson.
Show the code that sets XML formatting, such as how to indent the XML and
whether a single or a double quotation character is used.
Show the code that controls aspects of generated XML, such as white space and
the use of escape characters in element names.
Show the code that invokes XmlConvert. The main use for this class is to
programmatically fix errors in XML names. You can also use it to convert
strongly typed data into a string type that is suitable for generating XML
content.
Use the custom add-in and watch expressions to show how code converts an
OLE DB data table source to XML.
Code Examination:
Writing XML from a Text
File
Practice: Writing XML
Content and Nodes
Why Create
Components with
Namespaces?
How to Generate
Elements with
Namespaces
How to Generate
Attributes with
Namespaces
How to Set XML
Formattin
g
How to Control Text
Aspects of XML
How to Convert XML
Code Examination:
Writing XML from a
Database
vi Module 4: Writing XML
Customization Information
This section identifies the lab setup requirements for a module and the
configuration changes that occur on student computers during the labs. This
information is provided to assist you in replicating or customizing Training and
Certification courseware.
Lab Setup
There are no lab setup requirements that affect replication or customization.
Lab Results
There are no configuration changes on student computers that affect replication
or customization.
Module 4: Writing XML 1
Overview
Overview of Generating XML Documents
Writing XML
Generating XML with Namespaces
Controlling XML Format and Converting XML
*****************************
ILLEGAL FOR NON
-
TRAINER USE
******************************
Writing Extensible Markup Language (XML) is a task that is central to
developing XML-based applications. In this chapter, you will learn about the
Microsoft
®
.NET Framework classes that you use to generate XML. You will
also learn how to incorporate namespaces as the XML is generated. Finally, you
will learn how to control many format characteristics of generated XML.
After completing this module, you will be able to:
Use the XmlTextWriter class to write well-formed XML.
Generate namespaces for elements and attributes.
Control indentation and other code format characteristics when generating
XML.
Write XML that preserves characters that are normally represented by using
escape characters.
Introduction
Objectives
2 Module 4: Writing XML
Lesson: Overview of Generating XML Documents
Why Generate XML?
What Is the XmlTextWriter Class?
The Process of Writing XML
*****************************
ILLEGAL FOR NON
-
TRAINER USE
******************************
The XmlTextWriter class is an implementation of the XmlWriter class that
provides the application programming interface (API) that writes XML to a file,
stream, or TextWriter.
Typically, you use the XmlTextWriter class to write XML as raw data.
Although you can accomplish this task by using the Document Object Model
(DOM), XmlTextWriter is often preferred because it is more efficient.
After completing this lesson, you will be able to:
Identify development tasks requiring XML writing functionality.
Identify the places in the process of writing XML that can be handled by
using the XmlTextWriter class.
Introduction
Lesson objectives
Module 4: Writing XML 3
Why Generate XML?
To translate data formats into XML
SQL Server database tables
OLE DB data sources
Electronic Data Interchange (EDI)
*****************************
ILLEGAL FOR NON
-
TRAINER USE
******************************
The main reason to generate XML is to encode data in a format that can be
easily decoded, transformed, and shared.
Often the reason to generate XML is to translate data that is formatted in a
language or system other than XML to prepare the data for use in an application
that can use XML. Data formats that might serve as sources for the data from
which you generate XML include:
Microsoft SQL Server
™
database tables
OLE DB data sources
Electronic data interchange (EDI)
Another reason to generate XML is to encode application data, such as the data
for storing session state and user preferences. For example, if you search a
computer running Microsoft Windows
®
XP or Microsoft Office XP for XML
files, you will build a list of files used for data storage by applications.
Introduction
Translating data into
XML
Storin
g application data
4 Module 4: Writing XML
What Is the XmlTextWriter Class?
Writes XML rapidly
Non-cached
Forward-only
XmlTextWriter
derived from XmlWriter
XmlWriter
An abstract base class
<a>
<b></b>
</a>
*****************************
ILLEGAL FOR NON
-
TRAINER USE
******************************
XmlWriter is an abstract base class that defines an interface for writing XML.
The XmlWriter class provides a forward-only, read-only, non-cached way of
generating XML streams. This helps you to build XML documents that
conform to the World Wide Web Consortium (W3C) XML 1.0 (Second
Edition) recommendation, located at
and the
W3C Namespaces in XML recommendation, located at
XmlTextWriter class is derived from XmlWriter. In your application you will
use the XmlTextWriter to implement the functionality of XmlWriter.
The XmlTextWriter class has methods and properties that are defined to:
Specify whether to support namespaces.
Write well-formed XML.
Encode binary bytes as base64 and as BinHex, and write out the resulting
text.
Manage the output, including methods to determine the progress of the
output, by using the WriteState property.
Write multiple documents to one output stream.
Flush or close the output.
Write valid names, qualified names, and name tokens.
Introduction
What the XmlTextWriter
can do
Module 4: Writing XML 5
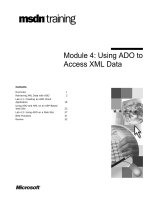
The Process of Writing XML
XmlTextWriter
write XML
CSV file
ADO.NET
XmlConvert object
fix any errors of form in the XML
3.9945256tea infuser
7.9911234coffee mug
PriceS K UProduct Name
Before Conversion After Conversion
<Product name> <Product></Product>
<S K U> <SKU></SKU>
<Price> <Price></Price>
<List>
<ProductName>coffee mug</ProductName>
<SKU>11234</SKU>
<Price>7.99</Price>
<ProductName>tea infuser</ProductName>
<SKU>45256</SKU>
<Price>3.99</Price>
</List>
OLE DB
Stream
*****************************
ILLEGAL FOR NON
-
TRAINER USE
******************************
Applications that write XML often get their data from sources that are external
to the application. Although the data source for such an application might
attempt to provide the data in well-formed XML, errors can still occur and be
sent along to the application. The application must have a way, prior to writing
any XML of its own, to ensure that any XML it consumes is well-formed.
For example, the data that is written by an application in XML format might
begin as a database table or a string of comma separated value (CSV) text. A
database table might be translated into XML by an application that uses
ADO.NET functionality. Sometimes database tables have spaces in the names.
These spaces might be converted directly into an XML element name, creating
XML that is not well-formed.
Since the XmlTextWriter class simply writes XML without performing any
checks to determine whether the XML being generated is well-formed, any
errors in the XML that the text writer receives will simply be written.
Therefore, if your code instructs XmlTextWriter to generate XML, there is no
internal check to prevent:
Errors that can result from the use of illegal characters in element and
attribute names. The XmlWriter class cannot write an element whose name
contains a space character, for example.
Unicode characters that do not fit the specified encoding. If the Unicode
characters do not fit the specified encoding, the XmlWriter class does not
process the Unicode characters into escape characters.
The existence of duplicate attributes.
To prevent XML errors from propagating through the writing process, you
would use XmlConvert to fix XML error prior to writing by using
XmlTextWriter.
Introduction
6 Module 4: Writing XML
Lesson: Writing XML
Demonstration: Writing XML
How to Create an XmlTextWriter Object
How to Write the XML Document Root
How to Write Elements
How to Write Attributes
How to Write Processing Instructions, Comments,
and CDATA
Code Examination: Writing XML from a Text File
Practice: Writing XML Content and Nodes
*****************************
ILLEGAL FOR NON
-
TRAINER USE
******************************
In this lesson, you will learn how to use the XmlTextWriter class to generate
well-formed XML.
After completing this lesson, you will be able to:
Create an instance of an XmlTextWriter object.
Write an XML document root.
Write elements.
Write attributes.
Write processing instructions, comments, and CDATA sections.
Introduction
Lesson ob
jectives
Module 4: Writing XML 7
Demonstration: Writing XML
The XML Tools add-in shows how to write
XML:
From plain text, such as a comma-
separated value (CSV) file
From an OLE DB data source, such as a
Microsoft Access table
*****************************
ILLEGAL FOR NON
-
TRAINER USE
******************************
This demonstration introduces the XML writing functionality of the XML
Tools add-in. The add-in should already be installed and loaded. If not, see
Appendix A for instructions.
To convert a sample text file into XML
1. In Microsoft Visual Studio
®
.NET, open the file names.csv.
2. On the XML Tools toolbar, click Text to XML.
3. In the Write XML from Text File dialog box, click OK. The resulting
XML file appears in the Output window. Notice that the columns are stored
as attributes and are named Column01, Column02, and so on.
Introduction
Demonstration
8 Module 4: Writing XML
4. On the XML Tools toolbar, click Text to XML.
If the active window is not the Text Editor window or the internal
Web browser, a dialog box appears that allows the user to select the file
from which to read. Select the file names.csv, and then click OK.
5. In the Write XML from Text File dialog box, under Store columns as,
click Elements, and then click OK. The resulting XML file appears in the
Output window. Notice that the columns are stored as elements and are
named Column01, Column02, and so on.
6. In the Text Editor, add a new first row to specify the column names for each
field. Avoid space characters. For example:
FirstName,LastName,Age
7. On the XML Tools toolbar, click Text to XML.
8. In the Text to XML dialog box, select the First Row Contains Field
Names check box, and then click OK. The resulting XML file appears in
the Output window. Notice that the columns now have names other than
Column01, Column02, and so on.
To convert a sample database table into XML by using attributes
1. On the XML Tools toolbar, click OLE DB to XML.
2. In the Write XML from Database dialog box, in the Command Text box,
change the table name from Employees to Employee.
Note
Module 4: Writing XML 9
3. Click Test. What happens?
A message box opens, stating that the input table Employee cannot be
found.
4. Fix the error, and then click Test. What happens? Why?
A message box opens, stating “9 row(s) affected” because the Employees
table contains nine records.
5. Click OK. The resulting XML file appears in the Output window.
To convert a sample database table into XML by using elements
1. On the XML Tools toolbar, click OLE DB to XML.
2. In the Write XML from Database dialog box, in the Command Text box,
change Employees to Suppliers.
3. In the Command Type list, click Table.
4. Under Store columns as, click Elements.
5. Click Test. What happens?
A message box opens, stating “29 row(s) affected” because the Suppliers
table contains 29 records.
6. Click OK. The resulting XML file appears in the Output window.
10 Module 4: Writing XML
How to Create an XmlTextWriter Object
To use the XmlTextWriter constructor set the following:
Parameter to a TextWriter, Stream, or String
Encoding property to ASCII, UTF-7, UTF-8 or Unicode
Formatting property to Indented
' Visual Basic
Dim BookWriter As New XmlTextWriter( _
"\catalog\books.xml", Encoding.UTF7)
BookWriter.Formatting = Formatting.Indented
// Visual C#
XmlTextWriter BookWriter = new XmlTextWriter(
@"\catalog\books.xml", Encoding.UTF7);
BookWriter.Formatting = Formatting.Indented;
' Visual Basic
Dim BookWriter As New XmlTextWriter( _
"\catalog\books.xml", Encoding.UTF7)
BookWriter.Formatting = Formatting.Indented
// Visual C#
XmlTextWriter BookWriter = new XmlTextWriter(
@"\catalog\books.xml", Encoding.UTF7);
BookWriter.Formatting = Formatting.Indented;
*****************************
ILLEGAL FOR NON
-
TRAINER USE
******************************
The XmlTextWriter class is a versatile XML writer. You can use it to write
XML to a file, console, stream, or other output type.
The XmlTextWriter constructor creates an instance of the XmlTextWriter,
which takes a file name, stream, or TextWriter. There is an overloaded method
that takes an additional parameter that defines the encoding type.
The XmlTextWriter class gives you the following encoding options:
ASCII
UTF-7
UTF-8 (this is the default)
Unicode
If you want the output XML file to be automatically indented and new line
characters to be inserted as white space, set the Formatting property to
Indented.
Introduction
Constructo
r
Encoding options
Formattin
g options
Module 4: Writing XML 11
The following example instantiates a new XmlTextWriter by using a string
containing a file name, and specifies UTF-7 encoding. Formatting is set to
Indented, which also preserves automatic white space; for example, new lines
for parent elements.
' Visual Basic
Dim BookWriter As New XmlTextWriter( _
"\catalog\books.xml", Encoding.UTF7)
BookWriter.Formatting = Formatting.Indented
// C#
XmlTextWriter BookWriter = new XmlTextWriter(
@"\catalog\books.xml", Encoding.UTF7);
BookWriter.Formatting = Formatting.Indented;
The following table provides a list of methods that you can use to ensure that
data is well-formed.
Method Description of work done
WriteAttributeString() XmlTextWriter encodes the text content of the attribute
with escaped entities, depending on what it finds.
WriteString() XmlTextWriter encodes special characters with escaped
entities, replacing them with & < > and numeric
character entities when required.
WriteBase64() XmlTextWriter encodes the base64 bytes, which can then
be read by using the ReadBinary() method of the
XmlReader.
Close() Close() checks to see if the XML is an invalid XML
document and throws an InvalidOperationException
if it is.
The XmlTextWriter performs the following additional tasks to ensure
well-formed XML:
Ensures that the XML elements are written in the correct order. For
example, the XmlTextWriter does not let you write an attribute outside of
an element, write a CDATA block inside an attribute, or write multiple root
elements. In addition, it ensures that the <?xml declaration comes first and
that the <!DOCTYPE node comes before the root element.
Ensures that the value and format of the xml:space attribute are correct, and
that its value is acceptable according to the WC3 XML 1.0 (Second Edition)
recommendation, located at
/>space. Valid values for the xml:space attribute are "default" and "preserve".
If the argument is not one of these values, an ArgumentException class is
thrown.
Checks when a string is used as a parameter (for example,
Null==String.Empty and String.Empty) and whether it follows the W3C
rules.
Example
Common methods
How does the
XmlTextWriter ensure
well-formedness?
12 Module 4: Writing XML
How to Write the XML Document Root
A well-formed XML document must have a declaration
and a root element
Use the WriteStartDocument() method and the
WriteEndDocument() method to create the declaration,
also known as the document root
Use the WriteStartElement() method and the
WriteEndElement() method to create the root element
<?xml version="1.0" encoding="utf-7" ?>
<books>
<!-- write other elements here -->
</books>
<?xml version="1.0" encoding="utf-7" ?>
<books>
<!-- write other elements here -->
</books>
Visual Basic Example
C# Example
*****************************
ILLEGAL FOR NON
-
TRAINER USE
******************************
The WriteStartDocument() method starts a new document and writes the
XML declaration with version attribute set to "1.0". The WriteEndDocument()
method closes that document.
When you call the next WriteStartDocument() to start writing the next
document, you can modify the formatting, indentation, and other properties of
the document. The WriteStartDocument() method programmatically
recognizes that an XML document is being written, and applies root-level rules.
If this method is not used, an XML fragment is created and verifies whether the
document is well-formed. Root-level rules are not applied.
Introduction
Module 4: Writing XML 13
Because a well-formed XML document must have a root element, you normally
combine a WriteStartDocument() method call with a WriteStartElement()
method call.
In this example, an XmlTextWriter is created. It writes XML to books.xml and
uses UTF-8 encoding. The written XML will be indented. The root element will
be <books> and the comment holds the space for code that writes any child
elements of the root element
' Visual Basic
Dim BookWriter As New XmlTextWriter( _
"\catalog\books.xml", Encoding.UTF8)
BookWriter.Formatting = Formatting.Indented
BookWriter.WriteStartDocument()
BookWriter.WriteStartElement("books")
' write other elements
BookWriter.WriteEndElement()
BookWriter.WriteEndDocument()
BookWriter.Close()
// C#
XmlTextWriter BookWriter = new XmlTextWriter(
@"\catalog\books.xml", Encoding.UTF8);
BookWriter.Formatting = Formatting.Indented;
BookWriter.WriteStartDocument();
BookWriter.WriteStartElement("books");
// write other elements
BookWriter.WriteEndElement();
BookWriter.WriteEndDocument();
BookWriter.Close();
<!-- XML Output -->
<?xml version="1.0" encoding="utf-8" ?>
<books>
<!-- other elements would appear here -->
</books>
Methods in the XmlWriter usually come in pairs. Similar to the pairing of
WriteStartDocument() with WriteEndDocument() are other pairings such as
WriteStartElement() with WriteEndElement() and WriteStartAttribute()
with WriteEndAttribute(). You use these method pairs to build an XML
document and to allow the creation of complex elements or attributes.
Root element
Example
Method pairs
14 Module 4: Writing XML
How to Write Elements
To write elements that has no children or attributes, use
the WriteElementString() method
To write elements with children or attributes, use the
WriteStartElement() and WriteEndElement() methods
BookWriter.WriteElementString("price", "19.95");
BookWriter.WriteElementString("price", "19.95");
BookWriter.WriteStartElement("book");
BookWriter.WriteElementString("price", "19.95");
BookWriter.WriteEndElement();
BookWriter.WriteStartElement("book");
BookWriter.WriteElementString("price", "19.95");
BookWriter.WriteEndElement();
<price>19.95</price>
<price>19.95</price>
<book>
<price>19.95</price>
</book>
<book>
<price>19.95</price>
</book>
*****************************
ILLEGAL FOR NON
-
TRAINER USE
******************************
You can write an element by using either a single method call or multiple
method calls, depending on whether the element has any child elements or
attributes.
The following code shows how to write an element that has no child elements
or attributes:
' Visual Basic
BookWriter.WriteElementString("price", "19.95")
// C#
BookWriter.WriteElementString("price", "19.95");
<!-- XML Output -->
<price>19.95</price>
The following code shows how to write an element that has a child element:
' Visual Basic
BookWriter.WriteStartElement("book")
BookWriter.WriteElementString("price", "19.95")
BookWriter.WriteEndElement()
// C#
BookWriter.WriteStartElement("book");
BookWriter.WriteElementString("price", "19.95");
BookWriter.WriteEndElement();
<!-- XML Output -->
<book>
<price>19.95</price>
</book>
Introduction
Sin
gle method call
Multiple method calls
Module 4: Writing XML 15
How to Write Attributes
To write attributes in a single step, use
WriteAttributeString()
To write attributes in multiple steps, use
WriteStartAttribute() and WriteEndAttribute()
<book price="19.95" />
<book price="19.95" />
BookWriter.WriteStartElement("book");
BookWriter.WriteAttributeString(
"price", "19.95");
BookWriter.WriteEndElement();
BookWriter.WriteStartElement("book");
BookWriter.WriteAttributeString(
"price", "19.95");
BookWriter.WriteEndElement();
Visual Basic Example C# Example
*****************************
ILLEGAL FOR NON
-
TRAINER USE
******************************
You can use the WriteAttributeString() method in two different ways: to
write attributes and associate them with a user-defined namespace prefix, and to
generate namespace declarations. If you write attributes and the localname
parameter is xmlns, the WriteAttributeString() method is considered to be a
namespace declaration. You will learn how to handle namespaces in the next
lesson.
In the following code example, the WriteAttributeString() method writes
attributes inside an element:
' Visual Basic
BookWriter.WriteStartElement("book")
BookWriter.WriteAttributeString("price", "19.95")
BookWriter.WriteEndElement()
// C#
BookWriter.WriteStartElement("book");
BookWriter.WriteAttributeString("price", "19.95");
BookWriter.WriteEndElement();
<!-- XML Output -->
<book price="19.95" />
Introduction
Example using single
method call
16 Module 4: Writing XML
The WriteStartAttribute() and WriteEndAttribute() methods are similar to
other start and end methods, but deal specifically with the start and end of
attributes. You use the WriteStartAttribute() method to write the start of the
attribute, the WriteString() method to write the attribute value, and the
WriteEndAttribute() method to end the attribute tag. The following code
example shows how to use the WriteStartAttribute(), WriteString(), and
WriteEndAttribute() methods:
' Visual Basic
BookWriter.WriteStartElement("book")
BookWriter.WriteStartAttribute("price", "")
BookWriter.WriteString("19.95")
BookWriter.WriteEndAttribute()
BookWriter.WriteEndElement()
// C#
BookWriter.WriteStartElement("book");
BookWriter.WriteStartAttribute("price", "");
BookWriter.WriteString("19.95");
BookWriter.WriteEndAttribute();
BookWriter.WriteEndElement();
<!-- XML Output -->
<book price="19.95" />
Example using multiple
method calls
Module 4: Writing XML 17
How to Write Processing Instructions, Comments, and CDATA
Writing a processing instruction
Writing a comment
Writing a CDATA section
BookWriter.WriteProcessingInstruction(
"xml-stylesheet", "type='text/xsl' href='style.xsl'");
BookWriter.WriteProcessingInstruction(
"xml-stylesheet", "type='text/xsl' href='style.xsl'");
BookWriter.WriteCData("Prices < $100 are 15% Off!");
BookWriter.WriteCData("Prices < $100 are 15% Off!");
BookWriter.WriteComment("This is a comment");
BookWriter.WriteComment("This is a comment");
*****************************
ILLEGAL FOR NON
-
TRAINER USE
******************************
Some common methods of the XmlWriter class are listed in this topic. For a
complete list of XmlWriter class members, see the XmlWriter Members
topic in the MSDN
®
online documentation.
The WriteProcessingInstruction() method writes a processing instruction with
a space between the name and text, as follows:
' Visual Basic
BookWriter.WriteProcessingInstruction("xml-stylesheet", _
"type='text/xsl' href='books.xsl'")
// C#
BookWriter.WriteProcessingInstruction("xml-stylesheet",
"type='text/xsl' href='books.xsl'");
<!-- XML Output -->
<?xml-stylesheet type='text/xsl' href='books.xsl' ?>
Introduction
How to write a
processin
g instruction
18 Module 4: Writing XML
The WriteComment() method writes a comment containing the specified text,
as follows:
' Visual Basic
BookWriter.WriteComment("This is the comment")
// C#
BookWriter.WriteComment("This is the comment");
<!-- XML Output -->
<!--This is the comment-->
The WriteCData() method writes out a <![CDATA[...]]> block containing the
specified text. The only parameter is the text that you want to place inside the
CDATA block, as follows:
' Visual Basic
BookWriter.WriteCData("Prices < $100 are 15% Off!")
// C#
BookWriter.WriteCData("Prices < $100 are 15% Off!");
<!-- XML Output -->
<![CDATA[Prices < $100 are 15% Off!]]>
How to write a comment
How to write a CDATA
section
Module 4: Writing XML 19
Code Examination: Writing XML from a Text File
This code generates XML from a text file
Highlights
.NET Framework String objects have a
method named Split() that can break a
string into an array of strings
.NET Framework Stream objects have an
internal buffer that can be monitored by
using the debugging tools
*****************************
ILLEGAL FOR NON
-
TRAINER USE
******************************
In this code examination, you will see how the Text to XML functionality in the
XML Tools add-in works. For detailed instructions for debugging an add-in,
see Appendix A.
Solutions are provided for both C# and Visual Basic languages in the following
folders:
install_folder\Democode\Addins\XmlToolsAddinCS\
install_folder\Democode\Addins\XmlToolsAddinVB\
To set breakpoints in the add-in
1. In Microsoft Visual Studio
®
.NET, open one of the solutions for this
demonstration.
2. In the Solution Explorer, right-click the Connect class, and then click
View Code.
3. On the View menu, click Shows Tasks, and then click All.
4. Double-click each TODO task in the following list and set a breakpoint on
the line of code following each comment:
a. TODO: Mod04: instantiate a writer using a memory stream
b. TODO: Mod04: reset column counter
c. TODO: Mod04: write an attribute otherwise write an element
5. On the Debug menu, click Start. A second instance of Visual Studio .NET
starts.
Introduction
Code examination