Windows Server 2008 Inside Out- P7
Bạn đang xem bản rút gọn của tài liệu. Xem và tải ngay bản đầy đủ của tài liệu tại đây (1.42 MB, 50 trang )
Modifying the Registry of a Remote Machine
You can modify the Registry of remote computers without having to log on locally. To
do this, select Connect Network Registry on the File menu in Registry Editor, then
use the Select Computer dialog box to specify the computer with which you want to
work. In most cases, all you must do is type the name of the remote computer and then
click OK. If prompted, you might need to enter the user name and password of a user
account that is authorized to access the remote computer.
After you connect, you get a new icon for the remote computer under your Computer
icon in the left pane of Registry Editor. Double-click this icon to access the physical
root keys on the remote computer (HKEY_LOCAL_MACHINE and HKEY_USERS).
The logical root keys aren’t available because they are either dynamically created or
simply pointers to subsets of information from within HKEY_LOCAL_MACHINE and
HKEY_USERS. You can then edit the computer’s Registry as necessary. When you are
done, you can select Disconnect Network Registry on the File menu and then choose
the computer from which you want to disconnect. Registry Editor then closes the Regis-
try on the remote computer and breaks the connection.
When working with remote computers, you can also load or unload hives as discussed
in “Loading and Unloading Hive Files” on page 270. If you’re wondering why you would
do this, the primary reason is to work with a specifi c hive, such as the hive that points
to Dianne Prescott’s user profi le because she inadvertently changed the display mode to
an invalid setting and can no longer access the computer locally. With her user profi le
data loaded, you could then edit the Registry to correct the problem and then save the
changes so that she can once again log on to the system.
Importing and Exporting Registry Data
Sometimes you might fi nd that it is necessary or useful to copy all or part of the Regis-
try to a fi le. For example, if you’ve installed a service or component that requires exten-
sive confi guration, you might want to use it on another computer without having to go
through the whole confi guration process again. So, instead, you could install the ser-
vice or component baseline on the new computer, then export the application’s Registry
settings from the previous computer, copy them over to the other computer, and then
import the Registry settings so that the service or component is properly confi gured. Of
course, this technique works only if the complete confi guration of the service or compo-
nent is stored in the Registry, but you can probably see how useful being able to import
and export Registry data can be.
By using Registry Editor, it is fairly easy to import and export Registry data. This
includes the entire Registry, branches of data stemming from a particular root key, and
individual subkeys and the values they contain. When you export data, you create a .reg
fi le that contains the designated Registry data. This Registry fi le is a script that can then
be loaded back into the Registry of this or any other computer by importing it.
Working with the Registry 267
Chapter 9
Please purchase PDF Split-Merge on www.verypdf.com to remove this watermark.
Note
Because the Registry script is written as standard text, you could view it and, if necessary,
modify it in any standard text editor as well. Be aware, however, that double-clicking the
.reg fi le launches Registry Editor, which prompts you as to whether you want to import
the data into the Registry. If you are concerned about this, save the data to a fi le with the
.hiv extension because double-clicking fi les with this extension won’t start Registry Edi-
tor. Files with the .hiv extension must be manually imported (or you could simply change
the fi le extension to .reg when it is time to use the data).
To export Registry data, right-click the branch or key you want to export, and then
select Export. You can also right-click the root node for the computer you are working
with, such as Computer for a local computer, to export the entire Registry. Either way,
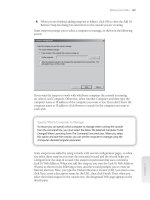
you’ll see the Export Registry File dialog box as shown in Figure 9-8. Use the Save In
selection list to choose a save location for the .reg fi le, and then type a fi le name. The
Export Range panel shows you the selected branch within the Registry that will be
exported. You can change this as necessary or select All to export the entire Registry.
Then click Save to create the .reg fi le.
Figure 9-8 Exporting Registry data to a .reg file so that it can be saved and, if necessary, imported
on this or another computer.
Note
Because the Registry script is written as standard text, you could view it and, if necessary,
modify it in any standard text editor as well. Be aware, however, that double-clicking the
.reg fi le launches Registry Editor, which prompts you as to whether you want to import
the data into the Registry. If you are concerned about this, save the data to a fi le with the
.hiv extension because double-clicking fi les with this extension won’t start Registry Edi-
tor. Files with the .hiv extension must be manually imported (or you could simply change
the fi le extension to .reg when it is time to use the data).
Chapter 9
268 Chapter 9 Managing the Registry
Please purchase PDF Split-Merge on www.verypdf.com to remove this watermark.
Working with the Registry 269
Chapter 9
You can export the entire Registry at the command line by typing regedit /e SaveFile,
where SaveFile is the complete fi le path to the location where you want to save the
copy of the Registry. For example, if you wanted to save a copy of the Registry to C:\
Corpsvr06-regdata.reg, you would type regedit /e C:\corpsvr06-regdata.reg.
You can also extend this technique to rapidly determine the exact Registry values the
operating system modifi es when you make a change to a system or application setting.
Start by opening the application of the System utility you want to work with as well as
a command prompt window. Next, export the Registry prior to making the change you
want to track. Then immediately and without doing anything else, make the change that
you want to track and export the Registry to a different fi le using the command prompt
window you opened previously. Finally, use the fi le comparison tool (fc.exe) to compare
the two fi les. For example, if you saved the original Registry to orig.reg and the changed
Registry to new.reg, you could type the following command at a command prompt to
write the changes to a fi le called changes.txt: fc /u orig.reg new.reg > changes.txt.
When you examine the changes.txt fi le in a text editor, you’ll see a comparison of the
Registry fi les and the exact differences between the fi les.
Importing Registry data adds the contents of the Registry script fi le to the Registry of
the computer you are working with, either creating new keys and values if they don’t
already exist or overwriting keys and values if they do exist. You can import Registry
data in one of two ways. You can double-click the .reg fi le, which starts Registry Editor
and prompts you as to whether you want to import the data. Or you can select Import
on the File menu, then use the Import Registry File dialog box to select and open the
Registry data fi le you want to import.
The export and import processes provide a convenient way to distribute Registry
changes to users. You could, for example, export a subkey with an important confi gura-
tion change and then mail the associated .reg fi le to users so they could import it simply
by double-clicking it. Alternatively, you could copy the .reg fi le to a network share where
users could access and load it. Either way, you have a quick and easy way to distribute
Registry changes. Offi cially, however, distributing Registry changes in this manner is
frowned upon because of the potential security problems associated with doing so. The
preferred technique is to distribute Registry changes through Group Policy as discussed
in Part 5.
SIDE OUT
Want to export the entire Registry quickly?
You can export the entire Registry at the command line by typing regedit /e SaveFile,
where SaveFile is the complete fi le path to the location where you want to save the
copy of the Registry. For example, if you wanted to save a copy of the Registry to C:\
Corpsvr06-regdata.reg, you would type regedit /e C:\corpsvr06-regdata.reg.
You can also extend this technique to rapidly determine the exact Registry values the
operating system modifi es when you make a change to a system or application setting.
Start by opening the application of the System utility you want to work with as well as
a command prompt window. Next, export the Registry prior to making the change you
want to track. Then immediately and without doing anything else, make the change that
you want to track and export the Registry to a different fi le using the command prompt
window you opened previously. Finally, use the fi le comparison tool (fc.exe) to compare
the two fi les. For example, if you saved the original Registry to orig.reg and the changed
Registry to new.reg, you could type the following command at a command prompt to
write the changes to a fi le called changes.txt: fc /u orig.reg new.reg > changes.txt.
When you examine the changes.txt fi le in a text editor, you’ll see a comparison of the
Registry fi les and the exact differences between the fi les.
SIDE OUT
Using export and import processes to distribute
Registry changes
The export and import processes provide a convenient way to distribute Registry
changes to users. You could, for example, export a subkey with an important confi gura-
tion change and then mail the associated .reg fi le to users so they could import it simply
by double-clicking it. Alternatively, you could copy the .reg fi le to a network share where
users could access and load it. Either way, you have a quick and easy way to distribute
Registry changes. Offi cially, however, distributing Registry changes in this manner is
frowned upon because of the potential security problems associated with doing so. The
preferred technique is to distribute Registry changes through Group Policy as discussed
in Part 5.
Please purchase PDF Split-Merge on www.verypdf.com to remove this watermark.
Loading and Unloading Hive Files
Just as you sometimes must import or export Registry data, you’ll sometimes need to
work with individual hive fi les. The most common reason for doing this, as discussed
previously, is when you must modify a user’s profi le to correct an issue that prevents
the user from accessing or using a system. Here, you would load the user’s Ntuser.dat
fi le into Registry Editor and then make the necessary changes. Another reason for
doing this would be to change a particular part of the Registry on a remote system. For
example, if you needed to repair an area of the Registry, you could load the related hive
fi le into the Registry of another machine and then repair the problem on the remote
machine.
Loading and unloading hives affects only HKEY_LOCAL_MACHINE and HKEY_
USERS, and you can perform these actions only when you select one of these root keys.
Rather than replacing the selected root key, the hive you are loading then becomes a
subkey of that root key. HKEY_LOCAL_MACHINE and HKEY_USERS are of course
used to build all the logical root keys used on a system, so you could in fact work with
any area of the Registry.
After you select either HKEY_LOCAL_MACHINE or HKEY_USERS in Registry Editor,
you can load a hive for the current machine or another machine by selecting Load Hive
on the File menu. Registry Editor then prompts you for the location and name of the
previously saved hive fi le. Select the fi le, and then click Open. Afterward, enter a name
for the key under which you want the hive to reside while it is loaded into the current
system’s Registry, and then click OK.
Note
You can’t work with hive fi les that are already being used by the operating system or
another process. You could, however, make a copy of the hive and then work with it.
At the command line, type reg save followed by the abbreviated name of the root key
to save and the fi le name to use for the hive fi le. For example, you could type reg save
hkcu c:\curr-hkcu.hiv to save HKEY_CURRENT_USER to a fi le called Curr-hkcu.hiv on
drive C. Although you can save the logical root keys (HKCC, HKCR, HKCU) in this manner,
you can save only subkeys of HKLM and HKU using this technique.
When you are fi nished working with a hive, you should unload it to clear it out of
memory. Unloading the hive doesn’t save the changes you’ve made—as with any modi-
fi cations to the Registry, your changes are applied automatically without the need to
save them. To unload a hive, select it, and choose Unload Hive on the File menu. When
prompted to confi rm, click Yes.
Note
You can’t work with hive fi les that are already being used by the operating system or
another process. You could, however, make a copy of the hive and then work with it.
At the command line, type reg save followed by the abbreviated name of the root key
to save and the fi le name to use for the hive fi le. For example, you could type reg save
hkcu c:\curr-hkcu.hiv to save HKEY_CURRENT_USER to a fi le called Curr-hkcu.hiv on
drive C. Although you can save the logical root keys (HKCC, HKCR, HKCU) in this manner,
you can save only subkeys of HKLM and HKU using this technique.
Chapter 9
270 Chapter 9 Managing the Registry
Please purchase PDF Split-Merge on www.verypdf.com to remove this watermark.
Working with the Registry from the Command Line
If you want to work with the Registry from the command line, you can do so using the
REG command. REG is run using the permissions of the current user and can be used
to access the Registry on both local and remote systems. As with Registry Editor, you
can work only with HKEY_LOCAL_MACHINE and HKEY_USERS on remote comput-
ers. These keys are, of course, used to build all the logical root keys used on a system,
so you can in fact work with any area of the Registry on a remote computer.
REG has different subcommands for performing various Registry tasks. These com-
mands include the following:
REG ADD
Adds a new subkey or value entry to the Registry
REG COMPARE
Compares Registry subkeys or value entries
REG COPY
Copies a Registry entry to a specifi ed key path on a local or remote
system
REG DELETE
Deletes a subkey or value entries from the Registry
REG EXPORT
Exports Registry data and writes it to a fi le
Note
These fi les have the same format as fi les you export from Registry Editor. Typically, how-
ever, they are saved with the .hiv extension so double-clicking fi les with this extension
won’t start Registry Editor.
REG IMPORT
Imports Registry data and either creates new keys and value entries
or overwrites existing keys and value entries
REG LOAD
Loads a Registry hive fi le
REG QUERY
Lists the value entries under a key and the names of subkeys (if any)
REG RESTORE
Writes saved subkeys and entries back to the Registry
REG SAVE
Saves a copy of specifi ed subkeys and value entries to a fi le
REG UNLOAD
Unloads a Registry hive fi le
You can learn the syntax for using each of these commands by typing reg followed by
the name of the subcommand you want to learn about and then /?. For example, if you
wanted to learn more about REG ADD, you would type reg add /? at the command line.
Note
These fi les have the same format as fi les you export from Registry Editor. Typically, how-
ever, they are saved with the .hiv extension so double-clicking fi les with this extension
won’t start Registry Editor.
Working with the Registry 271
Chapter 9
Please purchase PDF Split-Merge on www.verypdf.com to remove this watermark.
Backing Up and Restoring the Registry
By now it should be pretty clear how important the Registry is and that it should be pro-
tected. I’ll go so far as to say that part of every backup and recovery plan should include
the Registry. Backing up and restoring the Registry normally isn’t done from within
Registry Editor, however. It is handled through the Windows Server Backup utility or
through your preferred third-party backup software. Either way, you have an effective
means to minimize downtime and ensure that the system can be recovered if the Regis-
try becomes corrupted.
You can make a backup of the entire Registry very easily at the command line. Simply
type regedit /e SaveFile, where SaveFile is the complete fi le path to the save location for
the Registry data. Following this, you could save a copy of the Registry to C:\Backups\
Regdata.reg by typing regedit /e c:\backups\regdata.reg. You would then have a com-
plete backup of the Registry.
You can also easily make backups of individual root keys. To do this, you use REG
SAVE. Type reg save followed by the abbreviated name of the root key you want to
save and the fi le name to use. For example, you could type reg save hkcu c:\backups\
hkcu.hiv to save HKEY_CURRENT_USER to a fi le in the C:\Backups directory. Again,
although you can save the logical root keys (HKCC, HKCR, HKCU) in this manner, you
can save only subkeys of HKLM and HKU using this technique.
Okay, so now you have your fast and easy backups of Registry data. What you do not
have, however, is a sure way to recover a system in the event the Registry becomes cor-
rupted and the system cannot be booted. Partly this is because you have no way to boot
the system to get at the Registry data.
In Windows Server 2008, you create a system state backup to help you recover the Reg-
istry and get a system to a bootable state. The system state backup includes essential
system fi les needed to recover the local system as well as Registry data. All computers
have system state data, which must be backed up in addition to other fi les to restore a
complete working system.
Normally, you back up the system state data when you perform a normal (full) backup
of the rest of the data on the system. Thus, if you are performing a full recovery of a
server rather than a repair, you use the complete system backup as well as system state
data to recover the server completely. Techniques for performing full system backups
and recovery are discussed in Chapter 41, “Backup and Recovery.”
That said, you can create separate system state backups. The fastest and easiest way to
do so is to use Wbadmin, the command-line counterpart to Windows Server Backup.
You create a system state backup using Wbadmin by entering the following command
at an elevated command prompt:
wbadmin start systemstatebackup -backuptarget StorageDrive
where StorageDrive is the drive letter for the storage location, such as:
wbadmin start systemstatebackup -backuptarget d:
Chapter 9
272 Chapter 9 Managing the Registry
Please purchase PDF Split-Merge on www.verypdf.com to remove this watermark.
Maintaining the Registry
The Registry is a database, and like any other database it works best when it is opti-
mized. Optimize the Registry by reducing the amount of clutter and information it
contains. This means uninstalling unnecessary system components, services, and
applications. One way to uninstall components, services, and applications is to use
the Uninstall Or Change A Program utility in Control Panel. This utility allows you to
remove Windows components and their related services safely as well as applications
installed using the Windows Installer. In Control Panel, click the Uninstall A Program
link under the Programs heading to access the Uninstall Or Change A Program utility.
Most applications include uninstall utilities that attempt to remove the application, its
data, and its Registry settings safely and effectively as well. Sometimes, however, appli-
cations either do not include an uninstall utility or for one reason or another do not
fully remove their Registry settings, and this is where Registry maintenance utilities
come in handy.
At the Microsoft Download Center on the Web, you’ll fi nd a download package for the
Windows Installer Clean Up Utility. This download package includes several fi les as
well as a helper application called Windows Installer Zapper. The Windows Installer
Clean Up Utility calls Windows Installer Zapper to perform clean up operations on the
Windows Installer confi guration management information. Although not to be used by
novice administrators, you can also work directly with Windows Installer Zapper.
Before you download and work with these utilities, you should refer to Microsoft
Knowledge Base Article 29031 ( This
article also includes a download link for obtaining the installer package. After you
download the installer package, right-click it and then select Run As Administrator. You
can then follow the prompts to install the Clean Up utilities. In the %SystemDrive%\
Program Files\Windows Installer Clean Up folder, you’ll fi nd Windows Installer Clean
Up Utility (msicuu.exe), Windows Installer Zapper (msizap.exe), and a read me fi le
(readme.t xt).
Note
There are two versions of Windows Installer Zapper: MsiZapA.exe is for use in Windows
95, Windows 98, and Windows Me, and MsiZapU.exe is for use in all other versions of
Windows. When you install the Windows Installer Clean Up Utility, the installation pro-
cess installs the correct version automatically and renames the .exe as Msizap.exe.
Both tools are designed to work with programs installed using the Windows Installer
and must be run using an account with Administrator permissions. In addition to being
able to clear out Registry settings for programs you’ve installed and then uninstalled,
you can use these utilities to recover the Registry to the state it was in prior to a failed
Note
There are two versions of Windows Installer Zapper: MsiZapA.exe is for use in Windows
95, Windows 98, and Windows Me, and MsiZapU.exe is for use in all other versions of
Windows. When you install the Windows Installer Clean Up Utility, the installation pro-
cess installs the correct version automatically and renames the .exe as Msizap.exe.
Maintaining the Registry 273
Chapter 9
Please purchase PDF Split-Merge on www.verypdf.com to remove this watermark.
or inadvertently terminated application installation. This works as long as the applica-
tion used the Windows Installer.
Using the Windows Installer Clean Up Utility
Windows Installer Clean Up Utility removes Registry settings for applications that were
installed using the Windows Installer. It is most useful for cleaning up Registry rem-
nants of applications that were partially uninstalled or whose uninstall failed. It is also
useful for cleaning up applications that can’t be uninstalled or reinstalled because of
partial or damaged settings in the Registry. It isn’t, however, intended to be used as an
uninstaller because it won’t clean up the application’s fi les or shortcuts and will make it
necessary to reinstall the application to use it again.
Note
Keep in mind that the profi le of the current user is part of the Registry. Because of this,
the Windows Installer Clean Up Utility will remove user-specifi c installation data from this
profi le. It won’t, however, remove this information from other profi les.
If you’ve already run the installer package, you can start this utility by clicking Start, All
Programs, Windows Installer Clean Up. When the Windows Installer Clean Up Util-
ity dialog box is displayed, select the program or programs to clean up, and then click
Remove. The Windows Installer Clean Up Utility keeps a log fi le to record the applica-
tions that users delete in this manner. The log is stored in the %SystemDrive%\Users\
UserName\AppData\Local \Temp directory and is named Msicuu.log.
Note
The Windows Installer Clean Up Utility is a GUI for the Windows Installer Zapper
discussed in the next section. When you use this utility, it runs the Windows Installer
Clean Up Utility with the /T parameter to delete an application’s Registry entries. It has
an added benefi t because it creates a log fi le, which is not used with Windows Installer
Zapper.
CAUTION
!
The Windows Installer Clean Up Utility is meant to be used as a last resort only. Don’t use
this program if you can uninstall programs by other means.
Note
Keep in mind that the profi le of the current user is part of the Registry. Because of this,
the Windows Installer Clean Up Utility will remove user-specifi c installation data from this
profi le. It won’t, however, remove this information from other profi les.
Note
The Windows Installer Clean Up Utility is a GUI for the Windows Installer Zapper
discussed in the next section. When you use this utility, it runs the Windows Installer
Clean Up Utility with the /T parameter to delete an application’s Registry entries. It has
an added benefi t because it creates a log fi le, which is not used with Windows Installer
Zapper.
CAUTION
!
Chapter 9
274 Chapter 9 Managing the Registry
Please purchase PDF Split-Merge on www.verypdf.com to remove this watermark.
Using the Windows Installer Zapper
The Windows Installer Zapper (Msizap.exe) is an advanced command-line utility for
removing Registry settings for applications that were installed using the Windows
Installer. Like the Windows Installer Clean Up Utility, it can be used to clean up Reg-
istry settings for applications that were partially uninstalled or for which the uninstall
failed, as well as applications that can’t be uninstalled or reinstalled because of partial
or damaged settings in the Registry. Additionally, it can be used to remove Registry
settings related to failed installations or failed rollbacks of installations. It can also be
used to correct failures related to multiple instances of a setup program running simul-
taneously and in cases when a setup program won’t run. Because you can inadvertently
cause serious problems with the operating system, only experienced administrators
should use this utility.
You’ll fi nd the Windows Installer Zapper in the %SystemDrive%\Program Files\Win-
dows Installer Clean Up folder. The complete syntax for the Windows Installer Zapper
is as follows:
msizap [*] [!] [A] [M] [P] [S] [W] [T] [G] [AppToZap]
where
AppToZap
Specifi es an application’s product code or the fi le path to the applica-
tion Windows Installer (.msi) program
*
Deletes all Windows Installer confi guration information on the computer,
including information stored in the Registry and on disk. Must be used with the
ALLPRODUCTS fl ag
!
Turns off warning prompts asking you to confi rm your actions
A
Gives administrators Full Control permissions on the applicable Windows
Installer data so that it can be deleted even if the administrator doesn’t have spe-
cifi c access to the data
M
Deletes Registry information related to managed patches
P
Deletes Registry information related to active installations
S
Deletes Registry information saved for rollback to the previous state
T
Used when you are specifying a specifi c application to clean up
W
Examines all user profi les for data that should be deleted
G
Removes orphaned Windows Installer fi les that have been cached for all users
CAUTION
!
Windows Installer Zapper is meant as a last resort only. Don’t use this program if you can
uninstall programs by other means.
CAUTION
!
Maintaining the Registry 275
Chapter 9
Please purchase PDF Split-Merge on www.verypdf.com to remove this watermark.
Removing Registry Settings for Active Installations That Have Failed
Application installations can fail during installation or after installation. When applica-
tions are being installed, an InProgress key is created in the Registry under the HKLM\
SOFTWARE\Microsoft\Windows\CurrentVersion\Installer subkey. In cases when
installation fails, the system might not be able to edit or remove this key, which could
cause the application’s setup program to fail the next time you try to run it. Running
Windows Installer Zapper with the P parameter clears out the InProgress key, which
should allow you to run the application’s setup program.
After installation, applications rely on their Registry settings to confi gure themselves
properly. If these settings become damaged or the installation becomes damaged, the
application won’t run. Some programs have a repair utility that can be accessed simply
by rerunning the installation. During the repair process, the Windows Installer might
attempt to write changes to the Registry to repair the installation or roll it back to get
back to the original state. If this process fails for any reason, the Registry can contain
unwanted settings for the application. Running Windows Installer Zapper with the S
parameter clears out the rollback data for the active installation. Rollback data is stored
in the HKLM\SOFTWARE\Microsoft\Windows\CurrentVersion\Installer\Rollback
key.
Any running installation also has rollback data, so you typically use the P and S param-
eters together. This means you would type msizap ps at an elevated command line.
Removing Partial or Damaged Settings for Individual Applications
When an application can’t be successfully uninstalled you can attempt to clean up its
settings from the Registry using the Windows Installer Zapper. To do this, you need to
know the product code for the application or the full path to the Windows Installer fi le
used to install the application. The installer fi le ends with the .msi extension and usu-
ally is found in one of the application’s installation directories.
You then type msizap t followed by the product code or .msi fi le path. For example, if
the installer fi le path is C:\Apps\KDC\KDC.msi, you would type msizap t c:\apps\
kdc\kdc.msi at the command line to clear out the application’s settings. Because the
current user’s profi le is a part of the Registry, user-specifi c settings for the application
will be removed from this profi le. If you want to clear out these settings for all user pro-
fi les on the system, add the W parameter, such as msizap wt c:\apps\kdc\kdc.msi.
Securing the Registry
The Registry is a critical area of the operating system. It has some limited built-in secu-
rity to reduce the risk of settings being inadvertently changed or deleted. Additionally,
some areas of the Registry are available only to certain users. For example, HKLM\
SAM and HKLM\SECURITY are available only to the LocalSystem user. This security
in some cases might not be enough, however, to prevent unauthorized access to the
Chapter 9
276 Chapter 9 Managing the Registry
Please purchase PDF Split-Merge on www.verypdf.com to remove this watermark.
Registry. Because of this, you might want to set tighter access controls than the default
permissions, and you can do this from within the Registry. You can also control remote
access to the Registry and confi gure access auditing.
Preventing Access to the Registry Utilities
One of the best ways to protect the Registry from unauthorized access is to make it so
users can’t access the Registry in the fi rst place. For a server, this means tightly con-
trolling physical security and allowing only administrators the right to log on locally.
For other systems or when it isn’t practical to prevent users from logging on locally to
a server, you can confi gure the permissions on Regedit.exe and Reg.exe so that they
are more secure. You could also remove Registry Editor and the REG command from
a system, but this can introduce other problems and make managing the system more
diffi cult, especially if you also prevent remote access to the Registry.
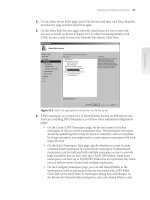
To modify permissions on Registry Editor, access the %SystemRoot% folder, right-click
Regedit.exe, and then select Properties. In the Regedit Properties dialog box, click the
Security tab, as shown in Figure 9-9. Add and remove users and groups as necessary,
then set permissions as appropriate. Permissions work the same as with other types of
fi les. You select an object and then allow or deny specifi c permissions. See Chapter 14,
“File Sharing and Security,” for details.
Figure 9-9 Tighten controls on Registry Editor to limit access to it.
To modify permissions on the REG command, access the %SystemRoot%\System32
folder, right-click Reg.exe, and then select Properties. In the Reg Properties dialog box,
click the Security tab. As Figure 9-10 shows, this command by default can be used by
users as well as administrators. Add and remove users and groups as necessary, then
set permissions as appropriate.
Securing the Registry 277
Chapter 9
Please purchase PDF Split-Merge on www.verypdf.com to remove this watermark.
Figure 9-10 Reg.exe is designed to be used by users as well as administrators and to be run from
the command line; its permissions reflect this.
Note
I’m not forgetting about Regedt32. It’s only a link to Regedit.exe, so you don’t really
need to set its access permissions. The permissions on Regedit.exe will apply regardless
of whether users attempt to run Regedt32 or Regedit.exe.
Applying Permissions to Registry Keys
Keys within the Registry have access permissions as well. Rather than editing these
permissions directly, I recommend you use an appropriate security template as dis-
cussed in Chapter 36, “Managing Group Policy.” Using the right security template locks
down access to the Registry for you, and you won’t have to worry about making inad-
vertent changes that will prevent systems from booting or applications from running.
That said, you might in some limited situations want to or have to change permissions
on individual keys in the Registry. To do this, start Registry Editor and then navigate to
the key you want to work with. When you fi nd the key, right-click it, and select Permis-
sions, or select the key, then choose Permissions on the Edit menu. This displays a Per-
missions For dialog box similar to the one shown in Figure 9-11. Permissions work the
same as for fi les. You can add and remove users and groups as necessary. You can select
an object and then allow or deny specifi c permissions.
Note
I’m not forgetting about Regedt32. It’s only a link to Regedit.exe, so you don’t really
need to set its access permissions. The permissions on Regedit.exe will apply regardless
of whether users attempt to run Regedt32 or Regedit.exe.
Chapter 9
278 Chapter 9 Managing the Registry
Please purchase PDF Split-Merge on www.verypdf.com to remove this watermark.
Figure 9-11 Use the Permissions For dialog box to set permissions on specific Registry keys.
Many permissions are inherited from higher-level keys and are unavailable. To edit
these permissions, you must access the Advanced Security Settings dialog box by click-
ing the Advanced button. As Figure 9-12 shows, the Advanced Security Settings dialog
box has four tabs:
Permissions
The Inherited From column on the Permissions tab shows from
where the permissions are inherited. Usually, this is the root key for the key
branch you are working with, such as CURRENT_USER. You can use the Add and
Edit buttons on the Permissions tab to set access permissions for individual users
and groups. Table 9-2 shows the individual permissions you can assign.
CAUTION
!
Before you click OK to apply changes, consider whether you should clear the Include
Inheritable Permissions From This Object’s Parent option. If you don’t do this, you’ll
change permissions on the selected key and all its subkeys.
Auditing
Allows you to confi gure auditing for the selected key. The actions you
can audit are the same as the permissions listed in Table 9-2. See “Registry Root
Keys” on page 251.
CAUTION
!
Securing the Registry 279
Chapter 9
Please purchase PDF Split-Merge on www.verypdf.com to remove this watermark.
Owner
Shows the current owner of the selected key and allows you to reassign
ownership. By default, only the selected key is affected, but if you want the change
to apply to all subkeys of the currently selected key, choose Replace Owner On
Subcontainers And Objects.
CAUTION
!
Be sure you understand the implications of taking ownership of Registry keys. Changing
ownership could inadvertently prevent the operating system or other users from running
applications, services, or application components.
Effective Permissions
Lets you see which permissions would be given to a partic-
ular user or group based on the current settings. This is helpful because permis-
sion changes you make on the Permissions tab aren’t applied until you click OK
or Apply.
Figure 9-12 Use the Advanced Security Settings dialog box to change the way permissions
are inherited or set and to view auditing settings, ownership, and effective permissions.
CU O
!
Chapter 9
280 Chapter 9 Managing the Registry
Please purchase PDF Split-Merge on www.verypdf.com to remove this watermark.
Table 9-2 Registry Permissions and Their Meanings
Permission Meaning
Full Control Allows user or group to perform any of the actions related to any
other permission
Query Value Allows querying the Registry for a subkey value
Set Value Allows creating new values or modifying existing values below the
specifi ed key
Create Subkey Allows creating a new subkey below the specifi ed key
Enumerate Subkeys Allows getting a list of all subkeys of a particular key
Notify Allows registering a callback function that is triggered when the
select value changes
Create Link Allows creating a link to a specifi ed key
Delete Allows deleting a key or value
Write DAC Allows writing access controls on the specifi ed key
Write Owner Allows taking ownership of the specifi ed key
Read Control Allows reading the discretionary access control list (DACL) for the
specifi ed key
Controlling Remote Registry Access
Hackers and unauthorized users can attempt to access a system’s Registry remotely
just like you do. If you want to be sure they are kept out of the Registry, you can prevent
remote Registry access. One way remote access to a system’s Registry can be controlled
is through the Registry key HKLM\SYSTEM\CurrentControlSet\Control\SecurePipe-
Servers\Winreg. If you want to limit remote access to the Registry, you can start by
changing the permissions on this key.
If this key exists, then the following occurs:
1. Windows Server 2008 uses the permissions on the key to determine who can
access the Registry remotely, and by default any authenticated user can do so. In
fact, authenticated users have Query Value, Enumerate Subkeys, Notify, and Read
Control permissions on this key.
2. Windows Server 2008 then uses the permissions on the keys to determine access
to individual keys.
If this key doesn’t exist, Windows Server 2008 allows all users to access the Registry
remotely and uses the permissions on the keys only to determine which keys can be
accessed.
Securing the Registry 281
Chapter 9
Please purchase PDF Split-Merge on www.verypdf.com to remove this watermark.
Some services require remote access to the Registry to function correctly. This includes
the Directory Replicator service and the Spooler service. If you restrict remote access to
the Registry, you must bypass the access restrictions. Either add the account name of the
service to the access list on the Winreg key or list the keys to which services need access
in the Machine or Users value under the AllowedPaths key. Both values are REG_MULTI_
SZ strings. Paths entered in the Machine value allow machine (LocalSystem) access to
the locations listed. Paths entered in the Users value allow users access to the locations
listed. As long as there are no explicit access restrictions on these keys, remote access is
granted. After you make changes, you must restart the computer so that Registry access
can be reconfi gured on startup.
Windows Vista and Windows Server 2008 disable remote access to all Registry paths
by default. As a result, the only Registry paths remotely accessible are those explicitly
permitted as part of the default confi guration or by an administrator. In Local Security
Policy, you can use Security Options to enable or disable remote Registry access. With
Windows Vista and Windows Server 2008, two new security settings are provided for
this purpose:
Network Access: Remotely Accessible Registry Paths
Network Access: Remotely Accessible Registry Paths And Sub-Paths
These security settings determine which Registry paths and subpaths can be accessed
over the network, regardless of the users or groups listed in the access control list (ACL)
of the Winreg Registry key. A number of default paths are set, and you should not mod-
ify these default paths without carefully considering the damage that changing this set-
ting may cause.
You can follow these steps to access and modify these settings in the Local Security
Policy console:
1. Click Start, click Administrative Tools, and then click Local Security Policy. This
opens the Local Security Policy console.
2. Expand the Local Policies node in the left pane and then select the Security
Options node.
3. In the main pane, you should now see a list of policy settings. Scroll down
through the list of security settings. As appropriate, double-click Network Access:
Remotely Accessible Registry Paths or Network Access: Remotely Accessible
Registry Paths And Sub-Paths.
4. On the Local Policy Setting tab of the Properties dialog box, you’ll see a list of
remotely accessible Registry paths or a list of remotely accessible Registry paths
and subpaths depending on which security setting you are working with. You can
SIDE OUT
Services might need remote access to the Registry
Some services require remote access to the Registry to function correctly. This includes
the Directory Replicator service and the Spooler service. If you restrict remote access to
the Registry, you must bypass the access restrictions. Either add the account name of the
service to the access list on the Winreg key or list the keys to which services need access
in the Machine or Users value under the AllowedPaths key. Both values are REG_MULTI_
SZ strings. Paths entered in the Machine value allow machine (LocalSystem) access to
the locations listed. Paths entered in the Users value allow users access to the locations
listed. As long as there are no explicit access restrictions on these keys, remote access is
granted. After you make changes, you must restart the computer so that Registry access
can be reconfi gured on startup.
Chapter 9
282 Chapter 9 Managing the Registry
Please purchase PDF Split-Merge on www.verypdf.com to remove this watermark.
now add or remove paths or subpaths as necessary. Note that the default settings
are listed on the Explain tab.
Note
Windows Server 2008 has an actual service called Remote Registry service. This service
does in fact control remote access to the Registry. You want to disable this service only
if you are trying to protect isolated systems from unauthorized access, such as when
the system is in a perimeter network and is accessible from the Internet. If you disable
Remote Registry service before starting the Routing and Remote Access service, you can-
not view or change the Routing and Remote Access confi guration. Routing and Remote
Access reads and writes confi guration information to the Registry, and any action that
requires access to confi guration information could cause Routing and Remote Access to
stop functioning. To resolve this, stop the Routing and Remote Access service, start the
Remote Registry service, and then restart the Routing and Remote Access service.
Auditing Registry Access
Access to the Registry can be audited as can access to fi les and other areas of the
operating system. Auditing allows you to track which users access the Registry and
what they’re doing. All the permissions listed previously in Table 9-1 can be audited.
However, you usually limit what you audit to only the essentials to reduce the amount
of data that is written to the security logs and to reduce the resource burden on the
affected server.
Before you can enable auditing of the Registry, you must enable the auditing function
on the system you are working with. You can do this either through the server’s local
policy or through the appropriate Group Policy Object. The policy that controls audit-
ing is Computer Confi guration\Windows Settings\Security Settings\Local Policies\
Audit Policy. For more information on auditing and Group Policy, see Chapter 14 and
Chapter 36, respectively.
After auditing is enabled for a system, you can confi gure how you want auditing to
work for the Registry. This means confi guring auditing for each key you want to track.
Thanks to inheritance, this doesn’t mean you have to go through every key in the
Registry and enable auditing for it. Instead, you can select a root key or any subkey to
designate the start of the branch for which you want to track access and then ensure the
auditing settings are inherited for all subkeys below it (this is the default setting).
Say, for example, you wanted to audit access to HKLM\SAM and its subkeys. To do this,
you would follow these steps:
1. After you locate the key in Registry Editor, right-click it, and select Permissions,
or select the key, then choose Permissions on the Edit menu. This displays the
Permissions For SAM dialog box.
Note
Windows Server 2008 has an actual service called Remote Registry service. This service
does in fact control remote access to the Registry. You want to disable this service only
if you are trying to protect isolated systems from unauthorized access, such as when
the system is in a perimeter network and is accessible from the Internet. If you disable
Remote Registry service before starting the Routing and Remote Access service, you can-
not view or change the Routing and Remote Access confi guration. Routing and Remote
Access reads and writes confi guration information to the Registry, and any action that
requires access to confi guration information could cause Routing and Remote Access to
stop functioning. To resolve this, stop the Routing and Remote Access service, start the
Remote Registry service, and then restart the Routing and Remote Access service.
Securing the Registry 283
Chapter 9
Please purchase PDF Split-Merge on www.verypdf.com to remove this watermark.
2. In the Permissions For SAM dialog box, click the Advanced button.
3. In the Advanced Security Settings dialog box, click the Auditing tab.
4. Click Add to select a user or group whose access you want to track.
5. After you select the user or group, click OK. The Auditing Entry For SAM dialog
box is displayed, as shown in Figure 9-13.
Figure 9-13 Use the Auditing Entry For dialog box to specify the permissions you want to
track.
6. For each permission, select the type of auditing you want to track. If you want to
track successful use of the permission, select the adjacent Successful check box.
If you want to track failed use of the permission, select the adjacent Failed check
box. Click OK to close the dialog box.
7. Repeat Step 6 to audit other users or groups.
8. If you want auditing to apply to subkeys, ensure the Include Inheritable Auditing
Entries From This Object’s Parent check box is selected.
9. Click OK twice.
Chapter 9
284 Chapter 9 Managing the Registry
Please purchase PDF Split-Merge on www.verypdf.com to remove this watermark.
C
ompared to earlier releases of Windows, the processes of installing, confi guring,
running, and maintaining software work differently in Windows Server 2008.
Primarily, this is because of an enhanced security architecture that changes the way
accounts are used and the way applications are installed and run.
Windows Server 2008 has two general types of user accounts, standard user accounts
and administrator user accounts. Standard users can perform any general computing
tasks, such as starting programs, opening documents, and creating folders, and any
support tasks that do not affect other users or the security of the computer. Administra-
tors, on the other hand, have complete access to the computer and can make changes
that affect other users and the security of the computer.
Understanding Software Installation Changes
In Windows Server 2008, software installation, confi guration, and maintenance are
processes that require elevated privileges. As discussed in “Mastering User Account
Control” on page 288, elevation is a feature of User Account Control (UAC). Because
of User Account Control, Windows Server 2008 is able to detect software installation.
When Windows Server 2008 detects a software installation related process, it prompts
for permission or consent prior to allowing you to install, confi gure, or maintain soft-
ware on your computer. This means you must either install software using an account
with administrator privileges or provide administrator permissions when prompted.
It also means administrator privileges are required to perform the following software
maintenance tasks:
Change/update
Repair/reinstall
Uninstall/remove
Windows Server 2008 does not include an Add/Remote Programs utility. Instead,
Windows Server 2008 relies completely on the software itself to provide the necessary
installation features through a related setup program. As discussed in “Maintaining
Application Integrity” on page 294, Windows Server 2008 also provides new architec-
ture for software that fundamentally changes the way software access tokens are used
and the way software programs write to system locations. These changes are so far
Understanding Software Installation Changes . . . . . . . 285
Mastering User Account Control . . . . . . . . . . . . . . . . . . 288
Maintaining Application Integrity . . . . . . . . . . . . . . . . . . 294
CHAPTER 10
Software and User Account Control
Administration
285
Please purchase PDF Split-Merge on www.verypdf.com to remove this watermark.
reaching that software not specifi cally designed to support the new architecture guide-
lines are considered legacy applications. Thus, software is either Windows Server 2008
compliant or it is legacy.
Part of the installation process involves validating your credentials and checking the
software’s compatibility with Windows Server 2008. Most software applications have
a setup program that uses Windows Installer, InstallShield, or Wise Install. The job
of the installer program is to track the installation process and make sure the installa-
tion completes successfully. If the installation fails, the installer is also responsible for
restoring your computer to its original state by reversing all the changes made by the
setup program. Although this works great in theory, you can encounter problems, par-
ticularly when you are installing older programs. Older programs won’t have and won’t
be able to use the features of the latest versions of installer programs, and as a result,
they sometimes are unable to uninstall a program completely.
As a partially uninstalled program can spell disaster for your computer, you should
protect yourself by backing up a server prior to installing any software. By backing up a
server as discussed in Chapter 41, “Backup and Recovery,” you can be sure that you can
fully recover the server to the state it was in prior to installing the software. This way, if
you run into problems, you’ll have an effective recovery strategy.
Before installing any software, you should do the following:
Check to see whether it is compatible with Windows Server 2008. You can deter-
mine compatibility in several ways. You can check the software packaging, which
should specify whether the program is compatible or provide a Windows Server
2008 logo. Alternatively, you can check the software developer’s Web site for a list
of compatible operating systems.
Check the software developer’s Web site for updates for the program. If avail-
able, download the updates prior to installing the software and then install them
immediately after completing the software installation. Some software programs
have automated update processes that you can use to check for updates after
installing the software. In this case, after installation, run the software and then
use the built-in update feature to check for updates.
Diagnosing a problem you are having as a compatibility issue isn’t always easy. For
deeper compatibility issues, you might need to contact the software developer’s tech-
nical support staff. To avoid known compatibility issues with legacy applications,
Windows Server 2008 includes an automated detection feature known as the Program
Compatibility Assistant.
If the Program Compatibility Assistant detects a known compatibility issue when
you run a legacy application, it notifi es you about the problem and provides possible
solutions for resolving the problem automatically. You can then allow the Program
Compatibility Assistant to reconfi gure the application for you. Although the Program
Compatibility Assistant is helpful, it can’t detect or avoid all compatibility issues. You
might have to confi gure compatibility manually. One way to do this is to right-click the
software shortcut, select Properties, and then use the options on the Compatibility tab
to confi gure software compatibility options.
Chapter 10
286 Chapter 10 Software and User Account Control Administration
Please purchase PDF Split-Merge on www.verypdf.com to remove this watermark.