Module 3: Creating Web Parts
Bạn đang xem bản rút gọn của tài liệu. Xem và tải ngay bản đầy đủ của tài liệu tại đây (1.3 MB, 66 trang )
Contents
Overview 1
Creating Web Parts 2
Creating Web Part Content by Using
Office 2000 21
Updating Previously Created Digital
Dashboard Components 29
Testing Web Parts 33
Exploring Advanced Web Part Topics 37
Lab A: Creating Web Parts 47
Review 60
Module 3: Creating Web
Parts
Information in this document is subject to change without notice. The names of companies,
products, people, characters, and/or data mentioned herein are fictitious and are in no way intended
to represent any real individual, company, product, or event, unless otherwise noted. Complying
with all applicable copyright laws is the responsibility of the user. No part of this document may
be reproduced or transmitted in any form or by any means, electronic or mechanical, for any
purpose, without the express written permission of Microsoft Corporation. If, however, your only
means of access is electronic, permission to print one copy is hereby granted.
Microsoft may have patents, patent applications, trademarks, copyrights, or other intellectual
property rights covering subject matter in this document. Except as expressly provided in any
written license agreement from Microsoft, the furnishing of this document does not give you any
license to these patents, trademarks, copyrights, or other intellectual property.
2000 Microsoft Corporation. All rights reserved.
Microsoft, Active Directory, ActiveX, BackOffice, FrontPage, NetMeeting
,
Outlook, PivotTable
,
PowerPoint, Visual Basic, Visual InterDev, Visual Studio, Windows, Windows Media, and
Windows NT are either registered trademarks or trademarks of Microsoft Corporation in the
U.S.A. and/or other countries.
Other product and company names mentioned herein may be the trademarks of their respective
owners.
Project Lead and Instructional Designer: Josh Barnhill
Technical Lead: Chris Howd
Technical Contributor: Howard Crow
Program Manager: Phil Clark
Graphic Artist: Andrea Heuston (Artitudes Layout and Design)
Editing Manager: Lynette Skinner
Editor: Elsa Leavitt
Copy Editor: Kathy Toney (S&T Consulting)
Production Manager: Miracle Davis
Production Coordinator: Jenny Boe
Production Tools Specialist: Julie Challenger
Production Support: Ed Casper (S&T Consulting)
Test Manager: Sid Benavente
Testing Developer: Greg Stemp (S&T OnSite)
Courseware Testing: Testing, Testing 123
Creative Director, Media/Sim Services: David Mahlmann
Web Development Lead: Lisa Pease
CD Build Specialist: David Myka (S&T Consulting)
Manufacturing Manager: Rick Terek
Operations Coordinator: John Williams
Manufacturing Support: Laura King; Kathy Hershey
Lead Product Manager, Release Management: Bo Galford
Lead Product Manager, Knowledge Management Solutions: Janet Wilson
Group Manager, Courseware Infrastructure: David Bramble
Group Product Manager, Content Development: Dean Murray
General Manager: Robert Stewart
Module 3: Creating Web Parts iii
Instructor Notes
This module provides students with the skills necessary to create Web Parts for
digital dashboards.
At the end of this module, students will be able to:
!
Create Web Parts by using both the Web Part Builder add-in to Microsoft
®
Visual InterDev
®
and the digital dashboard customization pages.
!
Create Web Part content that includes the Microsoft Outlook
®
2000 view
control, Microsoft Office Web Components, and data access pages by using
Microsoft Office 2000.
!
Update previously created digital dashboards and information nuggets to
conform to the new Web Part architecture.
!
Test Web Parts by using the Web Part Builder.
!
Describe and use advanced techniques, including the Digital Dashboard
Services Component, to create a more robust digital dashboard.
Materials and Preparation
This section provides you with the required materials and preparation tasks that
are needed to teach this module.
Required Materials
To teach this module, you need the following materials:
!
Microsoft PowerPoint
®
file 2017a_03.ppt
!
Module 3, “Creating Web Parts”
Preparation Tasks
To prepare for this module, you should:
!
Read all of the materials for this module.
!
Read the instructor notes and margin notes for this module.
!
Complete the lab.
Presentation:
45 Minutes
Lab:
75 Minutes
iv Module 3: Creating Web Parts
Module Strategy
Use the following strategy to present this module:
!
Creating Web Parts
Describe how to include content in Web Parts. Introduce using the Web Part
Builder to create Web Parts. Explain how to create a Web Part by modifying
an existing Web Part. Explain how to create a Web Part by including
existing content. Explain how to create a Web Part by including new
content. Explain how to use the digital dashboard customization pages to set
properties for a digital dashboard and for Web Parts.
!
Creating Web Part Content by Using Office 2000
Explain how to create Web Part content by using Microsoft
FrontPage
®
2000. Explain how to incorporate Office Web Components in a
Web Part. Explain how to create a data access page.
!
Updating Previously Created Digital Dashboard Components
Explain how to convert information nuggets to Web Parts. Describe how to
update entire digital dashboards that were created by using the Digital
Dashboard Starter Kit.
!
Testing Web Parts
Explain how to test Web Part logic as part of the storage process. Explain
how to test Web Parts within a Test Environment digital dashboard.
!
Exploring Advanced Web Part Topics
Explain how the Digital Dashboard Services Component functions.
Describe how to isolate Web Parts on a digital dashboard, and explain why
isolating them is useful. Explain how to use token and string replacement.
Explain how to use Web Part frames. Explain how to enable users to
customize Web Parts.
Module 3: Creating Web Parts 1
Overview
!
Creating Web Parts
!
Creating Web Part Content by Using Office 2000
!
Updating Previously Created Digital Dashboard
Components
!
Testing Web Parts
!
Exploring Advanced Web Part Topics
At the end of this module, you will be able to:
!
Create Web Parts by using both the Web Part Builder add-in to Microsoft
®
Visual InterDev
®
and the digital dashboard customization pages.
!
Create Web Part content that includes the Microsoft Outlook
®
2000 view
control, Microsoft Office Web Components, and data access pages by using
Microsoft Office 2000.
!
Update previously created digital dashboards and information nuggets to
comply with the new digital dashboard architecture.
!
Test Web Parts by using the Web Part Builder and a Test Environment
digital dashboard.
!
Describe and use advanced techniques, including using the Digital
Dashboard Services Component, to create a more robust digital dashboard.
Slide Objective
To provide an overview of
the module topics and
objectives.
Lead-in
In this module, you will learn
about creating Web Parts
for digital dashboards.
2 Module 3: Creating Web Parts
#
##
#
Creating Web Parts
!
Including Web Part Content
!
Introduction to Using the Web Part Builder
!
Creating a Web Part by Modifying an Existing Web Part
!
Creating a Web Part by Including Existing Content
!
Creating a Web Part by Including New Content
!
Using the Digital Dashboard Customization Pages
You can build a digital dashboard that uses existing Web Parts by copying Web
Parts from existing digital dashboards into a new digital dashboard folder. Quite
often, however, existing Web Parts will not satisfy user requirements and you
will need to create new Web Parts. You can create new Web Parts by using the
Web Part Builder add-in to Visual InterDev or by using the digital dashboard
customization pages.
It is better to use the Web Part Builder than to use the digital dashboard
customization pages to create Web Parts, unless the Web Parts are very simple.
Regardless of the method that you use to create Web Parts, it is important to
consider whether to include embedded or linked content. The following topic
addresses this decision.
Slide Objective
To outline this topic.
Lead-in
You can build Web Parts by
using the digital dashboard
editing environment or the
Web Part Builder.
Module 3: Creating Web Parts 3
Including Web Part Content
!
Determining Which Type of Content to Include
!
Specifying Linked Content
$
Linked content example
!
Specifying Embedded Content
$
Embedded content example
!
Using the ContentType Property
Before you create a Web Part, you should consider the type of content that you
want to include in the Web Part.
The digital dashboard factory renders Web Parts to display content in the digital
dashboard view. The Web Parts being rendered include their content in one of
two ways:
!
Embedded content. Embedded content includes code written in Hypertext
Markup Language (HTML), Extensible Markup Language (XML),
JavaScript, and Microsoft Visual Basic
®
Scripting Edition (VBScript).
!
Linked content. A Web Part includes linked content by providing a
hyperlink that points to any type of Web-based content in any location.
Determining Which Type of Content to Include
The method that you use to include content in your Web Part depends on the
purpose of the Web Part and on the location and amount of content the Web
Part will display when rendered by the digital dashboard factory.
!
Dynamic information. If you are creating a Web Part that retrieves content
from another source (such as a Web server, a database, or the Internet) or if
you are including content that changes frequently (such as corporate news
and events), use the ContentLink property to establish a hyperlink that
points to the source of the content.
!
Static information. If your Web Part will contain static information, such as
a message or a simple script, embed the content in the Web Part by using
the Content property. You should use embedded content only when the
amount of content is small and easy to manage, because the editing
environment is very limited.
Slide Objective
To present the topics
associated with including
Web Part content.
Lead-in
You can include linked
content or embedded
content in Web Parts.
Explain that the value in the
ContentLink property is a
hyperlink, while the value in
the Content property is
basically equivalent to the
contents of a stand-alone
file (written in HTML, XML,
JavaScript, or VBScript
languages) that is
embedded directly within the
Web Part. If it appears that
the class does not
understand the difference,
present examples of each
type.
4 Module 3: Creating Web Parts
Specifying Linked Content
When you create a Web Part that contains linked content, use the ContentLink
property to add a hyperlink that points to any type of Web content. Types of
content include HTML (which is the default), VBScript, JavaScript, and XML
code. To enable the digital dashboard factory to interpret linked content
correctly, you should use the ContentType property in conjunction with the
ContentLink property.
If the ContentLink property contains a valid hyperlink, any value contained in
the Content property is ignored. That is, the ContentLink property takes
precedence over the Content property. If the value in the ContentLink
property is invalid, or if there is an error when connecting to the site specified
in the ContentLink property, the value in the Content property is used to
display content for the Web Part. It is generally good practice to supply an error
message in the Content property when using the ContentLink property to
include content in a Web Part.
Linked Content Example
Here is an example of the XML code for a Web Part that contains a hyperlink
pointing to content located on the Internet:
<WebPart>
<WebPartID>/LinkedContentPart</WebPartID>
<Title>Linked Content Web Part</Title>
<Description>A Web Part that contains linked content.</Description>
<ContentType>0</ContentType>
<ContentLink></ContentLink>
</WebPart>
To save space, the example code listed above does not include all of the
schema properties. All properties that are not shown were stored with their
default values.
Note
Module 3: Creating Web Parts 5
Specifying Embedded Content
To create a Web Part that contains embedded content, use the Content property
of the Web Part schema. When you use embedded content, all of the content
that the Web Part displays on a digital dashboard is contained as the value in
this property. The Content property can contain HTML, XML, VBScript, or
JavaScript content.
Embedded Content Example
The following example shows the complete XML code for a Web Part that
contains embedded content:
<?xml version="1.0" ?>
- <WebPart><Title>ExampleWebPart</Title>
<Description />
<WebPartID>/ExampleWebPart</WebPartID>
<DashboardID />
- <Content>
- <![CDATA[
<HTML>
<HEAD><TITLE>ExampleWebPart</TITLE></HEAD>
<BODY>
<H3>Web Part containing embedded HTML</H3>
</BODY>
</HTML>
]]>
</Content>
<ContentLink />
<ContentType>0</ContentType>
<IsVisible>1</IsVisible>
<AllowRemove>1</AllowRemove>
<HasFrame>1</HasFrame>
<AllowMinimize>0</AllowMinimize>
<FrameState>0</FrameState>
<RequiresIsolation>0</RequiresIsolation>
<RefreshInterval>0</RefreshInterval>
<CacheBehavior>0</CacheBehavior>
<CacheTimeout>0</CacheTimeout>
<Width />
<Height />
<DetailLink />
<CustomizationLink />
<XSL />
<XSLLink />
<Namespace />
<LastModified>Mon, 24 Apr 2000 21:00:17 GMT</LastModified>
<IsIncluded>1</IsIncluded>
<MasterPartLink />
<PartOrder>0</PartOrder>
<PartStorage />
<Zone>3</Zone>
</WebPart>
Point out where the
embedded content begins
and ends and point out that
some properties require a
value while others do not.
6 Module 3: Creating Web Parts
Using the ContentType Property
If you are using a content type other than HTML, you should use the
ContentType property in conjunction with the ContentLink and Content
properties. This enables the digital dashboard factory to interpret the content
correctly. The following table lists the possible values in the ContentType
property.
Value in schema Value in XML Meaning
0 HTML Content is written in HTML code.
1 VBScript Content is written in VBScript code that runs
on the server.
2 JavaScript Content is written in JavaScript code that runs
on the server.
3 XML Content is written in XML code and should be
transformed by using the XSL property or the
XSLLink property.
Digital dashboard factories
interpret values outside this
range as unknown;
however, if you are creating
a specialized Web Part, you
can extend this list by
creating your own content
types. If you do not specify a
value in this property, the
default value is 0 (HTML).
Module 3: Creating Web Parts 7
Introduction to Using the Web Part Builder
Microsoft Visual Interdev [design]
F
ile Edit View Project Build Debug Tools Window Help
Digital Dashboar d
<HTML>
<HEAD>
<META NAME=“GENERATOR” Content=“Microsoft Visual S
<TITLE></TITLE>
</HEAD>
<BODY>
<P>
<OBJECT classid=clsid:0006F063-0000-0000-C000-000
<PARAM NAME=“View” VALUE=“”>
<PARAM NAME=“Folder” VALUE=“Tasks”>
<PARAM NAME=“Namespace” VALUE=“MAPI”>
<PARAM NAME=“Restriction” VALUE=“”>
<PARAM NAME=“DeferUpdate” VALUE=“0”>
</OBJECT>
</P>
</BODY>
</HTML>
Ready
Ln14 Col5 Ch2 STREAM INS
Project Explorer
OutlookCalendar .htm
Tasks.htm
Dashboard/Web Part Properties
Allow Minimize Yes
Allow Remove Yes
Cache Behavior None
Cache Timeout 0
Content Link
Content Type HTML
Customization Link
Description
Detail Link
Frame State Normal
Has Frame Yes
Height
Is Included Yes
Is Visible Yes
Last Modified Tue, 23
Master Part Link
Namespace
Part Order 0
Part Storage
Refresh Interval 0
Requires Isol ation No
Title Tasks
Width
XSL
XSL Link
Zone CenterDesign Source Quick View
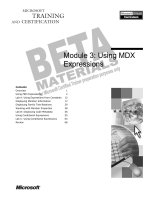
The Web Part Builder add-in to Visual InterDev provides a rich development
environment that you can use to create and test Web Parts and to save Web
Parts to any data store supported by the Digital Dashboard Resource Kit
version 2.0.
The Web Part Builder enables you to create new Web Parts by modifying
existing Web Parts, by linking a Web Part to an existing Web page, or by
creating new content within a Web Part.
The Web Part Builder setup program adds a Digital Dashboard button to the
Visual InterDev standard toolbar. In addition, the setup program enhances the
Visual InterDev Project Explorer pane by providing additional functionality
related to digital dashboards and Web Parts.
Connecting Visual InterDev to a Digital Dashboard Site
Digital dashboard projects are stored locally on a client computer. Digital
dashboard sites are stored on a server within an organization. The Web Part
Builder enables you to connect a digital dashboard project with a digital
dashboard site. This connection provides you with access to existing digital
dashboards, Web Parts, and the Web page resources that are located in the
Dashboard Resources folder on the digital dashboard server. Because the new
digital dashboard project is part of Visual InterDev, the connection can also be
used to create Web Parts based on new content created by using Visual
InterDev.
To connect Visual InterDev to a digital dashboard site:
1. Start Visual InterDev.
2. On the File menu, click New Project.
Slide Objective
To present the Web Part
Builder add-in to Visual
InterDev.
Lead-in
You use the Web Part
Builder to create Web Parts
within Visual InterDev.
8 Module 3: Creating Web Parts
3. In the New Project dialog box, on the New tab, click the Digital
Dashboard icon, and then click Open.
4. In the New Digital Dashboard dialog box, click the Remote Web Server
option, type server_name (where server_name is the name of your digital
dashboard server), and then click OK.
Accessing the Dashboard/Web Part Properties Pane
You can access the Dashboard/Web Part Properties pane by using the Digital
Dashboard button or by using the Project Explorer pane.
Using the Digital Dashboard Button
To access the Dashboard/Web Part Properties pane by using the Digital
Dashboard button:
1. To select a digital dashboard folder or a Web Part file, in the Visual
InterDev Project Explorer pane, click the name of the folder or file.
2. On the Visual InterDev standard toolbar, click the Digital Dashboard
button.
3. Click Hide/Show Properties Window.
Using the Project Explorer Pane
To access the Dashboard/Web Part Properties pane by using the Project
Explorer pane:
1. To select a digital dashboard folder or a Web Part file, in the Visual
InterDev Project Explorer pane, click the name of the folder or file.
2. Right-click the selected item.
3. On the shortcut menu, click either Dashboard Properties or Web Part
Properties, depending on which of the two commands is available.
Using the Dashboard/Web Part Properties Pane
You can use the Dashboard/Web Part Properties pane to display and modify the
properties of both Web Parts and digital dashboards.
Columns in the Dashboard/Web Part Properties Pane
The Dashboard/Web Part Properties pane displays two columns of information.
This pane is very similar to the standard properties pane that is included with
Visual InterDev and the other software development applications found in
Microsoft Visual Studio
®
. The pane includes two columns:
!
Property Name column. The Property Name column (on the left) displays
the name of each property for the selected digital dashboard or Web Part, in
alphabetical order.
Module 3: Creating Web Parts 9
!
Property Value column. The Property Value column (on the right) displays
the current value in each property and either provides a space for you to
type in a new value, or provides a list of available settings from which you
can choose.
The digital dashboard and Web Part schemas define default values for
some properties. When creating a new Web Part or digital dashboard folder,
you will notice that these default values are applied for you.
Selecting Properties in the Dashboard/Web Part Properties Pane
To select a property within the Dashboard/Web Part Properties pane, click in
the Property Name column. If the selected property (for example, the Zone
property) has a discreet number of possible values, a drop-down arrow appears
in the Property Value column, to the right of the existing value. To display a
list of the possible values, click the drop-down arrow. You can click a listed
value to select it.
Docking the Dashboard/Web Part Properties Pane
The Dashboard/Web Part Properties pane can be docked on the rightmost side
of the Visual InterDev application window. To dock a Web Part means to attach
it to the Visual InterDev application window in such a way that it appears to be
an integrated component. This docking simplifies accessing and modifying
digital dashboard and Web Part properties. You should replace the standard
Visual InterDev properties pane with the Dashboard/Web Part Properties pane
when working on a digital dashboard project.
To replace the Properties pane with the Dashboard/Web Part Properties pane:
1. To dock the Dashboard/Web Part Properties pane in a position directly
below the Project Explorer pane, click the title bar of the Dashboard/Web
Part Properties pane, and then use a drag-and-drop operation to move the
Dashboard/Web Part Properties pane to a position directly below the Project
Explorer pane.
During the drop portion of the drag-and-drop operation, the mouse
pointer should be positioned along the bottom edge of the Project Explorer
pane. When the mouse pointer is in the correct location, a gray rectangular
outline will appear, showing where the Dashboard/Web Part Properties pane
will be located when you release the mouse button.
2. To close the Properties pane, on the title bar of the Properties pane, click
Close.
Note
Note
10 Module 3: Creating Web Parts
Accessing Additional Web Part Builder Features by
Using the Digital Dashboard Button
When you click the Digital Dashboard button, seven commands appear in a
menu beneath the button. These commands enable you to access additional
features that will help you create digital dashboards and Web Parts. The
commands are described in the following list:
!
Add Dashboard Folder. This command creates a new digital dashboard
folder within your existing digital dashboard folder hierarchy. (This
command is also available on the shortcut menu if you right-click a digital
dashboard folder.)
!
Add Web Part. This command creates a new Web Part within a digital
dashboard folder. (This command is also available on the shortcut menu if
you right-click a digital dashboard folder.)
!
View Dashboard. This command displays a digital dashboard. (This
command is also available on the shortcut menu if you right-click a digital
dashboard folder.)
!
Copy To. This command copies digital dashboards or Web Parts to another
location on the digital dashboard site. The new location must be compatible
with the Web Distributed Authoring and Versioning (WebDAV) protocol.
!
Import. This command imports an XML-schema–based Web Part (.dwp)
file that is stored in the Windows file system.
Web Part files that have the file extension .dwp (Dashboard Web
Part) are based on the Web Part XML schema. Only Web Part files with the
.dwp file extension can be transported from one physical location to another.
!
Export. This command exports a Web Part file to the Windows file system,
creating an XML-schema−based Web Part (.dwp) file.
!
Digital Dashboard SDK Help. This command displays an online Help
system. The online Help system provides information about the Web Part
schema, the digital dashboard schema, the Web Part and digital dashboard
XML schemas, and the Digital Dashboard Services Component.
You cannot use the Web Part Builder when Visual InterDev is in local
mode. In addition, the following actions might cause Visual InterDev to fail:
!
Frequent refreshes of the Visual InterDev project window
!
Connecting to a local server and to a remote server in the same session
These problems are not caused by the Web Part Builder add-in to Visual
InterDev. You can significantly reduce these problems by installing Service
Pack 3 for Visual InterDev 6.0 before installing the Web Part Builder.
Note
Note
Module 3: Creating Web Parts 11
Creating a Web Part by Modifying an Existing Web Part
!
Copying a Web Part by Using Windows Explorer
!
Editing the Properties of the Web Part
One way to create a Web Part is to modify a similar Web Part that already
exists in a digital dashboard folder on your server.
After you have created a new project in Visual InterDev, you can use the
following procedures to copy an existing Web Part to a different digital
dashboard folder and to edit the properties of the new Web Part.
The Web Part must retain its WebDAV properties during the copy
operation. Before using any application other than Windows Explorer to copy a
Web Part, ensure that the application provides built-in WebDAV support.
Copying a Web Part by Using Windows Explorer
To copy an existing Web Part by using Windows Explorer:
1. On the desktop, double-click the My Computer icon.
2. In the My Computer window, on the toolbar, to open the Folders pane, click
the Folders icon.
3. In the Folders pane, expand the folder hierarchy to show the digital
dashboard (or digital dashboards) that will be used during the copy
operation.
4. Select the Web Part that you want to copy.
5. On the Edit menu, click Copy.
Slide Objective
To list the procedures that
you use to modify an
existing Web Part.
Lead-in
You can create a Web Part
by copying a Web Part and
then editing the properties of
the Web Part.
Note
12 Module 3: Creating Web Parts
6. In the Folders pane, click the digital dashboard folder in which you want to
copy the new Web Part.
7. On the Edit menu, click Paste.
You can also change the name of the Web Part file before closing
Windows Explorer.
Editing the Properties of the Web Part
To edit the properties of the Web Part:
1. To open the Dashboard/Web Part Properties pane, either:
• In the Visual InterDev Project Explorer pane, select the Web Part that
you want to edit. Then, on the Visual InterDev standard toolbar, click
the Digital Dashboard button, and then click the Hide/Show
Properties Window command.
-Or-
• In the Visual InterDev Project Explorer pane, right-click the Web Part,
and then click Web Part Properties.
2. To select and modify properties of the new Web Part, either:
• To position the cursor in the property’s value editor box, in the
Dashboard/Web Part Properties pane, click a Web Part property name,
and then press TAB.
-Or-
• To display the list of property value options, click the down arrow that is
located to the right of the current property value.
3. To modify the Title property of a Web Part, use the digital dashboard
Content in digital_dashboard_name customization page (where
digital_dashboard_name is the name of the digital dashboard) to display the
Web Part properties, and change the text in the Name box.
Note
Module 3: Creating Web Parts 13
Creating a Web Part by Including Existing Content
!
Advantages of Linking to Existing HTML Content
!
Creating a Web Part that Links to an Existing HTML
Page
The Web Part Builder enables you to include a previously created Web page in
a new or existing Web Part. You do this by linking the Web Part to the Web
page by using the ContentLink property.
Advantages of Linking to Existing HTML Content
The ability to include existing HTML content in a Web Part enables you or
someone else in your organization to generate HTML content by using an
industry-standard product, such as Microsoft FrontPage
®
2000. You can then
create a Web Part that includes a link to this content. The person who generates
the HTML content does not have to be working in Visual InterDev and does not
need access to the Web Part Builder toolset.
Relative hyperlinks, such as ..\Resources\PartImage.jpg, do not
function in Web Parts even if the data, an image in this example, is displayed
correctly in Visual InterDev. Document and image-file hyperlinks within
HTML content files must be updated to reflect the complete file-path location
on the server of the linked file.
The digital dashboard factory processes relative links by using the Factory
folder (the folder containing the Factory.asp file) as the relative starting point
for the link, rather than the folder containing the HTML content. You can
modify the HTML code to reflect the Factory folder location as the starting
point for linked content, but it is recommended that you update links to include
the full file path to the linked content instead of using relative links.
Slide Objective
To list the steps that you
use to create a Web Part by
including existing content.
Lead-in
You can create a Web Part
by including a previously
created Web page.
Note
14 Module 3: Creating Web Parts
Creating a Web Part that Links to an Existing HTML Page
After you have created a new digital dashboard project by using Visual
InterDev, you can use the following procedure to create a new Web Part that
uses the ContentLink property to include the content of an existing HTML
page.
To create a Web Part that links to an existing HTML page:
1. In Visual InterDev, in the Project Explorer pane, expand the digital
dashboard hierarchy to display your digital dashboard.
2. In the Project Explorer pane, right-click your digital dashboard folder, and
then, on the shortcut menu, click Add Web Part.
3. In the Add Web Part dialog box, in the Title (required) box, type a name
for the new Web Part, and then click OK.
4. In the Dashboard/Web Part Properties pane, modify the ContentLink
property so that it includes a hyperlink pointing to the existing HTML page.
5. In the Dashboard/Web Part Properties pane, modify any additional Web Part
properties as required to complete the design of your Web Part.
Module 3: Creating Web Parts 15
Creating a Web Part by Including New Content
!
Including Embedded Content in a New Web Part
$
Creating a new Web page and adding embedded
content
!
Including Linked Content in a New Web Part
$
Creating a new Web page and adding linked content
If you need to create new content when creating a Web Part, Visual InterDev
provides a powerful environment in which to work. You can use Visual
InterDev to include embedded or linked content in a new Web Part.
Including Embedded Content in a New Web Part
After you have created a new digital dashboard project by using Visual
InterDev, you can use the following procedure to create a new Web Part that
includes embedded content.
Creating a New Web Part and Adding Embedded Content
To create a new Web page and add content:
1. In Visual InterDev, in the Project Explorer pane, expand the digital
dashboard hierarchy to display your digital dashboard.
2. In the Project Explorer pane, right-click your digital dashboard folder, and
then, on the shortcut menu, click Add Web Part.
3. In the Add Web Part dialog box, in the Title (required) box, type the
name of your new Web Part, and then click OK.
4. Use Visual InterDev to create the HTML code that will be used as
embedded content in the Web Part.
5. To save the embedded HTML code, on the File menu, click Save.
6. In the Dashboard/Web Part Properties pane, modify any additional Web Part
properties as required to complete the design of your Web Part.
Slide Objective
To outline procedures for
creating new Web Parts that
include embedded and
linked content.
Lead-in
You can use Visual InterDev
to create new content for a
Web Part.
16 Module 3: Creating Web Parts
Including Linked Content in a New Web Part
After you have created a new digital dashboard project by using Visual
InterDev, you can use the following procedure to create a new Web Part that
includes linked content.
Creating a New Web Part and Adding Linked Content
To create a new Web page and add linked content:
1. In Visual InterDev, in the Project Explorer pane, expand the digital
dashboard hierarchy to display your digital dashboard.
2. In the Project Explorer pane, right-click your digital dashboard folder, and
then, on the shortcut menu, click Add Web Part.
3. In the Add Web Part dialog box, in the Title (required) box, type the
name of your new Web Part, and then click OK.
4. Use Visual InterDev to create and save an embedded error message that will
be displayed if the hyperlink to the linked content fails.
5. Use the Dashboard/Web Part Properties pane to modify the value of the
ContentLink property of the new Web Part.
Module 3: Creating Web Parts 17
Demonstration: Creating an Inbox Web Part
This demonstration illustrates how to create a common Web Part found on
digital dashboards—the inbox Web Part that uses the Outlook view control.
Creating a new Visual InterDev Project
To create a new Visual InterDev project:
1. Click Start, point to Programs, point to Microsoft Visual InterDev 6.0,
and then click Microsoft Visual InterDev 6.0.
2. If the New Project dialog box appears, select the Don’t show this dialog in
the future check box, and click Cancel.
3. On the File menu, click New Project.
4. In the New Project dialog box, on the New tab, click Digital Dashboard,
and then click Open.
5. In the New Digital Dashboard dialog box, verify that the Local Web
Server option is selected, and then click OK.
Registering the Outlook View Control on the Instructor
Computer
To review how the Outlook view control can be registered on a computer:
1. On the Tools menu, click Customize Toolbox, click the ActiveX Controls
tab, and then click Browse.
2. In the Browse dialog box, in the Look-in list, select the Outlook View
Control folder located at the root of the C drive.
3. In the Files of type list, select All Files (*.*).
4. In the file list, select outlctlx.dll, and then click Open.
5. Verify that the Microsoft Outlook View Control check box is selected, and
then click OK.
Slide Objective
To demonstrate how to
create a common Web Part.
Lead-in
In this demonstration, the
instructor will show you how
to create a Web Part that
uses the Outlook view
control to display the
contents of a personal
inbox.
Explain that the Outlook
view control was registered
on the instructor computer
as part of the classroom
setup process and that this
portion of the demo is
included to show the student
the procedure.
18 Module 3: Creating Web Parts
Creating the Inbox Web Part
To create the inbox Web Part:
1. To display the existing London digital dashboard folder on the digital
dashboard site server, in the Project Explorer pane, expand the London
folder, and then expand the Dashboards and Student Dashboards folders.
2. To open the shortcut menu and add a new Web Part to the London digital
dashboard, right-click the London folder, and then click Add Web Part.
Be sure that you right-click the London digital dashboard folder,
and not the London server folder.
3. In the Add Web Part dialog box, in the Title (required) box, type My
Inbox and then click OK.
4. In the My Inbox.htm design view area, click the Design tab.
5. In the Toolbox pane, click the General button.
6. Use a drag-and-drop operation to copy the OVCtl control into the
My Inbox.htm design view area.
The Outlook view control object will not appear in the design view area.
7. To view the Outlook view control, click the Quick View tab.
Notice that the default settings display the user’s Inbox.
8. On the File menu, click Save
Dashboards\Student Dashboards\London\My Inbox.htm.
9. To open the shortcut menu and view the London digital dashboard, in the
Project Explorer pane, right-click the London digital dashboard, and then
click View Dashboard.
10. If a dialog box appears asking if you want to work offline, click Try Again.
11. To finish this demonstration, close your digital dashboard and Visual
InterDev.
Important
Module 3: Creating Web Parts 19
Using the Digital Dashboard Customization Pages
Content
Layout
Settings
You can use the digital dashboard customization pages to create simple Web
Parts. These customization pages do not include any online Help, and they do
not provide a way to preview or test Web Parts.
The digital dashboard customization pages are included with all digital
dashboards created by using the Digital Dashboard Resource Kit 2.0. The
customization pages enable you to create simple Web Parts from within an
existing digital dashboard. The Web Parts that you create in this manner can be
used within the digital dashboard in which they are created, and they can be
copied to other digital dashboards.
Creating a Web Part from Within a Digital Dashboard
To build a Web Part from within a digital dashboard:
1. On a digital dashboard, on the digital dashboard title bar, click the Content
button.
2. On the Content in “your_digital_dashboard_name” customization page
(where your_digital_dashboard_name is the name of your digital
dashboard), at the bottom of the page, click the Create a new Web Part
hyperlink.
3. On the Settings for “New Part” page, in the Name box, type a name for
the Web Part. This name will be used to set the schema Title property,
which is required.
4. To display additional Web Part property settings, click Show Advanced
Settings.
Slide Objective
To present the digital
dashboard customization
pages.
Lead-in
You can use the digital
dashboard customization
pages to create simple Web
Parts from within an existing
digital dashboard.
20 Module 3: Creating Web Parts
5. Use either the Content or the ContentLink box to specify content for the
Web Part:
• If you want to use embedded content, in the Embedded content box,
specify the content.
-Or-
• If you want to use linked content, in the Get content from the
following link box, specify the Uniform Resource Locator (URL) of the
content that you want to link to.
6. If necessary, set additional properties for the Web Part.
7. To publish the new Web Part to the current digital dashboard folder, click
OK.
8. To return to the digital dashboard, on the content customization page, click
OK.
Module 3: Creating Web Parts 21
#
##
#
Creating Web Part Content by Using Office 2000
!
Using FrontPage 2000
!
Incorporating Office Web Components
!
Creating Data Access Pages by Using Access 2000
Microsoft Office 2000 simplifies the creation of HTML documents for use in
Web Parts. Microsoft Word 2000, Microsoft Excel 2000, Microsoft
FrontPage 2000, Microsoft Access 2000, and the Office Web Components can
all be used to turn personal, team, and corporate data into useful Web Part
content.
For example, Word 2000 allows you to create HTML content by using any
document (including documents that are organized by using a table) that you
want to include in a Web Part. After creating the Word document, you simply
use the Save as Web Page command on the File menu.
Slide Objective
To outline this topic.
Lead-in
You can use applications in
the Office 2000 productivity
suite to create content for
Web Parts.