Purification and cloning of PCR products
Bạn đang xem bản rút gọn của tài liệu. Xem và tải ngay bản đầy đủ của tài liệu tại đây (338.61 KB, 26 trang )
Purification and cloning
of PCR products
6.1 Introduction
Once you have generated a PCR product it must often be cloned to provide
a permanent source of the amplified DNA fragment(s) for future use. This
Chapter outlines methods for purifying PCR products prior to cloning or
direct sequence analysis (Chapter 5), or for use as hybridization probes, and
then describes strategies for cloning PCR products into appropriate vectors.
PCR is a superb technique for the isolation of a target DNA sequence from
either genomic DNA or cDNA in a relatively short time, avoiding many of
the time-consuming aspects of ‘traditional’ gene cloning procedures.
However, once you have your product you will often clone it into a suit-
able vector to provide a ready supply of the DNA without the need to
repeatedly amplify the product from its original source. This will allow you
to use the product for a variety of purposes, either as control DNA in
subsequent experiments or for further detailed investigation.
A critical step in planning a PCR experiment is to consider the vector and
cloning strategy that you will adopt before you design and order the primers
to perform the PCRs. Although, as we will discuss, it is possible to clone any
PCR product, it is most efficient to design the experiment first in order to
optimize primer design and build appropriate features into the primers before
PCR. For example, these may include suitable restriction sites, regulatory
elements such as promoters, or additional nucleotides to encode a peptide
linker or to ensure the reading frame of a coding region is maintained. It is
this ability to tailor make primers with the most appropriate features and thus
to modify the resulting PCR product that makes PCR such a powerful method
compared with traditional ‘cut-and-paste’ experiments based on naturally
occurring restriction enzyme sites. Once the primers have been designed and
the PCR product has been generated you will invest significant time and effort
in cloning and characterizing your amplified DNA. It can be very helpful
to perform your experiments in silico first to ensure correct design features
are considered such as maintenance of open reading frames. An appropriate
software system can be used, such as Vector NTI (Invitrogen; see
where a limited number of tools are available
freely online). Take note of the methods described in Chapter 5 that deal
with verification of the PCR product and make sure that it is the correct one
either before you clone it, or as the first analysis of resulting clones.
6.2 Purification of PCR products
Advantages of purifying PCR products for sequencing or cloning include
removal of:
6
● primers, nucleotides and buffer components;
● nontarget amplification products;
● compounds that may inhibit the ligation reaction.
In addition the concentration of product can be increased.
The major disadvantage is loss of product as no purification procedure
has a 100% recovery rate. Clearly the advantages outweigh the disadvan-
tages and so it is strongly recommended that PCR products are purified
prior to the ligation reaction. There are a range of alternative protocols
for product purification depending upon the efficiency and specificity of
the PCR and the subsequent use for the purified DNA. The following
sections do not attempt to provide a comprehensive list of available
methods and commercial kits but do describe the main approaches and
their principles.
Commercial DNA purification kits
The simplest, most convenient and most reproducible approach is to use a
commercial PCR purification kit. Such kits for purification of PCR-generated
DNA fragments, either from solution or from a gel slice, are available from
most large molecular biology reagent supply companies, and in general
they perform equally well. Most kits are based on the retention of DNA
fragments of greater than around 100 bp on some form of solid support,
such as a silica membrane. Following washing steps to remove dNTPs,
buffer and unincorporated primers, a final elution step allows recovery of
the bound DNA in a reasonably small volume. The benefit of such systems
is that they remove the need for steps such as phenol extractions and
ethanol precipitations and they are relatively quick and easy. For example,
the QIAGEN QIAquick Gel extraction kit, like many commercial kits, is
based on spin-column technology together with absorption of DNA to a
membrane. It can be used for either gel extraction or direct purification of
PCR products. For gel extractions, the PCR products should be size-
fractionated through an agarose gel and the DNA band of interest cut from
the gel in the smallest possible volume of agarose, under UV illumination,
using a fresh razor blade. Remember to take precautions such as wearing
gloves and a face shield to prevent UV irradiation damage. Carefully trim
away as much excess agarose as possible. The gel slice is melted in the
presence of a chaotropic salt such as sodium iodide followed by absorption
to a membrane in a spin column. The bound DNA is then washed,
removing contaminants, followed by elution into a Tris-based buffer. The
same procedure is used for post-PCR clean-up without gel separation. In
this case the contents of the PCR tube are mixed with a high salt solution,
loaded onto the spin column, which is washed to remove dNTPs and
primers, and the PCR products are eluted. The procedure is rapid (~15 min)
and results in highly purified DNA for use in ligation reactions. Other
similar kits are available from a range of molecular biology suppliers.
A benefit of commercial kits is that they generally avoid ethanol precipi-
tation steps, although for small amounts of product elution in the
recommended volume of around 30–50 µl of buffer may lead to samples
being too dilute. However, as they are in water or a low-salt buffer the
112 PCR
sample can usually be concentrated by evaporation for a few minutes in a
spin-vac to achieve the desired concentration.
Ethanol precipitation
Ethanol precipitation can be used as a fairly crude purification tool for
removal of nucleotides and salts, with the added benefit that it also concen-
trates DNA samples. It can remove short oligonucleotides (<15 nucleotides)
but can lead to coprecipitation of the longer oligonucleotides used as
primers in many PCR applications. Several new approaches for recovery of
DNA do not require concentration of DNA by precipitation from ethanol.
The main justification for including some discussion of the method here is
that ethanol precipitation is a simple, cheap and well-tested tool. The DNA
solution is increased in salt concentration and precipitated by addition of
ethanol. Traditionally ethanol precipitation was performed at low temper-
ature, usually by incubating at –20°C or –70°C, however, it is now
recognized that this results in increased precipitation of salt and so
incubation at room temperature or in an ice bucket is now more common.
After collecting the DNA by centrifugation, usually at 13 000 g in a micro-
centrifuge, the pellet is washed in 70% ethanol to remove excess salt before
briefly drying and redissolving in an appropriate buffer such as 10 mM
Tris-HCl (pH 8.0), 1 mM EDTA. Particularly where small quantities of DNA
are being precipitated it can be difficult to see a pellet. In such cases the
microcentrifuge tubes should be placed in the microcentrifuge in a defined
orientation, for example with the hinge upwards, so the position of the
pellet can be identified even if it is not visible. An inert carrier compound
such as glycogen used at 50–150 µg ml
–1
or linear acrylamide used at 10–20
µg ml
–1
such as those from Ambion can be added to increase the size of the
pellet. There are also now colored carriers available. Examples include
Glycoblue, a derivatized glycogen (Ambion) and Pellet Paint™ coprecipi-
tant (Novagen) that is available either in a fluorescent or nonfluorescent
(NF) format. These reagents provide a visual indicator of the presence and
position of an ethanol pellet. The Pellet Paint™ NF reagent is compatible
with preparation of samples for fluorescent sequencing applications involv-
ing dyes such as the BigDye™ terminators where the fluorescent
coprecipitant would interfere with sequence detection.
In-gel ligation
High-purity, low-melting-temperature agarose does not inhibit DNA ligase
activity. Thus, PCR products can be cloned directly after agarose gel electro-
phoresis and without recovery from the agarose. The PCR products should
be size fractionated through a low-melting-temperature agarose gel and the
DNA band of interest cut from the gel as described above. Ideally the final
concentration of agarose should be 0.4% or lower so if, for example, you
used a 4% gel then the agarose can only comprise 0.1 vol. of the ligation
reaction volume. The gel slice should be equilibrated with water in a micro-
centrifuge tube for about 30 min to remove the electrophoresis buffer. The
agarose slice is melted by heating to 50°C. The ligation reaction com-
ponents are set up as for a standard reaction, with the exception of the PCR
Purification and cloning of PCR products 113
product. The appropriate volume of gel, held at 50°C is then pipetted into
the ligation mix held at 37°C, and mixed immediately. This ensures the
agarose does not set on contact with the other reaction components. The
ligation reaction can then be incubated at the desired temperature
(15–37°C). Depending on the temperature at which the ligation reaction is
performed the agarose may partly solidify, but this is not a problem.
Advantages of in-gel ligation are that it is rapid and relatively cheap
(although high-quality agarose is expensive) and DNA loss is avoided. As a
comment on any gel purification procedure, even when well-separated
bands are purified from a gel, there can be some cross-contamination from
other DNA molecules. This makes it important to confirm the identity of
an insert in clones derived from the isolated DNA. If the PCR product is to
be used for direct analysis such as DNA sequencing without cloning, then
any such minor cross-contamination will not be an issue.
Spin columns
An early method of DNA purification used a siliconized glass wool plug and
standard microcentrifuge tubes. The principle of the technique is that the
glass wool physically retains an agarose slice while under centrifugal force
the buffer and DNA are forced out of the gel and can pass through the glass
wool plug. A small plug of siliconized glass wool is placed in the bottom
of a 0.5 ml microcentrifuge tube containing a pin-sized hole in the bottom
to allow liquid to pass through during centrifugation. The gel slice contain-
ing DNA is placed on top of the glass wool cushion and the tube placed
inside a 1.5 ml microcentrifuge tube before centrifugation at 13 000 g for
1–2 min. The liquid in the larger tube should contain DNA from the gel
and can be concentrated by ethanol precipitation if necessary. Once it is
placed in the tip of filter unit the gel slice can be subjected to a freeze–thaw
cycle by placing the unit at –20°C until the gel is frozen and then allow-
ing it to thaw at room temperature. Such a treatment can increase the
recovery of product. This method is cheap and generally reliable although
occasionally agarose components can pass through the glass wool plug. It
is better to use a standard agarose rather than a low-melting-temperature
agarose as the former will be less likely to disintegrate during centrifugation.
Generally this approach has been superseded by commercially available
spin filters such as 0.22 µm Costar® Spin-X® centrifuge tube filters
(Corning Life Sciences). The agarose slice is simply placed in the filter and
centrifuged in a microcentrifuge for 1–2 min. Quantitative recovery of
product depends on the size and amount of DNA being purified, and is
generally more efficient for shorter fragments. In general recovery is usually
less than 50%.
Electroelution
After agarose gel electrophoresis the DNA band is cut from the gel and the
DNA is eluted from the gel slice by means of an electrical current. There are
many approaches to electroelution and we mention only two here. The first
approach does not require special apparatus. The gel slice is placed at one
side of a piece of preboiled (1) dialysis tubing that also contains a small
114 PCR
volume (100–500 µl depending on the gel slice size) of the agarose gel running
buffer. After sealing, the dialysis tube is placed in the gel electrophoresis tank
containing the same buffer as in the tubing and gel slice. The gel slice is
closest to the anode (–) and an electrical current is applied to electrophoretic-
ally elute the DNA from the gel slice so it becomes trapped on the surface of
the dialysis tubing. It is recommended that the elution be allowed to proceed
for 30 min at 50–75 V when using a mini-gel apparatus. DNA elution from
gel slices can be monitored by use of a hand-held UV lamp (365 nm) to
visualize ethidium bromide fluorescence. Often the DNA will accumulate on
the cathode-facing inner surface of the dialysis membrane. It can be released
by reversing the current in the electrophoresis tank for 30–60 s. Alternatively,
following removal of the gel slice, it can be released back into solution by
gentle agitation or pipetting of the solution against the membrane. It can
sometimes be convenient to remove some of the buffer from the dialysis bag
before dislodging the DNA to allow a more concentrated solution to be
recovered. If necessary the DNA can be concentrated by ethanol precipita-
tion (see above). There are also various commercial apparatus for
electroelution, for example from Stratagene and Millipore.
Silica matrix or Geneclean purification
This approach is the basis for most commercial purification kits. It is based
on the observation that DNA could be released from agarose gel slices and
bound to silica particles in the presence of a chaotropic salt (2,3). A gel slice
containing DNA is excised from an agarose gel and allowed to dissolve in
1 ml of 6 M sodium iodide at 55°C. Once dissolved around 10 µl of a silica
fine-particle suspension is added, mixed and incubated with constant but
gentle shaking for 10 min. The silica fines bind the DNA that can be
collected by microcentrifugation followed by washing three times with 70%
ethanol. The pellet is air-dried briefly (about 5 min) and the DNA eluted in
20 µl of water by incubation at 45°C for 1 min. Although this approach
results in good recovery (up to 80%) of DNA from agarose gels it is not
recommended for large DNA fragments (10–15 kbp) as shearing is often
observed. For example, Geneclean can be obtained from Q-biogene.
6.3 Introduction to cloning of PCR products
The success of cloning PCR-generated fragments depends on several factors,
including PCR product purity (Section 6.2), the choice of restriction
enzyme(s), primer design and the plasmid you choose to use as the recipient
vector. Although the cloning of PCR-amplified products can sometimes prove
difficult, new and improved vectors and procedures have been developed to
increase cloning efficiency. The following sections describe factors that
should be considered in order to successfully clone your PCR product and
will outline several ways to increase your PCR cloning efficiency.
PCR re-amplification
Occasionally you will have a low yield of PCR product. To increase the yield
it is possible to re-amplify using PCR. Essentially a small aliquot of the
Purification and cloning of PCR products 115
products of the first PCR is used as template in a second round of PCR using
the same primers and reaction conditions. In this case there is no need to
purify the products of the first PCR before performing the second PCR,
simply use a 1–5 µl aliquot of the first PCR reaction mix as the template
for the second PCR. Of course one potential disadvantage of the increased
number of PCR cycles is the increased possibility of accumulating
PCR-mediated mutations in the final PCR products. Use of ‘proofreading’
DNA polymerases (Chapter 3) reduces, but does not eliminate this
possibility. Generally therefore, PCR re-amplification should be avoided as
a routine procedure to increase product yield. Rather, it is more appropriate
either to increase the amount of template used, or to perform several
identical PCR amplifications using a standard number of cycles (25–30
cycles) and to pool the products. Nonetheless, it may be appropriate to use
a re-amplification step if there is negligible product visible and you suspect,
for example, that either the amount of starting template was very low, or
the reaction has not worked efficiently, perhaps due to some contaminant.
The effect of performing a further PCR would be to use the enriched
template preparation to amplify the product sufficiently to visualize it, or
to dilute out contaminants interfering with the reaction. If products from
re-amplifications or nested PCRs are to be cloned it is important to ensure
that several independent clones are sequenced to identify those containing
the correct sequence and to discard any that may contain a mutation. This
is obviously more difficult for clones whose sequence is not already known
and in such cases may require the sequencing of 10–12 clones to identify
the consensus.
Why can PCR cloning be a problem?
You may have heard that the efficiency of PCR cloning can be low, but
careful experimental design can reduce such difficulties. One important
source of difficulty is the terminal transferase activity of Taq DNA
polymerase that leads to the addition of an additional nucleotide, usually
an A, at the 3′-end of the newly synthesized DNA strand. This non-
template-directed addition leads to PCR products that do not have blunt
ends as expected, but rather have single nucleotide extensions. This
phenomenon explains the inefficiency of blunt-end ligations involving
PCR products. In order to generate blunt-end PCR fragments it is necessary
to treat the DNA with a proofreading enzyme such as the Klenow fragment
of DNA polymerase I, or T4 or T7 DNA polymerase, or a proofreading
thermostable DNA polymerase, in the presence of the four dNTPs (see
Protocol 6.1). This procedure results in the enzyme removing the unpaired
terminal nucleotide, but the presence of the dNTPs means that if the
enzyme removes the next nucleotide this is immediately replaced by its
5′→3′ DNA synthesis activity, leaving a blunt or ‘polished’ end. The
‘terminal A’ issue does not generally occur when a thermostable proof-
reading DNA polymerase is used as these enzymes would remove any
unpaired nucleotide they erroneously added. Several commercial systems
are available for cloning PCR products by exploiting the additional A
added by Taq DNA polymerase.
116 PCR
6.4 Approaches to cloning PCR products
Essentially any cloning vector can be used for cloning a PCR product,
although as with any cloning experiment success is often better with
relatively small vectors (2.5–5 kbp). An increasing range of vectors are avail-
able from molecular biology reagent suppliers that:
● allow cloning of restriction digested PCR products;
● allow efficient blunt-end cloning of proofreading enzyme products;
● exploit the additional A on Taq PCR products (4); or
● utilize topoisomerase-mediated (TOPO) ligation (5) for very rapid (5 min)
cloning reactions;
● exploit the addition of 5′-sequences on primers to allow ligation-
independent cloning or recombinational cloning.
Various approaches for cloning PCR products are outlined below, and the
features of the PCR product and vector are summarized in Table 6.1.
Restriction enzyme cloning
It is common to incorporate restriction enzyme sites into the primers used
to generate the PCR products (6). When the PCR product is digested with
these restriction enzymes the resulting fragment can be ligated with a suit-
ably restricted vector molecule. Often it is convenient to introduce different
restriction enzyme sites at the two ends of the PCR product to allow
directional cloning into the doubly digested vector, with at least one of the
enzymes generating a cohesive or ‘sticky’ end (Table 6.2). This double-digest
strategy can also avoid the need to use alkaline phosphatase to dephos-
phorylate the vector, a step that is necessary to prevent religation of the
vector alone if it is restricted with a single enzyme. The introduction of
restriction sites into the primer is straightforward (Chapter 3) and there are
two approaches. Most commonly the site is added as a 5′-extension to the
PCR primer (Table 6.2), or if there is a sequence within the PCR primer that
differs by only one or two nucleotides from a restriction enzyme site, these
nucleotides can be changed or mutated to generate the new restriction site
within the original sequence. There are some issues that must be consid-
ered when designing such primers. The positioning of the restriction site
in relation to the 5′-end of the primer and the enzyme you choose dictate
the efficiency of digestion and the overall success of your cloning experi-
ment (7). A useful source of information about how many nucleotides to
add to the 5′-end of primers for digestion by different enzymes is given in
an Appendix to the New England Biolabs molecular biology products cata-
logue. It is recommended that between 3 and 10 nucleotides should precede
the restriction enzyme site in order to ensure efficient cleavage of the site
within the terminus of a PCR product (Table 6.2). It is best to err on the
side of caution and add sufficient overhang nucleotides since the cost of
additional nucleotides added to a primer sequence is more effective than
having to adopt some alternative strategy to ensure efficient restriction
enzyme cleavage.
If this issue does prove problematic, one approach that has been reported
to overcome some difficulties with restriction enzyme digestion is to blunt-
Purification and cloning of PCR products 117
Table 6.1
Approaches to cloning PCR products and the vector features necessary for different PCR cloning strategies
Cloning strategy Type of end Sequence of end Vector properties
Taq DNA 3’-dA overhang 5’ANNNNNN......3’ TA vector + ligase
polymerase 3’ANNNNNN......5’ TOPO TA vector
Proofreading DNA Blunt end 5’NNNNNN......3’ Blunt ended vector, e.g. SmaI digested
polymerase 3’NNNNNN......5’ (CCC/GGG) then alkaline phosphatase then
ligase
Added restriction
site (blunt end)
Zero Blunt
Zero Blunt TOPO
Added restriction 5’ or 3’ overhang e.g.
Similarly digested vector
site (cohesive end) EcoRI 5’AATTCNNNN......3’ If single digest, then treat vector with
AAAA3’GNNNN......5’ alkaline phosphatase then ligase
BamHI 5’GATCCNNNN......3’ If double digest, add ligase
AAAA3’GNNNN......5’
PstI AAAA5’GNNNN......3’
3’ACGTCNNNN......5’
Directional TOPO Add the appropriate 5’CACC-target sequence......3’ TOPO activated vector
cloning sequence to the 5’ end 3’GTGG-target sequence......5’
of the sense primer
5’......vector3’
3’......vectorGTGG5
’
Strand invasion of the added sequence by the
complementary vector tail and TOPO ligation.
The other end of the product is joined to the
vector by a blunt end TOPO reaction
Table 6.1
continued
Cloning strategy Type of end Sequence of end Vector properties
Ligation Polynucleotide tail Restricted vector treated with (TdT) and
independent added by Terminal
complementary nucleotide
cloning deoxynucleotidyl
transferase (TdT) 5’GGGGGGGGGGGGG...3’ 5’...3’
5’GGGGGGGGGGG3’...5’ 3’…CCCCCCCCCCCCCC...5’
Ligation Specific sequence added 5’GAC GAC GAC AAG ATX-targetsequence 3’ 5’vector......3’
independent to 5’end of upstream 5’GAC GAC GAC AAG3’AX-targetsequence 5’ 3’vector......CTGCTGCTGTTCT5’
cloning primer
Specific sequence added 5’target sequence-A 5’CC GGG CTT CTC CTC......vector3’
to 5’end of downstream 3’target sequence–TGG CCC GAA GAG GAG5’ 3’......vector5’
primer
Anneal vector and insert, 22
o
C, 5 min
Then treat PCR product
with T4 DNA polymerase
+ dATP
Gateway cloning Add attB sites to PCR
product
Sense strand (attB1) 5’G GGG ACA AGT TTG TAC AAA AAA GCA GGC Recombine with Donor vector containing
T-target sequence 3’ attP1 and attP2 sites. Ensure the reading
Antisense strand (attB2) 5’GGG GAC CAC TTT GTA CAA GAA AGC TGG
frame is maintained as shown for the triplet
GTA-target sequence
codons
Gateway cloning Directional TOPO clone See above Clone into TOPO activated Donor vector so
that attL1 and attL2 sites now flank the insert.
Ensure correct reading frame is maintained
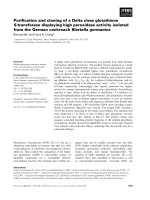
end ligate the PCR products (Figure 6.1) to produce concatamers. For Taq
DNA polymerase-generated products this will require a polishing step to
ensure removal of any overhang nucleotides to create a blunt end (Protocol
6.1). Remember also that the PCR products must be 5′-phosphorylated for
this strategy to work. Since most primers are not usually synthesized in
phosphorylated format, a treatment of the primers before PCR (Protocol 3.1)
or of the PCR product with T4 DNA kinase in the presence of ATP will be
necessary for efficient self-ligation. The latter can also be performed
120 PCR
PCR products with terminal
restriction sites added by
PCR primers
Blunt-end polish then
ligate PCR products
Restriction digestion of
concatamers of PCR
products
Figure 6.1
Concatemerization of blunt-end PCR products to allow efficient restriction
digestion for subsequent cloning via cohesive ends. Restriction enzyme sites are
introduced as part of the PCR primers. The PCR products are first made blunt-
ended (Protocol 6.1) and are then ligated under conditions favoring intermolecular
ligation to form concatemers. This leads to restriction sites being located within
long DNA molecules, allowing efficient restriction enzyme digestion to release
fragments with cohesive ends suitable for ligation into the cloning vector.
Table 6.2
Cleavage efficiency of some commonly used restriction endonu-
cleases. This assay system measures the cleavage rate close to the end of
duplex oligonucleotides. The restriction endonuclease cleavage site is shown
in bold.
Restriction enzyme Oligonucleotide sequence Cleavage efficiency after
2 hour at 37°C
EcoRI GGAATTCC >90%
CGGAATTCCG >90%
XbaICTCTAGAG0%
GCTCTAGAGC >90%
XhoICCTCGAGG0%
CCCTCGAGGG 10%
BamHI CGGATCCG 10%
CGGGATCCCG >90%