Roaming User Profiles in Mixed Environments
Bạn đang xem bản rút gọn của tài liệu. Xem và tải ngay bản đầy đủ của tài liệu tại đây (37.05 KB, 8 trang )
Roaming User Profiles in Mixed Environments
Roaming users move between different computers in a mixed network environment. To
achieve this, you will need to create roaming user profiles, and then enable and configure
profile information for each of the roaming users in your organization. When you enable
roaming and specify a network share for roaming files, some files and folders
automatically roam with the users. This makes the user files available to roaming users,
regardless of the client computer from which the user logs on to the domain. Creating and
enabling a roaming user profile is a two-step procedure:
1. Create and configure a test user profile.
2. Copy the test user profile to a network server.
Note Before enabling roaming user profiles, it is recommended that you consider the
important point of application compatibility. The underlying reason is
straightforward, although, strangely enough, overlooked. The problem is that some
new features and functionality available in newer versions of applications might be
unavailable to users who have earlier versions of the same applications. This, of
course, becomes a source of confusion in networks that use a mix of different
versions of the same application. One such example is Microsoft Outlook 2002,
since some of its features are unavailable to the users of Outlook 2000. Therefore, if
you are using Microsoft Outlook as a mail client, it is recommended that you ensure
that the same version of the application is used in a single area (such as a domain),
or at least perform a centralized upgrade.
To create a test profile for a roaming user on a client computer running Windows 2000,
Windows XP, or Windows Server 2003, follow these steps:
1. Log on as Administrator, open the Administrative Tools applet and click the
Computer Management icon.
2. In the console tree, expand Local Users and Groups, right-click Users and select
the New User command from the right-click menu.
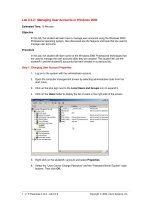
3. When the New User window opens (Fig. 10.10
), type in a name and password for
the user, then clear the User must change password at next logon checkbox.
Click Create, and then click Close.
Figure 10.10: Creating a test user account
4. Quit the Computer Management snap-in and log off the computer.
5. Log on as the test user account that you have just created. A user profile is
automatically created on the local computer in the %SystemDrive%\Documents
and Settings\Username folder (where Username is the name of the new user
account that you have just created).
6. Configure the desktop environment, including appearance, shortcuts, Start menu
options, etc.
7. Log off, and then log on as Administrator.
After creating a test profile, you need to copy it to a network server. To achieve this goal,
proceed as follows:
1. Create an account for the administrative user on the Windows 2000 Server or
Windows Server 2003 PDC (use Active Directory Users and Computers for this
purpose). This user will be the administrator of the user profiles. Also create a
shared directory for storing user profiles, for example: \\Server_name\Profiles.
Within this shared folder, create a user_name folder for each user.
2. Copy the roaming profile that you have created and configured, to the user_name
folder(s) on the network server. To do so, log on as Administrator on the client
workstation, open the User Profiles window (see Fig. 10.8
), select the profile that
you want to configure as roaming from the Profiles stored on this computer list,
and click the Copy To button. In the Copy To dialog (see Fig. 10.9
), click the
Browse button and specify the path using the UNC (Universal Naming
Convention) format (for example: \\Server_name\Profiles\user_name). If the
folder doesn't exist, it will be created.
3. On the Windows 2000 Server or Windows Server 2003 PDC, start the Active
Directory Users and Computers MMS snap-in. In the console tree, expand the
Domain node, and then click the folder where users are located (typically, the
Users folder). In the list of user names, right-click the name of the user whom you
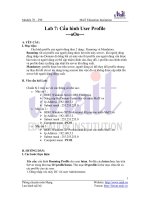
are going to configure for roaming, and then click Properties. Go to the Profile
tab (Fig. 10.11
).
Figure 10.11: Configuring a user profile for roaming
4. For clients running Windows NT, Windows 2000, Windows XP, or Windows
Server 2003, go to the Profile Path field in the User Profile group. Type in the
full path to the user profile folder that you have created for the roaming profile of
that user (for example, \\Server_name\Profiles\user_name. For clients running
Windows 9x/ME, set the Connect radio button and type the full path to the user
folder into the To field.)
5. Logon to the network from the client workstation. From the Start menu, select
Settings | Control Panel, then launch the System applet and go to the User
Profiles tab. The profile type for the user to whom you've assigned the roaming
profile will change to Roaming.
6. Repeat these steps for each user whom you are configuring for roaming. To make
this profile mandatory, rename the Ntuser.dat file as Ntuser.man in the user's
profile folder. Notice, however, that in Windows XP and Windows Server 2003,
mandatory user profiles are supported for backward compatibility only.
Note Starting with Windows 2000, standard access rights to roaming profiles have
changed in comparison to those in Windows NT 4.0. For example, administrators
no longer have Full Control access to all user profiles. Consequently, if an
administrator needs access to the contents of the user profile, he or she will need to
take ownership for the appropriate file system objects (if the user profiles are stored
on the NTFS partition) and also to take ownership for the respective registry hives.
From a security point of view, this is a wise thing to do, because the operation of
taking ownership is an event that can be audited. Also notice that Windows Server
2003 does not support the use of encrypted files with roaming user profiles.
Windows XP and Windows Server 2003 Enhancements to Roaming User Profiles
Windows XP and Windows Server 2003 introduce several enhancements to user settings
management, including more reliable roaming, an improved user profile merge algorithm
and several new group policy settings. Let us consider these enhancements in more detail.
First of all, user profile policies in Windows XP and Windows Server 2003 have their
own node in Group Policy Editor (Fig. 10.12
). Furthermore, there are three new policies.
To view these policies, proceed as follows:
Figure 10.12: User Profile Policies have their own node in Group Policy Editor
1. Click Start, click Run, type mmc, and then click OK.
2. From the File menu, select the Add/Remove Snap-in command, go to the
Standalone tab and click Add.
3. From the Available Standalone Snap-ins list, select the Group Policy option and
then click the Add button. When the Select Group Policy object window opens,
select the Local Computer option to edit the local Group Policy object, or click
Browse to find the Group Policy object that you want.
4. Click Finish, then Close, then OK. The Group Policy snap-in opens the Group
Policy object for editing. Expand the console tree in the left pane of this window
as follows: Computer Configuration | Administrative Templates | System |
User Profiles (Fig. 10.12
).
The three new policies that have been added with Windows XP are the last ones in the
list of the available policies in the right pane of the Group Policy window:
Prevent Roaming Profile Changes From Propagating to the server. As its
name implies, this policy specifies whether the changes made by the users to their
roaming profiles are merged with the copies of their roaming profiles stored on the
server. If you set this policy, the users at login will receive the copies of their
roaming profiles, but the changes they introduce will not be merged with their
roaming profiles.
Add the Administrator security group to the roaming user profile share. As
was aforementioned, starting with Windows 2000, the default permissions for
newly created roaming profiles provide full control permissions for the user and
no access to the Administrators group. If you want to reset this behavior in a way
compatible to Windows NT 4.0, where the Administrators group has full control
of the user's profile directories, you should set this policy.
Do Not Allow users to change profile type. Allows an administrator to control
whether a user is allowed to change their profile type from a Roaming Profile to a
Local profile.
Note Besides new policies, Windows XP and Windows Server 2003 provide other
improvements to roaming profiles management. For example, in Windows 2000
there may be situations in which applications and services keep registry keys open
during logoff. This prevents Windows from unloading the user's registry hive and
saving the user profiles modifications to the server. As a result, such "locked" user
profiles never get unloaded, and take up a large amount of memory on a server that
has many users logging on. If such a profile is marked for deletion at logoff in order
to clean up the disk space on the server, it also never gets deleted. In Windows XP
this problem was not an issue. Now Windows saves the user's registry hive at the
end of the 60-second delay and roams the profile correctly. In contrast to Windows
2000, when the application or service closes the registry key that locks the user
profile, Windows XP and Windows Server 2003 unload the hive and free the
memory consumed by the user profile. In cases where an application or service
never releases the registry key, Windows XP will delete all profiles marked for
deletion at the next reboot.
Non-Roaming Folders and Quotas on Profile Size
The way the users get their profiles depends on the profile type configured for them. Let
us consider this process in more detail. For local profiles the procedure comprises the
following steps:
The user logs on. The operating system checks the list of user profiles located in
HKEY_LOCAL_MACHINE\SOFTWARE\Microsoft\WindowsNT\CurrentVersio
n\ProfileList (Fig. 10.13
) to determine if a local profile exists for the user. If an
entry exists, then this local profile is used. If a local profile is not found, and the
computer is part of a domain, the operating system checks if a domain-wide
default profile exists (it must be located on the domain controller's NETLOGON
share in a folder named Default User). If a default domain-wide user profile exists,
it will be copied to the following subfolder on the local computer:
%SystemDrive%\Documents and Settings\Username. If a default domain-wide
user profile does not exist, then the local default profile is copied from the
%Systemdrive%\Documents and Settings\Default User folder to the
%SystemDrive%\Documents and Settings\Username subfolder on the local
computer.