Practical Database Programming With Visual C#.NET- P11
Bạn đang xem bản rút gọn của tài liệu. Xem và tải ngay bản đầy đủ của tài liệu tại đây (1008.24 KB, 50 trang )
6.8 Insert Data into Oracle Database Using Runtime Objects
523
Let ’ s take a look at these modifi cations to see how they work.
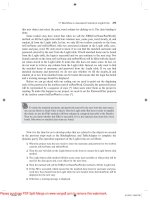
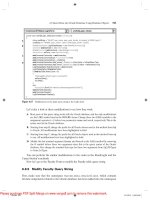
A. Most parts of this query string work with the Oracle database, and the only modifi cations
are the LIKE symbol used in the WHERE clause. Change these two LIKE symbols to the
assignment operator (=:) before two parameters
name
and
word
, respectively. This is the
syntax used in the Oracle database.
B. Starting from step B, change the prefi x for all Oracle classes used in this method from Sql
to Oracle. All modifi cations have been highlighted in bold.
C. Starting from step C, change the prefi x for all Oracle objects used in this method from sql
to ora. All modifi cations have been highlighted in bold.
D. Modify the fi rst nominal argument
@name
and
@word
in the Add() method by removing
the @ symbol before these two arguments since this is the query syntax of the Oracle
database. Also change the nominal data type for these two arguments from
SqlDbType
to
OracleType
.
You can perform the similar modifi cations to the codes in the ReadLogIn and the
Cancel button ’ s methods.
Now let ’ s go to the Faculty Form to modify the Faculty table query string.
6.8.5 Modify Faculty Query String
First, make sure that the namespace
System.Data.OracleClient
, which contains
all data components related to the Oracle database, has been added into the namespace
private void cmdTabLogIn_Click(object sender, EventArgs e)
{
string cmdString = "SELECT user_name, pass_word, faculty_id, student_id FROM LogIn ";
cmdString += "WHERE (user_name=: name ) AND (pass_word=: word)";
OracleDataAdapter LogInDataAdapter = new OracleDataAdapter();
DataTable oraDataTable = new DataTable();
OracleCommand oraCommand = new OracleCommand();
SelectionForm selForm = new SelectionForm();
oraCommand.Connection = oraConnection;
oraCommand.CommandType = CommandType.Text;
oraCommand.CommandText = cmdString;
oraCommand.Parameters.Add("name", OracleType.Char).Value = txtUserName.Text;
oraCommand.Parameters.Add("word", OracleType.Char, 8).Value = txtPassWord.Text;
LogInDataAdapter.SelectCommand = oraCommand;
LogInDataAdapter.Fill(oraDataTable);
if (oraDataTable.Rows.Count > 0)
{
//MessageBox.Show("LogIn is successful");
selForm.Show();
this.Hide();
}
else
MessageBox.Show("No matched username/password found!");
oraDataTable.Dispose();
oraCommand.Dispose();
LogInDataAdapter.Dispose();
}
A
B
C
D
OracleInsertRTObject.LogInForm cmdTabLogIn_Click()
Figure 6.67
Modifi cations to the login query string in the LogIn form.
c06.indd 523c06.indd 523 2/11/2010 11:56:24 AM2/11/2010 11:56:24 AM
Please purchase PDF Split-Merge on www.verypdf.com to remove this watermark.
524
Chapter 6 Data Inserting with Visual C#.NET
area in the code window of the Faculty Form, which is located at the top of this code
window.
Then open the user - defi ned UpdateFaculty() method and change the prefi x of all
data classes from
Sql
to
Oracle
, and the prefi x of all data objects from
sql
to
ora
.
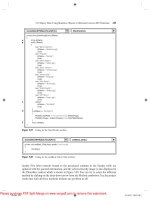
Now open the Select button ’ s Click method by double - clicking on this button from
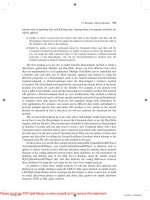
the Faculty Form window, and perform the modifi cations shown in Figure 6.68 to this
method.
Let ’ s take a look at these modifi cations to see how they work.
A. T h e fi rst modifi cation is to the query string. As we did in the last section, most parts of
this query string work for the Oracle database, and the only modifi cation is to change the
statement LIKE, which is in the WHERE clause and located before the dynamic param-
eter @
name
, to the Oracle assignment operator (=:) since this is the query requirement of
the Oracle database. Also remove the @ symbol before the parameter name.
private void cmdSelect_Click(object sender, EventArgs e)
{
string cmdString = "SELECT faculty_id, faculty_name, office, phone, college, title, email FROM Faculty ";
cmdString += "WHERE faculty_name =: name";
OracleDataAdapter FacultyDataAdapter = new OracleDataAdapter();
OracleCommand oraCommand = new OracleCommand();
OracleDataReader oraDataReader;
DataTable oraDataTable = new DataTable();
LogInForm logForm = new LogInForm();
logForm = logForm.getLogInForm();
oraCommand.Connection = logForm.oraConnection;
oraCommand.CommandType = CommandType.Text;
oraCommand.CommandText = cmdString;
oraCommand.Parameters.Add("name", OracleType.Char).Value = ComboName.Text;
string strName = ShowFaculty(ComboName.Text);
if (strName == "No Match")
MessageBox.Show("No Matched Faculty Image found!");
if (ComboMethod.Text == "DataAdapter Method")
{
FacultyDataAdapter.SelectCommand = oraCommand;
FacultyDataAdapter.Fill(oraDataTable);
if (oraDataTable.Rows.Count > 0)
FillFacultyTable(ref oraDataTable);
else
MessageBox.Show("No matched faculty found!");
oraDataTable.Dispose();
FacultyDataAdapter.Dispose();
}
else if (ComboMethod.Text == "DataReade
r Method")
{
oraDataReader = oraCommand.ExecuteReader();
if (oraDataReader.HasRows == true)
FillFacultyReader(oraDataReader);
else
MessageBox.Show("No matched faculty found!");
oraDataReader.Close();
}
else
MessageBox.Show("Invalid Method Selected!");
}
OracleInsertRTObject.FacultyForm cmdSelect_Click()
A
B
C
D
E
Figure 6.68
Modifi cations to the query string in the Faculty form.
c06.indd 524c06.indd 524 2/11/2010 11:56:24 AM2/11/2010 11:56:24 AM
Please purchase PDF Split-Merge on www.verypdf.com to remove this watermark.
6.8 Insert Data into Oracle Database Using Runtime Objects
525
B. Change the prefi x of all Oracle data classes from the
Sql
to the
Oracle
, and change the
prefi x of all data objects from
sql
to
ora
. Steps involved in these modifi cations are B ,
C , and E . All modifi cations have been indicated in bold.
C. Remove the @ symbol before the fi rst argument “
name
” in the Add() method to meet
the needs of the query requirement of the Oracle database. Change the prefi x of the
nominal data type, which is the second argument in the Add() method, from
SqlDbType
to
OracleType
. These modifi cations are also indicated in bold.
Another modifi cation is for the user - defi ned FillFacultyReader() method. The data
type of the argument should be changed from
SqlDataReader
to
OleDbDataReader
.
Before we can run the project to insert data into the database, we need to fi nish the
rest of the modifi cations to other forms. Basically, these modifi cations change the con-
nection object from SqlConnection to OleDbConnection for all other forms to match the
connection requirement of the Microsoft Access database.
6.8.6 Modifi cations to Other Forms
As we did for the LogIn and Faculty forms, the fi rst modifi cation we need to do is to
make sure that the namespace
System.Data.OracleClient
has been added into the
namespace area for all three forms: Selection, Course, and Insert Faculty forms. Open
the code window for all of these forms and add that namespace to the namespace area
if it has not been added.
The second modifi cation is to modify the Connection object located at these forms.
In this project we need to use the LogIn, Faculty, Selection, Course, and the Insert Faculty
Form; therefore, we only need to modify the Connection object for the last three forms —
Selection, Course, and the Insert Faculty Form — since we have fi nished the modifi cations
for the fi rst two forms.
The following methods contain this Connection object:
• The Select button ’ s Click method and the Course ListBox ’ s SelectedIndexChanged method
in the Course Form
• The Insert button ’ s Click method in the Insert Faculty Form
• The Exit button ’ s Click method in the Selection Form
Open those methods and change the Connection object from sqlConnection to ora-
Connection. Also perform the following modifi cations to the associated items in all forms
used in this project:
• Change the prefi x of all Oracle - related classes from Sql to Oracle, and the prefi x of all
objects from sql to ora, respectively.
• Change the data type for all passed parameters from SqlDbType to OracleType, from
SqlCommand to OracleCommand, and from SqlDataReader to OracleDataReader.
The third modifi cation is to change the query strings, that is, the assignment operator
in the WHERE clause, from LIKE@ to the Oracle assignment operator (=:). The follow-
ing methods contain the query strings:
• The Course ListBox ’ s SelectedIndexChanged method in the Course Form — change “ LIKE
@courseid ” to “ =: courseid ” .
c06.indd 525c06.indd 525 2/11/2010 11:56:24 AM2/11/2010 11:56:24 AM
Please purchase PDF Split-Merge on www.verypdf.com to remove this watermark.
526
Chapter 6 Data Inserting with Visual C#.NET
• The Select button ’ Click method in the Course Form — change the joint query ON clause
from “ ON (Course.faculty_id LIKE Faculty.faculty_id) AND (Faculty.faculty_name LIKE
@name) ” to “ ON (Course.faculty_id = Faculty.faculty_id) AND (Faculty.faculty_name
=: name) ”
• The Insert button ’ s Click method in the Insert Faculty Form — change the VALUES clause
from “ VALUES (@faculty_id,@faculty_name,@offi ce,@phone, @college,@title,@
email) ” to “ VALUES (:faculty_id, :faculty_name, :offi ce,:phone, :college, :title,:email ) ” .
Open these methods and perform the modifi cations to the query strings.
The fi nal modifi cation is for the user - defi ned InsertParameters() method in the Insert
Faculty Form. Change the data type of the inserting parameters from SqlDbType to
OracleType for all seven inserted parameters. Also remove the @ symbol before each
parameter in the Add() method.
At this point, we fi nished modifi cations to our new project OracleInsertRTObject,
and you can run the project to test the data insertion to the Oracle database. A completed
project OracleInsertRTObject can be found from the folder DBProjects\Chapter 6
located at the accompanying ftp site (see Chapter 1 ).
In the next section, we will discuss how to insert data using the LINQ query methods.
6.9 INSERT DATA INTO DATABASE USING LINQ QUERIES
As discussed in Chapter 4 , Language - Integrated Query (LINQ) is a ground - breaking
innovation in Visual Studio 2008 and the .NET Framework version 3.5 that bridges the
gap between the world of objects and the world of data. In Visual Studio.NET you can
write LINQ queries in C# with SQL Server databases, XML documents, ADO.NET
DataSets, and any collection of objects that supports IEnumerable or the generic
IEnumerable< T > interface.
LINQ can be considered as a pattern or model that is supported by a collection of
so - called Standard Query Operator methods we discussed in Section 4.1 , and all those
Standard Query Operator methods are static methods defi ned in either IEnumerable or
IQueryable classes in the namespace System.Linq . The data operated in LINQ query are
object sequences with the data type of either IEnumerable < T > or IQueryable < T > , where
T is the actual data type of the objects stored in the sequence.
LINQ is composed of three major components: LINQ to Objects, LINQ to ADO.
NET, and LINQ to XML. Where LINQ to ADO.NET contains LINQ to DataSet, LINQ
to SQL, and LINQ to Entities. Because there is no LINQ to the Oracle model available,
we will concentrate our discussion on inserting data into the SQL Server database using
the LINQ to SQL model.
Generally, the popular method to insert a new record into the database using the
LINQ query follows the three steps listed below:
1. Create a new object that includes the column data to be submitted.
2. Add the new row object to the LINQ to SQL Table collection associated with the target
table in the database.
3. Submit the change to the database.
c06.indd 526c06.indd 526 2/11/2010 11:56:24 AM2/11/2010 11:56:24 AM
Please purchase PDF Split-Merge on www.verypdf.com to remove this watermark.
6.10 Insert Data into Database Using Stored Procedures
527
Two ways can be used to add a new row object into the table: (1) using the Add()
method and (2) using the InsertOnSubmit() method. However, both methods must be
followed with the SubmitChanges() method to complete this new record insertion. In the
following section, let ’ s start with the data insertion using the LINQ to SQL queries to
illustrate the second method.
6.9.1 Insert Data into SQL Server Database Using LINQ to
SQL Queries
As discussed in Section 4.6 , to use LINQ to SQL to perform data queries, we must convert
our relational database to the associated entity classes using either SQLMetal or Object
Relational Designer tools. Also we need to set up a connection between our project and
the database using the DataContext object. Refer to Section 4.6.1 in Chapter 4 to get a
clear picture of how to create entity classes and add the DataContext object to connect
to our sample database CSE_DEPT.mdf. To perform data insertion using LINQ to SQL
model, refer to Sections 4.6.2 and 4.6.2.2 in Chapter 4 to get a detailed description and
the coding process of a real project QueryLINQSQL, which is a Console Application, to
insert a new record into the Faculty table.
6.10 INSERT DATA INTO DATABASE USING
STORED PROCEDURES
In this section, we discuss how to insert data into the database using stored procedures.
We provided a very detailed introduction to the stored procedures in Section 5.19.2.7 in
Chapter 5 and illustrated how to use this method to perform the data query for the
Student form and Student table in Section 5.19.2.7.3 in Chapter 5 . Refer to that part to
get more detailed descriptions about the stored procedures.
We try to use the Course form and Course table to illustrate how to insert a new
course record based on the selected faculty into the Course data table in this part. First,
we discuss how to insert a new record into the Course table in the SQL Server database,
and then we try to perform the similar function for the Oracle database. Some readers
may have noted that we spent a lot of time to modify the codes in the Course form in
the last project OracleInsertRTObject, but we did not use that form in that project. The
reason for this issue is that we will use that Course form to illustrate inserting data into
the Oracle database in the next section.
6.10.1 Insert Data into SQL Server Database Using
Stored Procedures
To save time and space, we can modify the project SQLInsertRTObject to create a
new project named SQLInsertRTObjectSP and add one more form window to perform
the data insertion using the stored procedures. Copy and paste the existing
project SQLInsertRTObject to the folder
C:\Chapter 6
and rename it to our new
project SQLInsertRTObjectSP. Refer to Section 6.8.2 to perform the modifi cations of
the project namespaces for all project fi les. Also refer to Section 6.8 to remove the SP
Form and the Student Form as well as to perform the modifi cations to the Selection Form
c06.indd 527c06.indd 527 2/11/2010 11:56:24 AM2/11/2010 11:56:24 AM
Please purchase PDF Split-Merge on www.verypdf.com to remove this watermark.
528
Chapter 6 Data Inserting with Visual C#.NET
since we do not need these two forms in this project. Recall that when we developed that
project, an Insert button was added into the Course Form window. We can use this button
to trigger a new form to perform the data insertion operation using the stored procedures.
First, let ’ s add one more form window into this new project. The name of this new form
is Insert Course Form.
6.10.1.1 Add an Inserting Data Form Window: Insert Course Form
The function of this Insert Course form is: As the project runs, after the user has fi nished
a correct login process and selected the item Course Information from the Selection
Form, the Course Form window will be displayed. When the user clicks on the Insert
button, the Insert Course Form window will appear. This form allows users to insert a
new course record into the Course data table in the database using the stored procedures.
The form also allows users to enter all pieces of information into the appropriate text-
boxes for the new inserted course. By clicking on the Insert button, a new course record
related to the selected faculty member is inserted into the database. However, if the user
wants to reenter those pieces of information before fi nishing this insertion, the Cancel
button can be used and all information entered will be erased. The Back button is used
to allow users to return to the Course Form window to perform the validation to confi rm
that the data insertion is successful.
Go to the
Project|Add Windows Form
menu item to open the Add New Item
dialog box. Keep the default Template, Windows Form, selected and enter the
Insert
Course Form.cs
into the Name box as the name for this new form. Then click on the
Add
button to add this form into our project.
To save time and space, we can copy all controls of this Course Form from the project
SQLInsertWizard Project we developed in this chapter. Open that project from the folder
DBProjects\Chapter 6
located at the accompanying ftp site (see Chapter 1 ) and open
the Insert Course Form window, and then go to the
Edit|Select All
menu item to
select all controls on that form window. Go to the
Edit|Copy
menu item to copy those
items. Now open our project SQLInsertRTObjectSP and our new form Insert Course
Form window, enlarge it to an appropriate size, and go to the
Edit|Paste
menu item
to paste those controls into this form.
One important issue to note is that the SQLInsertWizard Project is developed using
the Visual Studio.NET design tools and wizards, so some objects related to those design
tools and wizards such as the Data Binding Source will be added into this form as you
paste those controls. Because we don ’ t need those objects in this runtime objects method,
delete all of them from this new Insert Course Form window. To do that, right - click on
the CourseBindingSource from the bottom of this form window and select the
Delete
item from the pop - up menu to remove it.
In addition to removing the components related to the design tools and wizards, you
also need to perform the following modifi cations to this form:
• Remove the combobox control ComboMethod from this form since we only use one method,
the ExecuteNonQuery method of the Command class, to execute the stored procedure to
perform this data insertion.
• Remove the Select button from this form since we will not perform the data validation until
we click on the Back button to return to the Course Form window. In other words, the data
validation is performed in the Course Form.
c06.indd 528c06.indd 528 2/11/2010 11:56:24 AM2/11/2010 11:56:24 AM
Please purchase PDF Split-Merge on www.verypdf.com to remove this watermark.
6.10 Insert Data into Database Using Stored Procedures
529
• Make sure the following properties of the form are set up:
• Name: InsertCourseForm
• Text: CSE DEPT Insert Course Form
• AcceptButton: cmdInsert (select the Insert button as the default button)
• StartPosition: CenterScreen (locate the form in the center of the screen)
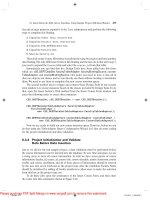
Your fi nished form window, Insert Course Form, should match the one shown in
Figure 6.69 .
The detailed descriptions of the function of each control on this form can be found
in Section 6.3.2 in this chapter. Simply speaking, the Faculty Name combobox is used to
allow users to select the desired faculty member to insert a new course for that selected
faculty. All seven textboxes allow users to enter the information for a new course to be
inserted into the Course table. The Course ID textbox is a key textbox since the Insert
button will be enabled if this textbox ’ s content is changed, which means that a new course
will be inserted. Generally, the Insert button should be disabled after a new course record
has been inserted into the database to avoid multiple insertions of the same record. The
Cancel button allows users to clean up the contents of all textboxes (except the Course
ID) to reenter the course information. A new course record will be inserted into the
database as the Insert button is clicked. The Back button is used to return to the Course
form to perform the data validation for the new inserted course.
Next let ’ s begin to develop the codes for this form. However, we need fi rst to take
care of our stored procedures issue.
6.10.1.2 Develop Stored Procedures of SQL Server Database
Recall that when we built our sample database CSE_DEPT in Chapter 2 , there is no
faculty name column in the Course table, and the only relationship that exists between
the Faculty and the Course tables is the faculty_id, which is a primary key in the Faculty
table but a foreign key in the Course table. As the project runs and the Insert Course
Form window appears, the user needs to insert new course data based on the faculty
name, not the faculty ID. Therefore, for this new course data insertion, we need to
Figure 6.69
Finished Insert Course Form window.
c06.indd 529c06.indd 529 2/11/2010 11:56:24 AM2/11/2010 11:56:24 AM
Please purchase PDF Split-Merge on www.verypdf.com to remove this watermark.
530
Chapter 6 Data Inserting with Visual C#.NET
perform two queries with two tables: First, we need to make a query to the Faculty table
to get the faculty_id based on the faculty name selected by the user, and second we can
insert a new course record based on the faculty_id we obtained from our fi rst query.
These two queries can be combined into a single stored procedure.
Compared with the stored procedure, another solution to avoid performing two
queries is to use a joined table query to combine these two queries together to complete
a course query, as we did for the Course Form in Section 5.19.2.5 in Chapter 5 . However,
it is more fl exible and convenient to use stored procedures to perform this kind of mul-
tiple queries, especially when the queries are performed to multiple different data tables.
Now let ’ s develop our stored procedures to combine these two queries to complete
this data insertion. The stored procedure is named
dbo.InsertFacultyCourse
.
Open Visual Studio.NET and the Server Explorer window, click on the plus symbol
icon that is next to CSE_DEPT database folder to connect to our database if this database
was added into the Server Explorer before. Otherwise you need to right - click on the Data
Connections folder to add and connect to our database. Refer to Section 5.19.2.7.3 in
Chapter 5 for the detailed information of adding and connecting the database.
Right - click on the Stored Procedures folder and select the Add New Stored
Procedure item to open the Add Procedure dialog box, and then enter the codes that
are shown in Figure 6.70 into this new procedure. Do not forget to change the procedure ’ s
name to
dbo.InsertFacultyCourse
, which is located at the top of this procedure.
The function of this stored procedure is:
A. All input parameters are listed in this part. The @FcaultyName is selected by the user from
the ComboName combobox, and all other input parameters should be entered by the user
to the associated textbox in the Insert Course Form window.
B. A local variable @FacultyID is declared, and it is used to hold the returned value from
the execution of the fi rst query to the Faculty table in step C .
C. T h e fi rst query is executed to pick up the matched faculty_id from the Faculty table based
on the fi rst input parameter, @FacultyName.
A
B
C
D
Figure 6.70
Stored procedure dbo.InsertFacultyCourse.
c06.indd 530c06.indd 530 2/11/2010 11:56:25 AM2/11/2010 11:56:25 AM
Please purchase PDF Split-Merge on www.verypdf.com to remove this watermark.
6.10 Insert Data into Database Using Stored Procedures
531
D. The second query is used to insert a new course record into the Course table. The last
parameter in the VALUES parameter list is the @FacultyID, which is obtained from the
fi rst query.
The coding for this stored procedure is simple and easy to be understood. One point
you should know is the order of parameters in the VALUES parameter list. This order
must be identical with the column order in the Course table. Otherwise, an error may be
encountered when this stored procedure is saved.
Go to the File|Save StoredProcedure1 menu item to save this stored procedure.
Now let ’ s test this stored procedure in the Server Explorer environment to make sure
that it works fi ne.
Right - click on our new stored procedure
dbo.InsertFacultyCourse
from the
Server Explorer window, and click on the Execute item from the pop - up menu to open
the Run Stored Procedure dialog box. Enter the input parameters into the associated
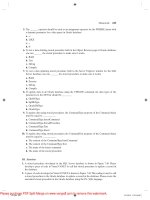
box for a new course record, and your fi nished parameters dialog box is shown in Figure
6.71 .
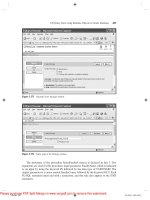
Click on the OK button to run this stored procedure. The running result is displayed
in the Output window at the bottom, which is shown in Figure 6.72 .
To confi rm this data insertion, open the Course table by fi rst expanding the Tables
folder in the Server Explorer window and then right - clicking on the Course folder, and
Running [dbo].[InsertFacultyCourse] ( @FacultyName = Ying Bai, @CourseID = CSE-
538, @Course = Advanced Robotics, @Schedule = T-H: 1:30 - 2:45 PM, @Classroom =
TC-336, @Credit = 3, @Enroll = 32 ).
(1 row(s) affected)
(0 row(s) returned)
@RETURN_VALUE = 0
Finished running [dbo].[InsertFacultyCourse].
Output
Figure 6.72
Running result of the stored procedure.
Figure 6.71
Run Stored Procedure dialog box.
c06.indd 531c06.indd 531 2/11/2010 11:56:25 AM2/11/2010 11:56:25 AM
Please purchase PDF Split-Merge on www.verypdf.com to remove this watermark.
532
Chapter 6 Data Inserting with Visual C#.NET
select the item Show Table Data . Browse the Course table until the last row, and you
can fi nd that a new course,
CSE - 538: Advanced Robotics
, has been inserted into this
table. OK, our stored procedure is successful!
Next we need to develop the codes in the Visual C#.NET environment to call this
stored procedure to insert a new course record into the database from our user interface.
6.10.1.3 Develop Codes to Call Stored Procedures to Insert Data into
Course Table
The coding for this data insertion is divided into three steps: the data validation before
the data insertion, data insertion using the stored procedure, and the data validation
after the data insertion. The purpose of the fi rst step is to confi rm that all inserted data
that is stored in each associated textbox should be complete and valid. In other words,
all textboxes should be nonempty. The third step is used to confi rm that the data inser-
tion is successful, in other words, the new inserted data should be in the desired table in
the database and can be read back and displayed in the Course form window. Let ’ s begin
with the coding for the fi rst step.
6.10.1.3.1 Validate Data Before Data Insertion and Startup Coding First, let ’ s
take care of the startup coding. The so - called startup coding includes adding the namespace
related to SQL Server Data Provider, the coding for the constructor of the InsertCourseForm
class, fi eld - level variables declarations, and coding for the Cancel and the Back buttons ’
Click methods. Open the code window of the Insert Course Form window and enter the
codes shown in Figure 6.73 into this code window.
The codes added into the constructor are used to add all faculty names into the
ComboName control to allow users to select one when performing the new course
insertion.
Let ’ s take a look at the following pieces of codes to see how they work.
A. The System.Data.SqlClient namespace is added into the namespace area since we need to
use data components related to SQL Server Data Provider to perform this new course
insertion.
B. A fi eld - level string array CourseInfo() is created fi rst, and this array is used to store all
information related to the new course to be inserted into the database.
C. In the constructor of the InsertCourseForm class, all faculty members are added into the
combobox ComboName by executing the Add() method, and the fi rst item is selected as
the default faculty member. The user can select a desired faculty member from this com-
bobox and insert a new course for that selected faculty as the project runs.
D. The user - defi ned InitCourseInfo() method is used to set up a one - to - one relationship
between each item in the CourseInfo string array and each textbox that contains a piece
of new course information. In this way, it is easier to scan and check each textbox to make
sure that none of them is empty when the user - defi ned CheckCourseInfo() method is
executed later.
E. To check each textbox, a
for
loop is utilized to scan the CourseInfo array. A warning
message would be displayed, and the method returns a nonzero value to the calling method
to indicate that this checking has failed if any textbox (except the Faculty ID) is empty.
Otherwise a zero is returned to indicate that this checking is successful. A trick is that the
for
loop starts from 1, not 0, which means that this check does not include the Faculty
c06.indd 532c06.indd 532 2/11/2010 11:56:26 AM2/11/2010 11:56:26 AM
Please purchase PDF Split-Merge on www.verypdf.com to remove this watermark.
6.10 Insert Data into Database Using Stored Procedures
533
………
using System.Data.SqlClient;
namespace SQLInsertRTObjectSP
{
public partial class InsertCourseForm : Form
{
string[] CourseInfo = new string[7];
public InsertCourseForm()
{
InitializeComponent();
ComboName.Items.Add("Ying Bai");
ComboName.Items.Add("Satish Bhalla");
ComboName.Items.Add("Black Anderson");
ComboName.Items.Add("Steve Johnson");
ComboName.Items.Add("Jenney King");
ComboName.Items.Add("Alice Brown");
ComboName.Items.Add("Debby Angles");
ComboName.Items.Add("Jeff Henry");
ComboName.SelectedIndex = 0;
}
private void InitCourseInfo()
{
CourseInfo[0] = txtFacultyID.Text;
CourseInfo[1] = txtCourseID.Text;
CourseInfo[2] = txtCourse.Text;
CourseInfo[3] = txtSchedule.Text;
CourseInfo[4] = txtClassRoom.Text;
CourseInfo[5] = txtCredits.Text;
CourseInfo[6] = txtEnroll.Text;
}
private int CheckCourseInfo()
{
int pos = 0, check = 0;
for (pos = 1; pos <= 6; pos++)
{
if (CourseInfo[pos] == String.Empty)
check++;
}
return check;
}
private void cmdBack_Click(object sender, EventArgs e)
{
this.Close();
}
private void
cmdCancel_Click(object sender, EventArgs e)
{
txtFacultyID.Text = String.Empty;
txtCourse.Text = String.Empty;
txtSchedule.Text = String.Empty;
txtClassRoom.Text = String.Empty;
txtCredits.Text = String.Empty;
txtEnroll.Text = String.Empty;
}
}
A
B
C
D
E
F
G
SQLInsertRTObjectSP.InsertCourseForm
InsertCourseForm()
Figure 6.73
Startup coding.
c06.indd 533c06.indd 533 2/11/2010 11:56:26 AM2/11/2010 11:56:26 AM
Please purchase PDF Split-Merge on www.verypdf.com to remove this watermark.
534
Chapter 6 Data Inserting with Visual C#.NET
ID textbox. That is correct because at this moment we may not have any knowledge for
this information.
F. The Cancel button ’ s Click method is used to clean up all textboxes ’ content, except the
Course ID. The reason for this is that after a new course is inserted into the database, the
Insert button will be disabled to avoid multiple insertions of the same course. But this
button will be enabled again as soon as the content of the Course ID textbox is changed,
which means that a different new course will be inserted. In order to avoid enabling this
button mistakenly, we keep the Course ID textbox, unchanged, that is, not cleaned.
G. The coding for the Back button ’ s Click method is easy, and the
this.Close()
method
is used to close the Insert Course Form window since we do not need this form when a
new course record has been inserted into the database.
Now let ’ s do our coding for the Insert button ’ s Click method to perform the data
validation before the data insertion.
This data validation can be performed by calling the InitCourseInfo() method and
the CheckCourseInfo() method, which we discussed above, in the Insert button ’ s Click
method. Open the Insert button ’ s Click method by double - clicking on the Insert button
from the form window of the Insert Course Form, and enter the codes that are shown in
Figure 6.74 into this method.
The function of this piece of code is straightforward and easy to understand. First,
the InitCourseInfo() method is called to set up a one - to - one relationship between each
item in the CourseInfo() array and each associated textbox that stores a piece of course
information. Next the CheckCourseInfo() method is executed to make sure that the new
course information is completed and valid. In other words, no textbox is empty. A
returned zero indicates that no empty textbox has been detected and this data validation
is successful. Otherwise a warning message is displayed to remind users to refi ll all text-
boxes if a nonzero is returned.
Now let ’ s develop and complete the codes to call the stored procedure to perform
the new course insertion.
6.10.1.3.2 Develop Codes to Call Stored Procedures Open the Insert button ’ s
Click method and then add the codes shown in Figure 6.75 into this method.
The codes we developed in the last section have been highlighted with shading. Let ’ s
take a look at these new added codes to see how they work.
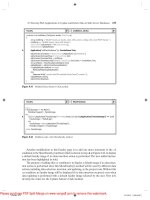
private void cmdInsert_Click(object sender, EventArgs e)
{
int check = 0;
InitCourseInfo();
check = CheckCourseInfo();
if (check == 0)
{
// data validation is successful! continue to do the data insertion....
}
else
MessageBox.Show("Fill all Course Information box, enter a NULL for blank column");
}
SQLInsertRTObjectSP.InsertCourseForm
cmdInsert_Click()
Figure 6.74
First coding for the Insert button ’ s Click method.
c06.indd 534c06.indd 534 2/11/2010 11:56:26 AM2/11/2010 11:56:26 AM
Please purchase PDF Split-Merge on www.verypdf.com to remove this watermark.
6.10 Insert Data into Database Using Stored Procedures
535
A. A local integer variable intInsert is created and initialized with zero. This variable works
as a value holder to hold the returned value of executing the insert method
— ExecuteNonQuery().
B. The query string is assigned with the name of the stored procedure developed in Section
6.10.1.2 . One of the most important points to call stored procedures is that the query string
must be exactly identical with the name of the stored procedure to be called. Visual C#.
NET project could not fi nd the stored procedures, and a runtime error would be encoun-
tered if the query string does not match the name of the stored procedure.
C. Some other components and variables used in this method are declared here. The
Command object and an instance of the LogIn form class are also created here. Since we
need to use the Connection object created in the LogIn form window for this data inser-
tion, we need to create an instance to access it.
D. The getLogInForm() method defi ned inside the LogIn Form class is called to get the
current instance of the LogInForm class and assign it to our new created instance logForm.
In this way, we can use and access our original LogInForm instance, and furthermore to
use and access the Connection object, we create that object instead of using a new instance
of the LogInForm class.
E. The Command object is initialized with the suitable components. Two important points
to be noted are CommandType and CommandText. The former must be assigned with
the property of StoredProcedure to indicate that the command type of this Command
object is a stored procedure, and a stored procedure will be called when this Command is
executed. Second, the name of the stored procedure to be called must be assigned to the
private void cmdInsert_Click(object sender, EventArgs e)
{
int check = 0, intInsert = 0;
string cmdString = "dbo.InsertFacultyCourse";
SqlCommand sqlCommand = new SqlCommand();
LogInForm logForm = new LogInForm();
InitCourseInfo();
check = CheckCourseInfo();
if (check == 0)
{
logForm = logForm.getLogInForm();
sqlCommand.Connection = logForm.sqlConnection;
sqlCommand.CommandType = CommandType.StoredProcedure;
sqlCommand.CommandText = cmdString;
InsertParameters(ref sqlCommand);
intInsert = sqlCommand.ExecuteNonQuery();
sqlCommand.Dispose();
if (intInsert == 0)
MessageBox.Show("The data insertion is failed");
else
{
cmdCancel.PerformClick(); // clean up all faculty information
cmdInsert.Enabled = false;
}
}
else
MessageBox.Show("Fill all Course Information box, enter a NULL for blank column");
}
A
B
C
D
E
F
G
H
I
J
SQLInsertRTObjectSP.InsertCourseForm cmdInsert_Click()
Figure 6.75
Modifi cations to the Insert button ’ s Click method.
c06.indd 535c06.indd 535 2/11/2010 11:56:26 AM2/11/2010 11:56:26 AM
Please purchase PDF Split-Merge on www.verypdf.com to remove this watermark.
536
Chapter 6 Data Inserting with Visual C#.NET
CommandText property of the Command object to indicate to the Visual C#.NET where
to fi nd this stored procedure.
F. The user - defi ned InsertParameters() method, whose detailed coding is shown in Figure
6.76 , is executed to fi ll all input parameters into the Parameters collection of the Command
object to fi nish the initialization of the Command object. A passing - by - reference mode is
used for this parameter passing since we want to make sure that all modifi cations to the
passed parameters are permanent.
G. The ExecuteNonQuery() method of the Command class is executed to call the stored
procedure to perform the new data insertion.
H. The Command object is cleaned up after the data insertion.
I. The ExecuteNonQuery() method will return an integer to indicate whether this calling is
successful or not. The returned value equals the number of rows or records that have been
successfully inserted into the database. A zero means that no row or record has been
inserted into the database, and this data insertion has failed. In that case, a warning
message is displayed.
J. Finally, after one data insertion, the information stored in all textboxes, except the Course
ID, are cleaned up to make it ready for the next data insertion. Also the Insert button is
disabled to avoid multiple insertions of the same data into the database.
The detailed coding for the user - defi ned InsertParameters() method is shown in
Figure 6.76 .
The function of this method is to assign each piece of information stored in each
textbox to the associated input parameter we defi ned in the stored procedure dbo.
InsertFacultyCourse . One key point is that the name of each passed parameter, which
is represented as a string and located at the fi rst argument ’ s position, must be identical
with the name of each input parameter we defi ned in the stored procedure. For example,
the name of the parameter @FacultyName used here must be identical with the input
parameter ’ s name @FacultyName that exists in the input parameter ’ s list we defi ned at
the beginning of the stored procedure dbo.InsertFacultyCourse . A run time error would
be encountered if a name of parameter is not matched with the associated parameter ’ s
name in the stored procedure as the project runs. Refer to Figure 6.70 for the detailed
list of all parameters ’ names defi ned in the stored procedure.
Now we have fi nished coding for this data insertion operation. Before we can run
the project to test the functionality of this data insertion, we need to fi gure out how to
open and start the Insert Course Form to perform this new course insertion. There are
private void InsertParameters(ref SqlCommand cmd)
{
cmd.Parameters.Add("@FacultyName", SqlDbType.Char).Value = ComboName.Text;
cmd.Parameters.Add("@CourseID", SqlDbType.Char).Value = txtCourseID.Text;
cmd.Parameters.Add("@Course", SqlDbType.Char).Value = txtCourse.Text;
cmd.Parameters.Add("@Schedule", SqlDbType.Char).Value = txtSchedule.Text;
cmd.Parameters.Add("@Classroom", SqlDbType.Char).Value = txtClassRoom.Text;
cmd.Parameters.Add("@Credit", SqlDbType.Char).Value = txtCredits.Text;
cmd.Parameters.Add("@Enroll", SqlDbType.Char).Value = txtEnroll.Text;
}
SQLInsertRTObjectSP.InsertCourseForm InsertParameters()
Figure 6.76
Coding for the InsertParameters method.
c06.indd 536c06.indd 536 2/11/2010 11:56:27 AM2/11/2010 11:56:27 AM
Please purchase PDF Split-Merge on www.verypdf.com to remove this watermark.
6.10 Insert Data into Database Using Stored Procedures
537
two methods to open the Insert Course Form as the project runs; one method directly
starts this form and inserts data, and another method is to use the Course Form to trigger
this form. We prefer to use the second method since we need to use the Course Form to
perform the data validation after a new record is inserted in the Course table.
Let ’ s make two modifi cations to the Course Form to trigger the Insert Course Form.
• T h e fi rst modifi cation is to add a fi eld - level object of the Insert Course Form class, and this
object is used to start the Insert Course Form window as the Insert button in the Course
Form is clicked. To do that, add the following command under the class header, which is
shown in step A in Figure 6.77 .
• The second modifi cation is to call the Show() method of the Insert Course Form object to
display that form when the Insert button in the Course Form is clicked. To do that, open
the Insert button ’ s Click method in the Course Form and add the command shown in step
B in Figure 6.77 into this method.
Now let ’ s run the project to test the new data insertion using the stored procedures.
Click on the Start Debugging button to start the project, enter the suitable username and
password, such as jhenry and test to the LogIn form, and select the Course Information
item from the Selection form to open the Course Form window. Click on the Insert button
to open the Insert Course Form window to perform the new course insertion.
Enter the following data into the associated textbox as the information for a new
course and leave the Faculty ID textbox empty since we don ’ t know that piece of infor-
mation at this moment, and this information can be retrieved by the stored procedure:
• Ying Bai Selected from the Faculty Name combobox
• CSE - 668 Course ID textbox
• Modern Controls Course Title textbox
• M - W - F: 9:00 – 9:55 AM Schedule textbox
• TC - 309 Classroom textbox
• 3 Credits textbox
• 30 Enrollment textbox
Your fi nished information window should match the one shown in Figure 6.78 .
namespace SQLInsertRTObjectSP
{
public partial class CourseForm : Form
{
private TextBox[] CourseTextBox = new TextBox[6];
InsertCourseForm InsertCourse = new InsertCourseForm(); // added in Nov. 26, 2008
……..
private void cmdInsert_Click(object sender, EventArgs e)
{
InsertCourse.Show(); // added in Nov. 26, 2008
}
A
B
SQLInsertRTObjectSP.CourseForm cmdInsert_Click()
Figure 6.77
Modifi cations to the codes in the Course Form window.
c06.indd 537c06.indd 537 2/11/2010 11:56:27 AM2/11/2010 11:56:27 AM
Please purchase PDF Split-Merge on www.verypdf.com to remove this watermark.
538
Chapter 6 Data Inserting with Visual C#.NET
Click on the Insert button to call the stored procedure to insert this new course record
into the database. Immediately the Insert button is disabled after this data insertion. Is
our data insertion successful? To answer this question, we need to perform the data vali-
dation in the next section.
6.10.1.3.3 Validate Data After Data Insertion Now click on the Back button to
return to the Course Form window to validate this data insertion.
Click on the drop - down arrow of the combobox control ComboName and select the
faculty member Ying Bai from the list since we have just inserted a new course for this
faculty in the last section. Click on the Select button to try to retrieve all courses, includ-
ing the new inserted course, taught by this faculty and display them in the CourseListBox
in this form window. All courses taught by the selected faculty are displayed in the
CourseList box. The last item is just the course we added into the Course table in the
last section. Click on that item and all information related to that new course is displayed
in this form, which is shown in Figure 6.79 . This is the evidence that our data insertion
using the stored procedure is successful!
A completed project SQLInsertRTObjectSP that includes the data insertion using
the stored procedure can be found from the folder DBProjects\Chapter 6 located at the
accompanying ftp site (see Chapter 1 ).
6.10.2 Insert Data into Oracle Database Using
Stored Procedures
There is no signifi cant difference between inserting data into the SQL Server database
and Oracle database using the stored procedures. One of the most important differences
is the prototype of the stored procedure defi ned in two different databases. In Oracle
database, a package component must be used to contain the stored procedure if the stored
procedure needs to return any data item.
In this section, we still want to use the Course Form and Course table to show readers
how to insert a new course record into the Course table using the stored procedure in
the Oracle database environment.
Figure 6.78
Running status of the Insert Course Form window.
c06.indd 538c06.indd 538 2/11/2010 11:56:27 AM2/11/2010 11:56:27 AM
Please purchase PDF Split-Merge on www.verypdf.com to remove this watermark.
6.10 Insert Data into Database Using Stored Procedures
539
To illustrate how to insert data into the Oracle database using stored procedures or
packages, we will utilize the following three steps:
1. Develop a user interface — Insert Course Form window.
2. Develop a package to contain stored procedures to perform inserting data into the Oracle
database.
3. Develop the codes to call the package developed in step 2 to complete the data insertion
function.
4. Validate the data insertion using the Course Form window.
Step 1 is similar to the step we did in the last project SQLInsertRTObjectSP, and the
only difference is that the Faculty ID textbox should be removed from this form window
since it does not contain any input information. Steps 3 and 4 are very similar to those
steps we developed for the same project in the last section. We will emphasize and high-
light the different coding when we develop those steps below.
To save time and space, we modify the project OracleInsertRTObject we developed in
Section 6.8 and create a new project named OracleInsertRTObjectSP. Refer to Section 6.8
to get more detailed information on how to modify a current project to create a new project.
Now let ’ s start from step 2, develop the stored procedure in the Oracle databases.
6.10.2.1 Develop Stored Procedures in Oracle Database
A very detailed discussion of creating and manipulating packages and stored procedures
in the Oracle database is provided in Section 5.20.3.6 . in Chapter 5 . Refer to that section
to get more detailed information for creating Oracle ’ s stored procedures.
The topic we are discussing in this section is the insertion of data into the database.
Thus no returned data is needed for this section. Therefore we only need to create
stored procedures in the Oracle database, not package, to perform the data insertion
function.
Figure 6.79
Data validation process.
c06.indd 539c06.indd 539 2/11/2010 11:56:27 AM2/11/2010 11:56:27 AM
Please purchase PDF Split-Merge on www.verypdf.com to remove this watermark.
540
Chapter 6 Data Inserting with Visual C#.NET
As discussed in Section 5.20.3.6 in Chapter 5 , different methods can be used to create
Oracle ’ s stored procedures. In this section, we will use the Object Browser page provided
by Oracle Database 10g XE to create our stored procedures
Open the Oracle Database 10g XE home page by going to Start|All Programs|Oracle
Database 10g Express Edition|Go To Database Home Page items. Finish the login
process by entering the correct username and password (in our case, the username is our
database name CSE_DEPT and the password is reback). Click on the Object Browser
and select the Create|Procedures item to open the Create Procedure window. Click the
Create button and select the Procedure icon from the list to open this window. The
opened window is shown in Figure 6.80 .
Enter
InsertFacultyCourse
into the Procedure Name box and keep the Include
Argument checkbox checked, and click on the Next button to go to the next page.
The next window is used to enter all input parameters. For this stored procedure we
need to perform two queries; therefore, we have seven input parameters. The fi rst query
is to get the
faculty_id
from the Faculty table based on the faculty name that is an
input and selected by the user from the ComboName combobox control from the Course
Form window, and the second query is to insert a new course record that contains six
pieces of information related to a new course into the Course table based on the
faculty_id
that is obtained from the fi rst query. The seven input parameters are
Faculty Name, Course ID, Course Title, Credit, Classroom, Schedule, and Enrollment.
The fi rst input parameter Faculty Name is used by the fi rst query, and the following six
input parameters are used by the second query.
Enter those input parameters one by one into the argument box. The point is that
the data type of each input parameter must be identical with the data type of each data
column in the Course table. Refer to Section 2.11.2.3 to get a detailed list of data types
used for those data columns in the Course data table.
For the Input/Output type of the parameters, select IN for all seven parameters since
no output is needed for this data insertion query. Your fi nished argument list should
match the one shown in Figure 6.81 .
Figure 6.80
Opened Create Procedure window.
c06.indd 540c06.indd 540 2/11/2010 11:56:29 AM2/11/2010 11:56:29 AM
Please purchase PDF Split-Merge on www.verypdf.com to remove this watermark.
6.10 Insert Data into Database Using Stored Procedures
541
Click on the Next button to go to the procedure - defi ning page. Enter the codes
shown in Figure 6.82 a into this new procedure as the body of the procedure, using the
language called Procedural Language Extension for SQL or PL - SQL. Then click on the
Next and the Finish buttons to confi rm creating this procedure. Your fi nished stored
procedure should match the one that is shown in Figure 6.82 b.
Seven input parameters are listed at the beginning of this procedure with the keyword
IN to indicate that these parameters are inputs to the procedure. The intermediate
parameter
faculty_id
is obtained from the fi rst query in this procedure from
the Faculty table. The data type of each parameter is indicated after the keyword IN, and
it must be identical with the data type of the associated data column in the Course table.
An IS command is attached after the procedure header to indicate that an intermediate
query result,
faculty_id
, will be held by a local variable
facultyID
declared later.
Two queries are included in this procedure. The fi rst query is used to get the
faculty_id
from the Faculty table based on the input parameter FacultyName , and
the second query is to insert seven input parameters into the Course table based on the
faculty_id
obtained from the fi rst query. A semicolon must be attached after each
PL - SQL statement and after the command
end
.
One important issue is that you need to create one local variable
facultyID
and
attach it after the IS command as shown in Figure 6.83 , and this coding has been
highlighted with a shading. Click on the Edit button to add this local variable. This
local variable is used to hold the returned
faculty_id
from the execution of the fi rst
query.
Another important issue in distributing the input parameters or arguments in an
INSERT command is that the order of those parameters or arguments must be identical
with the order of the data columns in the associated data table. For example, in the
Course table, the order of the data columns is course_id, course, credit, classroom, sched-
ule, enrollment, and faculty_id. Accordingly, the order of input parameters placed in
the INSERT argument list must be identical with the data columns ’ order displayed in
above.
Figure 6.81
Finished argument list.
c06.indd 541c06.indd 541 2/11/2010 11:56:32 AM2/11/2010 11:56:32 AM
Please purchase PDF Split-Merge on www.verypdf.com to remove this watermark.
542
Chapter 6 Data Inserting with Visual C#.NET
(a)
(b)
SELECT faculty_id INTO facultyID FROM Faculty
WHERE faculty_name = FacultyName;
INSERT INTO Course VALUES (CourseID, Course, Credit,
Classroom, Schedule, Enroll, facultyID);
Figure 6.82
Stored procedure body.
FacultyID VARCHAR2(10);
Figure 6.83
Completed stored procedure.
To make sure that this procedure is error free, we need to compile it fi rst. Click on
the Compile button to compile and check our procedure. A successful compilation
message should be displayed if our procedure is a bug - free stored procedure.
Close the Oracle Database 10 g Express Edition by clicking on the Close button.
Next we need to develop the codes in our Visual C#.NET project to call this stored pro-
cedure to perform the data insertion function.
c06.indd 542c06.indd 542 2/11/2010 11:56:34 AM2/11/2010 11:56:34 AM
Please purchase PDF Split-Merge on www.verypdf.com to remove this watermark.