Practical Database Programming With Visual C#.NET- P12
Bạn đang xem bản rút gọn của tài liệu. Xem và tải ngay bản đầy đủ của tài liệu tại đây (1.04 MB, 50 trang )
7.5 Runtime Objects Method
573
actions such as updating data and deleting data. Among them, two popular methods are
widely applied:
1. Update or delete records from the desired data table in the DataSet, and then call the
DataAdapter.Update() method to update the updated or deleted records from the table in
the DataSet to the table in the database.
2. Build the update or delete commands using the Command object, and then call the
Command ’ s method ExecuteNonQuery() to update or delete records in the database. Or
you can assign the built command object to the UpdateCommand or DeleteCommand
properties of the DataAdapter and call the ExecuteNonQuery() method from the
UpdateCommand or DeleteCommand property.
The fi rst method is to use the so - called DataSet - DataAdapter method to build a
data - driven application. DataSet and DataTable classes can have different roles when
they are implemented in a real application. Multiple DataTables can be embedded into
a DataSet and each table can be fi lled, inserted, updated, and deleted by using the
different properties of a DataAdapter such as the SelectCommand, InsertCommand,
UpdateCommand, or DeleteCommand when the DataAdapter ’ s Update() method
is executed. The DataAdapter will perform the associated operations based on the modi-
fi cations you made for each table in the DataSet. For example, if you deleted rows
from a table in the DataSet, then call this DataAdapter ’ s Update() method. This method
will perform a DeleteCommand based on your modifi cations. This method is relativly
simple since you do not need to call some specifi c methods such as the ExecuteNonQuery()
to complete these data queries. However, this simplicity brings some limitations for
your applications. For instance, you cannot access different data tables individually to
perform multiple specifi c data operations. This method is very similar to the second
method we discussed in Part I; therefore, we will not continue the discussion for this
method.
The second method allows us to use each object individually, which means that you
do not have to use the DataAdapter to access the Command object or use the DataTable
together with the DataSet. This provides more fl exibility. In this method, no DataAdapter
or DataSet is needed, and you only need to create a new Command object with a new
Connection object, and then build a query statement and attach some useful parameters
into that query for the new created Command object. Then you can update or delete data
against any data table by calling the ExecuteNonQuery() method, which belongs to the
Command class. We will concentrate on this method in this part.
In this section, we provide three sample projects named SQLUpdataDeleteRTObject,
AccUpdataDeleteRTObject, and OracleUpdataDeleteRTObject to illustrate how to
update or delete records in three different databases using the runtime object method.
Because of the coding similarity between these three databases, we will concentrate on
updating and deleting data in the SQL Server database using the sample project
SQLUpdataDeleteRTObject fi rst, and then illustrate the coding differences between
these databases by using the real codes for the rest of two sample projects.
In addition to those three sample projects, we will also discuss data updating and
deleting in our sample databases using the LINQ to SQL query method. A sample project
LINQSQLUpdateDelete will be developed in this chapter to show readers how to build
an actual data - driven project to update and delete data against our sample databases
using the LINQ to SQL query method.
c07.indd 573c07.indd 573 2/11/2010 11:57:20 AM2/11/2010 11:57:20 AM
Please purchase PDF Split-Merge on www.verypdf.com to remove this watermark.
574
Chapter 7 Data Updating and Deleting with Visual C#.NET
7.6 UPDATE AND DELETE DATA FOR SQL SERVER DATABASE
USING RUNTIME OBJECTS
Now let ’ s fi rst develop the sample project SQLUpdataDeleteRTObject to update and
delete data in the SQL Server database using the runtime objects method. Recall in
Sections 5.19.2.3 to 5.19.2.7 in Chapter 5 , we discussed how to select data for the Faculty,
Course, and Student Form windows using the runtime objects method. For the Faculty
Form, a regular runtime selecting query is performed, and for the Course Form, a runtime
joined - table selecting query is developed. For the Student table, the stored procedures
are used to perform the runtime data query.
Similarly in this part, we divide this discussion into two sections:
1. Update and delete data in the Faculty table from the Faculty Form window using the
runtime objects method.
2. Update and delete data in the Faculty table from the Faculty Form using the runtime stored
procedure method.
In order to avoid duplication of the coding, we will modify an existing project named
SQLInsertRTObject developed in Chapter 6 to create our new project SQLUpdata
DeleteRTObject used in this section.
Open Windows Explorer and create a new folder such as Chapter 7 if you have not,
and then browse to the folder DBProjects\Chapter 6 located at the accompanying ftp site
(See Chapter 1 ), and copy the project SQLInsertRTObject to the new folder C:\Chapter
7 we just created. Change the name of the project from SQLInsertRTObject to
SQLUpdataDeleteRTObject. Double - click on the SQLUpdataDeleteRTObject.csproj
to open this project.
On the opened project, perform the following modifi cations to get our desired
project:
• Go to Project|SQLUpdataDeleteRTObject Properties menu item to open the project ’ s
property window. Change the Assembly name and the Default namespace from SQLInsert
RTObject to SQLUpdataDeleteRTObject, respectively.
• Click on the Assembly Information button to open the Assembly Information dialog
box, and change the Title and the Product to SQLUpdataDeleteRTObject. Click on the
OK to close this dialog box.
• Change the project namespace for all project fi les from SQLInsertRTObject to
SQLUpdataDeleteRTObject using the Find and Replace dialog box.
Go to the File|Save All to save those modifi cations. Now we are ready to develop
our graphic user interfaces based on our new project SQLUpdataDeleteRTObject.
7.6.1 Update Data in Faculty Table for SQL Server Database
Let ’ s fi rst discuss updating data in the Faculty table for the SQL Server database. To
update data in the Faculty data table, we do not need to add any new window forms, and
we can use the Faculty Form window as the user interface. However, we need to perform
the following four steps to modify this project:
c07.indd 574c07.indd 574 2/11/2010 11:57:21 AM2/11/2010 11:57:21 AM
Please purchase PDF Split-Merge on www.verypdf.com to remove this watermark.
7.6 Update and Delete Data for SQL Server Database Using Runtime Objects
575
1. Modify the current Faculty Form window.
2. Modify the codes in the Faculty Form and the Insert Faculty Form code windows.
3. Develop codes to update data.
4. Validate the data updating.
First, we need to modify the Faculty Form to make it suitable for our data
updating.
7.6.1.1 Modify Faculty Form Window
Recall that when we developed the Faculty Form for the project SQLInsertRTObject in
the last chapter, fi ve labels were developed in that form to store the faculty information.
In order to update records in the Faculty table, we need a way to enter new faculty
information into some controls and update that record later. The textbox is a good can-
didate to receive and store a piece of new faculty information. Therefore the fi rst job we
need to do is to replace all of those fi ve labels with fi ve textbox controls and add one
more textbox, Faculty Name textbox, into the Faculty Information group box since we
can update a faculty member with six pieces of new information without touching the
faculty_id
column.
A good and simple way to modify this Faculty Form window is to fi rst remove all
controls from the current Faculty Form window, and then copy all controls from the
Faculty Form window in the project SQLUpdateDeleteWizard we developed in this
chapter, and paste them into the current Faculty Form window. To do that, fi rst remove
all controls from the current Faculty Form window by clicking on the Edit|Select All ,
and then Edit|Delete menu items. Next open the project SQLUpdateDeleteWizard and
its Faculty Form window, select Edit|Select All , and then Edit|Copy to copy all controls
from that Faculty Form window. Now open our current Faculty Form window, going to
the Edit|Paste menu item to paste them into our current form. Your fi nished Faculty
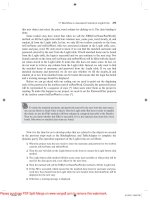
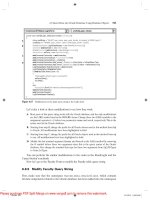
Form window should match the one shown in Figure 7.13 .
Figure 7.13
Modifi ed Faculty form window.
c07.indd 575c07.indd 575 2/11/2010 11:57:21 AM2/11/2010 11:57:21 AM
Please purchase PDF Split-Merge on www.verypdf.com to remove this watermark.
576
Chapter 7 Data Updating and Deleting with Visual C#.NET
Note that when you perform this copy - paste operation, an object FacultyBindingSource
that belongs to the project SQLUpdateDeleteWizard will also be copied and pasted into
the Faculty Form. Remove this object since we do not need it in this project.
7.6.1.2 Modify Original Coding in Faculty Form
The code modifi cations to the Faculty Form can be divided into two parts: (1) replace
the fi eld - level label array FacultyLabel[] used to store faculty information with textbox
array FacultyTextBox[] and (2) modify the codes related to those textboxes.
Let ’ s begin this modifi cation from the fi rst part. Open the code window of the Faculty
Form window, and change the fi eld - level label collection FacultyLabel to the textbox
collection FacultyTextBox. Your fi nished textbox collection FacultyTextBox should
look like:
private TextBox[] FacultyTextBox = new TextBox[7];
The code modifi cation in the second part relates to codes in the three user - defi ned
methods: FillFacultyTable(), MapFacultyTable(), and FillFacultyReader(). Open these
methods and perform the following modifi cations shown in Figure 7.14 to these methods.
All modifi ed codes have been highlighted in bold.
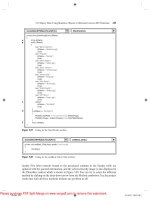
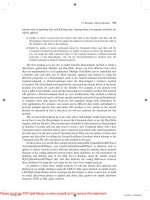
Let ’ s take a close look at these modifi cations to see how they work.
A. Replace the FacultyLabel array with the FacultyTextBox array in the user - defi ned method
FillFacultyTable(). Also change the class name from Label to TextBox. Perform the same
modifi cations to the codes inside the method FillFacultyReader(), which is shown in step
E in Figure 7.14 .
B. Change the passing - argument object in the user - defi ned method MapFacultyTable() from
the label array FacultyLabel to the textbox array FacultyTextBox. Perform the same
modifi cations to the codes inside the method FillFacultyReader(), which is shown in step
F in Figure 7.14 .
C. Change the label array FacultyLabel to the textbox array FacultyTextBox inside the
foreach
loop.
D. Change the nominal passing - argument object in the user - defi ned method MapFacultyTable()
from the label array fLabel to the textbox array fTextBox. Expand the lower bound of the
FacultyTextBox array to 1 since we need to update six pieces of faculty information in our
database. Also replace six label objects with six textbox objects and assign them to the
associated textbox control in the Faculty Form window.
E. Change the label array FacultyLabel to the textbox array FacultyTextBox inside the
for
loop in the FillFacultyReader() method.
Note that some buttons may not respond to your clicking on them as the project runs.
These buttons may include the Select, Back, and Insert buttons. This is because we delete
all original controls from this Faculty Form window, and copy and paste all controls from
the Faculty Form in another project SQLUpdateDeleteWizard to this Faculty Form. The
relationship between each button and its delegated method is also removed with our
deletion for those original controls in the Faculty Form. To fi x these errors, we can re - do
these delegation relationships between each button and its method one by one. Just
double - click on each button to open its delegated method and move the codes from the
old method to this new one. You can also change the name of the new opened method
c07.indd 576c07.indd 576 2/11/2010 11:57:21 AM2/11/2010 11:57:21 AM
Please purchase PDF Split-Merge on www.verypdf.com to remove this watermark.
7.6 Update and Delete Data for SQL Server Database Using Runtime Objects
577
to the original one if you like. However, you need to fi rst remove the old method, and
then change the name of the new method to the original one from the associated Form ’ s
Designer.cs fi le by compiling and building the project.
Well, quite a few modifi cations have made in this part. However, that is a good thing
since we can save a lot of time when we develop the next project, OracleUpdate
DeleteRTObject, by just making a few modifi cations to the current project. Now let ’ s
begin to develop the codes for our data updating and deleting parts.
7.6.1.3 Develop Codes to Update Data
As we mentioned in the previous sections, to update or delete an existing record from
our related tables, one must follow the three steps listed in Section 7.1.1 . Open the Update
button ’ s Click method by double - clicking on the Update button from the Faculty Form
window and enter the codes shown in Figure 7.15 into this method.
private void FillFacultyTable(ref DataTable FacultyTable)
{
int pos1 = 0;
for (int pos2 = 0; pos2<= 6; pos2++) //Initialize the object array
FacultyTextBox[pos2] = new TextBox(); // modified on 12-3-2008
MapFacultyTable(FacultyTextBox); //
foreach (DataRow row in FacultyTable.Rows)
{
foreach (DataColumn column in FacultyTable.Columns)
{
FacultyTextBox[pos1].Text = row[column].ToString(); //
pos1++;
}
}
}
private void MapFacultyTable(Object[] fText) // modified on 12-3-2008
{
fText[1] = txtName;
fText[2] = txtOffice; //The order must be identical
fText[3] = txtPhone; //with the real order in the query string
fText[4] = txtCollege;
fText[5] = txtTitle;
fText[6] = txtEmail;
}
private void FillFacultyReader(SqlDataReader FacultyReader)
{
int intIndex = 0;
for (intIndex = 0; intIndex <= 6; intIndex++) //Initialize the object array
FacultyTextBox[intIn
dex] = new TextBox();
MapFacultyTable(FacultyTextBox);
while (FacultyReader.Read())
{
for (intIndex = 0; intIndex <= FacultyReader.FieldCount - 1; intIndex++)
FacultyTextBox[intIndex].Text = FacultyReader.GetString(intIndex);
}
}
A
B
C
D
E
F
G
SQLUpdateDeleteRTObject.FacultyForm
FillFacultyReader()
Figure 7.14
Modifi cations to the Faculty Form.
c07.indd 577c07.indd 577 2/11/2010 11:57:21 AM2/11/2010 11:57:21 AM
Please purchase PDF Split-Merge on www.verypdf.com to remove this watermark.
578
Chapter 7 Data Updating and Deleting with Visual C#.NET
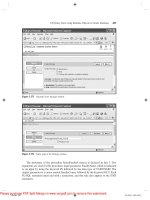
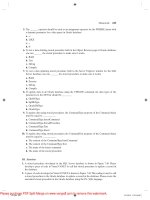
Let ’ s take a look at this piece of code to see how it works.
A. The Update query string is defi ned fi rst at the beginning of this method. All six data
columns in the Faculty table are input parameters. The dynamic parameter @Param1
represents the old faculty name, which is the faculty name that has not been updated.
B. All data components and local variables are declared here such as the Command object,
LogInForm object, and intUpdate . The LogInForm object and the getLogInForm()
method are used to access the Connection object we built in the LogIn Form object
and initialize the Command object with the Connection object below. The integer variable
intUpdate is used to hold the returned data from calling the ExecuteNonQuery() method.
C. The Command object is initialized and built using the Connection object and the Parameter
object.
D. A user - defi ned method UpdateParameters() is called to add all updating parameters into
the Command Parameters ’ property. The passing mode used for the passed argument is
passing by reference, which means that a valid starting address of that Command object
is passed into the method, and any modifi cation to this Command object is permanent and
it can be returned to the calling method.
E. Then the ExecuteNonQuery() method of the Command class is executed to update the
faculty table. The running result of this method is returned and stored in the local variable
intUpdate .
private void cmdUpdate_Click(object sender, EventArgs e)
{
string cmdString = "UPDATE Faculty SET faculty_name = @name, office = @office, phone = @phone, " +
"college = @college, title = @title, email = @email “ +
“WHERE (faculty_name LIKE @Param1)";
LogInForm logForm = new LogInForm();
logForm = logForm.getLogInForm();
SqlCommand sqlCommand = new SqlCommand();
int intUpdate = 0;
sqlCommand.Connection = logForm.sqlConnection;
sqlCommand.CommandType = CommandType.Text;
sqlCommand.CommandText = cmdString;
UpdateParameters(ref sqlCommand);
intUpdate = sqlCommand.ExecuteNonQuery();
sqlCommand.Dispose();
ComboName.Items.Clear();
UpdateFaculty();
if (intUpdate == 0)
MessageBox.Show("The data updating is failed");
}
private void UpdateParameters(ref SqlCommand cmd)
{
cmd.Parameters.Add("@name", SqlDbType.Char).Value = txtName.Text;
cmd.Parameters.Add("@office", SqlDbType.Char).Value = txtOffice.Text;
cmd.Parameters.Add("@phone", SqlDbType.Char).Value = txtPhone.Text;
cmd.Parameters.Add("@college", SqlDbType.Char).Value = txtCollege.Text;
cmd.Parameters.Add("@title", SqlDbType.Char).Value = txtTitle.Text;
cmd.Parameters.Add("@email", SqlDbType.Char).Value = txtEmail.Text;
cmd.Parameters.Add("@Param1", SqlDbType.Char).Value = ComboName.Text;
}
A
B
C
D
E
SQLUpdateDeleteRTObject.FacultyForm cmdUpdate_Click()
F
G
H
Figure 7.15
Coding for the data updating operation.
c07.indd 578c07.indd 578 2/11/2010 11:57:21 AM2/11/2010 11:57:21 AM
Please purchase PDF Split-Merge on www.verypdf.com to remove this watermark.
7.6 Update and Delete Data for SQL Server Database Using Runtime Objects
579
F. The Command object is released after this data updating, and the updated faculty members
are refreshed in the ComboName box by executing the UpdateFaculty() method. Before
this updating can be refreshed, the ComboName box is cleaned up by running its Clear()
method.
G. The returned value from calling the ExecuteNonQuery() method is equal to the number
of rows that have been updated in the Faculty table. A zero means that no row has
been updated, an error message is displayed, and the procedure is exited if this situation
occurred.
H. The detailed coding for the user - defi ned method UpdateParameters() is shown in this step.
Six pieces of new faculty information are assigned to the associated columns in the Faculty
table.
At this point, we have fi nished the coding for the data updating operation for the
Faculty table. Next let ’ s take care of the data validation after this data updating to confi rm
that our data updating is successful.
7.6.1.4 Validate Data Updating
We do not need to add any new form windows to perform this data validation, and we
can use the Faculty Form window to perform this validation operation. By clicking on
the Select button on the Faculty Form window, we can perform the selection query to
retrieve the updated faculty record from the database and display it on the Faculty Form.
Before we can run the project to test the data updating function, we prefer to fi rst
complete the coding for the data deleting operation.
7.6.2 Delete Data from Faculty Table for SQL Server Database
As we mentioned in the previous section, to delete a faculty record from our database,
we have to follow the two steps listed below:
1. First, delete records from the child tables (LogIn and Course tables).
2. Second, delete records from the parent table (Faculty table).
The data deleting function can be performed by using the Delete button ’ s Click
method in the Faculty Form window. Therefore, the main coding for this functionality is
developed inside that method.
7.6.2.1 Develop Codes to Delete Data
Open the Delete button ’ s Click method by double - clicking on the Delete button from
the Faculty Form window, and enter the codes shown in Figure 7.16 into this method.
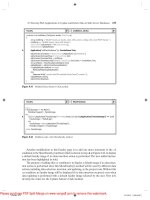
Let ’ s take a close look at this piece of code to see how it works.
A. The deleting query string is declared fi rst at the beginning of this method. The only input
parameter is the
faculty_name
. Although the primary key of the Faculty table is
faculty_id
, in order to make it convenient to the user, the
faculty_name
is used
as the criterion for this data deleting query. A potential problem of using the
faculty_
name
column as the deleting criterion is that no duplicated
faculty_name
should exist
in the Faculty table for this application. In other words, each faculty name must be unique
c07.indd 579c07.indd 579 2/11/2010 11:57:22 AM2/11/2010 11:57:22 AM
Please purchase PDF Split-Merge on www.verypdf.com to remove this watermark.
580
Chapter 7 Data Updating and Deleting with Visual C#.NET
in the Faculty table. A solution to this potential problem is that we can use the
faculty_
id
as the criterion for the data deleting query in the future.
B. A MessageBox button ’ s object is created, and this object is used to display both buttons
in the MessageBox, Yes and No, when the project runs.
C. All data components and local variables used in this method are declared here, too. The
data type of the variable Answer is DialogResult. However, one can use an integer vari-
able to replace it. The LogInForm object and the getLogInForm() method are used to
access the Connection object we built in the LogIn Form object and initialize the Command
object with that Connection object below. The integer variable intDelete is used to hold
the returned data from calling the ExecuteNonQuery() method to delete a record from
the Faculty table.
D. As the Delete button is clicked when the project runs, fi rst a MessageBox is displayed to
confi rm that the user wants to delete the selected member from the Faculty table.
E. If the user ’ s answer to the MessageBox is Yes, then the deleting operation begins to be
processed. The Command object is initialized and built by using the Connection object
and the Command string we defi ned at the beginning of this procedure.
F. The dynamic parameter @Param1 is replaced by the real parameter, the faculty name
stored in the combobox ComboName. A key point to note is that you must use the faculty
name stored in the combobox control, which is an existing faculty name. However, you
cannot use the faculty name stored in the Faculty Name textbox since that is an updating
faculty name.
G. The ExecuteNonQuery() method of the Command class is called to execute the data delet-
ing query to the Faculty table. The running result of calling this method is stored in the
local variable intDelete .
private void cmdDelete_Click(object sender, EventArgs e)
{
string cmdString = "DELETE FROM Faculty WHERE (faculty_name LIKE @Param1)";
MessageBoxButtons vbButton = MessageBoxButtons.YesNo;
LogInForm logForm = new LogInForm();
logForm = logForm.getLogInForm();
SqlCommand sqlCommand = new SqlCommand();
DialogResult Answer;
int intDelete = 0;
Answer = MessageBox.Show("Do you want to delete this record?", "Delete", vbButton);
if (Answer == System.Windows.Forms.DialogResult.Yes)
{
sqlCommand.Connection = logForm.sqlConnection;
sqlCommand.CommandType = CommandType.Text;
sqlCommand.CommandText = cmdString;
sqlCommand.Parameters.Add("@Param1", SqlDbType.Char).Value = ComboName.Text;
intDelete = sqlCommand.ExecuteNonQuery();
sqlCommand.Dispose();
if (intDelete == 0)
MessageBox.Show("The data Deleting is failed");
for (intDelete = 0; intDelete < 7; intDelete++) // clean up the Faculty textbox array
FacultyTextBox[intDelete].Text = string.Empty;
}
}
A
B
C
D
E
UpdateDeleteRTObject.FacultyForm
cmdDelete_Click() SQL
F
G
H
I
J
Figure 7.16
Coding for the data deleting query.
c07.indd 580c07.indd 580 2/11/2010 11:57:22 AM2/11/2010 11:57:22 AM
Please purchase PDF Split-Merge on www.verypdf.com to remove this watermark.
7.6 Update and Delete Data for SQL Server Database Using Runtime Objects
581
H. The Command object is released after the data deleting.
I. The returned value from calling of the ExecuteNonQuery() method is equal to the number
of rows that have been successfully deleted from the Faculty table. If a zero returns, which
means that no row has been deleted from the Faculty table and this data deleting has failed,
an error message is displayed and the method is exited if that situation occurred.
J. After the data deleting is done, all faculty information stored in the six textboxes should
be cleaned up. A
for
loop is used to fi nish this cleaning job.
Finally let ’ s take care of the coding to validate the data deleting query.
7.6.2.2 Validate Data Updating and Deleting
As we did for the validation of the data updating in the last section, we do not need to
create any new form window to do this validation, and we can use the Faculty Form to
perform this data validation.
Now let ’ s run the project to test both data updating and data deleting operations.
Before we can run the project, make sure that a default faculty photo fi le named Default.
jpg has been stored in the default folder in our project if an updating photo is involved
in this data updating. In this application, this default folder is the folder in which
the executable fi le of our Visual C#.NET project is located, which is C:\Chapter 7\
SQLUpdateDeleteRTObject\bin\Debug .
Click on the Start Debugging button to start our project, enter the suitable username
and password to the LogIn form, and select the item Faculty Information from the
Selection Form to open the Faculty Form window. First, let ’ s select a faculty member
and retrieve all information related to the selected faculty from our database, and display
those pieces of information in this form. Then we can update this faculty by modifying
some pieces of information stored in related textboxes. In this test, we select
Ying Bai
as a faculty member and enter the following updated information to the related
textboxes:
• Professor Title textbox
• MTC - 305 Offi ce textbox
• 750 - 378 - 1127 Phone textbox
Click on the Update button in the Faculty Form window to update this record.
To validate this data updating, fi rst select another faculty from the combobox control
ComboName and click on the Select button to retrieve all information for that faculty.
Then go to the combobox again and select our updated faculty name
Ying Bai
from the
box, and click on the Select button to retrieve back the updated information for that
selected faculty member. Immediately you can fi nd that all pieces of updated information
related to the selected faculty are displayed in this form. This means that our data updat-
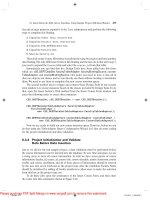
ing is successful. Your updated faculty information window should match the one shown
in Figure 7.17 .
Next let ’ s test the data deleting function by clicking on the Delete button to try to
delete this updated faculty record from the Faculty table. Click on Yes to the message
box and all updated faculty information stored in six textboxes is gone. Is our data delet-
ing successful? To answer this question, click on the Select button again to try to retrieve
that deleted faculty information from the Faculty table. What happens after you click on
c07.indd 581c07.indd 581 2/11/2010 11:57:22 AM2/11/2010 11:57:22 AM
Please purchase PDF Split-Merge on www.verypdf.com to remove this watermark.
582
Chapter 7 Data Updating and Deleting with Visual C#.NET
the Select button? A message “ No matched faculty found ” shows up, and this means
that the selected faculty and all information related to that selected faculty have been
successfully deleted from the Faculty table. Yes, our data deleting is successful.
To keep our sample database neat and complete, it is highly recommended to recover
those updated and deleted faculty records after this testing. To perform this recovering
work successfully, the following points must be kept in mind:
1. Recall that when we built our sample database, that is, when we set up the relationships
among tables, we selected the Cascade mode for both
Update
and
Delete Rules
for
INSERT and UPDATE Specifi cation fi elds between the Faculty and LogIn, Faculty and
Course, and Course and StudentCourse tables. This means that among these tables, the
Faculty is a parent table for the LogIn and the Course tables and the LogIn and the Course
are child tables to the Faculty table. Similarly, the Course is a parent table for the
StudentCourse table, and the StudentCourse is a child table to the Course table. The
cascade updating and deleting means that when a record in the parent table is updated or
deleted, all related records in the child tables are also updated or deleted. An example of
cascade updating and deleting is shown in Figure 7.18 . The faculty member Ying Bai with
a faculty_id=B78880 is selected for this cascade updating and deleting example.
2. As shown in Figure 7.18 , if the faculty member with a faculty_id=B78880 , which is a
primary key in the Faculty table but a foreign key in the LogIn and the Course tables, is
updated or deleted from the Faculty table, the related records in the child tables, LogIn
and Course, with the same faculty_id will also be updated or deleted with the associated
columns. Two associated columns, user_name and pass_word , located in the LogIn table
and four associated columns, course_id , located in the Course table will also be updated
or deleted. Similarly, if a course_id that is a primary key in the Course table but a foreign
key in the StudentCourse table is updated or deleted from the Course table, all related
records in the child table, StudentCourse, will also be updated or deleted. Figure 7.18 shows
the associated columns that will be affected when these cascade updating or deleting actions
are performed for the selected faculty member Ying Bai .
3. An important issue is the order to recover these deleted records. You have to fi rst recover
the records in the parent table (Faculty and Course tables) and then recover the records in
Figure 7.17
Updated faculty information window.
c07.indd 582c07.indd 582 2/11/2010 11:57:22 AM2/11/2010 11:57:22 AM
Please purchase PDF Split-Merge on www.verypdf.com to remove this watermark.
7.6 Update and Delete Data for SQL Server Database Using Runtime Objects
583
the child tables. Follow the table order in Figure 7.18 and refer to Sections 2.10.1 to 2.10.3
in Chapter 2 and Tables 7.3 , 7.4 , 7.5 and 7.6 to complete this record ’ s recovery.
A completed project SQLUpdateDeleteRTObject can be found from the folder
DBProjects\Chapter 7 located at the accompanying ftp site (see Chapter 1 ).
Course Table
course_id
StudentCourse Table
course_id
course_id=CSC-132B
course_id=CSC-234A
course_id=CSE-434
course_id=CSE-438
Primary Key
Faculty Table
faculty_id
LogIn Table
faculty_id
B78880
Course Table
faculty_id
B78880
user_name
ybai
pass_word
reback
course_id=CSC-132B
course_id=CSC-234A
course_id=CSE-434
course_id=CSE-438
Figure 7.18
Relationships among tables.
Table 7.4 Data to be recovered in the Log I n Table
Table 7.3 Data to be recovered in the Faculty Table
faculty_id faculty_name office phone college title email
B78880 Ying Bai MTC-211 750-378-1148 Florida Atlantic University Associate Professor
user_name pass_word faculty_id student_id
ybai reback B78880 NULL
Table 7.5 Data to be recovered in the Course Table
Table 7.6 Data to be recovered in the Student C ourse Table
course_id course credit classroom schedule enrollment faculty_id
CSC-132B Introduction to Programming 3 TC-302 T-H: 1:00-2:25 PM 21 B78880
CSC-234A Data Structure & Algorithms 3 TC-302 M-W-F: 9:00-9:55 AM 25 B78880
CSE-434 Advanced Electronics Systems 3 TC-213 M-W-F: 1:00-1:55 PM 26 B78880
CSE-438 Advd Logic & Microprocessor 3 TC-213 M-W-F: 11:00-11:55 AM 35 B78880
s_course_id student_id course_id credit major
1005 J77896 CSC-234A 3 CS/IS
1009 A78835 CSE-434 3 CE
1014 A78835 CSE-438 3 CE
1016 A97850 CSC-132B 3 ISE
1017 A97850 CSC-234A 3 ISE
c07.indd 583c07.indd 583 2/11/2010 11:57:22 AM2/11/2010 11:57:22 AM
Please purchase PDF Split-Merge on www.verypdf.com to remove this watermark.
584
Chapter 7 Data Updating and Deleting with Visual C#.NET
7.7 UPDATE AND DELETE DATA FOR ORACLE DATABASES
USING RUNTIME OBJECTS
Because of the coding similarity between the SQL Server and the Oracle databases for
the data updating and deleting, in this section we only show the differences in the coding
for both databases. The main differences between the SQL Server and the Oracle data-
bases are the syntax in the query strings for data deleting and updating. In this section,
we concentrate on these query strings.
First, let ’ s modify an existing project SQLUpdateDeleteRTObject we developed in
the last section to create our new project OracleUpdateDeleteRTObject used in this
section. Open that project and perform the following operations to make it a new project.
Open Windows Explorer and create a new folder such as Chapter 7 if you have not,
and then browse to the folder DBProjects\Chapter 7 located at the accompanying ftp site
(see Chapter 1 ). Copy the project SQLUpdateDeleteRTObject to the new folder
C:\Chapter 7. Change the name of the project from SQLUpdateDeleteRTObject to
OracleUpdataDeleteRTObject. Double - click on the OracleUpdataDeleteRTObject.
csproj to open this project.
On the opened project, perform the following modifi cations to get our desired project:
• Go to Project|OracleUpdataDeleteRTObject Properties menu item to open the project ’ s
property window. Change the Assembly name and the Default namespace from
SQLUpdateDeleteRTObject to OracleUpdataDeleteRTObject, respectively.
• Click on the Assembly Information button to open the Assembly Information dialog
box, change the Title and the Product to OracleUpdataDeleteRTObject. Click on OK to
close this dialog box.
• Change the project namespace for all fi les from SQLUpdateDeleteRTObject to
OracleUpdataDeleteRTObject using the Find and Replace dialog box.
Go to the File|Save All to save those modifi cations. Now we are ready to develop
our codes based on our new project OracleUpdataDeleteRTObject.
We can use graphical user interfaces in this modifi ed project, and the only modifi ca-
tions we need to do are the coding parts for each form window. Basically, we need to
perform the following modifi cations on the coding:
1. Add the Oracle namespace reference to the project.
2. Modify the connection string in the LogIn Form.
3. Modify the SELECT query string for the LogIn button ’ s Click method in the LogIn Form.
4. Modify the SELECT query string for the Select button ’ s Click method in the Faculty Form.
5. Modify the UPDATE query string for the Update button ’ s Click method in the Faculty
Form.
6. Modify the DELETE query string for the Delete button ’ s Click method in the Faculty
Form.
7. Modify the parameters ’ names for the UPDATE and the DELETE command objects in
the Faculty Form.
8. Modify two SELECT query strings for the Select button ’ s Click method and the
SelectedIndexChanged method of the Course listbox in the Course Form.
9. Modify all prefi xes for all Oracle classes and objects used in this project.
c07.indd 584c07.indd 584 2/11/2010 11:57:23 AM2/11/2010 11:57:23 AM
Please purchase PDF Split-Merge on www.verypdf.com to remove this watermark.
7.7 Update and Delete Data for Oracle Databases Using Runtime Objects
585
Well, it looks like we need to do many modifi cations for this project. However, it is
easy to handle these operations. Let ’ s begin our fi rst modifi cation.
7.7.1 Add Oracle Namespace Reference
Open our new project and go to the Solution Explorer window, right - click on the project,
and select Add Reference item to open the Add Reference dialog box. Browse down
along the list until you fi nd the item System.Data.OracleClient , select it by clicking on
it, and click on the OK button to add this reference to our project.
Open the code windows of the following forms from the current project:
• LogIn
• Faculty
• Course
Add the Oracle namespace statement using System.Data.OracleClient ; to the
namespace section for all the form windows. Since we will not use the Student, Insert
Faculty, and the SP Forms for this project, leave them unchanged.
7.7.2 Modify Connection String and Query String for
Log I n Form
The modifi cations to the LogIn Form can be divided into three parts: Modifi cations
to the connection string in the constructor, modifi cations to the SELECT query string in
the TableAdapter LogIn button ’ s Click method, and modifi cations to the SELECT query
string in the DataReader LogIn button ’ s Click method.
7.7.2.1 Modify Connection String in Constructor of Log I n Class
Open the constructor of the LogIn Form class and change the connection string to:
string oraString = “ Data Source=XE; ” +
“ User ID=CSE_DEPT; ” + “ Password=reback ” ;
Also change the prefi xes of all data classes from Sql to Oracle, the prefi xes of all data
objects from sql to ora, respectively, in this constructor.
7.7.2.2 Modify SELECT Query String in Tab L ogIn Button Click Method
The only modifi cation we need to do to this method is to change the syntax of the query
string and make it compatible with the query string used in the Oracle database. Open
the TabLogIn button ’ s Click method and change the SELECT query string to:
string cmdString
= “ SELECT user_name, pass_word, faculty_id, student_id FROM LogIn ” ;
cmdString += “ WHERE user_name=:name AND pass_word=:word ” ;
Also change the prefi xes of all data classes from Sql to Oracle and the prefi xes of all
data objects from sql to ora. Change two dynamic parameters ’ names from @name to
name and from @word to word for the Add() method in the Command ’ s Parameters
c07.indd 585c07.indd 585 2/11/2010 11:57:23 AM2/11/2010 11:57:23 AM
Please purchase PDF Split-Merge on www.verypdf.com to remove this watermark.
586
Chapter 7 Data Updating and Deleting with Visual C#.NET
property, respectively. Also change the data type for those two dynamic parameters to
OracleType .
7.7.2.3 Modify SELECT Query String in Read LogIn Button Click Method
Open the ReadLogIn button ’ s Click method and change the SELECT query string to:
string cmdString
= “ SELECT user_name, pass_word, faculty_id, student_id FROM LogIn ” ;
cmdString += “ WHERE user_name=:name AND pass_word=:word ” ;
Also change the prefi xes of all data classes from Sql to Oracle and the prefi xes of all
data objects from sql to ora. Change two dynamic parameters ’ names from @name to
name and from @word to word for the Add() method in the Command ’ s Parameters
property, respectively. Also change the data type for those two dynamic parameters to
OracleType .
7.7.3 Modify Query Strings in Faculty Form
This modifi cation can also be divided into three parts: Modifi cations to the query string for
the Select button ’ s Click method, modifi cations to the query string for the Update button ’ s
Click method, and modifi cations to the query string for the Delete button ’ s Click method.
7.7.3.1 Modify SELECT Query String for Select Button Click Method
Open the Faculty Form window and the Select button ’ s Click method, and change the
query string to:
string cmdString = “ SELECT faculty_id, faculty_name, office, phone,
college, title, email FROM Faculty ” ;
cmdString += “ WHERE faculty_name =: FacultyName ” ;
Also change the prefi xes of all data classes from Sql to Oracle and the prefi xes of all
data objects from sql to ora. Change the dynamic parameter ’ s name from @FacultyName
to FacultyName for the Add() method in the Command Parameter ’ s property. Also
change the data type for that dynamic parameter from SqlDbType to OracleType .
7.7.3.2 Modify UPDATE Query String for Update Button Click Method
Open the Update button ’ s Click method and change the query string to:
string cmdString
= “ UPDATE Faculty SET faculty_name=:name, office=:office,
phone=:phone, ” + “ college=:college, title=:title,
email=:email ” + “ WHERE (faculty_name =: Param1) ” ;
Change the prefi xes of all data classes from Sql to Oracle and the prefi xes of all data
objects from sql to ora. Also modify the data types and the name of the dynamic param-
eters inside the UpdateParameters() method as below:
• Change the data type for all parameters from SqlDbType to OracleType .
• Remove the @ symbol before each parameter ’ s name.
c07.indd 586c07.indd 586 2/11/2010 11:57:23 AM2/11/2010 11:57:23 AM
Please purchase PDF Split-Merge on www.verypdf.com to remove this watermark.
7.7 Update and Delete Data for Oracle Databases Using Runtime Objects
587
7.7.3.3 Modify DELETE Query String for Delete Button Click Method
Open the Delete button ’ s Click method and change the query string to:
string cmdString = “ DELETE FROM Faculty WHERE (faculty_name
=: Param1) ” ;
Change the prefi xes of all data classes from Sql to Oracle and the prefi xes of all data
objects from sql to ora. Also change the dynamic parameter ’ s name from @Param1 to
Param1 and the data type from SqlDbType to OracleType for the Add() method in the
Command Parameter ’ s property.
7.7.4 Modify Query Strings for Course Form
The modifi cation to this form can be divided into two parts: modifi cations to the query
string for the Select button ’ s Click method and modifi cations to the query string for the
Course Listbox ’ s SelectedIndexChanged method.
7.7.4.1 Modify SELECT Query String for Select Button Click Method
Open the Course Form window and the Select button ’ s Click method and change the
query string to:
string strCourse
= “ SELECT Course.course_id, Course.course FROM Course, Faculty ” ;
strCourse += “ WHERE (Course.faculty_id=Faculty.faculty_id) AND
(Faculty.faculty_name=:name) ” ;
Change the prefi xes of all data classes from Sql to Oracle and the prefi xes of all data
objects from sql to ora. Also change the dynamic parameter ’ s name from @name to name
and the data type from SqlDbType to OracleType for the Add() method in the Command
Parameter ’ s property.
Another modifi cation is to change the data type of the nominal argument
CourseReader from SqlDataReader to OracleDataReader in the user - defi ned method
FillCourseReader() .
7.7.4.2 Modify SELECT Query String for CourseList Click Method
Open the Course Form window and the Course Listbox ’ s SelectedIndexChanged method
and change the query string to:
string cmdString = “ SELECT course, credit, classroom, schedule,
enrollment, course_id FROM Course ” ;
cmdString += “ WHERE course_id =: courseid ” ;
Change the prefi xes of all data classes from Sql to Oracle and the prefi xes of all data
objects from sql to ora. Also change the dynamic parameter ’ s name from @courseid to
courseid and the data type from SqlDbType to OracleType for the Add() method in
the Command Parameter ’ s property. Another modifi cation is to change the data type of
the nominal argument CourseReader from the SqlDataReader to the OracleDataReader
in the user - defi ned method FillCourseReaderTextBox() .
c07.indd 587c07.indd 587 2/11/2010 11:57:23 AM2/11/2010 11:57:23 AM
Please purchase PDF Split-Merge on www.verypdf.com to remove this watermark.
588
Chapter 7 Data Updating and Deleting with Visual C#.NET
7.7.5 Other Modifi cations
Change the prefi xes of all data classes from Sql to Oracle and the prefi xes of all data
objects from sql to ora. Change the data type from SqlDbType to OracleType and
DataReader from SqlDataReader to OracleDataReader. These modifi cations include the
following methods:
• The Cancel button ’ s Click method in the LogIn Form
• The user - defi ned method UpdateFaculty() in the Faculty Form
• The user - defi ned method FillFacultyReader() in the Faculty Form
• The constructor of the Course Form
• The constructor of the Insert Faculty Form
• The Exit button ’ s Click method in the Selection Form
After completing the modifi cations listed above, we may still encounter some other
compiling errors as we build the project. These errors may include:
• Mismatched Connection object inside the Select button ’ s Click method in the Insert Faculty
Form window
• Mismatched Connection object inside the user - defi ned method BuildCommand() in the
Student Form window
• Mismatched Connection object inside the user - defi ned method BuildCommand() in the SP
Form window
Just comment out these instructions to avoid the related compiling errors since we
will not use those methods in this project. In addition to commenting out these compiling
error instructions, you also need to comment out the following two instructions since (1)
they will be executed as a new instance of either the Student Form or the SP Form class,
and (2) we will not use these two forms in this project:
• Calling of the Select button ’ s Click method in the constructor of the Student Form class:
cmdSelect_Click(this.cmdSelect, null) ;
• Calling of the Select button ’ s Click method in the constructor of the SP Form class: cmd-
Select_Click(this.cmdSelect, null) ;
At this point, we have fi nished all modifi cations to the project, and now we can run
the project to test the data updating and deleting functions. Click on the Start Debugging
button to run the project. Enter the suitable username and password such as jhenry and
test to the LogIn Form, and select the item Faculty Information from the Selection Form
to open the Faculty Form window.
To test the data updating, fi rst let ’ s select a faculty member such as Ying Bai from
the combobox ComboName, and click on the Select button to retrieve all six pieces of
information related to that selected faculty and display them in this form. Then update
this faculty by changing the following information in the associated textbox:
• Peter Bai Faculty Name textbox
• Research Professor Title textbox
• MTC - 335 Offi ce textbox
• 750 - 330 - 5555 Phone textbox
• Email textbox
c07.indd 588c07.indd 588 2/11/2010 11:57:23 AM2/11/2010 11:57:23 AM
Please purchase PDF Split-Merge on www.verypdf.com to remove this watermark.
7.8 Update and Delete Data in Database Using Stored Procedures
589
Click on the Update button to update this record in the Faculty table in the
database.
To confi rm this data updating, click on the drop - down arrow on the combobox
control ComboName. First, we can select any other faculty from the list and click on the
Select button to show the information for that faculty. Then select the updated faculty
(Peter Bai) from the combobox control ComboName and click on the Select button to
try to retrieve this updated faculty information and display it in this form. Immediately
you can fi nd that the selected faculty information has been updated and displayed, which
is shown in Figure 7.19 . Our data updating is successful.
Now let ’ s test our data deleting function. Keep the updated faculty name unchanged
in the combobox control ComboName and click on the Delete button to try to delete it
from the Faculty table in the database. Click on Yes to the confi rmation message box,
and then you can fi nd that all information related to the deleted faculty is removed from
all textboxes. To confi rm that data deleting, click on the Select button to try to retrieve
the deleted record from the Faculty table. A message “ No matched faculty found ” i s
displayed to indicate that the selected faculty and the related information have been
deleted from the database. Yes, our data deleting is also successful.
Before we can fi nish this section, it is highly recommended to recover the deleted
faculty information involved in the Faculty, LogIn, Course, and the StudentCourse tables
in our sample Oracle database CSE_DEPT. Open the sample Oracle database and refer
to Section 7.6.2.2 in this Chapter to complete these data recoveries.
A complete project OracleUpdateDeleteRTObject can be found from the folder
DBProjects\Chapter 7 located in the accompanying ftp site (see Chapter 1 ).
7.8 UPDATE AND DELETE DATA IN DATABASE USING
STORED PROCEDURES
As we mentioned in the previous sections, performing the data updating among related
tables is a very challenging topic. But the good news is that most of the time it is unneces-
Figure 7.19
Confi rmation of the data updating operation.
c07.indd 589c07.indd 589 2/11/2010 11:57:23 AM2/11/2010 11:57:23 AM
Please purchase PDF Split-Merge on www.verypdf.com to remove this watermark.
590
Chapter 7 Data Updating and Deleting with Visual C#.NET
sary to update the primary key, or the
faculty_id
, in our Faculty table if we want to
update any faculty information from the Faculty table in the database. Basically, it is
much better to insert a new faculty record with a new
faculty_id
into the Faculty table
than updating that record including the primary key
faculty_id
because the primary
key or
faculty_id
is good for the lifetime of the database in actual applications.
Therefore, based on the analysis above, we will perform the data updating for all columns
in the Faculty table except the
faculty_id
in this section.
To delete records from related tables, we need to perform two steps: First, we need
to delete records from the child tables, and then we can delete those records from the
parent table. For example, if we want to delete a record from the Faculty table, fi rst we
need to delete those records that are related to the record to be deleted from the Faculty
table from the LogIn and the Course tables (child tables), and then we can delete the
record from the Faculty table (parent table).
We divide this discussion into three parts based on three types of databases we used
in this book: using stored procedures to update and delete data in (1) Microsoft Access
2007 database, (2) SQL Server database, and (3) Oracle database.
To save time and space, we will not duplicate any project, and we want to modify
some existing projects to create our desired projects.
7.8.1 Update and Delete Data in Access Database Using
Stored Procedures
We want to modify the project SQLUpdateDeleteRTObject to create our desired project
AccessUpdateDeleteSP to discuss the data updating and deleting in the Faculty table
using the stored procedures for the Microsoft Access database.
Perform the following tasks to fi nish this project.
1. Modify the existing project to access the Microsoft Access database.
2. Create stored procedures in the Microsoft Access database.
3. Call the stored procedure to update and delete the faculty information.
4. Confi rm the updated and deleted faculty information.
Now let ’ s start from the fi rst part to modify the project.
7.8.1.1 Modify Existing Project
Open Windows Explorer and create a new folder such as Chapter 7 if you have not, and
then browse to the folder DBProjects\Chapter 7 located at the accompanying ftp site (see
Chapter 1 ). Copy the project SQLUpdateDeleteRTObject to the new folder Chapter 7.
Change the names of the solution and the project to AccessUpdateDeleteSP. Double -
click on the AccessUpdateDeleteSP.csproj to open this project.
On the opened project, perform the following modifi cations to get our desired
project:
• Go to Project| AccessUpdateDeleteSP Properties menu item to open the project ’ s
property window. Change the Assembly name and the Default namespace from
SQLUpdateDeleteRTObject to AccessUpdateDeleteSP, respectively.
c07.indd 590c07.indd 590 2/11/2010 11:57:23 AM2/11/2010 11:57:23 AM
Please purchase PDF Split-Merge on www.verypdf.com to remove this watermark.
7.8 Update and Delete Data in Database Using Stored Procedures
591
• Click on the Assembly Information button to open the Assembly Information dialog
box, change the Title and the Product to AccessUpdateDeleteSP. Click on OK to close this
dialog box.
• Change the project namespace for all fi les from SQLUpdateDeleteRTObject to
AccessUpdateDeleteSP using the Find and Replace dialog box.
Go to the File|Save All to save those modifi cations. Now we are ready to modify our
codes based on our new project AccessUpdateDeleteSP.
The code modifi cations include the following parts:
1. Add the OleDb Data Provider namespace and change the connection string in the LogIn Form.
2. Change the query strings for the LogIn button ’ s Click method in the LogIn Form.
3. Change the query strings for the Select, Update, and Delete buttons ’ Click methods in the
Faculty Form.
4. Change the prefi xes of all data classes from Sql to OleDb and the prefi xes of all data objects
from sql to acc for the LogIn, Faculty, and Selection Forms.
5. Other modifi cations.
Let ’ s start from the fi rst modifi cation — modify the Imports commands
7.8.1.1.1 Modify Namespaces and Connection String Open the code window of
the LogIn Form class and add the OleDb Data Provider namespace to the namespace
section of that form by entering the following statement:
using System.Data.OleDb;
Perform the same namespace addition to all other forms in this new project.
Open the constructor of the LogIn Form class and change the connection string to:
string accString = “ Provider=Microsoft.ACE.OLEDB.12.0; ” +
“ Data Source=C:\\database\\Access\\CSE_DEPT.accdb; ” ;
Also change the prefi xes of all data classes from Sql to OleDb and the prefi xes of all
data objects from sql to acc in the constructor.
7.8.1.1.2 Modify the Query Strings in the Log I n Button Click Method There are
two query strings located at two different LogIn buttons ’ Click methods: the TabLogIn
and the ReadLogIn. Open these two methods and modify these two query strings. This
modifi cation is very easy and the only change is to remove the @ symbol before each
dynamic parameter in the WHERE clause and in the Add() method in the Parameters
property of the Command class. An example of this modifi cation is to change the dynamic
parameters @name to name and @word to word , respectively, for the TabLogIn query
string and the Add() method of the Parameters property. Another modifi cation is to
change the data type of the dynamic parameters in the Add() method of the Parameters
property of the Command class from SqlDbType to OleDbType. Perform this modifi ca-
tion to two query strings. Also change the prefi xes of all data classes from Sql to OleDb
and the prefi xes of all data objects from sql to acc in these two methods.
7.8.1.1.3 Modify Query Strings in Select, Update, and Delete Buttons Click
Methods Open the Faculty Form window and these three buttons ’ Click methods one
c07.indd 591c07.indd 591 2/11/2010 11:57:23 AM2/11/2010 11:57:23 AM
Please purchase PDF Split-Merge on www.verypdf.com to remove this watermark.
592
Chapter 7 Data Updating and Deleting with Visual C#.NET
by one to modify each query string. For the Select button ’ s Click method, replace the
symbol LIKE @ with the equal symbol = in the WHERE clause for the query string.
Remove the @ symbol before the dynamic parameter (@name) in the Add() method in
the Parameters property of the Command class. Also change the data type of the dynamic
parameters in the Add() method of the Parameters property of the Command class from
SqlDbType to OleDbType.
For the Update button ’ s Click method, replace the symbol LIKE @ with the equal
symbol = in the WHERE clause for the query string. Also Remove the @ symbol before
each updating dynamic parameter in the updating query string. Another modifi cation is
to change the data type of each dynamic parameter in the Add() method of the Parameters
property of the Command class in the user - defi ned method UpdateParameters() from
SqlDbType to OleDbType, and remove the @ symbol from each dynamic parameter
in that method. Finally change the data type of the passed Command object from
SqlCommand to OleDbCommand in the user - defi ned method UpdateParameters().
For the Delete button ’ s Click method, replace the symbol LIKE @ with the equal
symbol = in the WHERE clause for the query string. Remove the @ symbol before the
dynamic parameter (@Param1) in the Add() method of the Parameters property of the
Command class. Also change the data type of the dynamic parameters in the Add()
method of the Parameters property of the Command class from SqlDbType to OleDbType.
Change the prefi xes of all data classes from Sql to OleDb and the prefi xes of all data
objects from sql to acc for these three methods. Another modifi cation to this form is to
change the data type of the passed argument FacultyReader from the SqlDataReader to
the OleDbDataReader in the user - defi ned method FillFacultyReader().
7.8.1.1.4 Other Modifi cations Change the prefi xes of all data classes from Sql to
OleDb and the prefi xes of all data object from sql to acc for the following methods:
• Cancel button ’ s Click method in the LogIn Form
• User - defi ned method UpdateFaculty() in the Faculty Form
• Exit button ’ s Click method in the Selection Form
Because we will not use other forms in this project such as the Course, Student, Insert
Faculty Form, and the SP Forms, we do not need to make modifi cations to these forms.
One possible problem is that you may encounter some compiling errors when you build
this project because of some unmodifi ed codes in these forms. To solve this problem, just
comment out those codes that have not been modifi ed. Also comment out the following
statement inside the constructors of the SP Form and the Student Form classes since we
will not uses these two forms:
cmdSelect_Click(this.cmdSelect, null);
Now let ’ s create our stored procedure in the Microsoft Access 2007 database.
7.8.1.2 Create Stored Procedures in Microsoft Access Database
As we mentioned at the beginning of this section, the data updating operation updates
all columns of one existing faculty record except the
faculty_id
column since it is
c07.indd 592c07.indd 592 2/11/2010 11:57:23 AM2/11/2010 11:57:23 AM
Please purchase PDF Split-Merge on www.verypdf.com to remove this watermark.