Practical Database Programming With Visual C#.NET- P14
Bạn đang xem bản rút gọn của tài liệu. Xem và tải ngay bản đầy đủ của tài liệu tại đây (855.76 KB, 50 trang )
8.5 Develop Web Applications to Update and Delete Data in SQL Server Databases
673
Another modifi cation to this Faculty page is to add one more statement to the
if
condition in the ShowFaculty() method, which is shown in step A in Figure 8.42 , to display
a default faculty image if no data insertion action is performed. The new added instruc-
tion has been highlighted in bold.
The purpose of adding this
or
condition is to display a default image if no data inser-
tion action is performed since this ShowFaculty() method will be used by different data
actions, including data selection, insertion, and updating, as the project runs. Without this
or
condition, no faculty image will be displayed if no data insertion occurred, even when
data updating is performed with a default faculty image selected by the user. Now let ’ s
develop the codes for the Update button ’ s Click method.
protected void cmdSelect_Click(object sender, EventArgs e)
{
string cmdString = "SELECT faculty_id, faculty_name, office, phone, college, title, email FROM Faculty ";
cmdString += "WHERE faculty_name LIKE @name";
SqlCommand sqlCommand = new SqlCommand();
SqlDataReader sqlDataReader;
Application["oldFacultyName"] = ComboName.Text;
sqlCommand.Connection = (SqlConnection)Application["sqlConnection"];
sqlCommand.CommandType = CommandType.Text;
sqlCommand.CommandText = cmdString;
sqlCommand.Parameters.Add("@name", SqlDbType.Char).Value = ComboName.Text;
string strName = ShowFaculty(ComboName.Text);
sqlDataReader = sqlCommand.ExecuteReader();
if (sqlDataReader.HasRows == true)
FillFacultyReader(sqlDataReader);
else
Response.Write("<script>alert('No matched faculty found!')</script>");
sqlDataReader.Close();
sqlCommand.Dispose();
}
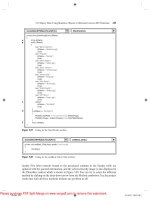
Faculty
cmdSelect_Click()
A
Figure 8.41
Modifi ed Select button ’ s Click method.
………
if (FacultyImage != "No Match")
PhotoBox.ImageUrl = FacultyImage;
else
if (((string)Application["FacultyImage"] == string.Empty) || (string)Application["FacultyImage"] == null)
FacultyImage = "Default.jpg";
else
FacultyImage = (string)Application["FacultyImage"];
PhotoBox.ImageUrl = FacultyImage;
return FacultyImage;
}
Faculty ShowFaculty()
A
Figure 8.42
Modifi ed codes of the ShowFaculty method.
c08.indd 673c08.indd 673 2/11/2010 11:58:44 AM2/11/2010 11:58:44 AM
Please purchase PDF Split-Merge on www.verypdf.com to remove this watermark.
674
Chapter 8 Accessing Data in ASP.NET
8.5.3 Develop Codes for Update Button Click Method
Open this method by double - clicking on the Update button from the Faculty Web form
window and enter the codes shown in Figure 8.43 into this method.
Let ’ s take a closer look at this piece of code to see how it works.
A. An updating query string is declared fi rst with the
oldName
as the name of the dynamic
parameter. This is because when you want to update the faculty name, the original name
stored in the combobox control ComboName becomes the old name, and we need to
distinguish this old name from the updated name.
B. The data component, Command object, used in this method is created here. A local integer
variable intUpdate is also created, and it is used as a value holder to keep the returned
data from executing the ExecutNonQuery() method later.
C. Before we can perform data updating, fi rst we need to clean up the Faculty ID textbox
since we don ’ t want to update this piece of information.
D. Now we need to check whether the user wants to update the faculty name or not by com-
paring the global variable oldFacultyName that is stored in the Application state function
during the data selection process in the Select button ’ s click method with the current faculty
name stored in the textbox control txtName . If both are different, that means the user has
updated the faculty name. In that case, we need to add the updated faculty name into the
combobox control ComboName and remove the old faculty name from that control to
allow users to select this updated faculty from the combobox list to perform the data actions
in the database in the future.
E. The Command object is initialized with the Connection object, Command type and
Command text.
protected void cmdUpdate_Click(object sender, EventArgs e)
{
string cmdString = "UPDATE Faculty SET faculty_name = @name, office = @office, phone = @phone, " +
"college = @college, title = @title, email = @email " +
"WHERE (faculty_name LIKE @oldName)";
SqlCommand sqlCommand = new SqlCommand();
int intUpdate = 0;
txtID.Text = string.Empty; //clean up the faculty_id textbox
if (txtName.Text != (string)Application["oldFacultyName"]) //the faculty name is updated
{
ComboName.Items.Add(txtName.Text);
ComboName.Items.Remove((string)Application["oldFacultyName"]);
}
sqlCommand.Connection = (SqlConnection)Application["sqlConnection"];
sqlCommand.CommandType = CommandType.Text;
sqlCommand.CommandText = cmdString;
UpdateParameters(ref sqlCommand);
intUpdate = sqlCommand.ExecuteNonQuery();
sqlCommand.Dispose();
if (intUpdate == 0)
Response.Write("<script>alert('The data updating is failed')</script>");
}
A
B
C
D
E
F
G
H
I
Faculty cmdUpdate_Click()
Figure 8.43
Coding for the Update button ’ s Click method.
c08.indd 674c08.indd 674 2/11/2010 11:58:44 AM2/11/2010 11:58:44 AM
Please purchase PDF Split-Merge on www.verypdf.com to remove this watermark.
8.5 Develop Web Applications to Update and Delete Data in SQL Server Databases
675
F. The user - defi ned UpdateParameters() method, whose detailed coding is shown in Figure
8.44 , is called to assign all input parameters to the command object.
G. The ExecuteNonQuery() method of the Command class is called to execute the data updat-
ing operation. This method returns a feedback value to indicate whether this data updating
is successful or not, and this returned value is stored into the local integer variable
intUpdate .
H. A cleaning job is performed to release all data objects used in this method.
I. The data value returned from calling the ExecuteNonQuery() is exactly equal to the
number of rows that have been successfully updated in the database. If this value is zero,
which means that no row has been updated and this data updating has failed, a warning
message is displayed. Otherwise if this value is nonzero, this data updating is successful.
The detailed coding for the method UpdateParameters() is shown in Figure 8.44 .
Seven input parameters are assigned to the Parameters collection property of the
command object using the Add() method. One important point for this parameter assign-
ment is the last input parameter or the dynamic parameter oldName . The original or the
old faculty name oldFacultyName stored in the Application state function must be used
as the value for this parameter. Some readers may disagree with me: The original or the
old faculty name is located at the combobox control ComboName, and we can directly
get it from that control without using this global variable. Well, this statement is correct
for the Windows - based application without any problem. However, for the Web - based
application, it is absolutely wrong. Recall that when the users clicked on the Update
button to perform a data updating action, this updating request will be sent to the server,
and the server will post back a refreshed Faculty page to the client. All old or the original
data stored in all textboxes or comboboxes in the previous page will be gone. In other
words, the contents stored in all textboxes and comboboxes in this refreshed page are
different with the contents stored in the previous pages. A wrong updating may occur if
you still use the faculty name stored in the combobox control ComboName in the current
or refreshed page.
At this point we have fi nished all coding jobs for the data updating actions against
the SQL Server database in the Faculty page. Before we can run the project to test this
data updating function, we must make sure that the starting page is the LogIn page, and
a default faculty image fi le Default.jpg has been stored in our default folder. To check
the starting page, right - click on our project icon from the Solution Explorer window,
select the Start Options item from the pop - up menu, and then check the Specifi c page
radio button and select the
LogIn.aspx
as the starting page.
private void UpdateParameters(ref SqlCommand cmd)
{
cmd.Parameters.Add("@name", SqlDbType.Char).Value = txtName.Text;
cmd.Parameters.Add("@office", SqlDbType.Char).Value = txtOffice.Text;
cmd.Parameters.Add("@phone", SqlDbType.Char).Value = txtPhone.Text;
cmd.Parameters.Add("@college", SqlDbType.Char).Value = txtCollege.Text;
cmd.Parameters.Add("@title", SqlDbType.Char).Value = txtTitle.Text;
cmd.Parameters.Add("@email", SqlDbType.Char).Value = txtEmail.Text;
cmd.Parameters.Add("@oldName", SqlDbType.Char).Value = ComboName.Text;
}
Faculty UpdateParameters()
Figure 8.44
Coding for the UpdateParameters method.
c08.indd 675c08.indd 675 2/11/2010 11:58:44 AM2/11/2010 11:58:44 AM
Please purchase PDF Split-Merge on www.verypdf.com to remove this watermark.
676
Chapter 8 Accessing Data in ASP.NET
Now let ’ s run the project to test the data updating actions. Click on the Start
Debugging button to run the project, enter the suitable username and password to the
LogIn page, and select the Faculty Information item from the Selection page to open the
Faculty page. Select the faculty name
Ying Bai
from the combobox control ComboName
and click on the Select button to retrieve the information for this selected faculty from
the database and display it on this page.
Now let ’ s test the data updating actions in two steps: First, we update the faculty
information without touching the faculty name, and second we update the faculty infor-
mation with changing the faculty name.
Let ’ s start from the fi rst step now. Enter the following information into the associated
textboxes to update this faculty record:
• Professor Title textbox
• MTC - 353 Offi ce textbox
• 750 - 378 - 3300 Phone textbox
Click on the Update button to perform this data updating. To confi rm this data
updating, fi rst select another faculty from the combobox control ComboName and click
on the Select button to retrieve and display that faculty information. Then select the
faculty
Ying Bai
whose information has just been updated from the combobox control
and click on the Select button to retrieve and display it. You can see that the selected
faculty information has been updated, which is shown in Figure 8.45 .
Next let ’ s perform data updating with the second method: Include updating of the
faculty name. Still keep the current page unchanged, and then modify the faculty infor-
mation from the associated textboxes by entering the following data:
Figure 8.45
Data updating process.
c08.indd 676c08.indd 676 2/11/2010 11:58:45 AM2/11/2010 11:58:45 AM
Please purchase PDF Split-Merge on www.verypdf.com to remove this watermark.
8.5 Develop Web Applications to Update and Delete Data in SQL Server Databases
677
• Peter Bai Faculty Name textbox
• Associate Professor Title textbox
• MTC - 555 Offi ce textbox
• 750 - 378 - 3355 Phone textbox
• Email textbox
Click on the Update button to update this faculty information. Immediately you will
fi nd that the original faculty name
Ying Bai
has disappeared from the combobox control
ComboName. To confi rm this data updating, in a similar way, let ’ s fi rst select another
faculty from the combobox control ComboName and click on the Select button to
retrieve and display that faculty information. Then select the faculty
Peter Bai
from the
combobox control and click on the Select button to retrieve and display it. You can see
that the selected faculty information including the faculty name has been updated, which
is shown in Figure 8.46 .
One point to note is the faculty photo. When you updated the faculty name, you did
not place an updated faculty photo fi le in our default folder. Therefore, a default faculty
photo is displayed for this situation. You can change this situation by placing an updated
faculty photo fi le in our default folder before the project runs if you like the correct
faculty photo to be displayed with this data updating. Our data updating action is very
successful.
Next let ’ s take care of the data deleting action in the SQL Server database. Similarly
to data updating, for data deleting we don ’ t need any new Web page as our user interface,
and we can still use the Faculty page to perform data deleting actions.
Figure 8.46
Data updating process — including the faculty name updating.
c08.indd 677c08.indd 677 2/11/2010 11:58:46 AM2/11/2010 11:58:46 AM
Please purchase PDF Split-Merge on www.verypdf.com to remove this watermark.
678
Chapter 8 Accessing Data in ASP.NET
8.5.4 Develop Codes for Delete Button Click Method
Since deleting a record from a relational database is a complex issue, we divide this dis-
cussion into fi ve sections:
1. Relationships between fi ve tables in our sample database
2. Data deleting sequence
3. Using the Cascade deleting option to simplify the data deleting
4. Creating the stored procedure to perform the data deleting
5. Calling the stored procedure to perform data deleting
Let ’ s start with the fi rst section.
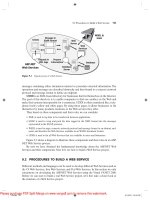
8.5.4.1 Relationships Between Five Tables in Our Sample Database
As we discussed at the beginning of this section, to delete a record from a relational
database, one must follow the correct sequence. In other words, one must fi rst delete the
records related to the record to be deleted in the parent table from the child tables. In
our sample database, fi ve tables are related together by using the primary and foreign
keys. In order to make these relationships clear, we redraw Figure 2.5 in Chapter 2 , which
is Figure 8.47 in this section, to illustrate this issue.
If you want to delete a record from the Faculty table, you must fi rst delete the related
records from the LogIn, Course, StudentCourse, and Student tables, and then you can
delete the desired record from the Faculty table. The reason for that is because the rela-
tionships existed between fi ve tables.
pass_word
faculty_id
student_iduser_name
faculty_id
name
office
college
student_id
name
major
gpa
course
credits
course_id
s_course_id
P.K. P.K.
P.K.
P.K.
P.K.
F.K.
F.K.
F.K.
faculty_id
student_id course_id
F.K.
F.K.
Many-to-Many
One-to-Many One-to-Many
One-to-Many
One-to-Many
One-to-Many
Student Table
Course Table
Faculty Table
LogIn Table
StudentCourse Table
Figure 8.47
Relationships between fi ve tables.
c08.indd 678c08.indd 678 2/11/2010 11:58:48 AM2/11/2010 11:58:48 AM
Please purchase PDF Split-Merge on www.verypdf.com to remove this watermark.
8.5 Develop Web Applications to Update and Delete Data in SQL Server Databases
679
For example, if one wants to delete a faculty record from the Faculty table, one must
perform the following deleting operations:
• T h e
faculty_id
is a primary key in the Faculty table, but it is a foreign key in the LogIn
and the Course table. Therefore, the Faculty table is a parent table and the LogIn and the
Course are child tables. Before one can delete any record from the Faculty table, one must
fi rst delete records that have the
faculty_id
as the foreign key from the child tables. In
other words, one must fi rst delete those records that use the
faculty_id
as a foreign key
from the LogIn and the Course tables.
• When deleting records that use the
faculty_id
as a foreign key from the Course table,
the related
course_id
that is a primary key in the Course table will also be deleted. The
Course table right now is a parent table since the
course_id
is a primary key for this
table. But as we mentioned, to delete any record from a parent table, one must fi rst delete
the related records from the child tables. Now the StudentCourse table is a child table for
the Course table; therefore, the records that use the
course_id
as a foreign key in the
StudentCourse table should be deleted fi rst.
• After those related records in the child tables are deleted, fi nally the faculty member can
be deleted from the parent table, Faculty table.
8.5.4.2 Data Deleting Order Sequence
Summarily, to delete a record from the Faculty table, one needs to perform the following
deleting operations in the order sequence shown below:
1. Delete all records that use the
course_id
as the foreign key from the StudentCourse
table.
2. Delete all records that use the
faculty_id
as the foreign key from the LogIn table.
3. Delete all records that use the
faculty_id
as the foreign key from the Course table.
4. Delete the desired faculty member from the Faculty table.
You can see how complicated the operations are to delete one record from the rela-
tional database from this example.
8.5.4.3 Use Cascade Deleting Option to Simplify Data Deleting
To simplify the data deleting operations, we can use the cascade deleting option provided
by the SQL Server 2005 Database Management Studio.
Recall that when we created and built the relationship between our fi ve tables, the
following fi ve relationships were built between tables:
1. A relationship between the LogIn and the Faculty tables was set up using the faculty_id as
a foreign key FK_LogIn_Faculty in the LogIn table.
2. A relationship between the LogIn and the Student tables was set up using the student_id
as a foreign key FK_LogIn_Student in the LogIn table.
3. A relationship between the Course and the Faculty tables was set up using the faculty_id
as a foreign key FK_Course_Faculty in the Course table.
4. A relationship between the StudentCourse and the Course table was set up using the
course_id as a foreign key FK_StudentCourse_Course in the StudentCourse table.
c08.indd 679c08.indd 679 2/11/2010 11:58:48 AM2/11/2010 11:58:48 AM
Please purchase PDF Split-Merge on www.verypdf.com to remove this watermark.
680
Chapter 8 Accessing Data in ASP.NET
5. A relationship between the StudentCourse and the Student table was set up using the
student_id as a foreign key FK_StudentCourse_Student in the StudentCourse table.
Refer to the data deleting sequence listed in the last section to delete a record from
the Faculty table. One needs to perform four deleting operations in that sequence.
Compared with those four deleting operations, the fi rst one is the most diffi cult and the
reason for that is: To perform the fi rst data deleting operation, one must fi rst fi nd all
course_ids that use the faculty_id as the foreign key from the Course table, and then
based on those course_ids, one needs to delete all records that use those course_ids as
the foreign keys from the StudentCourse table. For deleting operations in sequences 3
and 4, they are very easy, and each deleting operation only needs one deleting query.
The conclusion for this discussion is: How do we fi nd an easy way to complete the delet-
ing operation in sequence 1?
A good solution to this question is to use the Cascade option, as we did in Chapter
2 , to perform data deleting and updating in a cascaded mode. This Cascade option allows
the SQL Server 2005 database engine to perform that deleting operation in sequence 1
as long as a Cascade option is selected for relationships 4 and 5 listed above.
Now let ’ s use a real example to illustrate how to use this Cascade option to simplify
the data deleting operations, especially for the fi rst data deleting in that sequence. Open
the SQL Server Management Studio Express by going to Start|All Programs |Microsoft
SQL Server 2005|SQL Server Management Studio Express. On the opened Studio
Express window, click on the Database and expand our sample database, C:\database\
SQLServer\CSE_DEPT.mdf , to display all fi ve tables. Since we are only interested in
relationships 4 and 5, expand the dbo.StudentCourse table and expand the Keys folder
to display all the keys we set up in Section 2.10.4 . Double - click on the key FK_
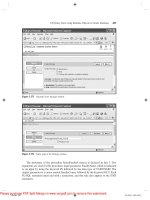
StudentCourse_Course to open it, which is shown in Figure 8.48 .
On the opened dialog box, keep our desired foreign key FK_StudentCourse_Course
selected from the left pane, and then click on the small plus icon before the item INSERT
And UPDATE Specifi cation , and you can fi nd that a Cascade mode has been set for
both Delete Rule and Update Rule items, which is shown in Figure 8.48 .
Figure 8.48
Foreign Key Relationship dialog box.
c08.indd 680c08.indd 680 2/11/2010 11:58:48 AM2/11/2010 11:58:48 AM
Please purchase PDF Split-Merge on www.verypdf.com to remove this watermark.
8.5 Develop Web Applications to Update and Delete Data in SQL Server Databases
681
After this Cascade option is set up, each time you want to delete all records that use
the
course_id
or the
student_id
as the foreign keys in the StudentCourse table, the
SQL Server engine will perform those data deleting operations automatically for you in
that cascaded sequence. Therefore, you can see how easy it is to perform data deleting
in sequence 1.
Now let ’ s create our codes for the Delete button ’ s Click method to perform this data
deleting operation.
8.5.4.4 Develop Codes to Perform Data Deleting
On the opened Visual Studio.NET, go to File|Open Web Site menu item to open our
Web application project SQLWebUpdateDelete. Then open the Delete button ’ s Click
method from the Faculty Web form window by double - clicking on the Delete button.
Enter the codes shown in Figure 8.49 into this method.
Let ’ s take a closer look at this piece of codes to see how it works.
A. The data deleting query string is declared fi rst with the
faculty_name
as the query
criterion.
B. The data object and local variable used in this method are declared here. The integer vari-
able intDelete is used to hold the returned value from calling the ExecuteNonQuery()
method of the Command class later.
C. The Command object is initialized by using the Connection object, Command Type,
Command Text, and Parameters properties.
D. After the Command object is initialized, the ExecuteNonQuery() method of the Command
class is called to perform the data deleting action. This method will return a data value,
and it is assigned to the local variable intDelete .
E. A cleaning operation is performed to release all objects used in this method.
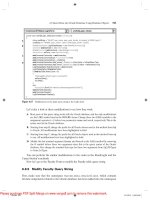
protected void cmdDelete_Click(object sender, EventArgs e)
{
string cmdString = "DELETE FROM Faculty WHERE (faculty_name LIKE @FacultyName)";
SqlCommand sqlCommand = new SqlCommand();
int intDelete = 0;
sqlCommand.Connection = (SqlConnection)Application["sqlConnection"];
sqlCommand.CommandType = CommandType.Text;
sqlCommand.CommandText = cmdString;
sqlCommand.Parameters.Add("@FacultyName", SqlDbType.Char).Value = ComboName.Text;
intDelete = sqlCommand.ExecuteNonQuery();
sqlCommand.Dispose();
if (intDelete == 0)
Response.Write("<script>alert('The data deleting is failed')</script>");
for (intDelete = 0; intDelete < 7; intDelete++) // clean up the Faculty textbox array
{
FacultyTextBox[intDelete] = new TextBox();
FacultyTextBox[intDelete].Text = string.Empty;
}
}
A
B
C
D
E
F
G
Faculty cmdDelete_Click()
Figure 8.49
Coding for the Delete button ’ s Click method.
c08.indd 681c08.indd 681 2/11/2010 11:58:49 AM2/11/2010 11:58:49 AM
Please purchase PDF Split-Merge on www.verypdf.com to remove this watermark.
682
Chapter 8 Accessing Data in ASP.NET
F. The returned value from calling the ExecuteNonQuery() method is exactly equal to the
number of rows that have been successfully deleted from our sample database. If this value
is zero, which means that no row has been deleted or affected from our database and this data
deleting has failed, a warning message is displayed. Otherwise if a nonzero value is returned,
at least one row in our database has been deleted, and this data deleting is successful.
G. A cleaning operation is performed to clean up the contents of all textboxes that stored the
deleted faculty information.
At this point, we fi nished all coding operations to delete data in the SQL Server
database via Web pages. Before we can run the project to test this deleting function,
make sure that the starting page is the LogIn page. After the project runs, enter the suit-
able username and password to complete the LogIn process. Then open the Faculty page
by clicking on the Faculty Information item from the Selection page, keep the default
faculty Ying Bai selected from the combobox control, and then click on the Select button
to retrieve and display this faculty ’ s information.
Click on the Delete button to delete this faculty record from our database. To confi rm
this data deleting, keep the deleted faculty member Ying Bai selected in the combobox
control ComboName, and click on the Select button to try to retrieve this deleted faculty
information. A warning message: "No matched faculty found!" is displayed to indicate
that this faculty member has been deleted from our sample database.
Another way to confi rm this data deleting is to open our sample database and fi nd
that all records related to that deleted faculty, as shown in Tables 8.7 to 8.10 , have been
deleted from our database. Yes, our data deleting action is successful.
Table 8.7 Data to Be Added into the Faculty Table
faculty_id faculty_name office phone college title email
B78880 Ying Bai MTC-211 750-378-1148 Florida Atlantic University Associate Professor
Table 8.10 Data to Be Added into the StudentCourse Table
s_course_id student_id course_id credit major
1005 J77896 CSC-234A 3 CS/IS
1009 A78835 CSE-434 3 CE
1014 A78835 CSE-438 3 CE
1016 A97850 CSC-132B 3 ISE
1017 A97850 CSC-234A 3 ISE
Table 8.8 Data to Be Added into the LogIn Table
user_name pass_word faculty_id student_id
ybai reback B78880 NULL
Table 8.9 Data to Be Added into the Course Table
course_id course credit classroom schedule enrollment faculty_id
CSC-132B Introduction to Programming 3 TC-302 T-H: 1:00-2:25 PM 21 B78880
CSC-234A Data Structure & Algorithms 3 TC-302 M-W-F: 9:00-9:55 AM 25 B78880
CSE-434 Advanced Electronics Systems 3 TC-213 M-W-F: 1:00-1:55 PM 26 B78880
CSE-438 Advd Logic & Microprocessor 3 TC-213 M-W-F: 11:00-11:55 AM 35 B78880
c08.indd 682c08.indd 682 2/11/2010 11:58:49 AM2/11/2010 11:58:49 AM
Please purchase PDF Split-Merge on www.verypdf.com to remove this watermark.
8.6 Develop ASP.NET Web Applications with LINQ to SQL Query
683
Before we can close the SQL Server Management Studio, it is highly recommended
to recover all records that have been deleted from our sample database. To do this recov-
ering operation, you need to take the following actions in the following order:
1. Recover the Faculty table by adding the deleted faculty record into the Faculty table, which
is shown in Table 8.7 .
2. Recover the LogIn table by adding the deleted login record into the LogIn table, as shown
in Table 8.8 .
3. Recover the Course table by adding the deleted courses taught by the deleted faculty
member into the Course table, which is shown in Table 8.9 .
4. Recover the StudentCourse table by adding the deleted courses taken by the associated
students into the StudentCourse table, as shown in Table 8.10 .
Some readers may have noticed the following interesting point: Although we have
developed the codes to clean up all seven textboxes ’ contents after this deletion action,
however, it looks like those pieces of code do not work and the deleted faculty informa-
tion stored in those seven textboxes are still in there. What is the reason for that? Does
our code have something wrong? Try to think about this and fi nd the solution yourself.
Yes, the answer is simple. This is a signifi cant difference that exists between the Windows -
based and Web - based applications since our project SQLWebUpdateDelete will run at
the server side, and each time the server sends back a refreshed Faculty page as an action
is performed from the client side. After a deletion action is performed, the server still
sends back a refreshed page that contains the original faculty information in seven text-
boxes to the client.
A complete Web application project SQLWebUpdateDelete can be found at the
folder DBProjects\Chapter 8 located at the accompanying ftp site (see Chapter 1 ).
8.6 DEVELOP ASP . NET WEB APPLICATIONS WITH
LINQ TO SQL QUERY
In this section, we provide a fundamental end - to - end LINQ to SQL scenario for adding,
modifying, and deleting data against our sample database via a Web page. As you know,
LINQ to SQL queries can perform not only the data selections, but also the data inser-
tion, updating, and deletion. The standard LINQ to SQL queries include:
• Select
• Insert
• Update
• Delete
To perform any of these operations or queries, we need to use entity classes and
DataContext, which we discussed in Section 4.6.1 , in Chapter 4 to do LINQ to SQL
actions in our sample database. We already created a Console project QueryLINQSQL
in that section to illustrate how to use LINQ to SQL to perform data queries, such as
data selection, insertion, updating, and deleting, in our sample database CSE_DEPT.mdf.
However, in this section, we want to create a Web - based project SQLWebLINQ by
c08.indd 683c08.indd 683 2/11/2010 11:58:50 AM2/11/2010 11:58:50 AM
Please purchase PDF Split-Merge on www.verypdf.com to remove this watermark.
684
Chapter 8 Accessing Data in ASP.NET
adding a graphic user interface to perform the data selection, and data insertion, and data
updating and deleting actions in our sample database CSE_DEPT.mdf using the LINQ
to SQL query via Web pages. Now let ’ s perform the following steps to create our new
project SQLWebLINQ:
1. Create a new Visual C# Web - based project and name it SQLWebLINQ.
2. Create a new Web form page with (1) fi ve button controls: Select, Insert, Update, Delete,
and Exit; (2) eight TextBox controls, (3) one DropDownList control, and (4) one Image
Box control.
3. Add a System.Data.Linq reference to this new project by right - clicking on our new project
from the Solution Explorer window, selecting the Add Reference item and scroll down the
list, and selecting the item System.Data.Linq from the list and clicking on the OK button.
4. Add the following directives at the top of the Faculty page fi le:
a. Using System.Data.Linq;
b. Using System.Data.Linq.Mapping;
5. Follow the steps listed in Section 4.6.1 in Chapter 4 to create entity classes using the Object
Relational Designer. The database used in this project is CSE_DEPT.mdf , and it is located
at the folder C:\database\SQLServer . Open the Server Explorer window and add this
database by right - clicking on the Data Connections item and select Add Connection if it
has not been added into our project.
6. We need to create fi ve entity classes, and each of them is associated with a data table in
our sample database. Drag each table from the Server Explorer window and place it on the
Object Relational Designer canvas. The mapping fi le ’ s name is CSE_DEPT.dbml . Make
sure that you enter this name into the Name box in the Object Relational Designer.
Now let ’ s begin the coding process for this project. Since we need to use the Select
button ’ s Click method to validate our data insertion and data updating and deleting
actions, we need to divide our coding process into the following four parts:
1. Create a new object of the DataContext class and do some initialization coding.
2. Develop the codes for the Select button ’ s Click method to retrieve the selected faculty
information using the LINQ to SQL query.
3. Develop the codes for the Insert button ’ s Click method to insert new faculty member using
the LINQ to SQL query.
4. Develop the codes for the Update button ’ s Click method to update the selected faculty
member using the LINQ to SQL query.
5. Develop the codes for the Delete button ’ s Click method to delete the selected faculty
member using the LINQ to SQL query.
Before we can start the coding process, fi rst let ’ s create a new Web form page as our
graphic user interface to perform those data actions.
8.6.1 Create New Web Form Page
In the newly created Web site project SQLWebLINQ, click on the View Designer button
to open the default Web page, Default.aspx, and add the components listed in Table 8.11
into this Web page. Your fi nished Web page should match the one shown in Figure 8.50 .
c08.indd 684c08.indd 684 2/11/2010 11:58:50 AM2/11/2010 11:58:50 AM
Please purchase PDF Split-Merge on www.verypdf.com to remove this watermark.
8.6 Develop ASP.NET Web Applications with LINQ to SQL Query
685
Table 8.11 Controls on the Faculty Web Page
Type ID Text TabIndex BackColor Font
Label Label1
xoBotohPegamI
Label Label2
Smaller
otohPtxtxoBtxeT
Label Label3
emaNobmoCtsiLnwoDporD
Label Label3
Smaller
DItxtxoBtxeT
Bold/ 4lebaLlebaL
Smaller
emaNtxtxoBtxeT
Bold/ 5leba
LlebaL
Smaller
eltiTtxtxoBtxeT
Bold/ 6lebaLlebaL
Smaller
eciffOtxtxoBtxeT
Bold/ 7lebaLlebaL
Smaller
enohPtxtxoBtxeT
Label Label8
Smaller
egelloCtxtxoBtxeT
Bold/9l
ebaLlebaL
Smaller
liamEtxtxoBtxeT
Bold/ SmalltceleSdmcnottuB
Bold/ SmalltresnIdmcnottuB
Button cmdUpdate
Bold/ SmalleteleDdmcnottuB
Bold/ Small
Bold/Large0
22
Bold/1
2
Bold/Smaller3
4
Bold/ 5
6
7
8
9
10
11
12
13
14
Bold/ 15
16
17
18
19
20
Bold/ Small21
22
23tixEdmcnottuB
Name
Title
Office
Phone
Select
Insert
Delete
CSE DEPT Faculty Page
Faculty Name
Faculty Photo
Faculty ID
College
Update
Exit
A key point in developing this Web page is that you have to set most controls ’
Position property to Absolute using the Format|Position menu item after you fi nish
dragging each control from the Tool box window and placing it on the Web form page.
These controls include all TextBoxes, DropDownList, Image control, and button con-
trols. You also need to set the line-height size in the Style|Block property to 5 px for
this Web page to align each label to make them vertically equal.
Another point is that you should not use the Copy|Paste menu items to create those
buttons. Instead, you need to create those buttons one by one by dragging each of them
from the ToolBox window and placing them on this page. Otherwise, the relationship
between each button and its event method may be missed.
Finally, you need to set the Font size of the Text property of all label controls to
smaller using the Format|Font menu item. Now let ’ s start our coding process.
8.6.2 Create New Object of DataContext Class
We need to create this new object of the DataContext class since we need to use this
object to connect to our sample database to perform data queries. We have connected
c08.indd 685c08.indd 685 2/11/2010 11:58:50 AM2/11/2010 11:58:50 AM
Please purchase PDF Split-Merge on www.verypdf.com to remove this watermark.
686
Chapter 8 Accessing Data in ASP.NET
Figure 8.50
Default.aspx Web page.
this DataContext class to our sample database CSE_DEPT.mdf in step 5 in Section 8.6 ,
and the connection string has been added into our web.confi g fi le when this connection
is done. Therefore we do not need to indicate the special connection string for this object.
Some initialization coding includes retrieving all updated faculty members from the
Faculty table in our sample database using the LINQ to SQL query and display them in
the ComboName combobox control.
Open the code window and the Page_Load() method of the Faculty Web page, and
enter the codes shown in Figure 8.51 into this method.
Let ’ s take a close look at this piece of code to see how it works.
A. A new fi eld - level object of the DataContext class, cse_dept, is created fi rst since we need
to use this object to connect our sample database to this Web project to perform the data
actions later.
B. A user - defi ned UpdateFaculty() method is executed to retrieve all updated faculty members
from our sample database and display them in the ComboName combobox control to allow
users to select a desired faculty later. To avoid multiple displaying of retrieved faculty
members, an
if
selection structure is adopted to make sure that we only display those
updated faculty members in the combobox control ComboName at the fi rst time as this
Web page is loaded, and will not display them each time as the server sends back a
refreshed Faculty page to the client when an action is performed in the client.
C. Before we can update the combobox control ComboName by adding the updated faculty
members into this control, a cleaning job is performed to avoid the multiple adding and
displaying of those faculty members.
c08.indd 686c08.indd 686 2/11/2010 11:58:50 AM2/11/2010 11:58:50 AM
Please purchase PDF Split-Merge on www.verypdf.com to remove this watermark.
8.6 Develop ASP.NET Web Applications with LINQ to SQL Query
687
public partial class _Default : System.Web.UI.Page
{
CSE_DEPTDataContext cse_dept = new CSE_DEPTDataContext();
protected void Page_Load(object sender, EventArgs e)
{
if (!IsPostBack)
{
UpdateFaculty();
ComboName.SelectedIndex = 0;
}
}
void UpdateFaculty()
{
ComboName.Items.Clear();
var faculty = (from fi in cse_dept.Faculties
let fields = "faculty_name"
select fi);
foreach (var f in faculty)
{
ComboName.Items.Add(f.faculty_name);
}
}
A
B
C
D
E
_Default Page_Load()
Figure 8.51
Initialization codes for the Faculty Web page.
D. The LINQ query is created and initialized with three clauses, from, let , and select . The
range variable
fi
is selected from the Faculty entity in our sample database. All current
faculty members (
faculty_name
) will be read back using the let clause and assigned to
the query variable faculty .
E. The LINQ query is executed to pick up all queried faculty members and add them into
the ComboName combobox control in our Faculty Form.
The coding for the Exit button ’ s Click method is easy, just enter the following code
line into this method:
Response.Write( " < script > window.close() < /script > " );
.
The function of this line is to close this Web project if this Exit button is clicked.
8.6.3 Coding for Data Selection Query
Double - click on the Select button to open its Click method and enter the codes shown
in Figure 8.52 into this method. The function of this piece of code is to retrieve all current
faculty members from the Faculty table in our sample database and display them in the
ComboName combobox control in the Faculty Form window as this Select button is
clicked on by the user.
Let ’ s take a close look at this piece of code to see how it works.
A. The user - defi ned ShowFaculty() method is executed to identify and display a matched
faculty image for the selected faculty member. You can copy this piece of code from the
Faculty Form class in the previous projects we developed in this chapter.
B. The LINQ query is created and initialized with three clauses: from, where , and select .
The range variable
fi
is selected from the Faculty entity in our sample database based on
a matched faculty members (
faculty_name
).
c08.indd 687c08.indd 687 2/11/2010 11:58:52 AM2/11/2010 11:58:52 AM
Please purchase PDF Split-Merge on www.verypdf.com to remove this watermark.
688
Chapter 8 Accessing Data in ASP.NET
C. The LINQ query is executed to pick up all columns for the selected faculty member and
display them on the associated textbox in our Faculty Form.
It is recommended that you copy the body of the user - defi ned ShowFaculty() method
from any Faculty Form page in the previous project SQLWebUpdateDelete we devel-
oped in this chapter, and paste it into this Faculty Form page. Now let ’ s concentrate on
the coding for our data insertion actions.
8.6.4 Coding for Data Insertion Query
Double - click on the Insert button from our Faculty Form page to open its Click method,
and enter the codes shown in Figure 8.53 into this method.
Let ’ s take a close look at this piece of code to see how it works.
A. A new instance of the Faculty entity class is created since we need to add a new record
into the Faculty table in our sample database.
B. Seven pieces of new faculty information stored in seven textbox controls are assigned to
the associated columns in the Faculty instance that can be mapped to the Faculty table in
our sample database.
C. A system method InsertOnSubmit() is executed to send our new created Faculty instance
to our Faculty table via the DataContext class.
D. Another system method SubmitChanges() is executed to perform this data insertion.
E. After a new record has been inserted into our database, we need to update our combobox
control ComboName to refl ect that insertion. First, we need to clean up all original con-
tents from this control to avoid multiple updating.
F. The user - defi ned UpdateFaculty() method is called to complete this updating.
G. In case the user wants to insert a new faculty image with that data insertion, the Text
property of the textbox control txtPhoto, which stored a valid faculty image fi le, is assigned
to the Application state function that works as a global variable. This global variable will
protected void cmdSelect_Click(object sender, EventArgs e)
{
string strName = ShowFaculty(ComboName.Text);
var faculty = (from fi in cse_dept.Faculties
where fi.faculty_name == ComboName.Text
select fi);
foreach (var f in faculty)
{
txtID.Text = f.faculty_id;
txtName.Text = f.faculty_name;
txtTitle.Text = f.title;
txtOffice.Text = f.office;
txtPhone.Text = f.phone;
txtCollege.Text = f.college;
txtEmail.Text = f.email;
}
}
A
B
C
_Default
cmdSelect_Click()
Figure 8.52
Codes for the Select button Click method.
c08.indd 688c08.indd 688 2/11/2010 11:58:52 AM2/11/2010 11:58:52 AM
Please purchase PDF Split-Merge on www.verypdf.com to remove this watermark.
8.6 Develop ASP.NET Web Applications with LINQ to SQL Query
689
be used later when we perform the confi rmation of the data insertion in the Select button ’ s
Click method.
Now let ’ s concentrate on the coding for our data updating and deleting actions.
8.6.5 Coding for Data Updating and Deleting Queries
Double - click on the Update button from our Faculty Form page window to open its Click
method, and enter the codes shown in Figure 8.54 into this method.
Let ’ s take a close look at this piece of code to see how it works.
A. A selection query is executed using the Standard Query Operator method with the
faculty_name
as the query criterion. The First() method is used to return only the fi rst
protected void cmdInsert_Click(object sender, EventArgs e)
{
Faculty newFaculty = new Faculty();
newFaculty.faculty_id = txtID.Text;
newFaculty.faculty_name = txtName.Text;
newFaculty.title = txtTitle.Text;
newFaculty.office = txtOffice.Text;
newFaculty.phone = txtPhone.Text;
newFaculty.college = txtCollege.Text;
newFaculty.email = txtEmail.Text;
// Add the faculty members to the Faculty table.
cse_dept.Faculties.InsertOnSubmit(newFaculty);
cse_dept.SubmitChanges();
ComboName.Items.Clear();
UpdateFaculty();
Application["FacultyImage"] = txtPhoto.Text;
}
A
B
C
D
E
F
G
_Default
cmdInsert_Click()
Figure 8.53
Codes for the Insert button Click method.
protected void cmdUpdate_Click(object sender, EventArgs e)
{
Faculty fi = cse_dept.Faculties.Where(f => f.faculty_name == ComboName.Text).First();
// updating the existing faculty information
fi.faculty_name = txtName.Text;
fi.title = txtTitle.Text;
fi.office = txtOffice.Text;
fi.phone = txtPhone.Text;
fi.college = txtCollege.Text;
fi.email = txtEmail.Text;
cse_dept.SubmitChanges();
ComboName.Items.Clear();
UpdateFaculty();
}
A
B
C
D
E
_Default
cmdUpdate_Click()
Figure 8.54
Codes for the Update button Click method.
c08.indd 689c08.indd 689 2/11/2010 11:58:52 AM2/11/2010 11:58:52 AM
Please purchase PDF Split-Merge on www.verypdf.com to remove this watermark.
690
Chapter 8 Accessing Data in ASP.NET
matched record. It does not matter to our application since we have only one record that
is associated with this specifi ed
faculty_name
.
B. All six columns for the selected faculty member are updated by assigning the current value
stored in the associated textbox to each column in the Faculty instance in our DataContext
class object cse_dept .
C. This data updating can be really performed only after the system method SubmitChanges()
is executed.
D. The combobox control ComboName is cleaned up to be ready to be updated.
E. The user - defi ned UpdateFaculty() method is executed to refresh the updated faculty
members stored in that control.
Before we can run our Web project to test these data actions, let ’ s complete the last
coding for our data deleting action.
Double - click on the Delete button from our Faculty Form page window to open its
Click method, and enter the codes shown in Figure 8.55 into this method.
Let ’ s take a close look at this piece of code to see how it works.
A. A LINQ selection query is fi rst executed to pick up the faculty member to be deleted. This
query is initialized with three clauses: from, where , and select . The range variable
fi
is
selected from the Faculty, which is exactly an instance of our entity class Faculty, and the
faculty_name
works as the query criterion for this query. All information related to
the selected faculty members (
faculty_name
) will be retrieved and stored in the query
variable faculty . The Single() means that only a single or the fi rst record is queried.
B. The system method DeleteOnSubmit() is executed to issue a deleting action to the faculty
instance, Faculties in our DataContext class object cse_dept .
C. Another system method SubmitChanges() is executed to exactly perform this deleting
action against data tables in our sample database. Only after this method is executed is the
selected faculty record deleted from our database.
protected void cmdDelete_Click(object sender, EventArgs e)
{
var faculty = (from fi in cse_dept.Faculties
where fi.faculty_name == ComboName.Text
select fi).Single<Faculty>();
cse_dept.Faculties.DeleteOnSubmit(faculty);
cse_dept.SubmitChanges();
// clean up all textboxes
txtID.Text = string.Empty;
txtName.Text = string.Empty;
txtOffice.Text = string.Empty;
txtTitle.Text = string.Empty;
txtPhone.Text = string.Empty;
txtCollege.Text = string.Empty;
txtEmail.Text = string.Empty;
ComboName.Items.Clear();
UpdateFaculty();
}
A
B
C
D
E
F
_Default
cmdDelete_Click()
Figure 8.55
Codes for the Delete button Click method.
c08.indd 690c08.indd 690 2/11/2010 11:58:52 AM2/11/2010 11:58:52 AM
Please purchase PDF Split-Merge on www.verypdf.com to remove this watermark.
8.6 Develop ASP.NET Web Applications with LINQ to SQL Query
691
D. All textboxes that stored information related to the deleted faculty are cleaned up by
assigning an empty string to each of them.
E. The combobox control ComboName is cleaned up to be ready to be updated.
F. The user - defi ned UpdateFaculty() method is executed to refl ect deleting this faculty record
for all faculty members stored in that control.
Now we can build and run our Web project to test the data actions against our sample
database. One point we need to note before we can run the project is that we must make
sure that all faculty image fi les should have been stored in the default folder in which our
Web project SQLWebLINQ is located. In this application, it should be C:\Chapter 8\
SQLWebLINQ.
Unlike other projects we developed in the previous chapters, in which a separate
Insert Faculty Form must be used to perform the data insertion action, in this project,
we can use the Faculty Form page to perform all data actions, including the data selec-
tion, data insertion, and data updating and deleting. As an example, let ’ s run the project
to test the data insertion action by inserting a new faculty member with the following
information:
• P77777 Faculty ID textbox
• Peter Tom Faculty Name textbox
• Assistant Professor Title textbox
• MTC - 200 Offi ce textbox
• 750 - 378 - 2000 Phone textbox
• University of Miami College textbox
• Email textbox
Directly enter these new data into each associated textbox after the project runs, and
you can select any faculty member from the combobox control ComboName to perform
this insertion action. Click on the Insert button when you fi nish this data entering to all
textboxes to perform this data insertion.
To confi rm this data action, fi rst select another faculty member from the combobox
control ComboName and click on the Select button to retrieve and display that faculty ’ s
information. Then select the new inserted faculty Peter Tom, who should already be in
the combobox control ComboName, and click on the Select button to try to retrieve that
new inserted faculty ’ s information and display it in this form. Your confi rmation page
should match the one shown in Figure 8.56 .
A default faculty image is displayed for this data insertion since we did not include
any faculty image fi le for this insertion. You can test to insert a new faculty with a selected
faculty image by entering the name of that faculty image fi le into the Faculty Photo
textbox control txtPhoto located at the upper - left corner of this page if you like.
Note that you had better recover any deleted faculty record if a data deleting action
is tested for this project since we want to keep our database neat and complete. Refer to
Tables 8.7 to 8.10 in section 8.5.4.4 to recover the deleted records to our sample
database.
A complete Web page application project SQLWebLINQ can be found from the
folder DBProjects\Chapter 8 located at the accompanying ftp site (see Chapter 1 ). Next
let ’ s take care of the Web applications with the Oracle database.
c08.indd 691c08.indd 691 2/11/2010 11:58:52 AM2/11/2010 11:58:52 AM
Please purchase PDF Split-Merge on www.verypdf.com to remove this watermark.
692
Chapter 8 Accessing Data in ASP.NET
8.7 DEVELOP ASP.NET WEB APPLICATION TO SELECT
DATA FROM ORACLE DATABASES
Because of the coding similarity between the SQL Server and Oracle databases, we will
emphasize the main differences between the codes in SQL Server and Oracle data
actions. Also in order to save time and space, we will modify the existing Web application
project SQLWebSelect we developed in the last section to make it our new project
OracleWebSelect in this section.
The main coding differences between these two database operations are:
1. Connection string and Connection object in the LogIn page
2. LogIn query string in the LogIn page
3. Query string in the Faculty page
4. Query strings in the Course page, which include the query string in the Select button ’ s Click
method and the query string in the SelectedIndexChanged event method of the CourseList
box control
5. Namespace and data objects used in the Selection page
6. Prefi x for each data object and class used for the Oracle database operations
7. Data type of the passed arguments of methods for Oracle database operations
Now let ’ s begin to modify the project SQLWebSelect based on the seven differences
listed above to make it our new project OracleWebSelect. Open Windows Explorer and
Figure 8.56
Testing status of the data insertion action.
c08.indd 692c08.indd 692 2/11/2010 11:58:52 AM2/11/2010 11:58:52 AM
Please purchase PDF Split-Merge on www.verypdf.com to remove this watermark.