Practical Database Programming With Visual C#.NET- P15
Bạn đang xem bản rút gọn của tài liệu. Xem và tải ngay bản đầy đủ của tài liệu tại đây (1.23 MB, 50 trang )
9.2 Procedures to Build a Web Service
723
messages containing either document - oriented or procedure - oriented information. The
operations and messages are described abstractly and then bound to a concrete network
protocol and message format to defi ne an endpoint.
UDDI is an XML - based directory for businesses that list themselves on the Internet.
The goal of this directory is to enable companies to fi nd one another on the Web and
make their systems interoperable for e - commerce. UDDI is often considered like a tele-
phone book ’ s yellow and white pages. By using those pages, it allows businesses to list
themselves by name, products, locations, or the Web services they offer.
Thus, based on these components and their roles, we can conclude:
• XML is used to tag data to be transferred between applications.
• SOAP is used to wrap and pack the data tagged in the XML format into the messages
represented in the SOAP protocol.
• WSDL is used to map a concrete network protocol and message format to an abstract end-
point, and describe the Web Services available in an WSDL document format.
• UDDI is used to list all Web Services that are available to users and businesses.
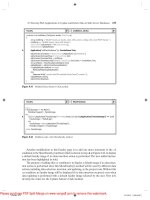
Figure 9.1 shows a diagram to illustrate these components and their roles in an ASP.
NET Web Service process.
By now we have obtained the fundamental knowledge about the ASP.NET Web
Services and their components. Next let ’ s see how to build a Web Service project.
9.2 PROCEDURES TO BUILD A WEB SERVICE
Different methods and languages can be used to develop different Web Services such as
the C# Web Services, Java Web Services, and Perl Web Services. In this section we only
concentrate on developing the ASP.NET Web Services using the Visual C#.NET 2008.
Before we can start to build a real Web Service project, let ’ s fi rst take a closer look at
the structure of a Web Service project.
WSDL &
UDDI
Client
Web
S
s
erver
Database
Server
Web
Message in
P Format
ASP.NET
Web Services
SOA
Services
Request in
XML tags
Prepare
Information
Database
Figure 9.1
Typical process of a Web Service.
c09.indd 723c09.indd 723 2/11/2010 3:01:04 PM2/11/2010 3:01:04 PM
Please purchase PDF Split-Merge on www.verypdf.com to remove this watermark.
724
Chapter 9 ASP.NET Web Services
9.2.1 Structure of a Typical Web Service Project
A typical Web Service project contains the following components:
1. As a new Web Service project is created, two page fi les and two folders are created under
this new project. The folder App_Code contains the code - behind page that has all real
codes for a simple default Web Service and the Web Service to be created. The folder
App_Data is used to store all project data.
2. The code - behind page Service.cs contains the real Visual C#.NET codes for a simple Web
Service. Visual Web Developer includes three default namespace declarations to help users
to develop Web Services on the top of this page, which are:
using System.Web;
using System.Web.Services;
using System.Web.Services.Protocols;
By default, a new code - behind fi le contains a class named
Service
that is defi ned with
the WebService and WebServiceBinding attributes. The class defi ned a default Web method
named HelloWorld that is a placeholder, and you can replace it with your own method or
methods later when you develop your own Web Service project.
3. The main Web Service page fi le Service.asmx is used to display information about the Web
Service ’ s methods and provide access to the Web Service ’ s WSDL information. The exten-
sion
.asmx
means that this is an Active Service Method fi le, and the letter
x
is just a
rotation of the attached symbol + after the keyword ASP since the ASP.NET was called
ASP+ in the early days. If you open the ASMX fi le on a disk, you will see that it actually
contains only one command line:
< %@ WebService Language= " C# " CodeBehind= " ~ /App_Code/Service.
cs " Class= " Service " % >
It indicates the programming language in which the Web Service ’ s code - behind fi le is
written, the code - behind fi le ’ s location, and the class that defi nes the Web Service. When
you request the Active Server Method File (ASMX) page through the Internet Information
Services (IIS), ASP.NET uses this information to generate the content displayed in the Web
browser.
4. The confi guration fi le web.confi g , which is an XML - based fi le, is used to set up a confi gura-
tion for the new created Web Service project, such as the namespaces for all kinds of Web
components, Connection string, and default authentication mode. Each Web Service project
has its own confi guration fi le.
Of all the fi les and folders discussed above, the code - behind page is the most impor-
tant fi le since all Visual C#.NET codes related to building a Web Service are located in
this page, and our major coding development will be concentrated on this page, too.
9.2.2 Real Considerations When Building a Web Service Project
Based on the structure of a typical Web Service project, some issues related to building
an actual Web Service project are emphasized here, and these issues are very important
and should be followed carefully to successfully create a Web Service project in the Visual
Studio.NET environment.
As a request is made and sent from a Windows or Web form client over the Internet
to the server, the request is packed into a SOAP message and sent to the IIS on the client
c09.indd 724c09.indd 724 2/11/2010 3:01:04 PM2/11/2010 3:01:04 PM
Please purchase PDF Split-Merge on www.verypdf.com to remove this watermark.
9.2 Procedures to Build a Web Service
725
computer. Then the IIS will pass the request to the ASP.NET to get it processed in terms
of the extension
.asmx
of the main service page. ASP.NET checks the page to make sure
that the code - behind page contains the necessary codes to power the Web Service, that
is, to trigger the associated Web methods to search, fi nd, and retrieve the information
required by the client, pack it to the SOAP message, and return it to the client.
During this process, the following detailed procedures must be performed:
1. When ASP.NET checks the received request represented in a SOAP message, the ASP.
NET will make sure that the names and identifi ers used in the SOAP message are unique.
In other words, those names and identifi ers cannot be confl icted with any name and identi-
fi er used by any other message. To make names and identifi ers unique, we need to use our
specifi c namespace to place and hold our SOAP message.
2. Generally, a request contains a set of information, not a single piece of information. To
request those pieces of information, we need to create a Web Service proxy class to consume
Web Services. In other words, we do not want to develop separate Web methods to query
each piece of information, which would make our project ’ s size terribly large if we needed
a lot of information. A good solution is to instantiate an object based on that class and
integrate these pieces of information into that object. All information can be embedded
into that object and can be returned if that object returns. Another choice is to design a
Web method to make it return a DataSet, which is a convenient way to return all data.
3. As a professional application, we need to handle the exceptions to make our Web Service
as perfect as possible. In that case, we need to create a base class to hold some error -
checking codes to protect our real class, which will be instantiated to an object that contains
all information we need. So this real class should be a child class inherited from the base
class.
4. Since the Web Services do not provide any GUI, we need to develop some GUIs in either
Windows - based or Web - based applications to interface to the Web Services to display
returned information on GUIs.
Keep these real issues in mind and now let ’ s begin to build a real Web Service project
using an ASP.NET Web Service template.
9.2.3 Procedures to Build an ASP . NET Web Service
As we mentioned in the last section, a Web Service is basically composed of a set of Web
methods that can be called by the computer programs by the client. To build these
methods, generally one needs to perform the following steps:
1. Create a new ASP.NET Web Service project.
2. Create a base class to handle the error checking to protect our real class.
3. Create our real Web Service class to hold all Web methods and codes to response to
requests.
4. Add all Web methods into our Web Service class.
5. Develop the detail codes for those Web methods to perform the Web Services.
6. Build a Windows - based and Web - based project to consume the Web Service to pick up and
display the required information on the GUI.
7. Store our ASP.NET Web Service project fi les in a safe location.
c09.indd 725c09.indd 725 2/11/2010 3:01:04 PM2/11/2010 3:01:04 PM
Please purchase PDF Split-Merge on www.verypdf.com to remove this watermark.
726
Chapter 9 ASP.NET Web Services
In this chapter, we try to develop the following projects to illustrate the building and
implementation process of a Web Services project:
• Build a professional ASP.NET Web Service project to access the SQL Server database to
obtain required information.
• Build client applications to provide GUIs to consume a Web Service.
• Build a professional ASP.NET Web Service project to insert new information into the SQL
Server database.
• Build a professional ASP.NET Web Service project to update and delete information against
the SQL Server database.
• Build a professional ASP.NET Web Service project to access the Oracle database to obtain
required information.
• Build a professional ASP.NET Web Service project to insert new information into the
Oracle database.
• Build a professional ASP.NET Web Service project to update and delete information against
the Oracle database.
Based on these procedures, we can start to build our fi rst Web Service project.
9.3 BUILD ASP.NET WEB SERVICE PROJECTS TO
ACCESS SQL SERVER DATABASE
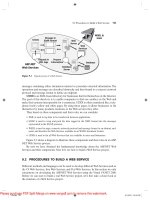
To create a new ASP.NET Web Service project, open the Visual Studio.NET 2008, and
then go to the File|New Web Site item. On the opened New Web Site dialog box, select
the ASP.NET Web Service item from the Templates list and enter our Web Service
project name WebServiceSQLSelect into the box that is next to the Location box, which
is shown in Figure 9.2 . Also select the Visual C# from the Language box since we need
to develop a Visual C# Web Service project in this chapter.
Note that Visual Studio.NET 2008 introduced a Web project model that can use
either IIS or the Local File System to develop Web applications. This model is good only
when developing ASP.NET Web Services and Web pages that are running locally on a
pseudo - Web server. This is our situation since we will run our Web Service in our local
machine and use it as a development server, so the File System is used for our server
location, which is shown in Figure 9.2 .
Click on the OK button to create this new project in our default folder
C:\Chapter 9.
9.3.1 Files and Items Created in the New Web Service Project
After this new Web Service project is created, four items are produced in our new project
in the Solution Explorer window. As we discussed in the last section, the main service
page fi le Service.asmx , which is used to display information about the Web Service ’ s
methods and provide access to the Web Service ’ s WSDL information, and the confi gura-
tion fi le web.confi g , which is used to set up a confi guration for our new Web Service
project, such as the namespaces for all kinds of Web components, connection strings for
c09.indd 726c09.indd 726 2/11/2010 3:01:04 PM2/11/2010 3:01:04 PM
Please purchase PDF Split-Merge on www.verypdf.com to remove this watermark.
9.3 Build ASP.NET Web Service Projects to Access SQL Server Database
727
data components, and Web Services and Windows authentication mode, are automati-
cally created and added into our new project. More important, the page fi le Service.asmx
is designed to automatically create extensible WSDL, dispatch Web methods, serialize
and deserialize parameters, and provide hooks for message interception within our appli-
cations. However, our default fi le Service.asmx only contains a compile directive as this
new Web Service project is created and opened from the File System.
Two folders, named App_Code , which is used to store our code - behind page Service.
cs , and App_Data , which is used to save the project data, are also created. The code -
behind page Service.cs is the place we need to create and develop the codes for our
Web Services. This page contains a default class named Service that is defi ned with the
WebService and WebServiceBinding attributes. The class defi ned as a default Web
method named
HelloWorld
is a placeholder, and we can replace it with our own method
or methods later based on the requirement of our Web Service project.
Now double - click on this code - behind page Service.cs , which is shown in Figure 9.3 ,
and let ’ s take a closer look at the code in this page.
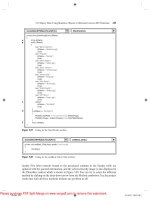
A. The Web Services – related namespaces that contain the Web Service components are
added into this page to allow us to access and use those service - related components to
build our Web Service project. A detailed description about those namespaces and their
functions is shown in Table 9.1 .
B. Some WebService attributes are defi ned in this part. Generally, WebService attributes are
used to identify additional descriptive information about deployed Web Services. The
namespace attribute is one of examples. As we discussed in the last section, we need to use
our own namespace to store and hold names and identifi ers used in our SOAP messages to
distinguish them from any other SOAP messages used by other Web Services. Here, in this
new project, Microsoft provided a default namespace " " , which is a
temporary system - defi ned namespace to identify all Web Services code generated
Figure 9.2
Create a new Web Service project.
c09.indd 727c09.indd 727 2/11/2010 3:01:04 PM2/11/2010 3:01:04 PM
Please purchase PDF Split-Merge on www.verypdf.com to remove this watermark.
728
Chapter 9 ASP.NET Web Services
by the .NET framework, to store this default Web method. We need to use our own
namespace to store our Web methods later when we deploy our Web Services in a real
application.
C. This Web Service Binding attribute indicates that the current Web Service complies with
the Web Services Interoperability Organization (WS - I.org) Basic Provide 1.1. Here, basi-
cally, a binding is equivalent to an interface in which it defi nes a set of concrete
operations.
D. This commented attribute indicates that if this Web Service is called from any script lan-
guage, such as ASP.NET AJAX, the associated namespace ScriptService should be used,
and this coding line should be uncommented.
E. Our Web Service class Service is a child class derived from the parent class WebService
located in the namespace System.Web.Services.
F. The constructor of our Service class contains an InitializeComponent() method used to
initialize all user - defi ned components used in this Web Service project. Generally, we do
not need to create any specifi c components for most of our Web Service projects, therefore
we keep the comment for this method.
using System;
using System.Linq;
using System.Web;
using System.Web.Services;
using System.Web.Services.Protocols;
using System.Xml.Linq;
[WebService(Namespace = "
[WebServiceBinding(ConformsTo = WsiProfiles.BasicProfile1_1)]
// To allow this Web Service to be called from script, using ASP.NET AJAX, uncomment the following line.
// [System.Web.Script.Services.ScriptService]
public class Service : System.Web.Services.WebService
{
public Service () {
//Uncomment the following line if using designed components
//InitializeComponent();
[WebMethod]
public string HelloWorld() {
return "Hello World";
}
}
A
B
C
D
E
F
G
Service Service()
}
Figure 9.3
Default coding for the code - behind page Service.cs.
Table 9.1 Web Service Namespaces
Namespace Functionality
System.Web Enable browser and server communication using the .Net Framework
System.Web.Services Enable creations of XML Web services using ASP.NET
System.Web.Services.Protocol Define the protocol used to transmit data across the wire during the communication
between the Web Service clients and servers
c09.indd 728c09.indd 728 2/11/2010 3:01:06 PM2/11/2010 3:01:06 PM
Please purchase PDF Split-Merge on www.verypdf.com to remove this watermark.
9.3 Build ASP.NET Web Service Projects to Access SQL Server Database
729
G. The default Web method
HelloWorld
is defi ned as a global function and this function
returns a string “ Hello World ” when it is returned to the client.
Next let ’ s double - click on the main service page fi le Service.asmx, which is the entry
point of our project to open it. This one line code contains only a compile directive shown
below since this project is created and opened using a File System:
< %@ WebService Language= " C# " CodeBehind= " ~ /App_Code/Service.
cs " Class= " Service " % >
As we mentioned in the last section, this code indicates the programming language
in which the Web Service ’ s code - behind fi le is written, the code - behind fi le ’ s name and
location, and the class that defi nes the Web Service. In a real application, both the code -
behind fi le name and the class name should be renamed to match our fi le and class names
used in our project, respectively. We will do those renames later in the following sections.
However, fi rst let ’ s run the default HelloWorld Web Service project to get a feeling about
what it looks like and how it works.
9.3.2 Feeling of Hello World Web Service Project as It Runs
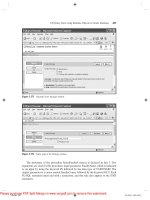
Click on the Start Debugging button to run the default HelloWorld project. After the
project is running, a message box is displayed with a warning message displayed, which
is shown in Figure 9.4 .
Generally, a Web Service project should not be debugged when it is deployed, and
this is defi ned in the web.confi g fi le with a control of disabling the debugging. However,
the debugging can be enabled during the development process by modifying the web.
confi g fi le. To do that, keep the default radio button selected in this warning message
box and click on OK to continue to run our project. Our Service.asmx page should be
the starting page and the following IE page is displayed as shown in Figure 9.5 .
This page displays the Web Service class named Service and all Web methods or
operations developed in this project. By default, only one method HelloWorld is created
and used in this project.
Figure 9.4
Debugging Not Enabled message box .
c09.indd 729c09.indd 729 2/11/2010 3:01:07 PM2/11/2010 3:01:07 PM
Please purchase PDF Split-Merge on www.verypdf.com to remove this watermark.
730
Chapter 9 ASP.NET Web Services
Below the method, the default namespace in which the current method or operation
is located is shown, and a recommendation that suggests that we create our own namespace
to store our Web Service project is displayed. Following this recommendation, some
example namespaces used in C#, Visual Basic, and C++ are listed.
Now let ’ s access our Web Service by clicking on the HelloWorld method. The test
method page appears, which is shown in Figure 9.6 .
The Invoke button is used to test our HelloWorld method using the HTTP Protocol.
Below the Invoke button, some message examples created by using the different proto-
cols are displayed. These include the requesting message and responding message created
in SOAP 1.1, SOAP 1.2, and HTTP Post. The placeholder located at the default namespace
" should be replaced by the actual namespace when this project is
modifi ed to a real application.
Now click on the Invoke button to run and test the default method
HelloWorld
. As
the Invoke button is clicked on, a URL that contains the default namespace and the
default
HelloWorld
method ’ s name is activated, and a new browser window, shown in
Figure 9.7 , is displayed. When the default method
HelloWorld
is executed, the main
service page Service.asmx sends a request to the IIS. Furthermore, the IIS sends it to
the ASP.NET runtime to process this request based on that URL.
The ASP.NET runtime will execute the
HelloWorld
method and pack the return
data as a SOAP message, and send it back to the client. The returned message contains
only a string object, that is, a string of “ Hello World ” for this default method.
Figure 9.5
Running status of the default Web service project.
c09.indd 730c09.indd 730 2/11/2010 3:01:07 PM2/11/2010 3:01:07 PM
Please purchase PDF Split-Merge on www.verypdf.com to remove this watermark.
9.3 Build ASP.NET Web Service Projects to Access SQL Server Database
731
In this returned result, the version and the encoding of the used XML code is indi-
cated fi rst. The xmlns attribute is used to indicate the namespace used by this string
object that contains only a string of “ Hello World ” .
As we discussed in the previous section, ASP.NET Web Service did not provide any
GUI, so the running result of this default project is represented using the XML codes in
some Web interfaces we have seen. This is because those Web interfaces are only pro-
vided and used for the testing purpose for the default Web Service. In a real application,
no such Web interface will be provided and displayed.
Figure 9.6
Test method page.
Figure 9.7
Running status of the default method.
c09.indd 731c09.indd 731 2/11/2010 3:01:10 PM2/11/2010 3:01:10 PM
Please purchase PDF Split-Merge on www.verypdf.com to remove this watermark.
732
Chapter 9 ASP.NET Web Services
Click on the Close button located on the upper - right corner of the browser for two
browser pages to close them. At this point, we should have a basic understanding and
feeling about a typical Web Service project and its structure as well as its operation
process. Next we will create our own Web Service project by modifying this default
project to perform the request to our sample database, that is, to the Faculty table, to
get the desired faculty information.
We will develop our Web Service project in the following sequence:
1. Modify the default Web Service project to make it our new Web Service project.
2. Create a base class to handle error - checking codes to protect our real Web Service class.
3. Create our real Web Service class to hold all Web methods and codes to respond to requests
to pick up desired faculty information.
4. Add Web methods into our Web Service class to access our sample database.
5. Develop the detail codes for those Web methods to perform the Web Services.
6. Build a Windows - based and a Web - based project to consume the Web Service to pick up
and display the required information on the GUI.
7. Deploy our completed Web Service to Internet Information Service (IIS).
The modifi cations defi ned in step 1 include the rename of the main service page ’ s
name, the code - behind page ’ s name, the class name, and the namespace defi ned in the
code - behind page and the main service page.
Let ’ s start with the step 1.
9.3.3 Modify Default Web Service Project
We will modify a default Web Service project to make it our new Web Service project
and allow it to access our sample SQL Server database to pick up the desired faculty
information.
The following modifi cations must be made to this default project:
• Rename the main service page from the default name Service to our new name
WebServiceSQLSelect .
• Rename the code - behind page ’ s name from Service.cs to our new name
WebServiceSQLSelect.cs .
• Modify the code - behind page ’ s name and class name in the main service page.
• Rename the namespace defi ned in the code - behind page.
• Add both reference and namespace System.Windows.Forms to this Web Service project
since we need to test our project using the MessageBox() method, and this method is
involved in that namespace.
• Add some other namespaces related to the System Data components and SQL Server Data
Provider since we need to use them to perform data actions in our sample database.
Let ’ s start these modifi cations from step 1 listed above.
c09.indd 732c09.indd 732 2/11/2010 3:01:11 PM2/11/2010 3:01:11 PM
Please purchase PDF Split-Merge on www.verypdf.com to remove this watermark.
9.3 Build ASP.NET Web Service Projects to Access SQL Server Database
733
Right - click on the main service page Service.asmx from the Solution Explorer
window and select the Rename item from the pop - up menu, and rename this page to a
new name WebServiceSQLSelect.asmx . Perform a similar operation to the code -
behind page Service.cs and rename it to WebServiceSQLSelect.cs .
Now open our new main service page WebServiceSQLSelect.asmx by double -
clicking on it, and change the compiler directive from
CodeBehind= " ~ /App_Code/Service.cs "
to
CodeBehind= " ~ /App_Code/WebServiceSQLSelect.cs "
Also change the class name from Class= " Service ” to Class= " WebServiceSQLSelect " .
Go to the File|Save All menu item to save these modifi cations. Now open our new
code - behind page WebServiceSQLSelect.cs by double - clicking on it from the Solution
Explorer window, and perform the modifi cations shown in Figure 9.8 in the bold to this
page.
Let ’ s take a closer look at this piece of modifi ed code to see how it works.
A. We need to use our own namespace to replace the default namespace used by Microsoft
to tell the ASP.NET runtime the location from which our Web Service can be found and
loaded as it runs. This specifi c namespace is unique because it is the home page of IEEE
Press appended with this book ’ s ISBN number. In fact, you can use any unique location
as your specifi c namespace to store your Web Service project if you like.
B. The default class Service is replaced by a new class WebServiceSQLSelect , which is our
desired Web Service class used in this new project.
C. The name of the constructor of our new class is also modifi ed.
using System;
using System.Linq;
using System.Web;
using System.Web.Services;
using System.Web.Services.Protocols;
using System.Xml.Linq;
[WebService(Namespace = " />[WebServiceBinding(ConformsTo = WsiProfiles.BasicProfile1_1)]
// To allow this Web Service to be called from script, using ASP.NET AJAX, uncomment the following line.
// [System.Web.Script.Services.ScriptService]
public class WebServiceSQLSelect : System.Web.Services.WebService
{
public WebServiceSQLSelect()
//Uncomment the following line if using designed components
//InitializeComponent();
}
[WebMethod]
public string HelloWorld() {
return "Hello World";
}
}
WebServiceS
LSelect WebServiceS
{
C
A
B
QQLSelect()
Figure 9.8
Modifi ed code - behind page.
c09.indd 733c09.indd 733 2/11/2010 3:01:11 PM2/11/2010 3:01:11 PM
Please purchase PDF Split-Merge on www.verypdf.com to remove this watermark.
734
Chapter 9 ASP.NET Web Services
Now, if we run our new project, a default Web interface is displayed with our new
project name, WebServiceSQLSelect , as shown in Figure 9.9 .
If you click on the default method HelloWorld and then on the Invoke button to test
that method, you can fi nd that the namespace has been updated to our new specifi c
namespace. Now, let ’ s add a system reference System.Windows.Forms to our project.
Right - click on our project WebServiceSQLSelect located at the Solution Explorer
win dow and click on the Add Reference item from the pop - up menu to open the Add
Reference dialog box. Scroll down along this list until you fi nd the item System.
Windows.Forms , click on this item to select it, and then click on OK to add it into our
project. Then add the following namespaces into the namespace area on this page:
using System.Windows.Forms;
using System.Data;
using System.Data.SqlClient;
using System.Configuration;
The fi rst namespace contains the defi nitions of all Windows - based applications ’ con-
trols and methods including MessageBox(). The following three namespaces contain the
prototypes of all Data objects, SQL Server Data Provider, and Data Confi guration classes
used for general data actions between the Web Services and databases.
9.3.4 Create a Base Class to Handle Error Checking for
Our Web Service
In this section we want to create a parent class or base class and use it to handle some
possible errors or exceptions as our project runs. It is possible that our requests cannot
be processed and returned properly. One of the most possible reasons for that is the
security issue. To report any errors or problems that occurred in the processing of
requests, a parent or base class is a good candidate to perform those jobs. We name this
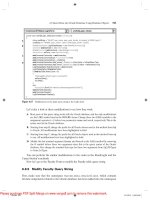
base class as SQLSelectBase , and it has two member data:
• SQLRequestOK As Boolean : True if the request is fi ne, otherwise a False is set.
• SQLRequestError As String : A string used to report the errors or problems.
Figure 9.9
Running status of our new Web Service project.
c09.indd 734c09.indd 734 2/11/2010 3:01:11 PM2/11/2010 3:01:11 PM
Please purchase PDF Split-Merge on www.verypdf.com to remove this watermark.
9.3 Build ASP.NET Web Service Projects to Access SQL Server Database
735
To create a new base class in our new project, right - click on our new service project
located at the top of the Solution Explorer window, and select the item Add New Item
from the pop - up menu. On the opened Add New Item dialog box, select the Class item
from the Template list, and enter SQLSelectBase.cs into the Name box as our new class
name. Then click on the Add button to add this new class into our project. Click on Yes
to the message box to place this new class into the App_Code folder in our new Web
Service project.
Now double - click on this new added class and enter the following codes shown in
Figure 9.10 in bold into this class as the class member data. Two public class member
data, SQLRequestOK and SQLRequestError , are added into this new base class. These
two data will work together to report possible errors or problems during the request
processing.
9.3.5 Create Real Web Service Class
Now we need to create our real Web Service class, which will be instantiated and returned
to us with our required information as the project runs. This class should be a child class
of our base class SQLSelectBase we just created. We name this class as SQLSelectResult.
Right - click on our new Web service project from the Solution Explorer window, and
select the item Add New Item from the pop - up menu. On the opened Add New Item
dialog box, select the Class item from the Template list. Enter SQLSelectResult .cs into
the Name box as the name for this new class, and then click on the Add button to add
this new class into our project.
Click on Yes to the message box to place this new class into the App_Code folder
in our new Web Service project. Double - click on this new added class and enter the codes
shown in Figure 9.11 into this class as the member data to this class. The new added codes
have been highlighted in bold.
Since this class will be instantiated to an object that will be returned to us with our
desired faculty information as the Web method is called, all desired faculty information
should be added into this class as the member data. When we make a request to this Web
service project, and furthermore, to our sample database, the following desired faculty
information should be included and returned:
public class SQLSelectBase
{
public bool SQLRequestOK;
public string SQLRequestError;
public SQLSelectBase()
{
//
// TODO: Add constructor logic here
//
}
}
SQLSelectBase SQLSelectBase()
Figure 9.10
Class member data.
c09.indd 735c09.indd 735 2/11/2010 3:01:11 PM2/11/2010 3:01:11 PM
Please purchase PDF Split-Merge on www.verypdf.com to remove this watermark.
736
Chapter 9 ASP.NET Web Services
• Faculty id
• Faculty offi ce
• Faculty phone
• Faculty college
• Faculty title
• Faculty email
All this information, which can be exactly mapped to all columns in the Faculty table
in our sample database, is added into this class as the member data. Although this does
not look like a professional schema, that is true. A better option is that we do not need
to create any class that will be instantiated to an object to hold this information. Instead,
we can use a DataSet to hold this information and allow the Web method to return that
DataSet as a whole package for those pieces of faculty information. However, that better
option is relatively complicated compared with our current class. Therefore at this
moment we prefer to start our project with an easier method. Later on we can discuss
how to use the DataSet to return our desired information.
As we mentioned before, this class is a child class of our base class SQLSelectBase.
In other words, this class is inherited from that base class. All six pieces of faculty data
is declared here as the member data for this class.
Next we need to take care of our Web method, which will response to our request
and return our desired faculty information to us as this method is called.
9.3.6 Add Web Methods into Our Web Service Class
Before we can add a Web method to our project and perform the coding for it, we want
to emphasize an important point that is easy to be overlooked by users, that is, the Web
Service class and those user - defi ned classes we just created in the last sections.
The Web Service class WebServiceSQLSelect is a system class, and it is used to
contain all codes we need to access the Web Service and Web methods to execute our
requests. The base class SQLSelectBase and the child class SQLSelectResult were created
public class SQLSelectResult:SQLSelectBase
{
public string FacultyID;
public string FacultyOffice;
public string FacultyPhone;
public string FacultyCollege;
public string FacultyTitle;
public string FacultyEmail;
public SQLSelectResult()
{
//
// TODO: Add constructor logic here
//
}
}
SQLSelectResult SQLSelectResult()
Figure 9.11
Member data for the child class SQLSelectResult.
c09.indd 736c09.indd 736 2/11/2010 3:01:11 PM2/11/2010 3:01:11 PM
Please purchase PDF Split-Merge on www.verypdf.com to remove this watermark.
9.3 Build ASP.NET Web Service Projects to Access SQL Server Database
737
by us and they belong to the application classes. These application classes will be instanti-
ated to the associated objects that can be used by the Web methods developed in the
system class WebServiceSQLSelect to return the requested information as the project
runs. Keep this difference in mind, and this will help us understand them better as we
develop a new Web Service project.
We can modify the default method HelloWorld and make it as our new Web method
in our system class WebServiceSQLSelect. This method will use an object instantiated
from the application class SQLSelectResult we created in the previous section to contain
and return the faculty data we required.
9.3.7 Develop the Codes for Web Methods to Perform
the Web Services
The name of this Web method is GetSQLSelect, and it contains an input parameter
Faculty Name with the following functions as this method is called:
1. Set up a valid connection to our sample database.
2. Create all required data objects and local variables to perform the necessary data operations
later.
3. Instantiate a new object from the application class SQLSelectResult and use it as the
returned object that contains all required faculty information.
4. Execute the associated data object ’ s method to perform the data query to the Faculty table
based on the input parameter — Faculty Name.
5. Assign each piece of acquired information obtained from the Faculty table to the associated
class member data defi ned in the class SQLSelectResult.
6. Release and clean up all data objects used.
7. Return the object to the client.
9.3.7.1 Web Service Connection Strings
Among these functions, function 1 — set up a valid connection — is the most challenging
task. There are two ways to perform this database connection in a Web Service applica-
tion. One way is to directly use the connection string and the Connection object in the
Web Service class as we did in the previous projects. Another way is to defi ne the con-
nection string in the web.confi g fi le. The second way is a better way since the web.
confi g fi le provides an attribute < connectionStrings/ > for this purpose, and ASP.NET
3.5 recommends storing the data components ’ connection string in the web.confi g fi le.
In this project, we will use the second way to store our connection string. To do that,
open the web.confi g fi le by double - clicking on it, and then enter the following codes
into the attribute < connectionStrings/ > :
< connectionStrings >
< add name= " sql_conn " connectionString= " Server=localhost\
SQLEXPRESS;
Integrated Security=SSPI;Database=
C:\database\SQLServer\CSE_DEPT.
mdf; " / >
< /connectionStrings >
c09.indd 737c09.indd 737 2/11/2010 3:01:12 PM2/11/2010 3:01:12 PM
Please purchase PDF Split-Merge on www.verypdf.com to remove this watermark.
738
Chapter 9 ASP.NET Web Services
The following important points should be noted when creating this connection string:
1. This connectionStrings attribute must be written in a single line in the web.confi g fi le.
Because of the limitation of the space in this page, we used two lines to represent this
attribute. However, in your real coding, you must place this attribute in a single line in your
web.confi g fi le; otherwise a grammar problem would be encountered.
2. Web Services that require a database connection in this project use SQL Server authentica-
tion with a login ID and password for a user account. However, because we used Windows
Authentication Mode when we created our sample database in Chapter 2 , we do not need
any login ID and password for the database connection in our application. One important
issue is the database we are using is not a real SQL Server 2005 database. Instead we are
using SQL Server 2005 Express. Therefore we have to add the InstanceName of our data-
base, which is SQLEXPRESS, into this connection string to tell the ASP.NET runtime to
make the correct connection. Attach this instance name after the
localhost
in the
ServerName item.
To test and confi rm this connectionString , we can develop some codes and modify
the coding of the default HelloWorld Web method in the code - behind page to do
that. Close the web.confi g fi le and open the code - behind page WebService
SQLSelect.cs by double - clicking on it from the Solution Explorer window, and then
enter the codes into this page shown in Figure 9.12 .
All modifi ed codes have been highlighted in bold, and let ’ s see how this piece of code
works to test our connection string defi ned in the web.confi g fi le.
A. Four namespaces that contain the prototypes and defi nitions of Windows - based controls,
SQL Server Data Provider, and confi guration classes are added into this page since we
need to use them to perform the testing of our connection and data actions against our
sample database via this Web Service project.
B. T h e ConnectionStrings property of the Confi gurationManager class is used to pick up
the connection string we defi ned in the web.confi g fi le, which can be considered as a
default connection confi guration. The connection name
sql_conn
works as an
argument for this property and must be identical with the name we defi ned for the
connection name in the web.confi g fi le. When this property is used, it returns a
ConnectionStringSettingsCollection object containing the contents of the
ConnectionStringsSection object for the current application ’ s default confi guration, and
a ConnectionStringsSection object contains the contents of the confi guration fi le ’ s con-
nectionStrings section.
C. A new SQL Connection object is created and initialized with the connection string we
obtained above.
D. The Open() method of the SQL Connection object is executed to try to open our sample
database and set up a valid connection.
E. By checking the State property of the Connection object, we can determine whether this
connection is successful or not. If the State property is not equal to the ConnectionState.
Open , which means that a valid database connection has not been installed, a warning
message is displayed.
F. Otherwise the connection is successful, a successful message is displayed, and the connec-
tion is closed.
c09.indd 738c09.indd 738 2/11/2010 3:01:12 PM2/11/2010 3:01:12 PM
Please purchase PDF Split-Merge on www.verypdf.com to remove this watermark.
9.3 Build ASP.NET Web Service Projects to Access SQL Server Database
739
Now you can run the project by clicking on the Start Debugging button. Click the
HelloWorld method from the built - in Web interface, and then click on the Invoke button
to execute that method to test our database connection.
A successful message should be displayed if this connection is fi ne. Click on the OK
button on the message box, and you can get the returned result from the execution of
the method HelloWorld.
An issue is that when you run this project, it may take a little while to complete this
database connection. The reason for that is because the MessageBox() is used, and it is
displayed behind the current Web page when it is activated. So you need to move the
current page by dragging it down and then you can fi nd that MessageBox. Click on OK
to that MessageBox, and the project will be continued and the running result can be
displayed.
Another issue is that this piece of code is only used for the testing purpose, and we
will modify this piece of code and place it into a user - defi ned function called SQLConn()
later when we develop our real project.
using System;
using System.Linq;
using System.Web;
using System.Web.Services;
using System.Web.Services.Protocols;
using System.Xml.Linq;
using System.Data;
using System.Data.SqlClient;
using System.Configuration;
using System.Windows.Forms;
[WebService(Namespace = " />[WebServiceBinding(ConformsTo = WsiProfiles.BasicProfile1_1)]
// To allow this Web Service to be called from script, using ASP.NET AJAX, uncomment the following line.
// [System.Web.Script.Services.ScriptService]
public class WebServiceSQLSelect : System.Web.Services.WebService
{
public WebServiceSQLSelect()
{
//Uncomment the following line if using designed components
//InitializeComponent();
}
[WebMethod]
public string HelloWorld()
{
string cmdString = ConfigurationManager.ConnectionStrings["sql_conn"].ConnectionString;
SqlConnection sqlConnection = new SqlConnection();
sqlConnection.ConnectionString = cmdString;
sqlConnection.Open();
if (sqlConnection.State != System.Data.ConnectionState.Open)
MessageBox.Show("Database Open is failed");
else
{
MessageBox.Show("Database Open is successful");
sqlConnection.Close();
}
return "Hello World";
}
}
A
B
C
D
E
F
WebServiceSQLSelect HelloWorld()
Figure 9.12
Modifi ed coding to test the connection string.
c09.indd 739c09.indd 739 2/11/2010 3:01:12 PM2/11/2010 3:01:12 PM
Please purchase PDF Split-Merge on www.verypdf.com to remove this watermark.
740
Chapter 9 ASP.NET Web Services
9.3.7.2 Modify Existing Web Method
Now let ’ s start to take care of our Web methods. In this project, we want to modify the
default method HelloWorld as our fi rst Web method and develop codes for this method
to complete those function (2 to 7) listed at the beginning of Section 9.3.7 .
Open the Web Service code - behind page if it is not opened, and make the following
modifi cations:
1. Change the Web method ’ s name from HelloWorld to GetSQLSelect.
2. Change the data type of the returned object of this method from string to SQLSelectResult,
which is our child application class we developed before.
3. Add a new input parameter FacultyName as an argument to this method using Passing -
By - Value mode.
4. Create a new object based on our child application class SQLSelectResult and name this
object as SQLResult.
5. Create the following data components used in this method:
a. SQL Command object sqlCommand
b. SQL Data Reader object sqlReader
6. Replace the default returned object in the method from the “ Hello World ” string to the
new created object SQLResult.
7. Move the connection testing codes we developed in this section into a user - defi ned method
SQLConn().
Your fi nished Web method GetSQLSelect() is shown in Figure 9.13 .
[WebMethod]
public SQLSelectResult GetSQLSelect(string FacultyName)
{
SqlConnection sqlConnection = new SqlConnection();
SQLSelectResult SQLResult = new SQLSelectResult();
SqlCommand sqlCommand = new SqlCommand();
SqlDataReader sqlReader;
return SQLResult;
}
protected SqlConnection SQLConn()
{
string cmdString = ConfigurationManager.ConnectionStrings["sql_conn"].ConnectionString;
SqlConnection conn = new SqlConnection();
conn.ConnectionString = cmdString;
conn.Open();
if (conn.State != System.Data.ConnectionState.Open)
{
MessageBox.Show("Database Open is failed");
conn = null;
}
return conn;
}
A
B
C
D
E
F
G
WebServiceSQLSelect GetSQLSelect()
Figure 9.13
Modifi ed Web method — GetSQLSelect.
c09.indd 740c09.indd 740 2/11/2010 3:01:12 PM2/11/2010 3:01:12 PM
Please purchase PDF Split-Merge on www.verypdf.com to remove this watermark.
9.3 Build ASP.NET Web Service Projects to Access SQL Server Database
741
Let ’ s take a closer look at this piece of modifi ed code to see how it works.
A. Modifi cation steps 1, 2, and 3 listed above are performed at this line. The method ’ s name
and the returned data type are changed to GetSQLSelect and SQLSelectResult, respec-
tively. Also an input parameter FacultyName is added into this method as an argument.
B. Modifi cation step 4 is performed at this line, and an instance of the application class
SQLSelectResult is created here.
C. Modifi cation step 5 is performed at this line and two SQL data objects are created: sqlCom-
mand and sqlReader.
D. Modifi cation step 6 is performed at this line, and the original returned data is changed to
the current object SQLResult.
E. Modifi cation step 7 is performed here and a new user - defi ned method SQLConn() is
created with the codes we developed to test the connection string in the previous
section.
F. If this connection fails, a warning message is displayed and the returned Connection object
is assigned with a
null
object. Otherwise a successful Connection object is assigned to
the returned Connection object
conn
.
G. The Connection object is returned to the Web method.
Next we need to develop codes to execute the associated data object ’ s method to perform
the data query to the Faculty table and place these codes into the space between steps
C and D in Figure 9.13 .
9.3.7.3 Develop Codes to Perform Database Queries
To perform the database query via our Web Service project, we need to perform the
following coding operations:
• Add the main codes to perform the data query into our Web method.
• Create a user - defi ned method, FillFacultyReader(), to handle the data assignments to our
returned object.
• Create an error or exception - processing method, ReportError(), to report any errors
encountered when the project runs.
Let ’ s fi rst concentrate on adding the codes into the space between steps C and D in Figure
9.13 to perform the data query to our sample database CSE_DEPT.
Open our Web method and add the codes shown in Figure 9.14 into this method.
The codes we developed in the previous sections have been highlighted with
shading.
Let ’ s take a closer look at these new added codes to see how they work.
A. The query string is declared at the beginning of this method. One point you need to note
is that a space must be attached at the end of the fi rst part of this query string. In other
words, after the " … FROM Faculty " this space works as a separator between the fi rst and
the second part of this query string. The query function could not be executed correctly
without this space.
B. Initially we assume that our Web method works fi ne by setting the Boolean variable
SQLRequestOK, which we defi ned in our base class SQLSelectBase, to
true
. This vari-
able will keep this value until an error or exception is encountered.
c09.indd 741c09.indd 741 2/11/2010 3:01:12 PM2/11/2010 3:01:12 PM
Please purchase PDF Split-Merge on www.verypdf.com to remove this watermark.
742
Chapter 9 ASP.NET Web Services
C. The user - defi ned method SQLConn(), whose detailed codes are shown in Figure 9.13 , is
called to perform the database connection. This method will return a Connection object if
the connection is successful. Otherwise, the method will return a
null
object.
D. If a
null
is returned from calling the method SQLConn(), which means that the database
connection has something wrong, a warning message is displayed and another user - defi ned
method ReportError(), whose codes are shown in Figure 9.16 , is executed to report the
encountered error.
E. The Command object is initialized with the Connection object that is obtained from the
method SQLConn(), Command type and Command text. Also the input parameter @
facultyName is assigned with a real input parameter FacultyName that is an input param-
eter to the Web method. One issue is the data type for this parameter. For this application,
it does not matter whether a SqlDbType.Char or SqlDbType.Text is used.
F. The ExecuteReader() method of the Command class is called to invoke the DataReader
and to perform the data query to our Faculty table.
G. By checking the HasRows property of the DataReader, we can determine whether this
query is successful or not. If this property is
true
, which means that at least one row has
been returned and the query is successful, the user - defi ned method FillFacultyReader() is
[WebMethod]
public SQLSelectResult GetSQLSelect(string FacultyName)
{
SqlConnection sqlConnection = new SqlConnection();
SQLSelectResult SQLResult = new SQLSelectResult();
SqlCommand sqlCommand = new SqlCommand();
SqlDataReader sqlReader;
string cmdString = "SELECT faculty_id, office, phone, college, title, email FROM Faculty " +
"WHERE faculty_name LIKE @facultyName";
SQLResult.SQLRequestOK = true;
sqlConnection = SQLConn();
if (sqlConnection == null)
{
SQLResult.SQLRequestError = "Database connection is failed";
ReportError(SQLResult);
return null;
}
sqlCommand.Connection = sqlConnection;
sqlCommand.CommandType = CommandType.Text;
sqlCommand.CommandText = cmdString;
sqlCommand.Parameters.Add("@facultyName", SqlDbType.Text).Value = FacultyName;
sqlReader = sqlCommand.ExecuteReader();
if (sqlReader.HasRows == true)
FillFacultyReader(ref SQLResult, sqlReader);
else
{
SQLResult.SQLRequestError = "No matched faculty found";
ReportError(SQLResult);
}
sqlReader.Close();
sqlConnection.Close();
sqlCommand.Dispose();
return SQLResult;
}
A
B
C
D
E
F
G
H
I
J
WebServiceSQLSelect GetSQLSelect()
Figure 9.14
Modifi ed codes for the Web method.
c09.indd 742c09.indd 742 2/11/2010 3:01:12 PM2/11/2010 3:01:12 PM
Please purchase PDF Split-Merge on www.verypdf.com to remove this watermark.