Windows Server 2008 Inside Out- P12
Bạn đang xem bản rút gọn của tài liệu. Xem và tải ngay bản đầy đủ của tài liệu tại đây (1.47 MB, 50 trang )
If you are trying to determine whether a fi le is used by FRS or the DLT Client service,
you could use the FSUtil ObjectID command to see if the fi le has an object identifi er
fi eld set. Type fsutil objectid query FilePath at the command prompt, where FilePath is
the path to the fi le or folder you want to examine. If the fi le has an object identifi er fi eld
set, it is displayed. If a fi le doesn’t have an object identifi er fi eld set, an error message is
displayed stating “The specifi ed fi le has no object ID.”
Reparse Points
On NTFS volumes, a fi le or folder can contain a reparse point. Reparse points are fi le
system objects with special attribute tags that are used to extend the functionality in
the I/O subsystem. When a program sets a reparse point, it stores an attribute tag as
well as a data segment. The attribute tag identifi es the purpose of the reparse point and
details how the reparse point is to be used. The data segment provides any additional
data needed during reparsing.
Reparse points are used for directory junction points and volume mount points. Direc-
tory junctions enable you to create a single local namespace using local folders, local
volumes, and network shares. Mount points enable you to mount a local volume to
an empty NTFS folder. Both directory junction points and volume mount points use
reparse points to mark NTFS folders with surrogate names.
When a fi le or folder containing a reparse point used for a directory junction point or a
volume mount point is read, the reparse point causes the pathname to be reparsed and
a surrogate name to be substituted for the original name. For example, if you were to
create a mount point with the fi le path C:\Data that is used to mount a hard disk drive,
the reparse point is triggered whenever the fi le system opens C:\Data and points the fi le
system to the volume you’ve mounted in that folder. The actual attribute tag and data
for the reparse point would look similar to the following:
Reparse Tag Value : 0xa0000003
Tag value: Microsoft
Tag value: Name Surrogate
Tag value: Mount Point
Substitute Name offset: 0
Substitute Name length: 98
Print Name offset: 100
Print Name Length: 0
Substitute Name: \??\Volume{3796c3c1-5106-11d7-911c-806d6172696f}\
Reparse Data Length: 0x0000006e
Reparse Data:
0000: 00 00 62 00 64 00 00 00 5c 00 3f 00 3f 00 5c 00 ..b.d...\.?.?.\.
0010: 56 00 6f 00 6c 00 75 00 6d 00 65 00 7b 00 33 00 V.o.l.u.m.e.{.3.
0020: 37 00 39 00 36 00 63 00 33 00 63 00 31 00 2d 00 7.9.6.c.3.c.1.-.
0030: 35 00 31 00 30 00 36 00 2d 00 31 00 31 00 64 00 5.1.0.6.-.1.1.d.
0040: 37 00 2d 00 39 00 31 00 31 00 63 00 2d 00 38 00 7.-.9.1.1.c.-.8.
0050: 30 00 36 00 64 00 36 00 31 00 37 00 32 00 36 00 0.6.d.6.1.7.2.6.
0060: 39 00 36 00 66 00 7d 00 5c 00 00 00 00 00 9.6.f.}.\.....
Advanced NTFS Features 517
Chapter 16
Please purchase PDF Split-Merge on www.verypdf.com to remove this watermark.
The reparse attribute tag is defi ned by the fi rst series of values, which identifi es the
reparse point as a Microsoft Name Surrogate Mount Point and specifi es the surrogate
name to be substituted for the original name. The reparse data follows the attribute tag
values and in this case provides the fully expressed surrogate name.
Examine Reparse Points
Using the FSUtil ReparsePoint command, you can examine reparse information associ-
ated with a fi le or folder. Type fsutil reparsepoint query FilePath at the command
prompt, where FilePath is the path to the fi le or folder you want to examine.
Reparse points are also used by fi le system fi lter drivers to mark fi les so they are used
with that driver. When NTFS opens a fi le associated with a fi le system fi lter driver, it
locates the driver and uses the fi lter to process the fi le as directed by the reparse infor-
mation. Reparse points are used in this way to implement Remote Storage.
Sparse Files
Often scientifi c or other data collected through sampling is stored in large fi les that are
primarily empty except for sparsely populated sections that contain the actual data. For
example, a broad-spectrum signal recorded digitally from space might have only sev-
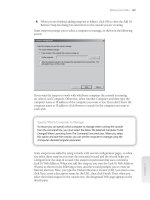
eral minutes of audio for each hour of actual recording. In this case, a multiple- gigabyte
audio fi le such as the one depicted in Figure 16-5 might have only a few gigabytes of
meaningful information. Because there are large sections of empty space and limited
areas of meaningful data, the fi le is said to be sparsely populated and can also be
referred to as a sparse fi le.
Stored normally, the fi le would use 20 GB of space on the volume. If you mark the fi le
as sparse, however, NTFS allocates space only for actual data and marks empty space as
nonallocated. In other words, any meaningful or nonzero data is marked as allocated
and written to disk, and any data composed of zeros is marked as nonallocated and
is not explicitly written to disk. In this example, this means the fi le uses only 5 GB of
space, which is marked as allocated, and has nonallocated space of 15 GB.
For nonallocated space, NTFS records only information about how much nonallocated
space there is, and when you try to read data in this space, it returns zeros. This allows
NTFS to store the fi le in the smallest amount of disk space possible while still being
able to reconstruct the fi le’s allocated and nonallocated space.
In theory, all this works great, but it is up to the actual program working with the
sparse fi le to determine which data is meaningful and which isn’t. Programs do this by
explicitly specifying the data for which space should be allocated. In Windows Server
2008, several services use sparse fi les. One of these is the Indexing Service, which
stores its catalogs as sparse fi les.
Examine Reparse Points
Using the FSUtil ReparsePoint command, you can examine reparse information associ-
ated with a fi le or folder. Type fsutil reparsepoint query FilePath at the command
prompt, where FilePath is the path to the fi le or folder you want to examine.
Chapter 16
518 Chapter 16 Managing Windows Server 2008 File Systems
Please purchase PDF Split-Merge on www.verypdf.com to remove this watermark.
Unused
Space
Used
Space
20 GB
Data File
Unused
Space
15 GB
Actual Space
Used by Data
5 GB
Size of Sparse
File on Disk
5 GB
Figure 16-5 Using sparse files.
Using the FSUtil Sparse command, you can easily determine whether a fi le has the
sparse attribute set. Type fsutil sparse queryfl ag FilePath at the command prompt,
where FilePath is the path to the fi le you want to examine, such as
fsutil sparse queryfl ag c:\data\catalog.wci\00010002.ci
If the fi le has the sparse attribute, this command returns
This fi le is set as sparse
You can examine sparse fi les to determine where the byte ranges that contain meaning-
ful (nonzero) data are located by using FSUtil Sparse as well. Type fsutil sparse query-
range FilePath at the command prompt, where FilePath is the path to the fi le you want
to examine, such as
fsutil sparse queryrange c:\data\catalog.wci\00010002.ci
The output is the byte ranges of meaningful data within the fi le, such as
sparse range [0] [28672]
In this particular case, the output specifi es that there’s meaningful data at the start of
the fi le to byte 28672. You can mark fi les as sparse as well. Type fsutil sparse setfl ag
FilePath at the command prompt, where FilePath is the path to the fi le you want to mark
as sparse.
Advanced NTFS Features 519
Chapter 16
Please purchase PDF Split-Merge on www.verypdf.com to remove this watermark.
Transactional NTFS
Windows Server 2008 supports transactional NTFS and Self-Healing NTFS. Transac-
tional NTFS allows fi le operations on an NTFS volume to be performed transactionally.
This means programs can use a transaction to group together sets of fi le and Registry
operations so that all of them succeed or none of them succeed. While a transaction is
active, changes are not visible outside of the transaction. Changes are committed and
written fully to disk only when a transaction is completed successfully. If a transaction
fails or is incomplete, the program rolls back the transactional work to restore the fi le
system to the state it was in prior to the transaction.
Transactions that span multiple volumes are coordinated by the Kernel Transaction
Manager (KTM). The KTM supports independent recovery of volumes if a transaction
fails. The local resource manager for a volume maintains a separate transaction log and
is responsible for maintaining threads for transactions separate from threads that per-
form the fi le work.
Using the FSUtil Transaction command, you can easily determine transactional infor-
mation. You can list currently running transactions by typing fsutil transaction list at
the command prompt. You can display transactional information for a specifi c fi le by
typing fsutil transaction fi leinfo FilePath at the command prompt, where FilePath is
the path to the fi le you want to examine, such as
fsutil transaction fi leinfo c:\journal\ls-dts.mdb
Traditionally, you have had to use the Check Disk tool to fi x errors and inconsisten-
cies in NTFS volumes on a disk. Because this process can disrupt the availability
of Windows systems, Windows Server 2008 uses Self-Healing NTFS to protect fi le
systems without having to use separate maintenance tools to fi x problems. Because
much of the self-healing process is enabled and performed automatically, you might
need to manually perform volume maintenance only when you are notifi ed by the
operating system that a problem cannot be corrected automatically. If such an error
occurs, Windows Server 2008 will notify you about the problem and provide possible
solutions.
Self-Healing NTFS has many advantages over Check Disk, including the following:
Check Disk must have exclusive access to volumes, which means system and boot
volumes can be checked only when the operating system starts up. On the other
hand, with Self-Healing NTFS, the fi le system is always available and does not
need to be corrected offl ine (in most cases).
Self-Healing NTFS attempts to preserve as much data as possible if corruption
occurs and reduces failed fi le system mounting that previously could occur if a
volume was known to have errors or inconsistencies. During restart, Self-Healing
NTFS repairs the volume immediately so that it can be mounted.
Self-Healing NTFS reports changes made to the volume during repair through
existing Chkdsk.exe mechanisms, directory notifi cations, and update sequence
number (USN) journal entries. This feature also allows authorized users and
Chapter 16
520 Chapter 16 Managing Windows Server 2008 File Systems
Please purchase PDF Split-Merge on www.verypdf.com to remove this watermark.
administrators to monitor repair operations through Verifi cation, Waiting For
Repair Completion, and Progress Status messages.
Self-Healing NTFS can recover a volume if the boot sector is readable but does not
identify an NTFS volume. In this case, you must run an offl ine tool that repairs
the boot sector and then allow Self-Healing NTFS to initiate recovery.
Although Self-Healing NTFS is a terrifi c enhancement, at times you might want to (or
might have to) manually check the integrity of a disk. In these cases, you can use Check
Disk (Chkdsk.exe) to check for and, optionally, repair problems found on FAT, FAT32,
and NTFS volumes.
Using File-Based Compression
File-based compression allows you to reduce the number of bits and bytes in fi les so
that they use less space on a disk. The Windows operating system supports two types
of compression: NTFS compression, which is a built-in feature of NTFS, and com-
pressed (zipped) folders, which is an additional feature of Windows available on both
FAT and NTFS volumes.
NTFS Compression
Windows allows you to enable compression when you format a volume using NTFS.
When a drive is compressed, all fi les and folders stored on the drive are automatically
compressed when they are created. This compression is transparent to users, who can
open and work with compressed fi les and folders just as they do with regular fi les and
folders. Behind the scenes, Windows decompresses the fi le or folder when it is opened
and compresses it again when it is closed. Although this can decrease a computer’s
performance, it saves space on the disk because compressed fi les and folders use less
space.
You can turn on compression after formatting volumes as well, or if desired turn on
compression only for specifi c fi les and folders. After you compress a folder, any new
fi les added or copied to the folder are compressed automatically and they remain com-
pressed even if you later move them to an uncompressed folder on an NTFS volume.
Moving uncompressed fi les to compressed folders affects their compression attribute
as well. If you move an uncompressed fi le from a different drive to a compressed drive
or folder, the fi le is compressed. However, if you move an uncompressed fi le to a com-
pressed folder on the same NTFS drive, the fi le isn’t compressed. Finally, if you move a
compressed fi le to a FAT16 or FAT32 volume, the fi le is uncompressed because FAT16
and FAT32 volumes do not support compression.
To compress or uncompress a drive, follow these steps:
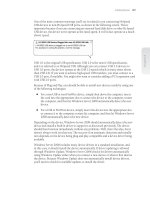
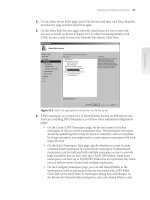
1. Right-click the drive that you want to compress or uncompress in Windows
Explorer or in the Disk Management Volume List view, and then select Properties.
This displays the disk’s Properties dialog box, as shown in Figure 16-6.
Using File-Based Compression 521
Chapter 16
Please purchase PDF Split-Merge on www.verypdf.com to remove this watermark.
Figure 16-6 You can compress entire volumes or perform selective compression for specific
files and folders.
2. Select or clear the Compress This Drive To Save Disk Space check box as
appropriate. When you click OK, the Confi rm Attribute Changes dialog box
shown in Figure 16-7 is displayed.
Figure 16-7 Choose a compression option.
3. If you want to apply changes only to the root folder of the disk, select Apply
Changes To X Only. Otherwise, accept the default, which will compress the entire
contents of the disk. Click OK.
CAUTION
!
Although Windows Server 2008 will let you compress system volumes, this is not recom-
mended because the operating system will need to decompress and compress system
fi les each time they are opened, which can seriously impact server performance. Addi-
tionally, you can’t use compression and encryption together. You can use one feature or
the other, but not both.
CAUTION
!
Chapter 16
522 Chapter 16 Managing Windows Server 2008 File Systems
Please purchase PDF Split-Merge on www.verypdf.com to remove this watermark.
You can selectively compress and uncompress fi les and folders as well. The advantage
here is that this affects only a part of a disk, such as a folder and its subfolders, rather
than the entire disk. To compress or uncompress a fi le or folder, follow these steps:
1. In Windows Explorer, right-click the fi le or folder that you want to compress or
uncompress, and then select Properties.
2. On the General tab of the related Properties dialog box, click Advanced. This
displays the Advanced Attributes dialog box shown in Figure 16-8. Select or clear
the Compress Contents To Save Disk Space check box as appropriate. Click OK
twice.
Figure 16-8 Use the Advanced Attributes dialog box to compress the file or folder.
3. If you are changing the compression attributes of a folder with subfolders, the
Confi rm Attribute Changes dialog box is displayed. If you want to apply the
changes only to the fi les in the folder and not fi les in subfolders of the folder,
select Apply Changes To X Only. Otherwise, accept the default, which will apply
the changes to the folder, its subfolders, and fi les. Click OK.
Windows Server 2008 also provides command-line utilities for compressing and
uncompressing your data. The compression utility is called Compact (Compact.exe).
The decompression utility is called Expand (Expand.exe).
You can use Compact to quickly determine whether fi les in a directory are compressed.
At the command line, change to the directory you want to examine and enter compact
without any additional parameters. If you want to check the directory and all subdirec-
tories, enter compact /s. The output will list the compression status and compression
ratio on every fi le and the fi nal summary details will tell you exactly how many fi les
and directories were examined and found to be compressed, such as:
Of 15435 fi les within 822 directories
0 are compressed and 15435 are not compressed.
2,411,539,448 total bytes of data are stored in 2,411,539,448 bytes.
The compression ratio is 1.0 to 1.
Using File-Based Compression 523
Chapter 16
Please purchase PDF Split-Merge on www.verypdf.com to remove this watermark.
Compressed (Zipped) Folders
Compressed (zipped) folders are another option for compressing fi les and folders.
When you compress data using this technique, you use Zip compression technology to
reduce the number of bits and bytes in fi les and folders so that they use less space on
a disk. Compressed (zipped) folders are identifi ed with a zipper on the folder icon and
are saved with the .zip fi le extension.
Note
At the time of this writing, compressed (zipped) folders were not available on 64-bit edi-
tions of Windows Server 2008. Further, if you install a Zip utility, the compressed folder
icon for this utility might be used and some of the built-in compressed (zipped) folder
features can change.
Compressed (zipped) folders have several advantages over NTFS compression. Because
Zip technology is an extension of the operating system rather than the fi le system, com-
pressed (zipped) folders can be used on both FAT and NTFS volumes. Zipped folders
can be password protected to safeguard their contents and can be sent by e-mail. They
can also be transferred using File Transfer Protocol (FTP), Hypertext Transfer Protocol
(HTTP), or other protocols. An added benefi t of zipped folders is that some programs
can be run directly from compressed folders without having to be decompressed. You
can also open fi les directly from zipped folders.
You can create a zipped folder by selecting a fi le, folder, or a group of fi les and folders
in Windows Explorer, right-clicking, pointing to Send To, and clicking Compressed
(Zipped) Folder. The zipped folder is named automatically by using the fi le name of the
last item selected and adding the .zip extension. If you double-click a zipped folder in
Windows Explorer, you can access and work with its contents. As shown in Figure 16-9,
the zipped folder’s contents are listed according to fi le name, type, and date. The fi le
information also shows the packed fi le size, the original fi le size, and the compression
ratio. Double-clicking a program in a zipped folder runs it (as long as it doesn’t require
access to other fi les). Double-clicking a fi le in a zipped folder opens it for viewing or
editing.
Figure 16-9 Compressed (zipped) folders can be accessed and used like other folders.
Note
At the time of this writing, compressed (zipped) folders were not available on 64-bit edi-
tions of Windows Server 2008. Further, if you install a Zip utility, the compressed folder
icon for this utility might be used and some of the built-in compressed (zipped) folder
features can change.
Chapter 16
524 Chapter 16 Managing Windows Server 2008 File Systems
Please purchase PDF Split-Merge on www.verypdf.com to remove this watermark.
While you’re working with a zipped folder, you can perform tasks similar to those you
can with regular folders. You can do the following:
Add other fi les, programs, or folders to the zipped folder by dragging them to it.
Copy a fi le in the zipped folder and paste it into a different folder.
Remove a fi le from the zipped folder using the Cut command so that you can
paste it into a different folder.
Delete a fi le or folder by selecting it and clicking Delete.
You also have the option to perform additional tasks, which are unique to zipped fold-
ers. You can choose File, Extract All to start the Extraction Wizard, which can be used
to extract all the fi les in the zipped folder and copy them to a new location. You can
click File, Add A Password to add a password to the zipped folder to control access to it.
Managing Disk Quotas
Even with the large disk drives available today, you’ll often fi nd that hard disk space is
at a premium, and this is where disk quotas come in handy. Disk quotas are a built-in
feature of NTFS that help you manage and limit disk space usage.
How Quota Management Works
Using disk quotas, you can monitor and control the amount of disk space people who
access the network can use. Without quota management it is hard to monitor the
amount of space being used by individual users and even harder to control the total
amount of space they can use. I refer to monitoring and controlling separately because
there’s a very important difference between monitoring disk space usage and control-
ling it—and the disk quota system allows you to perform these tasks separately or
together. You can, in fact, do the following:
Confi gure the disk quota system to monitor disk space usage only, allowing
administrators to check disk space usage manually
Confi gure the disk quota system to monitor disk space usage and generate warn-
ings when users exceed predefi ned usage levels
Confi gure the disk quota system to monitor disk space usage, generate warnings
when users exceed predefi ned usage levels, and enforce the limits by denying
disk space to users who exceed the quota limit
Your organization’s culture will probably play a major role in the disk quota technique
you use. In some organizations the culture is such that it is acceptable to monitor
space usage and periodically notify users that they are over recommended limits, but
it wouldn’t be well received if administrators enforced controls that limited disk space
usage to specifi c amounts. In other organizations, especially larger organizations where
there might be hundreds or thousands of employees on the network, it can make sense
Managing Disk Quotas 525
Chapter 16
Please purchase PDF Split-Merge on www.verypdf.com to remove this watermark.
to have some controls in place and users might be more understanding of specifi c
controls. Controls at some point become a matter of necessity to help ensure that the
administrative staff can keep up with the disk space needs of the organization.
Disk quotas are confi gured on a per-volume basis. When you enable disk quotas, all
users who store data on a volume will be affected by the quota. You can set exceptions
for individual users as well that either set new limits or remove the limits altogether.
As users create fi les and folders on a volume, an ownership fl ag is applied that says
that this particular user owns the fi le or folder. Thus, if a user creates a fi le or folder on
a volume that user is the owner of, the fi le or folder and the space used counts toward
the user’s quota limit. However, because each volume is managed separately, there is no
way to set a specifi c limit for all volumes on a server or across the enterprise.
Note
For NTFS compressed fi les and sparse fi les, the space usage reported can refl ect total
space of fi les rather than the actual space the fi les use. This happens because the quota
system reads the total space used by the fi le rather than its reduced fi le size.
Ownership of fi les and folders can change in several scenarios. If a user creates a copy
of a fi le owned by someone else, the copy is owned by that user. This occurs because a
fi le is created when the copy is made. File and folder ownership can also change when
fi les are restored from backup. This can happen if you restore the fi les to a volume other
than the one the fi les were created on and copy the fi les over to the original volume.
Here, during the copy operation, the administrator becomes the owner of the fi les. A
workaround for this is to restore fi les and folders to a different location on the same
volume and then move the fi les and folders rather than copying them. When you move
fi les and folders from one location to another on the same volume, the original owner-
ship information is retained.
Administrators can be assigned as the owners of fi les in other ways as well, such as
when they install the operating system or application software. To ensure that admin-
istrators can always install programs, restore data, and perform other administrative
tasks, members of the Administrators group don’t have a quota limit as a general rule.
This is true even when you enforce disk quotas for all users. In fact, for the Administra-
tors group, the only type of quota you can set is a warning level that warns administra-
tors when they’ve used more than a set amount of space on a volume. When you think
about it, this makes a lot of sense—you don’t want to get into a situation where adminis-
trators can’t recover the system because of space limitations.
That said, you can apply quotas to individual users—even those who are members of the
Administrators group. You do this by creating a separate quota entry for each user. The
only account that cannot be restricted in this way is the built-in Administrator account.
If you try to set a limit on the Administrator account, the limit is not applied.
Note
For NTFS compressed fi les and sparse fi les, the space usage reported can refl ect total
space of fi les rather than the actual space the fi les use. This happens because the quota
system reads the total space used by the fi le rather than its reduced fi le size.
Chapter 16
526 Chapter 16 Managing Windows Server 2008 File Systems
Please purchase PDF Split-Merge on www.verypdf.com to remove this watermark.
Finally, it is important to note that all space used on a volume counts toward the disk
quota—even space used in the Recycle Bin. Thus, if a user who is over the limit deletes
fi les to get under the limit, the disk quota might still give warnings or if quotas are
enforced, the user still might not be able to write fi les to the volume. To resolve this
issue, the user would need to delete fi les and then empty the Recycle Bin.
Confi guring Disk Quotas
By default, disk quotas are disabled. If you want to use disk quotas, you must enable
quota management for each volume on which you want to use disk quotas. You can
enable disk quotas on any NTFS volume that has a drive letter or a mount point. Before
you confi gure disk quotas, think carefully about the limit and warning level. Set values
that make the most sense given the number of users who store data on the volume and
the size of the volume. For optimal performance of the volume, you won’t want to get in
a situation where all or nearly all of the disk space is allocated. For optimal user happi-
ness, you want to ensure that the warning and limit levels are adequate so the average
user can store the necessary data to perform job duties. Quota limits and warning lev-
els aren’t one size fi ts all either. Engineers and graphic designers can have very different
space needs than a typical user. In the best situations you’ll have confi gured network
shares so that different groups of users have access to different volumes, and these vol-
umes should be sized to meet the typical requirements of a particular group.
In some organizations, I’ve seen administrators set very low quota limits and warning
levels on data shares. The idea behind this was that the administrators wanted users to
save most of their data on their workstations and only put fi les that needed to be shared
on the data shares. I would discourage this for two reasons. Low quota limits and
warning levels frustrate users—you don’t want frustrated users; you want happy users.
Second, you should be encouraging users to store more of their important fi les on cen-
tral fi le servers, not less. Central fi le servers should be a part of regular enterprise-wide
backup routines because corporate servers and backing up data safeguards it from loss.
In addition, with the Volume Shadow Copy service, shadow copies of fi les on shared
folders can be created automatically, allowing users to perform point-in-time fi le recov-
ery without needing help from administrators.
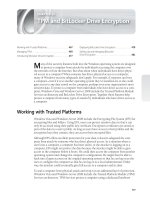
To enable disk quotas on an NTFS volume, follow these steps:
1. In Computer Management, expand Storage, and then select Disk Management. In
the details pane, right-click the volume on which you want to enable quotas, and
then select Properties.
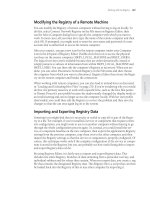
2. Click the Quota tab, and then select the Enable Quota Management check box as
shown in Figure 16-10.
Managing Disk Quotas 527
Chapter 16
Please purchase PDF Split-Merge on www.verypdf.com to remove this watermark.
Figure 16-10 Enable quota management on the volume, and then configure the disk quota
settings.
3. Defi ne a default disk quota limit for all users by selecting Limit Disk Space To
and then using the fi elds provided to set a limit in KB, MB, GB, TB, PB, or EB.
Afterward, use the Set Warning Level To fi eld to set the default warning limit. In
most cases, you’ll want the disk quota warning limit to be 90 to 95 percent of the
disk quota limit. This should give good separation between when warnings occur
and when the limit is reached.
4. To prevent users from going over the disk quota limit, select the Deny Disk Space
To Users Exceeding Quota Limit check box. This sets a physical limitation for
users that will prevent them from writing to the volume after the limit is reached.
5. NTFS sends warnings to users when they reach a warning level or limit. To
ensure that you have a record of these warnings, you can confi gure quota logging
options. Select the Log Event check boxes as appropriate.
6. Click OK. If the quota system isn’t currently enabled, you’ll see a prompt asking
you to enable the quota system. Click OK to allow Windows Server 2008 to
rescan the volume and update the disk usage statistics. Keep in mind that actions
might be taken against users who exceed the current limit or warning levels,
which can include preventing additional writing to the volume, notifying users
the next time they try to access the volume that they’ve exceeded a warning level
or have reached a limit, and logging applicable events in the application log.
Chapter 16
528 Chapter 16 Managing Windows Server 2008 File Systems
Please purchase PDF Split-Merge on www.verypdf.com to remove this watermark.
Customizing Quota Entries for Individual Users
After you enable disk quotas, the confi guration is set for and applies to all users who
store data on the volume. The only exception, as noted previously, is for members of the
Administrators group. The default disk quotas don’t apply to these users. If you want to
set a specifi c quota limit or warning level for an administrator, you can do this by creat-
ing a custom quota entry for that particular user account. You can also create custom
quota entries for users who have special needs, requirements, or limitations.
To view and work with quota entries, access Disk Management, right-click the volume
on which you enabled quotas, and then select Properties. In the Properties dialog box
for the disk, click the Quota tab, and then click Quota Entries. You’ll then see a list of
quota entries for everyone who has ever stored data on the volume, as shown in Figure
16-11. The entries show the following information:
Status
The status of the disk entries. Normal status is OK. If a user has reached
a warning level, the status is Warning. If a user is at or above the quota limit, the
status is Above Limit.
Name
The display name of the user account.
Logon Name
The logon name and domain (if applicable).
Amount Used
The amount of disk space used by the user.
Quota Limit
The quota limit set for the user.
Warning Level
The warning level set for the user.
Percent Used
The percentage of disk space used toward the limit.
Figure 16-11 Any existing quota entries are shown.
Quota entries get on the list in one of two ways: either automatically if a user has ever
stored data on the volume or by an administrator creating a custom entry for a user. You
can customize any of these entries—even the ones automatically created—by double-
clicking them, which displays the Quota Settings For dialog box shown in Figure 16-12,
and selecting the appropriate options either to remove the disk quota limits or set new
ones.
Managing Disk Quotas 529
Chapter 16
Please purchase PDF Split-Merge on www.verypdf.com to remove this watermark.
Figure 16-12 You can customize quota entries for individual users as necessary.
Note
You can’t create quota entries for groups. The only group entry that is allowed is the one
for the Administrators account, which is created automatically.
If a user doesn’t have an entry in the Quota Entries For dialog box, it means that user
has not yet saved fi les to the volume. You can still create a custom entry for the user if
you want. To do this, choose Quota, New Quota Entry. This displays the Select Users
dialog box shown in Figure 16-13. Use this dialog box to help you fi nd the user account
you want to work with. Type the name of the user account or part of the name, and click
Check Names. If multiple names match the value you entered, you’ll see a list of names
and will be able to choose the one you want to use. Otherwise, the name will be fi lled
in for you, and you can click OK to display the Add New Quota Entry dialog box, which
has the same options as the Quota Settings For dialog box shown in Figure 16-12.
Use Locations to Access User Accounts from Other Domains
By default, the Select Users dialog box is set to work with users from your logon domain.
If you want to add a user account from another domain, click Locations to display the
Locations dialog box. Then either select the entire directory or the specifi c domain in
which the account is located, and click OK.
Note
You can’t create quota entries for groups. The only group entry that is allowed is the one
for the Administrators account, which is created automatically.
Use Locations to Access User Accounts from Other Domains
By default, the Select Users dialog box is set to work with users from your logon domain.
If you want to add a user account from another domain, click Locations to display the
Locations dialog box. Then either select the entire directory or the specifi c domain in
which the account is located, and click OK.
Chapter 16
530 Chapter 16 Managing Windows Server 2008 File Systems
Please purchase PDF Split-Merge on www.verypdf.com to remove this watermark.
Figure 16-13 Type the name of the user account or part of the name, and click Check Names.
In the Quota Entries dialog box, there are a couple of tricks you can use to add or
manage multiple quota entries at once. If you want to add identical quota entries for
multiple users, you can do this by choosing Quota, New Quota Entry. This displays the
Select Users dialog box. Click Advanced to display the advanced Select Users dialog
box, as shown in Figure 16-14.
Figure 16-14 The advanced Select Users dialog box has additional options.
You can now search for users by name and description or by clicking Find Now without
entering any search criteria to display a list of available users from the current location.
You can select any of the users listed. Select multiple user accounts by holding down
the Ctrl key and clicking each account you want to select or by holding down the Shift
key, selecting the fi rst account name, and then clicking the last account name to choose
a range of accounts. Click OK twice, and then use the Add New Quota Entry dialog box
to confi gure the quota options for all the selected users.
Managing Disk Quotas 531
Chapter 16
Please purchase PDF Split-Merge on www.verypdf.com to remove this watermark.
To manage multiple quota entries simultaneously, access the Quota Entries dialog box,
then select the entries by holding down the Ctrl key and clicking each entry you want
to select or by holding down the Shift key, selecting the fi rst entry, and then clicking the
last entry to choose a range of entries. Afterward, right-click one of the selected entries,
and then choose Properties. You’ll then be able to confi gure quota options for all the
selected entries at once.
Managing Disk Quotas After Confi guration
Users are notifi ed that they have reached a warning level or quota limit when they
access the volume on which you’ve confi gured disk quotas. As an administrator, you’ll
want to check for quota violations periodically, and there are several ways you can do
this. One way is to access Disk Management, right-click the volume that you want to
check on, and then select Properties. In the Properties dialog box for the disk, click the
Quota tab, and then click the Quota Entries button. You can then check the current
disk usage of users and see whether there are any quota violations. You can also copy
selected entries to the Clipboard by pressing Ctrl+C and then pasting them into other
applications, such as Microsoft Excel, using Ctrl+V to help you create reports or lists of
disk space usage.
You can check quota entries from the command line as well. Type fsutil quota query
DriveDesignator at the command prompt, where DriveDesignator is the drive letter of
the volume followed by a colon, such as D:. If disk quotas are enabled on the volume,
you’ll then get a summary of the disk quota settings on the volume, as follows:
FileSystemControlFlags = 0x00000031
Quotas are tracked and enforced on this volume
Logging enabled for quota limits and threshold
The quota values are up to date
Default Quota Threshold = 0x0000000038400000
Default Quota Limit = 0x0000000040000000
SID Name = CPANDL\edwardh (User)
Change time = Saturday, April 12, 2008
Quota Used = 528164252
Quota Threshold = 943718400
Quota Limit = 1073741824
SID Name = CPANDL\mollyp (User)
Change time = Monday, April 14, 2008
Quota Used = 627384965
Quota Threshold = 943718400
Quota Limit = 1073741824
In this example, disk quotas are tracked and enforced on the volume, logging is
enabled for both quota limits, and the warning levels and the disk quota values are cur-
rent. In addition, the default warning limit (listed as the quota threshold) is set to 900
MB (0 × 038400000 bytes) and the default quota limit is set to 1 GB (0 × 040000000
bytes).
Chapter 16
532 Chapter 16 Managing Windows Server 2008 File Systems
Please purchase PDF Split-Merge on www.verypdf.com to remove this watermark.
The disk quota summary is followed by the individual disk quota entries for each user
who has stored data on the volume or has a custom entry regardless of whether the user
has ever written data to the volume. The entries show the following information:
SID Name
The logon name and domain of user accounts or the name of a built-in
or well-known group that has a quota entry.
Change Time
The last time the quota entry was changed or updated.
Quota Used
The amount of space used in bytes.
Quota Threshold
The current warning level set for the user in bytes.
Quota Limit
The current quota limit set for the user in bytes.
When you confi gure disk quotas, you also have the option of logging two types of
events in the system logs: one for when a user exceeds the quota limit and another for
when a user exceeds the warning level. By default, quota violations are written to the
system log once an hour, so if you checked the logs periodically, you could see events
related to any users who have disk quota violations. It’s much easier to check for quota
violations from the command line, however. Simply type fsutil quota violations at the
command prompt, and the FSUtil Quota command will check the system and applica-
tion event logs for quota violations.
Note
Wondering why FSUtil Quota Violations checks the system and application logs? Well, in
some cases, quota violations for programs running under user accounts are logged in the
application log rather than the system log. So, to ensure all quota violations are checked
for, FSUtil Quota Violations checks both logs.
If there are no quota violations found, the output is similar to the following:
Searching in System Event Log...
Searching in Application Event Log...
No quota violations detected
If there are quota violations, the output shows the event information related to each vio-
lation. In the following example, a user reached the warning level (listed as the quota
threshold):
Searching in System Event Log...
**** A user hit their quota threshold ! ****
Event ID : 0x40040024
EventType : Information
Event Category : 2
Source : Ntfs
User: CPANDL\harryt (User)
Data: D:
Searching in Application Event Log...
Note
Wondering why FSUtil Quota Violations checks the system and application logs? Well, in
some cases, quota violations for programs running under user accounts are logged in the
application log rather than the system log. So, to ensure all quota violations are checked
for, FSUtil Quota Violations checks both logs.
Managing Disk Quotas 533
Chapter 16
Please purchase PDF Split-Merge on www.verypdf.com to remove this watermark.
As you can see, the output shows you the event ID, type, category, and source. It also
shows the user who violated the disk quota settings and the volume on which the viola-
tion occurred.
As mentioned previously, quota violations are written to the event logs once an hour by
default. You can check or change this behavior using the FSUtil Behavior command. Keep
in mind, however, that any changes you make apply to all volumes on the system that
use disk quotas. To check the notifi cation interval, type fsutil behavior query quota-
notify. If the notifi cation interval has been set by you or another administrator, the noti-
fi cation interval is shown in seconds. To set the notifi cation interval, type fsutil behavior
set quotanotify Interval, where Interval is the notifi cation interval you want to set
expressed as the number of seconds. For example, if you want to receive less-frequent
notifi cations, you might want to set the notifi cation interval to 7200 seconds (2 hours),
and you would do this by typing fsutil behavior set quotanotify 7200.
Exporting and Importing Quota Entries
If you want to use the same quotas on more than one NTFS volume, you can do this by
exporting the quota entries from one volume and importing them on another volume.
When you import quota entries, if there isn’t a quota entry for the user already, a quota
entry will be created. If a user already has a quota entry on the volume, you’ll be asked
if you want to overwrite it.
To export and import quota entries, access Disk Management, right-click the volume
from which you want to export quota settings, and then select Properties. In the Proper-
ties dialog box for the disk, click the Quota tab, and then click the Quota Entries but-
ton. You’ll then see the Quota Entries dialog box. Select Export from the Quota menu.
This displays the Export Quota Settings dialog box.
Use the Save In selection list to choose the save location for the fi le containing the
quota settings, and then set a name for the fi le using the File Name fi eld. Afterward,
click Save.
Next, access the Quota Entries dialog box for the drive on which you want to import
settings. Select Import on the Quota menu. Then, in the Import Quota Settings dialog
box, select the quota settings fi le that you saved previously. Click Open.
If prompted about whether you want to overwrite an existing entry, click Yes to replace
an existing entry or click No to keep the existing entry. Select Do This For All Quota
Entries prior to clicking Yes or No to use the same option for all existing entries.
SIDE OUT
You can change the notifi cation interval for quota violations
As mentioned previously, quota violations are written to the event logs once an hour by
default. You can check or change this behavior using the FSUtil Behavior command. Keep
in mind, however, that any changes you make apply to all volumes on the system that
use disk quotas. To check the notifi cation interval, type fsutil behavior query quota-
notify. If the notifi cation interval has been set by you or another administrator, the noti-
fi cation interval is shown in seconds. To set the notifi cation interval, type fsutil behavior
set quotanotify Interval, where l Interval is the notifi cation interval you want to set
expressed as the number of seconds. For example, if you want to receive less-frequent
notifi cations, you might want to set the notifi cation interval to 7200 seconds (2 hours),
and you would do this by typing fsutil behavior set quotanotify 7200.
Chapter 16
534 Chapter 16 Managing Windows Server 2008 File Systems
Please purchase PDF Split-Merge on www.verypdf.com to remove this watermark.
Maintaining File System Integrity
As part of routine maintenance, you should periodically check disks for errors. The
primary tool to do this is Check Disk, which is implemented in both a graphical and a
command-line version.
How File System Errors Occur
File data is stored in clusters, and the Windows operating system uses a fi le table to
determine where a fi le begins and on which clusters it is stored. With FAT, the fi le table
used is called the root directory table. It defi nes the starting cluster of each fi le in the
fi le system. This cluster has a pointer to the second cluster, and the second cluster has
a pointer to the next, and so on until you get to the fi nal cluster used by the fi le, which
has an EOF marker. With NTFS, an MFT is used. If a fi le’s data can’t fi t within a single
record in this table, clusters belonging to the fi le are referenced using VCNs that map
to starting LCNs on the disk. If a fi le’s pointer or mapping is lost, you might not be able
to access the fi le. Errors can also occur for pointers or mappings that relate to the fi le
tables themselves and to the pointers or mappings for folders.
FAT tries to prevent disk integrity problems by maintaining a duplicate fi le allocation
table that can be used to recover the primary fi le allocation table if it becomes cor-
rupted. Beyond this, however, FAT doesn’t do much else to ensure disk integrity. NTFS,
on the other hand, has several mechanisms for preventing and correcting disk integrity
problems automatically. NTFS stores a partial duplicate of the MFT, which can be used
for failure recovery. NTFS also stores a persistent history of all changes made to fi les
on the volume in a log fi le, and the log fi le can be used to recover NTFS metadata fi les,
regular data fi les, and folders. What these fi le structure recovery mechanisms all have
in common is that they are automatic and you as an administrator don’t need to do any-
thing to ensure that these disk housekeeping tasks are performed. These mechanisms
aren’t perfect, however, and errors can occur.
The most common errors relate to the following areas:
Internal errors in a fi le’s structure
Free space being marked as allocated
Allocated space being marked as free
Partially or improperly written security descriptors
Unreadable disk sectors not marked as bad
Fixing File System Errors by Using Check Disk
Using Check Disk, you can check for and correct any of the common disk errors dis-
cussed previously. Check Disk works on FAT, FAT32, and NTFS volumes and primarily
looks for inconsistencies in the fi le system and its related metadata. It locates errors by
comparing the volume bitmap to the disk sectors assigned to fi les. For fi les, Check Disk
Maintaining File System Integrity 535
Chapter 16
Please purchase PDF Split-Merge on www.verypdf.com to remove this watermark.
looks at structural integrity, but won’t check for or attempt to repair corrupted data
within fi les that appear to be structurally intact.
Check Disk has two modes in which it can be run. It can analyze a disk, checking for
errors, but not repairing them. Or it can analyze a disk and attempt to repair any errors
found. New for Windows Server 2008 is that Check Disk has been optimized so that it
runs faster than previous versions.
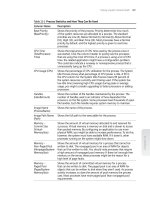
You can run the graphical version of Check Disk by using either Windows Explorer or
Disk Management. Right-click the volume, and choose Properties. On the Tools tab of
the Properties dialog box, click Check Now to display the Check Disk dialog box, as
shown in Figure 16-15. If you want to analyze the disk but not repair errors, click Start
without selecting either of the available options. If you want to check for errors and
repair them, select the Automatically Fix File System Errors check box, and click Start.
You can also check for and repair bad sectors by selecting the Scan For And Attempt
Recovery Of Bad Sectors check box.
Figure 16-15 Check the disk for errors and repair them or perform analysis only.
To fi x errors, Check Disk needs exclusive access to the volume. If Check Disk can’t get
exclusive access to fi les (because they have open fi le handles), Check Disk will prompt
you, as shown in Figure 16-16. If you click Schedule Disk Check, Check Disk will ana-
lyze and repair the disk the next time the system is started.
Figure 16-16 Check Disk needs exclusive access to some Windows files to fix errors.
Chapter 16
536 Chapter 16 Managing Windows Server 2008 File Systems
Please purchase PDF Split-Merge on www.verypdf.com to remove this watermark.