Windows Server 2008 Inside Out- P13
Bạn đang xem bản rút gọn của tài liệu. Xem và tải ngay bản đầy đủ của tài liệu tại đây (1.27 MB, 50 trang )
Managing File and Folder Permissions
You can think of fi le and folder permissions as the base-level permissions—the permis-
sions that are applied no matter what. For NTFS volumes, you use fi le and folder per-
missions and ownership to further constrain actions within the share as well as share
permissions. For FAT volumes, share permissions provide the only access controls. The
reason for this is that FAT volumes have no fi le and folder permission capabilities.
File and folder permissions are much more complex than share permissions, and to
really understand how they can be used and applied, you must understand ownership
and inheritance as well as the permissions that are available.
As administrators, we often forget about the basic fi le and folder attributes that can
be assigned. However, basic fi le and folder attributes can affect access, so let’s look at
these attributes fi rst and then at the fi le and folder permissions you can apply to NTFS
volumes. All fi les and folders have basic attributes regardless of whether you are work-
ing with FAT or NTFS. These attributes can be examined in Windows Explorer by right-
clicking the fi le or folder icon and then selecting Properties. Folder and fi le attributes
include Hidden and Read-Only. Hidden determines whether the fi le is displayed in fi le
listings. You can override this by telling Windows Explorer to display hidden fi les. On
NTFS, the Read-Only attribute for folders is initially shown as unavailable. Here, this
means the attribute is in a mixed state regardless of the current state of fi les in the folder.
If you override the mixed state by selecting the Read-Only check box for a folder, all fi les
in the folder will be read-only. If you override the mixed state and clear the Read-Only
check box for a folder, all fi les in the folder will be writable.
File and Folder Ownership
Before working with fi le and folder permissions, you should understand the concept of
ownership as it applies to fi les and folders. In Windows Server 2008, the fi le or folder
owner isn’t necessarily the fi le or folder’s creator. Instead, the fi le or folder owner is the
person who has direct control over the fi le or folder. File or folder owners can grant
access permissions and give other users permission to take ownership of a fi le or folder.
The way ownership is assigned initially depends on where the fi le or folder is being
created. By default, the user who created the fi le or folder is listed as the current owner.
Ownership can be taken or transferred in several ways. Any administrator can take
ownership. Any user or group with the Take Ownership permission can take owner-
ship. Any user who has the right to Restore Files And Directories, such as a member of
the Backup Operators group, can take ownership as well. Any current owner can trans-
fer ownership to another user as well.
SIDE OUT
Changes to basic fi le and folder attributes are
sometimes necessary
As administrators, we often forget about the basic fi le and folder attributes that can
be assigned. However, basic fi le and folder attributes can affect access, so let’s look at
these attributes fi rst and then at the fi le and folder permissions you can apply to NTFS
volumes. All fi les and folders have basic attributes regardless of whether you are work-
ing with FAT or NTFS. These attributes can be examined in Windows Explorer by right-
clicking the fi le or folder icon and then selecting Properties. Folder and fi le attributes
include Hidden and Read-Only. Hidden determines whether the fi le is displayed in fi le
listings. You can override this by telling Windows Explorer to display hidden fi les. On
NTFS, the Read-Only attribute for folders is initially shown as unavailable. Here, this
means the attribute is in a mixed state regardless of the current state of fi les in the folder.
If you override the mixed state by selecting the Read-Only check box for a folder, all fi les
in the folder will be read-only. If you override the mixed state and clear the Read-Only
check box for a folder, all fi les in the folder will be writable.
Managing File and Folder Permissions 567
Chapter 17
Please purchase PDF Split-Merge on www.verypdf.com to remove this watermark.
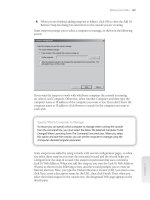
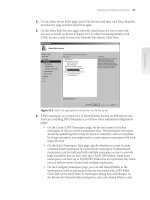
Taking Ownership of a File or Folder
You can take ownership using a fi le or folder’s Properties dialog box. Right-click the fi le
or folder, and then select Properties. On the Security tab of the Properties dialog box,
display the Advanced Security Settings dialog box by clicking Advanced. Next, on the
Owner tab, click Edit to display an editable version of the Owner tab, as shown in Fig-
ure 17-17. In the Change Owner To list box, select the new owner. If you’re taking own-
ership of a folder, you can take ownership of all subfolders and fi les within the folder by
selecting the Replace Owner On Subcontainers And Objects check box. Click OK twice
when you are fi nished.
Figure 17-17 Taking ownership is done by using the Owner tab.
Transferring Ownership
If you are an administrator or a current owner of a fi le or folder, you can transfer own-
ership to another user by using a fi le or folder’s Properties dialog box. In Windows
Explorer, right-click the fi le or folder, and then select Properties. On the Security tab of
the Properties dialog box, display the Advanced Security Settings dialog box by click-
ing the Advanced button. Next, on the Owner tab, click Edit to display an editable ver-
sion of the Owner tab, as shown in Figure 17-17.
Click Other Users Or Groups to display the Select User, Computer, Or Group dialog
box. Type the name of a user or group, and click Check Names. If multiple names
match the value you entered, you’ll see a list of names and will be able to choose the one
you want to use. Otherwise, the name will be fi lled in for you, and you can click OK to
close the Select User, Computer, Or Group dialog box. Under Change Owner To on the
Owner tab of the Advanced Security Settings dialog box, the user you added is listed
and selected. When you click OK, ownership is transferred to this user.
Chapter 17
568 Chapter 17 File Sharing and Security
Please purchase PDF Split-Merge on www.verypdf.com to remove this watermark.
Permission Inheritance for Files and Folders
By default, when you add a folder or fi le to an existing folder, the folder or fi le inherits
the permissions of the existing folder. For example, if the Domain Users group has
access to a folder and you add a fi le to this folder, members of the Domain Users group
will be able to access the fi le. Inherited permissions are automatically assigned when
fi les and folders are created.
When you assign new permissions to a folder, the permissions propagate down and
are inherited by all subfolders and fi les in the folder and supplement or replace exist-
ing permissions. If you add permissions on a folder to allow a new group to access a
folder, these permissions are applied to all subfolders and fi les in the folder, meaning
the additional group is granted access. On the other hand, if you were to change the
permissions on the folder so that, for instance, only members of the Engineering group
could access the folder, these permissions would be applied to all subfolders and fi les
in the folder, meaning only members of the Engineering group would have access to the
folder, its subfolders, and its fi les.
Inheritance is automatic. If you do not want the permissions of subfolders and fi les
within folders to supplement or replace existing permissions, you must override inheri-
tance starting with the top-level folder from which the permissions are inherited. A
top-level folder is referred to as a parent folder. Files and folders below the parent folder
are referred to as child fi les and folders. This is identical to the parent/child structure of
objects in Active Directory.
Changing Shaded Permissions and Stopping Inheritance
If a permission you want to change is shaded, the fi le or folder is inheriting the permis-
sion from a parent folder. To change the permission, you must do one of the following:
Access the parent folder and make the desired changes. These changes will then
be inherited by child folders and fi les.
Select the opposite permission to override the inherited permission if possible. In
most cases, Deny overrides Allow, so if you explicitly deny permission to a user
or group for a child folder or fi le, this permission should be denied to that user or
group of users.
Stop inheriting permissions from the parent folder and then copy or remove exist-
ing permissions as appropriate.
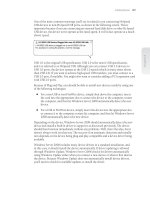
To stop inheriting permissions from a parent folder, right-click the fi le or folder in
Windows Explorer and then select Properties. On the Security tab of the Properties
dialog box, click Advanced to display the Advanced Security Settings dialog box. On
the Permissions tab, click Edit to display an editable version of the Permissions tab, as
shown in Figure 17-18.
Managing File and Folder Permissions 569
Chapter 17
Please purchase PDF Split-Merge on www.verypdf.com to remove this watermark.
Figure 17-18 Change inheritance as necessary.
Clear the Include Inheritable Permissions From This Object’s Parent check box. As
shown in Figure 17-19, you now have the opportunity to copy over the permissions
that were previously applied or remove the inherited permissions and apply only
the permissions that you explicitly set on the folder or fi le. Click Copy or Remove as
appropriate.
Figure 17-19 Copy over or remove the inherited permissions.
Resetting and Replacing Permissions
Another way to manage permissions is to reset the permissions of subfolders and fi les
within a folder, replacing their permissions with the current permissions assigned
to the folder you are working with. In this way, subfolders and fi les get all inheritable
permissions from the parent folder and all other explicitly defi ned permissions on the
individual subfolders and fi les are removed.
To reset permissions for subfolders and fi les of a folder, right-click the fi le or folder in
Windows Explorer, and then select Properties. On the Security tab of the Properties
dialog box, click Advanced to display the Advanced Security Settings dialog box. On
the Permissions tab, click Edit to display an editable version of the Permissions tab.
Chapter 17
570 Chapter 17 File Sharing and Security
Please purchase PDF Split-Merge on www.verypdf.com to remove this watermark.
Select Replace All Existing Inheritable Permissions…, and then click OK. As shown in
Figure 17-20, you will see a prompt explaining that this action will remove all explicitly
defi ned permissions and enable propagation of inheritable permissions. Click Yes.
Figure 17-20 Confirm that you want to replace the existing permissions on subfolders and files.
Confi guring File and Folder Permissions
On NTFS volumes, you can assign access permissions to fi les and folders. These per-
missions grant or deny access to users and groups.
Basic Permissions
In Windows Explorer you can view basic permissions by right-clicking the fi le or folder
you want to work with, selecting Properties on the shortcut menu, and then in the
Properties dialog box selecting the Security tab, as shown in Figure 17-21. The Group
Or User Names list shows groups and users with assigned permissions. If you select a
group or user in this list, the applicable permissions are shown in the Permissions For
list. If permissions are unavailable, it means the permissions are inherited from a par-
ent folder as discussed previously.
Figure 17-21 The Security tab shows the basic permissions assigned to each user or group.
Managing File and Folder Permissions 571
Chapter 17
Please purchase PDF Split-Merge on www.verypdf.com to remove this watermark.
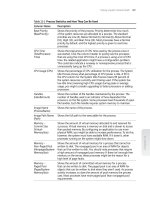
The basic permissions you can assign to folders and fi les are shown in Table 17-1 and
Table 17-2. These permissions are made up of multiple special permissions.
Table 17-1 Basic Folder Permissions
Permission Description
Full Control This permission permits reading, writing, changing, and deleting
fi les and subfolders. If a user has Full Control over a folder, she
can delete fi les in the folder regardless of the permission on the
fi les.
Modify This permission permits reading and writing to fi les and
subfolders; allows deletion of the folder.
List Folder Contents This permission permits viewing and listing fi les and subfolders
as well as executing fi les; inherited by folders only.
Read & Execute This permission permits viewing and listing fi les and subfolders
as well as executing fi les; inherited by fi les and folders.
Write This permission permits adding fi les and subfolders.
Read This permission permits viewing and listing fi les and subfolders.
Table 17-2 Basic File Permissions
Permission Description
Full Control This permission permits reading, writing, changing, and deleting
the fi le.
Modify This permission permits reading and writing of the fi le; allows
deletion of the fi le.
Read & Execute This permission permits viewing and accessing the fi le’s contents
as well as executing the fi le.
Write This permission permits writing to a fi le. Giving a user permission
to write to a fi le but not to delete it doesn’t prevent the user
from deleting the fi le’s contents.
Read This permission permits viewing or accessing the fi le’s contents.
Read is the only permission needed to run scripts. Read access is
required to access a shortcut and its target.
You can set basic permissions for fi les and folders by following these steps:
1. In Windows Explorer, right-click the fi le or folder you want to work with, and
select Properties. In the Properties dialog box, select the Security tab, shown
previously in Figure 17-21.
2. Click Edit to display an editable version of the Security tab. Users or groups that
already have access to the fi le or folder are listed in the Name list box. You can
change permissions for these users and groups by selecting the user or group you
want to change and then using the Permissions list box to grant or deny access
permissions.
Chapter 17
572 Chapter 17 File Sharing and Security
Please purchase PDF Split-Merge on www.verypdf.com to remove this watermark.
3. To set access permissions for additional users, computers, or groups, click Add.
This displays the Select Users, Computers, Or Groups dialog box.
4. The Locations button allows you to access account names from other domains.
Click Locations to see a list of the current domain, trusted domains, and other
resources that you can access. Because of the transitive trusts in Windows Server
2008, you can usually access all the domains in the domain tree or forest.
5. Type the name of a user or group account in the selected or default domain, and
then click Check Names. The options available depend on the number of matches
found as follows:
When a single match is found, the dialog box is automatically updated as
appropriate and the entry is underlined.
When no matches are found, you’ve either entered an incorrect name part
or you’re working with an incorrect location. Modify the name and try
again, or click Locations to select a new location.
If multiple matches are found, select the name(s) you want to use, and then
click OK.
6. To add additional users or groups, type a semicolon (;), and then repeat this
process.
7. When you click OK, the users and groups are added to the Name list for the
fi le or folder. Confi gure access permissions for each user and group added by
selecting an account name and then allowing or denying access permissions. If
a user or group should be granted access permissions, select the check box for
the permission in the Allow column. If a user or group should be denied access
permissions, select the check box for the permission in the Deny column.
8. When you’re fi nished, click OK.
Special Permissions
In Windows Explorer you can view special permissions by right-clicking the fi le or
folder you want to work with and selecting Properties on the shortcut menu. In the
Properties dialog box, select the Security tab, and then click Advanced to display the
Advanced Security Settings dialog box, as shown in Figure 17-22.
The special permissions available are as follows:
Traverse Folder/Execute File
Traverse Folder lets you directly access a folder even
if you don’t have explicit access to read the data it contains. Execute File lets you
run an executable fi le.
List Folder/Read Data
List Folder lets you view fi le and folder names. Read Data
lets you view the contents of a fi le.
Read Attributes
Lets you read the basic attributes of a fi le or folder. These attri-
butes include Read-Only, Hidden, System, and Archive.
Managing File and Folder Permissions 573
Chapter 17
Please purchase PDF Split-Merge on www.verypdf.com to remove this watermark.
Figure 17-22 The Advanced Security Settings dialog box can be used to access the special
permissions assigned to each user or group.
Read Extended Attributes
Lets you view the extended attributes (named data
streams) associated with a fi le. As discussed in Chapter 16, “Managing Windows
Server 2008 File Systems,” these include Summary fi elds, such as Title, Subject,
and Author, as well as other types of data.
Create Files/Write Data
Create Files lets you put new fi les in a folder. Write Data
allows you to overwrite existing data in a fi le (but not add new data to an existing
fi le because this is covered by Append Data).
Create Folders/Append Data
Create Folders lets you create subfolders within
folders. Append Data allows you to add data to the end of an existing fi le (but not
to overwrite existing data because this is covered by Write Data).
Write Attributes
Lets you change the basic attributes of a fi le or folder. These
attributes include Read-Only, Hidden, System, and Archive.
Write Extended Attributes
Lets you change the extended attributes (named data
streams) associated with a fi le. As discussed in Chapter 16, these include Sum-
mary fi elds, such as Title, Subject, and Author, as well as other types of data.
Delete Subfolders And Files
Lets you delete the contents of a folder. If you have
this permission, you can delete the subfolders and fi les in a folder even if you
don’t specifi cally have Delete permission on the subfolder or fi le.
Delete
Lets you delete a fi le or folder. If a folder isn’t empty and you don’t have
Delete permission for one of its fi les or subfolders, you won’t be able to delete it.
You can do this only if you have the Delete Subfolders And Files permission.
Chapter 17
574 Chapter 17 File Sharing and Security
Please purchase PDF Split-Merge on www.verypdf.com to remove this watermark.
Read Permissions
Lets you read all basic and special permissions assigned to a
fi le or folder.
Change Permissions
Lets you change basic and special permissions assigned to a
fi le or folder.
Take Ownership
Lets you take ownership of a fi le or folder. By default, admin-
istrators can always take ownership of a fi le or folder and can also grant this
permission to others.
Tables 17-3 and 17-4 show how special permissions are combined to make the basic
permissions for fi les and folders. Because special permissions are combined to make
the basic permissions, they are also referred to as atomic permissions.
Table 17-3 Special Permissions for Folders
Special Permissions
Full
Control Modify
Read &
Execute
List
Folder
Contents Read Write
Traverse Folder/
Execute File
XXXX
List Folder/Read Data
XXXXX
Read Attributes
XXXXX
Read Extended
Attributes
XXXXX
Create Files/Write
Data
XX X
Create Folders/
Append Data
XX X
Write Attributes
XX X
Write Extended
Attributes
XX X
Delete Subfolders And
Files
X
Delete
XX
Read Permissions XXXXXX
Change Permissions
X
Take Ownership
X
Managing File and Folder Permissions 575
Chapter 17
Please purchase PDF Split-Merge on www.verypdf.com to remove this watermark.
Table 17-4 Special Permissions for Files
Special Permissions
Full
Control Modify
Read &
Execute Read Write
Traverse Folder/
Execute File
XXX
List Folder/Read Data X X X X
Read Attributes X X X X
Read Extended
Attributes
XXXX
Create Files/Write Data X X X
Create Folders/
Append Data
XX X
Write Attributes
XX X
Write Extended
Attributes
XX X
Delete Subfolders And
Files
X
Delete
XX
Read Permissions X X X X X
Change Permissions
X
Take Ownership
X
You can set special permissions for fi les and folders in Windows Explorer. Right-click
the fi le or folder you want to work with and then select Properties. In the Properties
dialog box, click the Security tab, and then click Advanced. This displays the Advanced
Security Settings dialog box with the Permissions tab selected. Click Edit to display an
editable version of the Permissions tab. You now have the following options:
Add
Adds a user or group. Click Add to display the Select User, Computer, Or
Group dialog box. Type the name of a user or group, and click Check Names. If
multiple names match the value you entered, you’ll see a list of names and will be
able to choose the one you want to use. Otherwise, the name will be fi lled in for
you. When you click OK, the Permission Entry For dialog box shown in Figure
17-23 is displayed.
Chapter 17
576 Chapter 17 File Sharing and Security
Please purchase PDF Split-Merge on www.verypdf.com to remove this watermark.
Figure 17-23 Use the Permission Entry For dialog box to set special permissions.
Edit
Edits an existing user or group entry. Select the user or group whose permis-
sions you want to modify, and then click Edit. The Permission Entry For dialog
box shown in Figure 17-23 is displayed.
Remove
Removes an existing user or group entry. Select the user or group whose
permissions you want to remove, and then click Remove.
If you are adding or editing entries for users or groups, you use the Permission Entry
For dialog box to grant or deny special permissions. Select Allow or Deny for each
permission as appropriate. When fi nished, use the Apply Onto options shown in Table
17-5 to determine how and where these permissions are applied. If you want to prevent
subfolders and fi les from inheriting these permissions, select Apply These Permissions
To Objects And/Or Containers Within This Container Only. When you do this, all the
related entries in Table 17-5 are No. This means the settings no longer apply onto subse-
quent subfolders or to fi les in subsequent subfolders.
Managing File and Folder Permissions 577
Chapter 17
Please purchase PDF Split-Merge on www.verypdf.com to remove this watermark.
Table 17-5 Special Permissions Apply Onto Options
Apply Onto
Applies to
Current
Folder
Applies to
Subfolders
in the
Current
Folder
Applies to
File in the
Current
Folder
Applies to
Subsequent
Subfolders
Applies
to Files in
Subsequent
Subfolders
This folder only Yes No No No No
This folder,
subfolders, and
fi les
Yes Yes Yes Yes Yes
This folder and
subfolders
Yes Yes No Yes No
This folder and
fi les
Yes No Yes No Yes
Subfolders and
fi les only
No Yes Yes Yes Yes
Subfolders only No Yes No Yes No
Files only No No Yes No Yes
Note
When Apply These Permissions To Objects And/Or Containers Within This Container Only
is selected, all the values under Applies To Subsequent Subfolders and Applies To Files In
Subsequent Subfolders are No. The settings no longer apply onto subsequent subfolders
or to fi les in subsequent subfolders.
Determining Effective Permissions
Navigating the complex maze of permissions can be daunting even for the best admin-
istrators. Sometimes it won’t be clear how a particular permission set will be applied
to a particular user or group. If you ever want to know exactly how the current permis-
sions will be applied to a particular user or group, you can use a handy tool called Effec-
tive Permissions.
Effective Permissions applies only to fi le and folder permissions—not share permis-
sions—and is an option of the Advanced Security Settings dialog box. To get to it from
Windows Explorer, right-click the fi le or folder you want to work with and select Prop-
erties. In the Properties dialog box, select the Security tab, and then click Advanced. To
see how permissions will be applied to a user or group, click the Effective Permissions
tab, click Select, type the name of the user or group, and then click OK. The Effective
Permissions for the selected user or group are displayed as shown in Figure 17-24.
Note
When Apply These Permissions To Objects And/Or Containers Within This Container Only
is selected, all the values under Applies To Subsequent Subfolders and Applies To Files In
Subsequent Subfolders are No. The settings no longer apply onto subsequent subfolders
or to fi les in subsequent subfolders.
Chapter 17
578 Chapter 17 File Sharing and Security
Please purchase PDF Split-Merge on www.verypdf.com to remove this watermark.
Figure 17-24 Use Effective Permissions to help you determine how permissions will be applied to a
specific user or group.
Effective Permissions does have the following limitations:
You need the proper access permissions to view the effective permissions of a
user or group. That goes without saying, pretty much. But it is important to point
out.
You cannot determine permissions for global or universal security groups that are
nested in domain local groups. For example, by default Users has access to most
folders, and one of its members is Domain Users, which is a global security group.
If you try to determine the effective permissions for Domain Users, no permis-
sions are displayed.
You cannot determine the effective permissions for implicit groups or special
identities, such as Everyone, Interactive, Domain Controllers, Local Service, or
Network Service.
Managing File Shares After Confi guration
Confi guring shares can be a time-consuming process especially if you are trying to
troubleshoot why a particular user doesn’t have access or set up a new server with
the same fi le shares as a server you are decommissioning. Fortunately, there are some
techniques you can use to help you better manage fi le shares and the way they are
implemented.
Net Share is a handy command-line tool for helping you track fi le share and print share
permissions. You can use it to display a list of shares and who has access. If you redirect
the output of Net Share, you can save the share confi guration and access information to
a fi le, and this fi le can become a log that helps you track share changes over time.
Managing File Shares After Configuration 579
Chapter 17
Please purchase PDF Split-Merge on www.verypdf.com to remove this watermark.
To view a list of confi gured shares, type net share at the command prompt. The output
of Net Share shows you the name of each share on the server, the location of the actual
folder being shared, and any descriptions you’ve added. Here is an example:
Share name Resource Remark
----------------------------------------------------------
ADMIN$ C:\Windows Remote Admin
C$ C:\ Default share
F$ F:\ Default share
IPC$ Remote IPC
CorpData C:\CorpData
CorpTech F:\CorpTech
DevData F:\DevData
EngData C:\EngData
HRData F:\HRData
Public C:\Users\Public
UserData C:\UserData
The command completed successfully.
The list of shares shown includes the fi le shares CorpData, CorpTech, EngData, Public,
and others, and administrative shares created and managed by Windows, including
ADMIN$, IPC$, and any drive shares.
If you want to redirect the output to a fi le, you can do this by typing net share > File-
Name.txt, where FileName.txt is the name of the fi le to create and to which you want to
write, such as
net share > C:\logs\fi leshares.txt
If you follow the Net Share command with the name of a confi gured share, you’ll see the
complete confi guration details for the share as shown in the following example:
Share name EngData
Path C:\EngData
Remark
Maximum users No limit
Users
Caching Manual caching of documents
Permission CPANDL\Domain Admins, FULL
CPANDL\Domain Users, READ
CPANDL\EngineeringUsers, READ
The command completed successfully.
You can append the share confi guration details to the previously created log fi le by
using the append symbol (>>) instead of the standard redirect symbol (>), as shown in
the following example:
net share corpdata >> C:\logs\fi leshares.txt
Chapter 17
580 Chapter 17 File Sharing and Security
Please purchase PDF Split-Merge on www.verypdf.com to remove this watermark.
Listing 17-1 shows the source of a command-line script that you could use to create a
confi guration log for the key shares on the computer. Although the path in the example
is set to c:\logs\fi leshares.txt, you can set any log path you want.
Listing 17-1 A sample share logging script
net share > C:\logs\fi leshares.txt
net share c$ >> C:\logs\fi leshares.txt
net share f$ >> C:\logs\fi leshares.txt
net share corpdata >> C:\logs\fi leshares.txt
net share corptech >> C:\logs\fi leshares.txt
net share devdata >> C:\logs\fi leshares.txt
net share engdata >> C:\logs\fi leshares.txt
net share hrdata >> C:\logs\fi leshares.txt
net share public >> C:\logs\fi leshares.txt
net share userdata >> C:\logs\fi leshares.txt
Auditing File and Folder Access
Access permissions will only help protect data; they won’t tell you who deleted impor-
tant data or who was trying to access fi les and folders inappropriately. To track who
accessed fi les and folders and what they did, you must confi gure auditing for fi le and
folder access. Every comprehensive security strategy should include auditing.
To track fi le and folder access, you must:
Enable auditing
Specify which fi les and folders to audit
Monitor the security logs
Enabling Auditing for Files and Folders
You confi gure auditing policies by using Group Policy or local security policy. Group
Policy is used when you want to set auditing policies for an entire site, domain, or orga-
nizational unit, and is used as discussed in Part 5 of this book, “Managing Active Direc-
tory and Security.” Local security policy settings apply to an individual workstation or
server and can be overridden by Group Policy.
To enable auditing of fi les and folders for a specifi c computer, start the Local Security
Policy tool by clicking Start, All Programs, Administrative Tools, and Local Security
Policy. Expand Local Policies, and then select Audit Policy, as shown in Figure 17-25.
Auditing File and Folder Access 581
Chapter 17
Please purchase PDF Split-Merge on www.verypdf.com to remove this watermark.
Figure 17-25 Access the local auditing policy settings.
Next, double-click Audit Object Access. This displays the Audit Object Access Proper-
ties dialog box shown in Figure 17-26. Under Audit These Attempts, select the Success
check box to log successful access attempts, the Failure check box to log failed access
attempts, or both check boxes, and then click OK. This enables auditing but it doesn’t
specify which fi les and folders should be audited.
Figure 17-26 Configure auditing for object access.
Specifying Files and Folders to Audit
After you have enabled Audit Object Access, you can set the level of auditing for individ-
ual folders and fi les. This allows you to control whether and how folder and fi le usage
is tracked. Keep in mind that auditing is available only on NTFS volumes. In addition,
everything discussed about inheritance applies to fi les and folders as well—and this is a
good thing. This allows you, for example, to audit access to every fi le or folder on a vol-
ume simply by specifying that you want to audit the root folder of the volume.
Chapter 17
582 Chapter 17 File Sharing and Security
Please purchase PDF Split-Merge on www.verypdf.com to remove this watermark.
You specify fi les and folders to audit using Windows Explorer. In Windows Explorer,
right-click the fi le or folder to be audited, and then, from the shortcut menu, select Prop-
erties. In the Properties dialog box, click the Security tab, and then click Advanced. In
the Advanced Security Settings dialog box, click Edit on the Auditing tab. You can now
view and manage auditing settings using the options shown in Figure 17-27.
Figure 17-27 Specify to which users and groups auditing should apply.
You have the same two inheritance options discussed earlier in the chapter:
If you want to inherit auditing settings from a parent object, ensure that the
Include Inheritable Permissions From This Object’s Parent check box is selected.
If you want child objects of the current object to inherit the settings you are set-
ting on the current folder, select the Replace All Existing Inheritable Auditing
Entries check box.
Now use the Auditing Entries list box to select the users, groups, or computers whose
actions you want to audit. To add specifi c accounts, click Add, and then use the Select
User, Computer, Or Group dialog box to select an account name to add. If you want to
audit actions for all users, use the special group Everyone. Otherwise, select the specifi c
user groups or users, or both, that you want to audit. When you click OK, you’ll see the
Auditing Entry For dialog box, as shown in Figure 17-28.
Auditing File and Folder Access 583
Chapter 17
Please purchase PDF Split-Merge on www.verypdf.com to remove this watermark.
Figure 17-28 Determine the actions to audit for the designated user, group, or computer.
The Apply Onto drop-down list box allows you to specify which actions should be
audited. Select the Successful or Failed check boxes, or both, for the events you want
to audit. The events you can audit are the same as the special permissions listed in
Tables 17-3 and 17-4, except you can’t audit the synchronizing of offl ine fi les and fold-
ers. Click OK when you’re fi nished. Repeat this process to audit other users, groups, or
computers.
Note
Often you’ll want to track only failed actions. This way, you know if someone was try-
ing to perform an action and failed. Keep in mind a failed attempt doesn’t always mean
someone is trying to break into a fi le or folder. A user simply might have double-clicked
a folder or fi le to which he or she didn’t have access. In addition, some types of actions
can cause multiple failed attempts to be logged even when the user performed the
action only once. Regardless, as an administrator, you should always check multiple failed
attempts because of the possibility that someone is attempting to breach your system’s
defenses.
Chapter 17
584 Chapter 17 File Sharing and Security
Please purchase PDF Split-Merge on www.verypdf.com to remove this watermark.
Monitoring the Security Logs
Any time fi les and folders that you’ve confi gured for auditing are accessed, the action is
written to the system’s Security log, where it’s stored for your review. The Security log
is accessible from Event Viewer. Successful actions can cause successful events, such
as successful fi le reads, to be recorded. Failed actions can cause failed events, such as
failed fi le deletions, to be recorded.
Auditing File and Folder Access 585
Chapter 17
Please purchase PDF Split-Merge on www.verypdf.com to remove this watermark.
Please purchase PDF Split-Merge on www.verypdf.com to remove this watermark.