Windows Internals covering windows server 2008 and windows vista- P9
Bạn đang xem bản rút gọn của tài liệu. Xem và tải ngay bản đầy đủ của tài liệu tại đây (734.19 KB, 50 trang )
390
When a thread finishes running (either because it returned from its main routine, called
ExitThread, or was killed with TerminateThread), it moves from the running state to the
terminated state. If there are no handles open on the thread object, the thread is removed from the
process thread list and the associated data structures are deallocated and released.
5.7.10 Context Switching
A thread’s context and the procedure for context switching vary depending on the processor’s
architecture. A typical context switch requires saving and reloading the following data:
■ Instruction pointer
■ Kernel stack pointer
■ A pointer to the address space in which the thread runs (the process’s page table directory)
The kernel saves this information from the old thread by pushing it onto the current (old
thread’s) kernel-mode stack, updating the stack pointer, and saving the stack pointer in the old
thread’s KTHREAD block. The kernel stack pointer is then set to the new thread’s kernel stack,
and the new thread’s context is loaded. If the new thread is in a different process, it loads the
address of its page table directory into a special processor register so that its address space is
available. (See the description of address translation in Chapter 9.) If a kernel APC that needs to
be delivered is pending, an interrupt at IRQL 1 is requested. Otherwise, control passes to the new
thread’s restored instruction pointer and the new thread resumes execution.
5.7.11 Idle Thread
When no runnable thread exists on a CPU, Windows dispatches the per-CPU idle thread.
Each CPU is allotted one idle thread because on a multiprocessor system one CPU can be
executing a thread while other CPUs might have no threads to execute.
Various Windows process viewer utilities report the idle process using different names. Task
Manager and Process Explorer call it “System Idle Process,” while Tlist calls it “System Process.”
If you look at the EPROCESS structure’s ImageFileName member, you’ll see the internal name
for the process is “Idle.” Windows reports the priority of the idle thread as 0 (15 on x64 systems).
In reality, however, the idle threads don’t have a priority level because they run only when there
are no real threads to run—they are not scheduled and never part of any ready queues. (Remember,
only one thread per Windows system is actually running at priority 0—the zero page thread,
explained in Chapter 9.)
Apart from priority, there are many other fields in the idle process or its threads that may be
reported as 0. This occurs because the idle process is not an actual full-blown object manager
process object, and neither are its idle threads. Instead, the initial idle thread and idle process
objects are statically allocated and used to bootstrap the system before the process manager
initializes. Subsequent idle thread structures are allocated dynamically as additional processors are
Please purchase PDF Split-Merge on www.verypdf.com to remove this watermark.
391
brought online. Once process management initializes, it uses the special variable PsIdleProcess to
refer to the idle process.
Apart from some critical fields provided so that these threads and their process can have a
PID and name, everything else is ignored, which means that query APIs may simply return zeroed
data.
The idle loop runs at DPC/dispatch level, polling for work to do, such as delivering deferred
procedure calls (DPCs) or looking for threads to dispatch to. Although some details of the flow
vary between architectures, the basic flow of control of the idle thread is as follows:
1. Enables and disables interrupts (allowing any pending interrupts to be delivered).
2. Checks whether any DPCs (described in Chapter 3) are pending on the processor. If DPCs
are pending, clears the pending software interrupt and delivers them. (This will also perform timer
expiration, as well as deferred ready processing. The latter is explained in the upcoming
multiprocessor scheduling section.)
3. Checks whether a thread has been selected to run next on the processor, and if so,
dispatches that thread.
4. Calls the registered power management processor idle routine (in case any power
management functions need to be performed), which is either in the processor power driver (such
as intelppm.sys) or in the HAL if such a driver is unavailable.
5. On debug systems, checks if there is a kernel debugger trying to break into the system and
gives it access.
6. If requested, checks for threads waiting to run on other processors and schedules them
locally. (This operation is also explained in the upcoming multiprocessor scheduling section.)
5.7.12 Priority Boosts
In six cases, the Windows scheduler can boost (increase) the current priority value of threads:
■ On completion of I/O operations
■ After waiting for executive events or semaphores
■ When a thread has been waiting on an executive resource for too long
■ After threads in the foreground process complete a wait operation
■ When GUI threads wake up because of windowing activity
■ When a thread that’s ready to run hasn’t been running for some time (CPU starvation)
The intent of these adjustments is to improve overall system throughput and responsiveness
as well as resolve potentially unfair scheduling scenarios. Like any scheduling algorithms,
however, these adjustments aren’t perfect, and they might not benefit all applications.
Please purchase PDF Split-Merge on www.verypdf.com to remove this watermark.
392
Note Windows never boosts the priority of threads in the real-time range (16 through 31).
Therefore, scheduling is always predictable with respect to other threads in the real-time range.
Windows assumes that if you’re using the real-time thread priorities, you know what you’re doing.
Windows Vista adds one more scenario in which a priority boost can occur, multimedia
playback. Unlike the other priority boosts, which are applied directly by kernel code, multimedia
playback boosts are managed by a user-mode service called the MultiMedia Class Scheduler
Service (MMCSS). (Although the boosts are still done in kernel mode, the request to boost the
threads is managed by this user-mode service.) We’ll first cover the typical kernelmanaged
priority boosts and then talk about MMCSS and the kind of boosting it performs.
Priority Boosting after I/O Completion
Windows gives temporary priority boosts upon completion of certain I/O operations so that
threads that were waiting for an I/O will have more of a chance to run right away and process
whatever was being waited for. Recall that 1 quantum unit is deducted from the thread’s
remaining quantum when it wakes up so that I/O bound threads aren’t unfairly favored. Although
you’ll find recommended boost values in the Windows Driver Kit (WDK) header files (by
searching for “#define IO” in Wdm.h or Ntddk.h), the actual value for the boost is up to the device
driver. (These values are listed in Table 5-18.) It is the device driver that specifies the boost when
it completes an I/O request on its call to the kernel function IoCompleteRequest. In Table 5-18,
notice that I/O requests to devices that warrant better responsiveness have higher boost values.
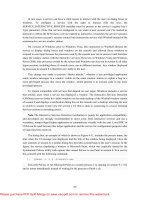
The boost is always applied to a thread’s current priority, not its base priority. As illustrated
in Figure 5-23, after the boost is applied, the thread gets to run for one quantum at the elevated
priority level. After the thread has completed its quantum, it decays one priority level and then
runs another quantum. This cycle continues until the thread’s priority level has decayed back to its
base priority. A thread with a higher priority can still preempt the boosted thread, but the
interrupted thread gets to finish its time slice at the boosted priority level before it decays to the
next lower priority.
Please purchase PDF Split-Merge on www.verypdf.com to remove this watermark.
393
As noted earlier, these boosts apply only to threads in the dynamic priority range (0 through
15). No matter how large the boost is, the thread will never be boosted beyond level 15 into the
real-time priority range. In other words, a priority 14 thread that receives a boost of 5 will go up to
priority 15. A priority 15 thread that receives a boost will remain at priority 15.
Boosts After Waiting for Events and Semaphores
When a thread that was waiting for an executive event or a semaphore object has its wait
satisfied (because of a call to the function SetEvent, PulseEvent, or ReleaseSemaphore), it
receives a boost of 1. (See the value for EVENT_ INCREMENT and
SEMAPHORE_INCREMENT in the WDK header files.) Threads that wait for events and
semaphores warrant a boost for the same reason that threads that wait for I/O operations
do—threads that block on events are requesting CPU cycles less frequently than CPU-bound
threads. This adjustment helps balance the scales.
This boost operates the same as the boost that occurs after I/O completion, as described in the
previous section:
■ The boost is always applied to the base priority (not the current priority).
■ The priority will never be boosted above 15.
■ The thread gets to run at the elevated priority for its remaining quantum (as described
earlier, quantums are reduced by 1 when threads exit a wait) before decaying one priority level at
a time until it reaches its original base priority.
A special boost is applied to threads that are awoken as a result of setting an event with the
special functions NtSetEventBoostPriority (used in Ntdll.dll for critical sections) and
KeSetEventBoostPriority (used for executive resources) or if a signaling gate is used (such as with
pushlocks). If a thread waiting for an event is woken up as a result of the special event boost
function and its priority is 13 or below, it will have its priority boosted to be the setting thread’s
priority plus one. If its quantum is less than 4 quantum units, it is set to 4 quantum units. This
boost is removed at quantum end.
Boosts During Waiting on Executive Resources
When a thread attempts to acquire an executive resource (ERESOURCE; see Chapter 3 for
more information on kernel synchronization objects) that is already owned exclusively by another
thread, it must enter a wait state until the other thread has released the resource. To avoid
deadlocks, the executive performs this wait in intervals of five seconds instead of doing an infinite
wait on the resource.
At the end of these five seconds, if the resource is still owned, the executive will attempt to
prevent CPU starvation by acquiring the dispatcher lock, boosting the owning thread or threads,
and performing another wait. Because the dispatcher lock is held and the thread’s WaitNext flag is
set to TRUE, this ensures a consistent state during the boosting process until the next wait is done.
This boost operates in the following manner:
■ The boost is always applied to the base priority (not the current priority) of the owner
thread.
Please purchase PDF Split-Merge on www.verypdf.com to remove this watermark.
394
■ The boost raises priority to 14.
■ The boost is only applied if the owner thread has a lower priority than the waiting thread,
and only if the owner thread’s priority isn’t already 14.
■ The quantum of the thread is reset so that the thread gets to run at the elevated priority for a
full quantum, instead of only the quantum it had left. Just like other boosts, at each quantum end,
the priority boost will slowly decrease by one level.
Because executive resources can be either shared or exclusive, the kernel will first boost the
exclusive owner and then check for shared owners and boost all of them. When the waiting thread
enters the wait state again, the hope is that the scheduler will schedule one of the owner threads,
which will have enough time to complete its work and release the resource. It’s important to note
that this boosting mechanism is used only if the resource doesn’t have the Disable Boost flag set,
which developers can choose to set if the priority inversion mechanism described here works well
with their usage of the resource.
Additionally, this mechanism isn’t perfect. For example, if the resource has multiple shared
owners, the executive will boost all those threads to priority 14, resulting in a sudden surge of
high-priority threads on the system, all with full quantums. Although the exclusive thread will run
first (since it was the first to be boosted and therefore first on the ready list), the other shared
owners will run next, since the waiting thread’s priority was not boosted. Only until after all the
shared owners have gotten a chance to run and their priority decreased below the waiting thread
will the waiting thread finally get its chance to acquire the resource. Because shared owners can
promote or convert their ownership from shared to exclusive as soon as the exclusive owner
releases the resource, it’s possible for this mechanism not to work as intended.
Priority Boosts for Foreground Threads After Waits
Whenever a thread in the foreground process completes a wait operation on a kernel object,
the kernel function KiUnwaitThread boosts its current (not base) priority by the current value of
PsPrioritySeperation. (The windowing system is responsible for determining which process is
considered to be in the foreground.) As described in the section on quantum controls,
PsPrioritySeperation reflects the quantum-table index used to select quantums for the threads of
foreground applications. However, in this case, it is being used as a priority boost value.
The reason for this boost is to improve the responsiveness of interactive applications—by
giving the foreground application a small boost when it completes a wait, it has a better chance of
running right away, especially when other processes at the same base priority might be running in
the background.
Unlike other types of boosting, this boost applies to all Windows systems, and you can’t
disable this boost, even if you’ve disabled priority boosting using the Windows
SetThreadPriorityBoost function.
EXPERIMENT: Watching Foreground Priority Boosts and Decays
Using the CPU Stress tool, you can watch priority boosts in action. Take the following steps:
Please purchase PDF Split-Merge on www.verypdf.com to remove this watermark.
395
1. Open the System utility in Control Panel (or right-click on your computer name’s icon on
the desktop, and choose Properties). Click the Advanced System Settings label, select the
Advanced tab, click the Settings button in the Performance section, and finally click the Advanced
tab. Select the Programs option. This causes PsPrioritySeperation to get a value of 2.
2. Run Cpustres.exe, and change the activity of thread 1 from Low to Busy.
3. Start the Performance tool by selecting Programs from the Start menu and then selecting
Reliability And Performance Monitor from the Administrative Tools menu. Click on the
Performance Monitor entry under Monitoring Tools.
4. Click the Add Counter toolbar button (or press Ctrl+I) to bring up the Add Counters dialog
box.
5. Select the Thread object, and then select the % Processor Time counter.
6. In the Instances box, select and click Search. Scroll down until you see the CPUSTRES
process. Select the second thread (thread 1). (The first thread is the GUI thread.) You should see
something like this:
7. Click the Add button, and then click OK.
8. Select Properties from the Action menu. Change the Vertical Scale Maximum to 16 and set
the interval to Sample Every N Seconds in the Graph Elements area.
Please purchase PDF Split-Merge on www.verypdf.com to remove this watermark.
396
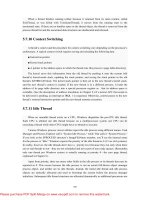
9. Now bring the CPUSTRES process to the foreground. You should see the priority of the
CPUSTRES thread being boosted by 2 and then decaying back to the base priority as follows:
10. The reason CPUSTRES receives a boost of 2 periodically is because the thread you’re
monitoring is sleeping about 25 percent of the time and then waking up (this is the Busy Activity
level). The boost is applied when the thread wakes up. If you set the Activity level to Maximum,
you won’t see any boosts because Maximum in CPUSTRES puts the thread into an infinite loop.
Therefore, the thread doesn’t invoke any wait functions and as a result doesn’t receive any boosts.
11. When you’ve finished, exit Reliability and Performance Monitor and CPU Stress.
Priority Boosts After GUI Threads Wake Up
Threads that own windows receive an additional boost of 2 when they wake up because of
windowing activity such as the arrival of window messages. The windowing system (Win32k.sys)
applies this boost when it calls KeSetEvent to set an event used to wake up a GUI thread. The
reason for this boost is similar to the previous one—to favor interactive applications.
EXPERIMENT: Watching Priority Boosts on GUI Threads
You can also see the windowing system apply its boost of 2 for GUI threads that wake up to
process window messages by monitoring the current priority of a GUI application and moving the
mouse across the window. Just follow these steps:
1. Open the System utility in Control Panel (or right-click on your computer name’s icon on
the desktop, and choose Properties). Click the Advanced System Settings label, select the
Advanced tab, click the Settings button in the Performance section, and finally click the Advanced
tab. Be sure that the Programs option is selected. This causes PsPrioritySeperation to get a value
of 2.
2. Run Notepad from the Start menu by selecting Programs/Accessories/Notepad.
3. Start the Performance tool by selecting Programs from the Start menu and then selecting
Reliability And Performance Monitor from the Administrative Tools menu. Click on the
Performance Monitor entry under Monitoring Tools.
Please purchase PDF Split-Merge on www.verypdf.com to remove this watermark.
397
4. Click the Add Counter toolbar button (or press Ctrl+I) to bring up the Add Counters dialog
box.
5. Select the Thread object, and then select the % Processor Time counter.
6. In the Instances box, select , and then click Search. Scroll down until you see Notepad
thread 0. Click it, click the Add button, and then click OK.
7. As in the previous experiment, select Properties from the Action menu. Change the
Vertical Scale Maximum to 16, set the interval to Sample Every N Seconds in the Graph Elements
area, and click OK.
8. You should see the priority of thread 0 in Notepad at 8, 9, or 10. Because Notepad entered
a wait state shortly after it received the boost of 2 that threads in the foreground process receive, it
might not yet have decayed from 10 to 9 and then to 8.
9. With Reliability and Performance Monitor in the foreground, move the mouse across the
Notepad window. (Make both windows visible on the desktop.) You’ll see that the priority
sometimes remains at 10 and sometimes at 9, for the reasons just explained. (The reason you
won’t likely catch Notepad at 8 is that it runs so little after receiving the GUI thread boost of 2 that
it never experiences more than one priority level of decay before waking up again because of
additional windowing activity and receiving the boost of 2 again.)
10. Now bring Notepad to the foreground. You should see the priority rise to 12 and remain
there (or drop to 11, because it might experience the normal priority decay that occurs for boosted
threads on the quantum end) because the thread is receiving two boosts: the boost of 2 applied to
GUI threads when they wake up to process windowing input and an additional boost of 2 because
Notepad is in the foreground.
11. If you then move the mouse over Notepad (while it’s still in the foreground), you might
see the priority drop to 11 (or maybe even 10) as it experiences the priority decay that normally
occurs on boosted threads as they complete their turn. However, the boost of 2 that is applied
because it’s the foreground process remains as long as Notepad remains in the foreground.
12. When you’ve finished, exit Reliability and Performance Monitor and Notepad.
Priority Boosts for CPU Starvation
Imagine the following situation: you have a priority 7 thread that’s running, preventing a
priority 4 thread from ever receiving CPU time; however, a priority 11 thread is waiting for some
resource that the priority 4 thread has locked. But because the priority 7 thread in the middle is
eating up all the CPU time, the priority 4 thread will never run long enough to finish whatever it’s
doing and release the resource blocking the priority 11 thread. What does Windows do to address
this situation?
We have previously seen how the executive code responsible for executive resources
manages this scenario by boosting the owner threads so that they can have a chance to run and
Please purchase PDF Split-Merge on www.verypdf.com to remove this watermark.
398
release the resource. However, executive resources are only one of the many synchronization
constructs available to developers, and the boosting technique will not apply to any other primitive.
Therefore, Windows also includes a generic CPU starvation relief mechanism as part of a thread
called the balance set manager (a system thread that exists primarily to perform memory
management functions and is described in more detail in Chapter 9).
Once per second, this thread scans the ready queues for any threads that have been in the
ready state (that is, haven’t run) for approximately 4 seconds. If it finds such a thread, the balance
set manager boosts the thread’s priority to 15 and sets the quantum target to an equivalent CPU
clock cycle count of 4 quantum units. Once the quantum is expired, the thread’s priority decays
immediately to its original base priority. If the thread wasn’t finished and a higher priority thread
is ready to run, the decayed thread will return to the ready queue, where it again becomes eligible
for another boost if it remains there for another 4 seconds.
The balance set manager doesn’t actually scan all ready threads every time it runs. To
minimize the CPU time it uses, it scans only 16 ready threads; if there are more threads at that
priority level, it remembers where it left off and picks up again on the next pass. Also, it will boost
only 10 threads per pass—if it finds 10 threads meriting this particular boost (which would
indicate an unusually busy system), it stops the scan at that point and picks up again on the next
pass.
Note We mentioned earlier that scheduling decisions in Windows are not affected by the
number of threads, and that they are made in constant time, or O(1). Because the balance set
manager does need to scan ready queues manually, this operation does depend on the number of
threads on the system, and more threads will require more scanning time. However, the balance
set manager is not considered part of the scheduler or its algorithms and is simply an extended
mechanism to increase reliability. Additionally, because of the cap on threads and queues to scan,
the performance impact is minimized and predictable in a worst-case scenario.
Will this algorithm always solve the priority inversion issue? No—it’s not perfect by any
means. But over time, CPU-starved threads should get enough CPU time to finish whatever
processing they were doing and reenter a wait state.
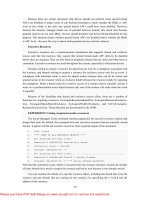
EXPERIMENT: Watching Priority Boosts for CPu Starvation
Using the CPU Stress tool, you can watch priority boosts in action. In this experiment, we’ll
see CPU usage change when a thread’s priority is boosted. Take the following steps:
Please purchase PDF Split-Merge on www.verypdf.com to remove this watermark.
399
1. Run Cpustres.exe. Change the activity level of the active thread (by default, Thread 1)
from Low to Maximum. Change the thread priority from Normal to Below Normal. The screen
should look like this:
2. Start the Performance tool by selecting Programs from the Start menu and then selecting
Reliability And Performance Monitor from the Administrative Tools menu. Click on the
Performance Monitor entry under Monitoring Tools.
3. Click the Add Counter toolbar button (or press Ctrl+I) to bring up the Add Counters dialog
box.
4. Select the Thread object, and then select the % Processor Time counter.
5. In the Instances box, select , and then click Search. Scroll down until you see the
CPUSTRES process. Select the second thread (thread 1). (The first thread is the GUI thread.) You
should see something like this:
Please purchase PDF Split-Merge on www.verypdf.com to remove this watermark.
400
6. Click the Add button, and then click OK.
7. Raise the priority of Performance Monitor to real time by running Task Manager, clicking
the Processes tab, and selecting the Mmc.exe process. Right-click the process, select Set Priority,
and then select Realtime. (If you receive a Task Manager Warning message box warning you of
system instability, click the Yes button.) If you have a multiprocessor system, you will also need
to change the affinity of the process: right-click and select Set Affinity. Then clear all other CPUs
except for CPU 0.
8. Run another copy of CPU Stress. In this copy, change the activity level of Thread 1 from
Low to Maximum.
9. Now switch back to Performance Monitor. You should see CPU activity every 6 or so
seconds because the thread is boosted to priority 15. You can force updates to occur more
frequently than every second by pausing the display with Ctrl+F, and then pressing Ctrl+U, which
forces a manual update of the counters. Keep Ctrl+U pressed for continual refreshes.
When you’ve finished, exit Performance Monitor and the two copies of CPU Stress.
EXPERIMENT: “listening” to Priority Boosting
To “hear” the effect of priority boosting for CPU starvation, perform the following steps on a
system with a sound card:
1. Because of MMCSS’s priority boosts (which we will describe in the next subsection), you
will need to stop the MultiMedia Class Scheduler Service by opening the Services management
interface (Start, Programs, Administrative Tools, Services).
2. Run Windows Media Player (or some other audio playback program), and begin playing
some audio content.
3. Run Cpustres, and set the activity level of Thread 1 to Maximum.
4. Raise the priority of Thread 1 from Normal to Time Critical.
5. You should hear the music playback stop as the compute-bound thread begins consuming
all available CPU time.
6. Every so often, you should hear bits of sound as the starved thread in the audio playback
process gets boosted to 15 and runs enough to send more data to the sound card.
7. Stop Cpustres and Windows Media Player, and start the MMCSS service again.
Priority Boosts for MultiMedia Applications and Games (MMCSS)
Please purchase PDF Split-Merge on www.verypdf.com to remove this watermark.
401
As we’ve just seen in the last experiment, although Windows’s CPU starvation priority
boosts may be enough to get a thread out of an abnormally long wait state or potential deadlock,
they simply cannot deal with the resource requirements imposed by a CPU-intensive application
such as Windows Media Player or a 3D computer game.
Skipping and other audio glitches have been a common source of irritation among Windows
users in the past, and the user-mode audio stack in Windows Vista would have only made the
situation worse since it offers even more chances for preemption. To address this, Windows Vista
incorporates a new service (called MMCSS, described earlier in this chapter) whose purpose is to
ensure “glitch-free” multimedia playback for applications that register with it.
MMCSS works by defining several tasks, including:
■ Audio
■ Capture
■ Distribution
■ Games
■ Playback
■ Pro Audio
■ Window Manager
Note You can find the settings for MMCSS, including a lists of tasks (which can be modified
by OEMs to include other specific tasks as appropriate) in the registry keys under
HKLM\SOFTWARE\Microsoft\Windows NT\CurrentVersion\Multimedia\SystemProfile.
Additionally, the SystemResponsiveness value allows you to fine-tune how much CPU usage
MMCSS guarantees to low-priority threads.
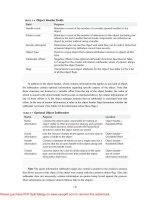
In turn, each of these tasks includes information about the various properties that differentiate
them. The most important one for scheduling is called the Scheduling Category, which is the
primary factor determining the priority of threads registered with MMCSS. Table 5-19 shows the
various scheduling categories.
The main mechanism behind MMCSS boosts the priority of threads inside a registered
process to the priority level matching their scheduling category and relative priority within this
category for a guaranteed period of time. It then lowers those threads to the Exhausted category so
that other, nonmultimedia threads on the system can also get a chance to execute.
Please purchase PDF Split-Merge on www.verypdf.com to remove this watermark.
402
By default, multimedia threads will get 80 percent of the CPU time available, while other
threads will receive 20 percent (based on a sample of 10 ms; in other words, 8 ms and 2 ms).
MMCSS itself runs at priority 27, since it needs to preempt any Pro Audio threads in order to
lower their priority to the Exhausted category.
It is important to emphasize that the kernel still does the actual boosting of the values inside
the KTHREAD (MMCSS simply makes the same kind of system call any other application would
do), and the scheduler is still in control of these threads. It is simply their high priority that makes
them run almost uninterrupted on a machine, since they are in the real-time range and well above
threads that most user applications would be running in.
As was discussed earlier, changing the relative thread priorities within a process does not
usually make sense, and no tool allows this because only developers understand the importance of
the various threads in their programs.
On the other hand, because applications must manually register with MMCSS and provide it
with information about what kind of thread this is, MMCSS does have the necessary data to
change these relative thread priorities (and developers are well aware that this will be happening).
EXPERIMENT: “listening” to MMCSS Priority Boosting
We are now going to perform the same experiment as the prior one but without disabling the
MMCSS service. In addition, we’ll take a look at the Performance tool to check the priority of the
Windows Media Player threads.
1. Run Windows Media Player (other playback programs may not yet take advantage of the
API calls required to register with MMCSS) and begin playing some audio content.
2. If you have a multiprocessor machine, be sure to set the affinity of the Wmplayer.exe
process so that it only runs on one CPU (since we’ll be using only one CPUSTRES worker
thread).
3. Start the Performance tool by selecting Programs from the Start menu and then selecting
Reliability And Performance Monitor from the Administrative Tools menu. Click on the
Performance Monitor entry under Monitoring Tools.
4. Click the Add Counter toolbar button (or press Ctrl+I) to bring up the Add Counters dialog
box.
5. Select the Thread object, and then select the % Processor Time counter.
6. In the Instances box, select , and then click Search. Scroll down until you see Wmplayer,
and then select all its threads. Click the Add button, and then click OK.
7. As in the previous experiment, select Properties from the Action menu. Change the
Vertical Scale Maximum to 31, set the interval to Sample Every N Seconds in the Graph Elements
area, and click OK.
You should see one or more priority 21 threads inside Wmplayer, which will be constantly
running unless there is a higher-priority thread requiring the CPU after they are dropped to the
Exhausted category.
Please purchase PDF Split-Merge on www.verypdf.com to remove this watermark.
403
8. Run Cpustres, and set the activity level of Thread 1 to Maximum.
9. Raise the priority of Thread 1 from Normal to Time Critical.
10. You should notice the system slowing down considerably, but the music playback will
continue. Every so often, you’ll be able to get back some responsiveness from the rest of the
system. Use this time to stop Cpustres.
11. If the Performance tool was unable to capture data during the time Cpustres ran, run it
again, but use Highest instead of Time Critical. This change will slow down the system less, but it
still requires boosting from MMCSS, and, because once the multimedia thread is put in the
Exhausted category, there will always be a higher priority thread requesting the CPU
(CPUSTRES), you should notice Wmplayer’s priority 21 thread drop every so often, as shown
here.
MMCSS’s functionality does not stop at simple priority boosting, however. Because of the
nature of network drivers on Windows and the NDIS stack, DPCs are quite common mechanisms
for delaying work after an interrupt has been received from the network card. Because DPCs run
at an IRQL level higher than user-mode code (see Chapter 3 for more information on DPCs and
IRQLs), long-running network card driver code could still interrupt media playback during
network transfers, or when playing a game for example.
Therefore, MMCSS also sends a special command to the network stack, telling it to throttle
network packets during the duration of the media playback. This throttling is designed to
maximize playback performance, at the cost of some small loss in network throughput (which
would not be noticeable for network operations usually performed during playback, such as
playing an online game). The exact mechanisms behind it do not belong to any area of the
scheduler, so we will leave them out of this description.
Note The original implementation of the network throttling code had some design issues
causing significant network throughput loss on machines with 1000 Mbit network adapters,
especially if multiple adapters were present on the system (a common feature of midrange
motherboards). This issue was analyzed by the MMCSS and networking teams at Microsoft and
later fixed.
Please purchase PDF Split-Merge on www.verypdf.com to remove this watermark.
404
5.7.13 Multiprocessor Systems
On a uniprocessor system, scheduling is relatively simple: the highest-priority thread that
wants to run is always running. On a multiprocessor system, it is more complex, as Windows
attempts to schedule threads on the most optimal processor for the thread, taking into account the
thread’s preferred and previous processors, as well as the configuration of the multiprocessor
system. Therefore, while Windows attempts to schedule the highest-priority runnable threads on
all available CPUs, it only guarantees to be running the (single) highestpriority thread somewhere.
Before we describe the specific algorithms used to choose which threads run where and when,
let’s examine the additional information Windows maintains to track thread and processor state on
multiprocessor systems and the two different types of multiprocessor systems supported by
Windows (hyperthreaded, multicore, and NUMA).
Multiprocessor Considerations in the Dispatcher Database
In addition to the ready queues and the ready summary, Windows maintains two bitmasks
that track the state of the processors on the system. (How these bitmasks are used is explained in
the upcoming section “Multiprocessor Thread-Scheduling Algorithms”.)
Following are the two bitmasks that Windows maintains:
■ The active processor mask (KeActiveProcessors), which has a bit set for each usable
processor on the system (This might be less than the number of actual processors if the licensing
limits of the version of Windows running supports less than the number of available physical
processors.)
■ The idle summary (KiIdleSummary), in which each set bit represents an idle processor
Whereas on uniprocessor systems, the dispatcher database is locked by raising IRQL to both
DPC/dispatch level and Synch level, on multiprocessor systems more is required, because each
processor could, at the same time, raise IRQL and attempt to operate on the dispatcher database.
(This is true for any systemwide structure accessed from high IRQL.) (See Chapter 3 for a general
description of kernel synchronization and spinlocks.)
Because on a multiprocessor system one processor might need to modify another processor’s
per-CPU scheduling data structures (such as inserting a thread that would like to run on a certain
processor), these structures are synchronized by using a new per-PRCB queued spinlock, which is
held at IRQL SYNCH_LEVEL. (See Table 5-20 for the various values of SYNCH_LEVEL.)
Thus, thread selection can occur while locking only an individual processor’s PRCB, in contrast
to doing this on Windows XP, where the systemwide dispatcher spinlock had to be held.
There is also a per-CPU list of threads in the deferred ready state. These represent threads
that are ready to run but have not yet been readied for execution; the actual ready operation has
Please purchase PDF Split-Merge on www.verypdf.com to remove this watermark.
405
been deferred to a more appropriate time. Because each processor manipulates only its own
per-processor deferred ready list, this list is not synchronized by the PRCB spinlock. The deferred
ready thread list is processed before exiting the thread dispatcher, before performing a context
switch, and after processing a DPC. Threads on the deferred ready list are either dispatched
immediately or are moved to the per-processor ready queue for their priority level.
Note that the systemwide dispatcher spinlock still exists and is used, but it is held only for the
time needed to modify systemwide state that might affect which thread runs next. For example,
changes to synchronization objects (mutexes, events, and semaphores) and their wait queues
require holding the dispatcher lock to prevent more than one processor from changing the state of
such objects (and the consequential action of possibly readying threads for execution). Other
examples include changing the priority of a thread, timer expiration, and swapping of thread
kernel stacks.
Thread context switching is also synchronized by using a finer-grained per-thread spinlock,
whereas in Windows XP context switching was synchronized by holding a systemwide context
swap spinlock.
Hyperthreaded and Multicore Systems
As described in the “Symmetric Multiprocessing” section in Chapter 2, Windows supports
hyperthreaded and multicore multiprocessor systems in two primary ways:
1. Logical processors as well as per-package cores do not count against physical processor
licensing limits. For example, Windows Vista Home Basic, which has a licensed processor limit
of 1, will use all four cores on a single processor system.
2. When choosing a processor for a thread, if there is a physical processor with all logical
processors idle, a logical processor from that physical processor will be selected, as opposed to
choosing an idle logical processor on a physical processor that has another logical processor
running a thread.
EXPERIMENT: Viewing Hyperthreading Information
You can examine the information Windows maintains for hyperthreaded processors using
the !smt command in the kernel debugger. The following output is from a dualprocessor
hyperthreaded Xeon system (four logical processors):
1. lkd> !smt
2. SMT Summary:
3. ------------
4. KeActiveProcessors: ****---------------------------- (0000000f)
5. KiIdleSummary: -***---------------------------- (0000000e)
6. No PRCB Set Master SMT Set #LP IAID
7. 0 ffdff120 Master *-*----------------------------- (00000005) 2 00
8. 1 f771f120 Master -*-*---------------------------- (0000000a) 2 06
9. 2 f7727120 ffdff120 *-*----------------------------- (00000005) 2 01
10. 3 f772f120 f771f120 -*-*---------------------------- (0000000a) 2 07
11. Number of licensed physical processors: 2
Please purchase PDF Split-Merge on www.verypdf.com to remove this watermark.
406
Logical processors 0 and 1 are on separate physical processors (as indicated by the term
“Master”).
NUMA Systems
Another type of multiprocessor system supported by Windows is one with a nonuniform
memory access (NUMA) architecture. In a NUMA system, processors are grouped together in
smaller units called nodes. Each node has its own processors and memory and is connected to the
larger system through a cache-coherent interconnect bus. These systems are called “nonuniform”
because each node has its own local high-speed memory. While any processor in any node can
access all of memory, node-local memory is much faster to access.
The kernel maintains information about each node in a NUMA system in a data structure
called KNODE. The kernel variable KeNodeBlock is an array of pointers to the KNODE
structures for each node. The format of the KNODE structure can be shown using the dt command
in the kernel debugger, as shown here:
1. lkd> dt nt!_knode
2. nt!_KNODE
3. +0x000 PagedPoolSListHead : _SLIST_HEADER
4. +0x008 NonPagedPoolSListHead : [3] _SLIST_HEADER
5. +0x020 PfnDereferenceSListHead : _SLIST_HEADER
6. +0x028 ProcessorMask : Uint4B
7. +0x02c Color : UChar
8. +0x02d Seed : UChar
9. +0x02e NodeNumber : UChar
10. +0x02f Flags : _flags
11. +0x030 MmShiftedColor : Uint4B
12. +0x034 FreeCount : [2] Uint4B
13. +0x03c PfnDeferredList : Ptr32 _SINGLE_LIST_ENTRY
14. +0x040 CachedKernelStacks : _CACHED_KSTACK_LIST
EXPERIMENT: Viewing NuMa Information
You can examine the information Windows maintains for each node in a NUMA system
using the !numa command in the kernel debugger. The following partial output is from a
32-processor NUMA system by NEC with 4 processors per node:
1. 21: kd> !numa
2. NUMA Summary:
3. ------------
4. Number of NUMA nodes : 8
5. Number of Processors : 32
6. MmAvailablePages : 0x00F70D2C
7. KeActiveProcessors : ********************************--------------------
8. (00000000ffffffff)
9. NODE 0 (E00000008428AE00):
10. ProcessorMask : ****-----------------------------------------------------
Please purchase PDF Split-Merge on www.verypdf.com to remove this watermark.
407
11. Color : 0x00000000
12. MmShiftedColor : 0x00000000
13. Seed : 0x00000000
14. Zeroed Page Count: 0x00000000001CF330
15. Free Page Count : 0x0000000000000000
16. NODE 1 (E00001597A9A2200):
17. ProcessorMask : ----****-------------------------------------------------
18. Color : 0x00000001
19. MmShiftedColor : 0x00000040
20. Seed : 0x00000006
21. Zeroed Page Count: 0x00000000001F77A0
22. Free Page Count : 0x0000000000000004
The following partial output is from a 64-processor NUMA system from Hewlett-
Packard with 4 processors per node:
1. 26: kd> !numa
2. NUMA Summary:
3. ------------
4. Number of NUMA nodes : 16
5. Number of Processors : 64
6. MmAvailablePages : 0x03F55E67
7. KeActiveProcessors : ****************************************************
************
8. (ffffffffffffffff)
9. NODE 0 (E000000084261900):
10. ProcessorMask : ****----------------------------------------------------
11. Color : 0x00000000
12. MmShiftedColor : 0x00000000
13. Seed : 0x00000001
14. Zeroed Page Count: 0x00000000003F4430
15. Free Page Count : 0x0000000000000000
16. NODE 1 (E0000145FF992200):
17. ProcessorMask : ----****-------------------------------------------------
18. Color : 0x00000001
19. MmShiftedColor : 0x00000040
20. Seed : 0x00000007
21. Zeroed Page Count: 0x00000000003ED59A
22. Free Page Count : 0x0000000000000000
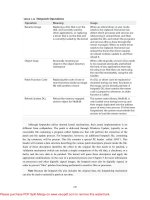
Applications that want to gain the most performance out of NUMA systems can set the
affinity mask to restrict a process to the processors in a specific node. This information can be
obtained using the functions listed in Table 5-21. Functions that can alter thread affinity are listed
in Table 5-13.
Please purchase PDF Split-Merge on www.verypdf.com to remove this watermark.
408
How the scheduling algorithms take into account NUMA systems will be covered in the
upcoming section “Multiprocessor Thread-Scheduling Algorithms” (and the optimizations in the
memory manager to take advantage of node-local memory are covered in Chapter 9).
Affinity
Each thread has an affinity mask that specifies the processors on which the thread is allowed
to run. The thread affinity mask is inherited from the process affinity mask. By default, all
processes (and therefore all threads) begin with an affinity mask that is equal to the set of active
processors on the system—in other words, the system is free to schedule all threads on any
available processor.
However, to optimize throughput and/or partition workloads to a specific set of processors,
applications can choose to change the affinity mask for a thread. This can be done at several
levels:
■ Calling the SetThreadAffinityMask function to set the affinity for an individual thread
■ Calling the SetProcessAffinityMask function to set the affinity for all the threads in a
process. Task Manager and Process Explorer provide a GUI to this function if you rightclick a
process and choose Set Affinity. The Psexec tool (from Sysinternals) provides a command-line
interface to this function. (See the –a switch.)
■ By making a process a member of a job that has a jobwide affinity mask set using the
SetInformationJobObject function (Jobs are described in the upcoming “Job Objects” section.)
■ By specifying an affinity mask in the image header when compiling the application (For
more information on the detailed format of Windows images, search for “Portable Executable and
Common Object File Format Specification” on www.microsoft.com.) You can also set the
“uniprocessor” flag for an image (at compile time). If this flag is set, the system chooses a single
processor at process creation time and assigns that as the process affinity mask, starting with the
first processor and then going round-robin across all the processors. For example, on a
dual-processor system, the first time you run an image marked as uniprocessor, it is assigned to
CPU 0; the second time, CPU 1; the third time, CPU 0; the fourth time, CPU 1; and so on. This
flag can be useful as a temporary workaround for programs that have multithreaded
synchronization bugs that, as a result of race conditions, surface on multiprocessor systems but
that don’t occur on uniprocessor systems. (This has actually saved the authors of this book on two
different occasions.)
EXPERIMENT: Viewing and Changing Process affinity
In this experiment, you will modify the affinity settings for a process and see that process
affinity is inherited by new processes:
Please purchase PDF Split-Merge on www.verypdf.com to remove this watermark.
409
1. Run the command prompt (Cmd.exe).
2. Run Task Manager or Process Explorer, and find the Cmd.exe process in the process list.
3. Right-click the process, and select Affinity. A list of processors should be displayed.
For example, on a dual-processor system you will see this:
4. Select a subset of the available processors on the system, and click OK. The process’s
threads are now restricted to run on the processors you just selected.
5. Now run Notepad.exe from the command prompt (by typing Notepad.exe).
6. Go back to Task Manager or Process Explorer and find the new Notepad process.
Right-click it, and choose Affinity. You should see the same list of processors you chose for the
command prompt process. This is because processes inherit their affinity settings from their
parent.
Windows won’t move a running thread that could run on a different processor from one CPU
to a second processor to permit a thread with an affinity for the first processor to run on the first
processor. For example, consider this scenario: CPU 0 is running a priority 8 thread that can run
on any processor, and CPU 1 is running a priority 4 thread that can run on any processor. A
priority 6 thread that can run on only CPU 0 becomes ready. What happens?
Windows won’t move the priority 8 thread from CPU 0 to CPU 1 (preempting the priority 4
thread) so that the priority 6 thread can run; the priority 6 thread has to wait. Therefore, changing
the affinity mask for a process or a thread can result in threads getting less CPU time than they
normally would, as Windows is restricted from running the thread on certain processors.
Therefore, setting affinity should be done with extreme care—in most cases, it is optimal to let
Windows decide which threads run where.
Ideal and Last Processor
Each thread has two CPU numbers stored in the kernel thread block:
■ Ideal processor, or the preferred processor that this thread should run on
■ Last processor, or the processor on which the thread last ran
The ideal processor for a thread is chosen when a thread is created using a seed in the process
block. The seed is incremented each time a thread is created so that the ideal processor for each
new thread in the process will rotate through the available processors on the system. For example,
the first thread in the first process on the system is assigned an ideal processor of 0. The second
thread in that process is assigned an ideal processor of 1. However, the next process in the system
has its first thread’s ideal processor set to 1, the second to 2, and so on. In that way, the threads
within each process are spread evenly across the processors.
Please purchase PDF Split-Merge on www.verypdf.com to remove this watermark.