Tài liệu Module 7: Managing Server Objects in Exchange 2000 pptx
Bạn đang xem bản rút gọn của tài liệu. Xem và tải ngay bản đầy đủ của tài liệu tại đây (1.42 MB, 58 trang )
&RQWHQWV##
2YHUYLHZ#4#
8VLQJ#([FKDQJH#6\VWHP#0DQDJHU#5#
/DE#$=#([SORULQJ#([FKDQJH#6\VWHP##
0DQDJHU#<#
0DQDJLQJ#$GGUHVV#/LVWV# 45#
/DE#%=#&UHDWLQJ#DQ#$GGUHVV#/LVW#LQ#
([FKDQJH#5333# 47#
0DQDJLQJ#$GPLQLVWUDWLYH#*URXSV# 4:#
/DE#&=#&UHDWLQJ#DQG#0DQDJLQJ##
$GPLQLVWUDWLYH#*URXSV# 56#
&UHDWLQJ#5HFLSLHQW#3ROLFLHV# 5;#
8VLQJ#([FKDQJH#5333#3ROLFLHV# 63#
/DE#'=#&UHDWLQJ#DQG#$SSO\LQJ##
([FKDQJH#5333#3ROLFLHV# 73#
5HYLHZ# 84#
#
Module 7: Managing
Server Objects in
Exchange 2000
Information in this document is subject to change without notice. The names of companies,
products, people, characters, and/or data mentioned herein are fictitious and are in no way intended
to represent any real individual, company, product, or event, unless otherwise noted. Complying
with all applicable copyright laws is the responsibility of the user. No part of this document may
be reproduced or transmitted in any form or by any means, electronic or mechanical, for any
purpose, without the express written permission of Microsoft Corporation. If, however, your only
means of access is electronic, permission to print one copy is hereby granted.
Microsoft may have patents, patent applications, trademarks, copyrights, or other intellectual
property rights covering subject matter in this document. Except as expressly provided in any
written license agreement from Microsoft, the furnishing of this document does not give you any
license to these patents, trademarks, copyrights, or other intellectual property.
2000 Microsoft Corporation. All rights reserved.
Microsoft, MS-DOS, MS, Windows, Windows NT, Active Directory directory service, ActiveX,
BackOffice, FrontPage, Hotmail, MSN, Outlook, PowerPoint, SQL Server, Visual Studios, and
Win32, are either registered trademarks or trademarks of Microsoft Corporation in the U.S.A.
and/or other countries.
The names of companies, products, people, characters, and/or data mentioned herein are fictitious
and are in no way intended to represent any real individual, company, product, or event, unless
otherwise noted.
Other product and company names mentioned herein may be the trademarks of their respective
owners.
Project Lead:
David Phillips
Instructional Designers:
Lance Morrison (Wasser), Janet Sheperdigian, Steve Thues
Lead Program Manager:
Mark Adcock
Program Manager:
Lyle Curry, Scott Hay, Janice Howd, Steve Schwartz (Implement.Com),
Bill Wade (Wadeware LLC)
Graphic Artist:
Kimberly Jackson, Andrea Heuston (Artitudes Layout and Design)
Editing Manager:
Lynette Skinner
Editor:
Elizabeth Reese (Write Stuff)
Copy Editor:
Ed Casper (S&T Consulting), Carolyn Emory (S&T Consulting), Patricia Neff
(S&T Consulting), Noelle Robertson (S&T Consulting)
Online Program Manager:
Debbi Conger
Online Publications Manager:
Arlo Emerson (Aquent Partners)
Online Support:
Eric Brandt
Multimedia Developer
: Kelly Renner (Entex)
Compact Disc Testing:
Data Dimensions, Inc.
Production Support:
Ed Casper (S&T Consulting)
Manufacturing Manager:
Bo Galford
Manufacturing Support:
Rick Terek
Lead Product Manager, Development Services:
Lead Product Manager:
David Bramble
Group Product Manager:
Robert Stewart
# 0RGXOH#:=#0DQDJLQJ#6HUYHU#2EMHFWV#LQ#([FKDQJH#5333# # LLL#
,QVWUXFWRU#1RWHV##
This module focuses on the differences between managing servers in
Microsoft
®
Exchange Server version 5.5 and Microsoft Exchange 2000.
Students will be introduced to the main Exchange 2000 console, which is
Exchange System Manager. Administrative groups are discussed in detail. This
module also includes topics covering address lists, policies, and multimedia
mail. These are new objects to Exchange 2000 that are all administered in
Exchange System Manager and do not warrant their own module.
At the end of this module, students will use Exchange System Manager to
create and manage administration groups, create various policies, and create
and manage address lists.
0DWHULDOV#DQG#3UHSDUDWLRQ#
This section provides you with the required materials and preparation tasks that
are needed to teach this module.
5HTXLUHG#0DWHULDOV#
To teach this module, you need the following materials:
•
Microsoft PowerPoint
®
file 1569A_07.ppt
3UHSDUDWLRQ#7DVNV#
To prepare for this module, you should:
„#
Read all of the materials for this module.
„#
Complete the lab.
„#
Practice your Exchange System Manager demonstration.
3UHVHQWDWLRQ=##
78#0LQXWHV#
#
/DE=#
:3#0LQXWHV#
LY##0RGXOH#:=#0DQDJLQJ#6HUYHU#2EMHFWV#LQ#([FKDQJH#5333#
,QVWUXFWRU#6HWXS#IRU#D#/DE#
This section provides lab tips for labs in this module.
/DE#%=#$GPLQLVWUDWLYH#*URXSV#
A student’s administrative group (your_servername AG) may disappear from
the Exchange System Manager console. It is actually still there, but the
permissions on the administrative group may have been lost or set such that no
users have access to it, and therefore they cannot see it. This can be corrected
by using the Windows 2000 Resource Kit utility ADSIEdit to re-apply the
default permissions to the administrative group.
The following text gives the path in the configuration partition of Active
Directory that contains the administrative groups for the Exchange
organization:
&RQILJXUDWLRQ#
&RQWDLQHU?&1 &RQILJXUDWLRQ/'& QZWUDGHUV/'& PVIW?&1 6HUYLFHV?#
&1 0LFURVRIW#([FKDQJH?&1 1RUWKZLQG#7UDGHUV?&1 $GPLQLVWUDWLYH#
*URXSV#
Follow these steps to correct the permissions problem:
1. Select the Administrative Groups container in the console tree.
A list of administrative groups appears in the details pane on the right. The
administrative groups that have a permissions problem will have a notepad
icon, and no sub-containers.
2. Select the administrative group that has permissions problems, and then
click
Properties
.
3. Click
OK
if you receive any error messages.
4. Click the
Security
tab, and add Domain Admins, Enterprise Admins, and
Exchange Admins with Full Control.
5. Click
OK
.
6. Select the Administrative Groups container on the right, and refresh the
screen until the administrative group shows the correct folder icon and you
can see sub-containers.
7. Repeat for any affected administrative groups.
# 0RGXOH#:=#0DQDJLQJ#6HUYHU#2EMHFWV#LQ#([FKDQJH#5333# # Y#
0RGXOH#6WUDWHJ\#
Use the following strategy to present this module:
„#
Using Exchange System Manager
Explain how Exchange System Manager starts. Demonstrate the top-level
objects and the server object properties.
„#
Creating and Using Address Lists
Explain how to create and manage address lists.
„#
Managing Administrative Groups
Explain the purpose of administrative groups and demonstrate how to create
and manage administrative groups.
„#
Creating Recipient Policies
Explain the purpose of recipient policies and demonstrate how to configure
a recipient policy.
„#
Using Policies
Explain what policies are. Demonstrate how to create each of the policies
that can be created. Show the various settings that can be made.
# 0RGXOH#:=#0DQDJLQJ#6HUYHU#2EMHFWV#LQ#([FKDQJH#5333# # 4#
2YHUYLHZ#
„
8VLQJ#([FKDQJH#6\VWHP#0DQDJHU
„
0DQDJLQJ#$GGUHVV#/LVWV
„
0DQDJLQJ#$GPLQLVWUDWLYH#*URXSV
„
&UHDWLQJ#5HFLSLHQW#3ROLFLHV
„
8VLQJ#([FKDQJH#5333#3ROLFLHV
Exchange System Manager is the management tool for Microsoft
®
Exchange 2000. This Manager, in Microsoft Management Console (MMC),
allows you to administer computers running Exchange 2000 Server and the
Exchange organization. Specific objects are discussed throughout the course,
but this module focuses on using the tool and covers certain objects that are not
discussed elsewhere.
At the end of this module, the student will be able to:
„#
Use Exchange System Manager to create and manage a variety of system
objects.
„#
Plan and create administrative groups for a given situation.
„#
Create and manage address lists.
„#
Define, create, and manage policies.
„#
Configure server-side multimedia messaging properties.
6OLGH#2EMHFWLYH#
7R#SURYLGH#DQ#RYHUYLHZ#RI#
WKH#PRGXOH#WRSLFV#DQG#
REMHFWLYHV1#
/HDG0LQ#
,Q#WKLV#PRGXOH/#\RX#ZLOO#OHDUQ#
KRZ#WR#PDQDJH#VHUYHU#
REMHFWV#XVLQJ#([FKDQJH#
6\VWHP#0DQDJHU1#
5# # 0RGXOH#:=#0DQDJLQJ#6HUYHU#2EMHFWV#LQ#([FKDQJH#5333#
‹‹
#
8VLQJ#([FKDQJH#6\VWHP#0DQDJHU#
„
6WDUWLQJ#([FKDQJH#6\VWHP#0DQDJHU
„
2UJDQL]DWLRQ#2EMHFW#3URSHUWLHV
„
7RS0/HYHO#&RQWDLQHUV
„
6HUYHU#2EMHFW#3URSHUWLHV
„
8VLQJ#([FKDQJH#6\VWHP#0DQDJHU
You will use Exchange System Manager in MMC to perform Microsoft
Exchange 2000 administration. This manages all Exchange 2000 settings and
tasks.
The following are the primary development goals for Exchange System
Manager:
„#
Provide a framework for containing all other Exchange snap-ins, so that an
entire Exchange enterprise can be managed from a single console.
„#
Provide a consistent administrative experience for administrators who deal
with all facets of Exchange, including user management, public folders,
servers, routing, and policies.
„#
Enable customers to rename and move as many of the objects in the console
tree as possible.
6OLGH#2EMHFWLYH#
7R#JLYH#DQ#RYHUYLHZ#RI#WKLV#
WRSLF1#
/HDG0LQ#
$OO#([FKDQJH#5333#V\VWHP#
PDQDJHPHQW#LV#SHUIRUPHG#
IURP#WKH#([FKDQJH#6\VWHP#
0DQDJHU#FRQVROH1#
# 0RGXOH#:=#0DQDJLQJ#6HUYHU#2EMHFWV#LQ#([FKDQJH#5333# # 6#
6WDUWLQJ#([FKDQJH#6\VWHP#0DQDJHU#
„
&RQQHFWV#WR#&ORVHVW#'RPDLQ#&RQWUROOHU#WR#3URYLGH#
'LUHFWRU\#,QIRUPDWLRQ
„
&DQ#%H#0RGLILHG#WR#&KRRVH#D#6SHFLILF#'RPDLQ#
&RQWUROOHU
Exchange System Manager is accessible in a saved console file in the Microsoft
Exchange program group. Exchange System Manager will, by default, connect
to a domain controller on the same subnet, as determined by your DNS entries.
If no domain controller exists on the same subnet as the computer running
Exchange System Manager, a domain controller will be chosen from within the
same Windows 2000 site. Exchange System Manager then queries Active
Directory
™
directory service to populate the console with data applicable to
Exchange 2000.
When you start Exchange System Manager by using the shortcut in the
Start
menu, the closest domain controller will be accessed. If you want to direct the
console to a specific domain controller, then you must add the snap-in to an
MMC console by using the Add/Remove command in MMC. Prior to adding
the snap-in to the console you will be prompted at that time for the specific
domain controller to administer. This domain controller information will be
maintained in the saved console file.
You may want to override the default domain controller in the following
scenarios:
„#
You need to bypass Active Directory replication latency.
„#
You want to connect to a specific domain in the Windows 2000 forest.
„#
You want to use the same administrator computer to connect to multiple
domain controllers in different Windows 2000 forests to manage different
companies or divisions.
6OLGH#2EMHFWLYH#
7R#H[SODLQ#KRZ#([FKDQJH#
6\VWHP#0DQDJHU#FRQQHFWV#
WR#$FWLYH#'LUHFWRU\#GXULQJ#
VWDUWXS1#
/HDG0LQ#
([FKDQJH#6\VWHP#0DQDJHU#
GLVSOD\V#GDWD#IURP#WKH#
:LQGRZV#5333#GRPDLQ#
$FWLYH#'LUHFWRU\1#
7# # 0RGXOH#:=#0DQDJLQJ#6HUYHU#2EMHFWV#LQ#([FKDQJH#5333#
2UJDQL]DWLRQ#2EMHFW#3URSHUWLHV#
Northwind Traders Properties
OK
A
pply
A
pply
Cancel Help
General Details
Administrative views
O
peration mode:
Native Mode [no pre-Exchange 2000 servers]
Security
Dis
play administrative groups
Dis
play administrative groups
Northwind Traders
Configure whether your organization employs routing groups
and administrative groups
Display routing groups
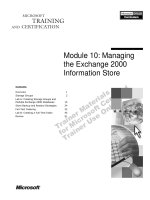
The Organization object is the top-level container for all other Exchange 2000
system objects. The Organization object has the following options.
Tab Option Function
General Display routing
groups
Displays the organization’s routing
group information. This option is
disabled by default and can only be
enabled in Exchange 2000 Beta 3 if you
are operating in native mode.
Display
administrative
groups
Displays the organization’s
administrative groups. This option is
disabled by default.
Operation mode
Displays whether the organization is
running in mixed mode or native mode.
By default, servers will run in mixed
mode.
Change operation
mode
Converts the organization to native
mode only when you are certain you will
no longer be coexisting with Exchange
Server 5.5. This action is not reversible.
Details Creation Date
Displays when the Organization object
is created in Active Directory.
Last Modification
Displays the date and time of the last
modification to the Organization object.
Administrative note
Provides additional information about
the Exchange organization.
6OLGH#2EMHFWLYH#
7R#GHVFULEH#WKH#
2UJDQL]DWLRQ#REMHFW#
SURSHUWLHV#IRU#DQ#
([FKDQJH#5333#
RUJDQL]DWLRQ1#
/HDG0LQ#
7KH#2UJDQL]DWLRQ#REMHFW#LV#
WKH#WRS0OHYHO#FRQWDLQHU#IRU#DQ#
([FKDQJH#5333#
RUJDQL]DWLRQ1#
# 0RGXOH#:=#0DQDJLQJ#6HUYHU#2EMHFWV#LQ#([FKDQJH#5333# # 8#
(
continued
)
Tab Option Function
Security Name
Displays the users and groups that
currently have permissions on the
Organization object. Click
Add
or
Remove
to modify this listing.
Permissions
Displays the access permissions for the
object selected in the
Name
window.
Select
Allow
or
Deny
to modify the
access rights of the selected object.
Advanced
Views or configures specific
permissions, auditing, and object owner
properties.
Allow inheritable
permissions from
parent to propagate
to this object
If selected, this option prevents the
Organization object from inheriting
permissions from its parent.
9# # 0RGXOH#:=#0DQDJLQJ#6HUYHU#2EMHFWV#LQ#([FKDQJH#5333#
7RS0/HYHO#&RQWDLQHUV#
EXCHANGE MANAGEMENT – [Northwind Traders (Exchange)]
&RQVROH
*OREDO#6HWWLQJV
:LQGRZ +HOS
$FWLRQ 9LHZ )DYRULWHV
)
DYRULWHV7UHH
1DPH
5HFLSLHQWV
6HUYHUV
3ROLFLHV
5RXWLQJ#*URXSV
7RROV
*OREDO#6HWWLQJV
5HFLSLHQWV
6HUYHUV
3ROLFLHV
5RXWLQJ#*URXSV
7RROV
1RUWKZLQG 7UDGHUV#+([FKDQJH,
Exchange 2000 system settings are located in several containers under the
Organization object. The contents of these containers may shift depending on
which display options you select in the organization unit properties. For
example, if you elect to display administrative groups, then Servers, Policies,
and Connectors will appear under the specific administrative group object.
Container Child Containers
Global Settings Organization-wide Internet message formats, message
delivery, and instant messaging properties.
Recipients Recipient policies, address lists, and address templates.
Administrative Groups
(not visible by default)
All administrative groups that you have defined for the
organization. Each administrative group container displays
containers representing the associated servers, policies,
connectors and folders.
Servers All servers defined in your organization.
Policies All defined mailbox store, public store, and server policies.
Connectors Simple Mail Transfer Protocol (SMTP), X.400, CC:Mail, MS
Mail, Lotus Notes, Groupwise and Dirsync connector objects.
If you are viewing routing groups, you will also see
connectors within the corresponding routing group.
Tools Manage your site replication services, track messages, and
monitor servers and connectors from this container.
6OLGH#2EMHFWLYH#
7R#OLVW#DQG#GHVFULEH#WKH#WRS0
OHYHO#FRQWDLQHUV#LQ#DQ#
([FKDQJH#5333#
RUJDQL]DWLRQ1#
/HDG0LQ#
7RS0OHYHO#FRQWDLQHUV#
RUJDQL]H#YDULRXV#V\VWHP#
VHWWLQJV1##
# 0RGXOH#:=#0DQDJLQJ#6HUYHU#2EMHFWV#LQ#([FKDQJH#5333# # :#
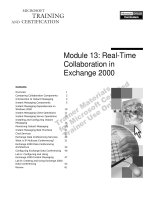
6HUYHU#2EMHFW#3URSHUWLHV#
LONDON Properties
OK
Cancel Help
General
Security
Log file maintenance
Multimedia Mail
Locales
LONDON
Configuration Responses
Diagnostics Logging Details Policies
Version 6.0 [Build 4052.0]
E
nable subject logging and display
En
able message tracking
R
emove log files
Rem
ove files older than [days]:
7
T
his is a front end server
Clients connect here and commands are forwarded to
a full server.
LONDON.nwtraders.msft
D
omain controller:
Specify the domain controller used by services on this server.
A
pply
A
pply
Depending on the view settings for Exchange System Manager, servers will
appear in the Servers top-level container, or within an administrative group.
Options of each individual server object are as follows.
Tab Option Function
General Enable subject
logging and
display
Allows the subject data from a message to be
logged to a file and subsequently displayed from
the message tracking center and queue viewer.
Enable message
tracking
Allows a message to be logged to the tracking log
and subsequently displayed from the message
tracking center.
Remove log files
If selected, Exchange 2000 will automatically
remove tracking log files after the given number o
f
days. This is enabled by default and set to seven
days.
This is a front-
end server
Configures this server as a front-end server for
Internet protocol access.
Locales
Add or remove locales from your server.
Diagnostics
Logging
Configures additional logging in order to
troubleshoot specific problems. Logging can be
enabled for the following services: Address List,
Information Store, Message Transfer Agent,
System Attendant, and Site Replication Service.
Policies
Displays which policies are applied to this server
object. Policies can only be added or removed
from the server object by accessing the applicable
policy object.
Responses
Configures alerts to notify support personnel when
a given server or group of servers is down.
6OLGH#2EMHFWLYH#
7R#OLVW#DQG#GHVFULEH#VHUYHU#
REMHFW#SURSHUWLHV1#
/HDG0LQ#
6HUYHU#REMHFWV#FRQWDLQ#
VHWWLQJV#WKDW#DSSO\#WR#HDFK#
VHUYHU1#
;# # 0RGXOH#:=#0DQDJLQJ#6HUYHU#2EMHFWV#LQ#([FKDQJH#5333#
'HPRQVWUDWLRQ=#8VLQJ#([FKDQJH#6\VWHP#0DQDJHU#
Exchange System Manager is an MMC console that provides a two-pane view,
displaying the administration containers on the left (console tree) and leaf
objects on the right (details pane).
Objects can be moved in Exchange System Manager by dragging and
dropping. For example, you can drag a policy from one administrative group to
another.
In Exchange 2000 Beta 3, moving servers between administrative
groups can have unpredictable results.
6OLGH#2EMHFWLYH#
7R#GHPRQVWUDWH#WKH#
DUUDQJHPHQW#RI#WKH#
FRQWDLQHUV#WKDW#SURYLGH#
([FKDQJH#5333#V\VWHP#
DGPLQLVWUDWLRQ1##
/HDG0LQ#
/HW¶V#WDNH#D#ORRN#DW#
([FKDQJH#6\VWHP#0DQDJHU1#
'HOLYHU\#7LS#
6KRZ#VWXGHQWV#HDFK#
FRQWDLQHU/#VXE0FRQWDLQHU/#
DQG#SURSHUWLHV#DV#
DSSURSULDWH1#0DQ\#RI#WKHVH#
VHWWLQJV#DUH#GLVFXVVHG#LQ#
GHWDLO#LQ#WKH#DSSURSULDWH#
PRGXOHV/#RU#ODWHU#LQ#WKLV#
PRGXOH1##
#
,PSRUWDQW#
# 0RGXOH#:=#0DQDJLQJ#6HUYHU#2EMHFWV#LQ#([FKDQJH#5333# # <#
/DE#$=#([SORULQJ#([FKDQJH#6\VWHP#0DQDJHU#
2EMHFWLYH#
After completing this lab, you will be able to:
•
Locate Microsoft Exchange Server 5.x and Microsoft Exchange 2000
equivalent configuration dialog boxes.
3UHUHTXLVLWHV#
Before working on this lab you should be familiar with:
•
Microsoft Windows 2000.
/DE#6HWXS
#
To complete this lab, you need the following:
•
A computer running Exchange 2000.
(VWLPDWHG#WLPH#WR#FRPSOHWH#WKLV#ODE=#53#PLQXWHV#
6OLGH#2EMHFWLYH#
7R#LQWURGXFH#WKH#ODE1#
/HDG0LQ#
,Q#WKLV#ODE/#\RX#ZLOO#YLHZ#WKH#
FRQWDLQHUV#DQG#REMHFWV#
PDQDJHG#LQ#([FKDQJH#
6\VWHP#0DQDJHU1#
([SODLQ#WKH#ODE#REMHFWLYH1#
43# # 0RGXOH#:=#0DQDJLQJ#6HUYHU#2EMHFWV#LQ#([FKDQJH#5333#
([HUFLVH#4#
/RFDWLQJ#&RPPRQ#&RQILJXUDWLRQ#2EMHFWV#LQ#WKH#([FKDQJH#
6\VWHP#0DQDJHU#
Tasks Detailed Steps
1.
Locate the object where
you would configure
message size restrictions
for users within the
organization.
a.
Expand
Northwind Traders (Exchange)
in your custom console.
b.
Expand
Global Settings
.
c.
Right-click
Message Delivery
, and then click
Properties
.
d.
Click the
Defaults
tab.
e.
Review the delivery restrictions that can be set, and then click
Cancel
.
2.
Locate the object on which
you would configure the
following settings:
- Message Tracking
- Diagnostics Logging
- Installed Locales
a.
If necessary, expand Northwind Traders (Exchange), Administrative
Groups, First Administrative Group, and Servers.
b.
Right-click your_servername, and then click
Properties
.
c.
Review the settings on the
General
,
Locales
, and
Diagnostics
Logging
tabs.
d.
Click
Cancel
.
3.
Locate the object where
you would configure the
message encoding format
for Post Office Protocol
version 3 (POP3)
messages.
a.
If necessary, expand Northwind Traders (Exchange), Administrative
Groups, First Administrative Group, and Servers.
b.
Expand your_servername.
c.
Expand
Protocols
.
d.
Expand
POP3
.
e.
Right-click
Default POP3 Virtual Server
, and then click
Properties
.
f.
Click the
Message Format
tab.
g.
Review the message encoding options that can be set, and then click
Cancel
.
Note:
Take some time to review the other settings on the Hypertext Transfer Protocol (HTTP), Internet
Message Access Protocol version 4 (IMAP4), Network News Transport Protocol (NNTP), and Simple Mail
Transfer Protocol (SMTP) protocols.
4.
Locate the object where
you would configure the
storage location for the
transaction logs and other
system files.
a.
If necessary, expand Northwind Traders (Exchange), Administrative
Groups, First Administrative Group, and Servers.
b.
Expand your_servername.
c.
Expand
Information Store
.
d.
Right-click
First Storage Group
, and then click
Properties
.
e.
Review the file location options that you can set, and then click
Cancel
.
# 0RGXOH#:=#0DQDJLQJ#6HUYHU#2EMHFWV#LQ#([FKDQJH#5333# # 44#
(continued)
Tasks Detailed Steps
5.
Locate the object where
you would configure client
Secure Multipurpose
Internet Mail Extension
(S/MIME) signature
support.
a.
If necessary, expand Northwind Traders (Exchange), Administrative
Groups, First Administrative Group, and Servers.
b.
Expand your_servername.
c.
Expand
Information Store
.
d.
Expand
First Storage Group
.
e.
Right-click
Mailbox Store
(your_servername), and then click
Properties
.
f.
Review the settings, and then click
Cancel
.
6.
Locate the object where
you would configure the
limit settings for message
size replication for Public
Folders.
a.
If necessary, expand Northwind Traders (Exchange), Administrative
Groups, First Administrative Group, and Servers.
b.
Expand your_servername.
c.
Expand
Information Store
.
d.
Expand
First Storage Group
.
e.
Right-click
Public Folder Store
(your_servername), and then click
Properties
.
f.
Click
Replication
.
g.
Review the settings, and then click
Cancel
.
7.
Locate the object that you
would use to track a
message that has been sent
within an Exchange
organization.
a.
If necessary, expand Northwind Traders (Exchange).
b.
Expand
Tools
.
c.
Right-click
Message Tracking Center
, and then click
Track Message
.
d.
Review the interface for the
Message Tracking Center
, and close the
dialog box.
8.
Take 15 minutes to explore
the properties of other
objects in the Exchange
System Manager. Think of
tasks that you would
perform in Exchange
Server 5.x and attempt to
locate the equivalent
location in Exchange
System Manager.
45# # 0RGXOH#:=#0DQDJLQJ#6HUYHU#2EMHFWV#LQ#([FKDQJH#5333#
0DQDJLQJ#$GGUHVV#/LVWV#
„
$GGUHVV#/LVW#6HUYLFHV
„
%XLOW0LQ#$GGUHVV#/LVWV
„
*OREDO#$GGUHVV#/LVWV
„
2IIOLQH#$GGUHVV#/LVWV
Address lists in Exchange 2000 replace the Exchange Server 5.5 Address Book
views, and their behavior is much the same. You can assign permissions on
address lists and global address lists to control who can see which lists, just as
in Address Book views in Exchange Server 5.5.
$GGUHVV#/LVW#6HUYLFHV#
The administrator identifies a specific computer running Exchange 2000 to be
responsible for updating address lists to include the correct recipients. The
recipients that should be displayed in each address list are defined by rules on
the appropriate address list object. This is similar to the Exchange Server 5.5
property, which defined the offline address book server, except that the address
list service in Exchange 2000 applies to all address lists.
%XLOW0LQ#$GGUHVV#/LVWV#
Exchange 2000 includes several built-in address lists:
„#
All Conferencing Resources
„#
All Contacts
„#
All Groups
„#
All Users
„#
Public Folders
You can create custom address lists by using filter rules to control the recipients
that a client displays. You can create new address lists under any of the built-in
address lists, or in the parent All Address Lists container. You should use the
built-in address lists wherever possible.
6OLGH#2EMHFWLYH#
7R#H[SODLQ#WKH#SXUSRVH#RI#
DGGUHVV#OLVWV#DQG#KRZ#WR#
FUHDWH#DQG#PDQDJH#WKHP1#
/HDG0LQ#
$GGUHVV#OLVWV#DUH#XVHG#WR#
JURXS#UHFLSLHQWV#VLPLODU#WR#
$GGUHVV#%RRN#9LHZV#LQ#
([FKDQJH#6HUYHU#8181##
'HOLYHU\#7LS#
'HPRQVWUDWH#KRZ#WR#FUHDWH#
DQG#PDQDJH#WKH#YDULRXV#
IHDWXUHV#RI#DGGUHVV#OLVWV1#
# 0RGXOH#:=#0DQDJLQJ#6HUYHU#2EMHFWV#LQ#([FKDQJH#5333# # 46#
*OREDO#$GGUHVV#/LVWV#+*$/,#
You can define properties to allow all mail-enabled objects to be displayed to
all Exchange 2000 users. You can also create additional GALs to support
multiple domain hosting or to limit GAL contents or client access to the GAL.
2IIOLQH#$GGUHVV#/LVWV#
You can create and configure address lists so that they are available to offline
users.
47# # 0RGXOH#:=#0DQDJLQJ#6HUYHU#2EMHFWV#LQ#([FKDQJH#5333#
/DE#%=#&UHDWLQJ#DQ#$GGUHVV#/LVW#LQ#([FKDQJH#5333#
2EMHFWLYHV#
After completing this lab, you will be able to:
„#
Create an address list in Outlook 2000.
„#
View the address list that you created.
3UHUHTXLVLWHV#
Before working on this lab you should be familiar with:
„#
Windows 2000.
„#
Exchange 2000 Server Manager.
/DE#6HWXS#
To complete this lab, you need the following:
•
A computer running Exchange 2000.
(VWLPDWHG#WLPH#WR#FRPSOHWH#WKLV#ODE=#43#PLQXWHV#
6OLGH#2EMHFWLYH#
7R#LQWURGXFH#WKH#ODE1#
/HDG0LQ#
,Q#WKLV#ODE/#\RX#ZLOO#FUHDWH#DQ#
DGGUHVV#OLVW1##
([SODLQ#WKH#ODE#REMHFWLYHV1#
# 0RGXOH#:=#0DQDJLQJ#6HUYHU#2EMHFWV#LQ#([FKDQJH#5333# # 48#
([HUFLVH#4##
&UHDWLQJ#DQ#$GGUHVV#/LVW
#
6FHQDULR#
Address lists are an effective method to provide Lightweight Directory Access Protocol (LDAP)
query lists to Outlook users. Based on the configuration of existing address lists, Outlook users can
view recipients’ lists that are segmented into smaller, more logical groups rather than view the
entire global address list. To test this feature, you will create an address list that has only the contact
entries that are defined in your city.
*RDO#
In this exercise, you will create an address list that details the contacts that are associated with your
city.
Tasks Detailed Steps
1.
Exit and log off Outlook.
a.
Switch to Outlook.
b.
On the
File
menu, click
Exit and Log Off
.
Note:
Currently, Outlook does not dynamically update the address list views that are present on the server.
Therefore, you log off the server to retrieve a fresh view when you log on.
2.
Use Exchange System
Manager to create an
address list that contains
only contacts whose City
attribute matches your
server’s name.
a.
Switch to
your_firstname's Console.
b.
Expand
Northwind Traders (Exchange)
.
c.
Expand
Recipients
.
d.
Expand
Address Lists
.
e.
Right-click
All Address Lists
, point to
New
, and then click
Address
List
.
f.
In the
Address list
name box, type
All
your_servername
Contacts
g.
Click the
Filter Rules
button.
h.
Click
Show only these recipients
, and then select the
Contacts
check
box.
i.
Click the
Advanced
tab.
j.
Click
Field
, point to
Contact
, and then click
City
.
k.
In the
Condition
drop-down box, click
Is (exactly)
.
l.
In the
Value
box, type
your_servername and then click
Add
.
m.
Click
Find Now
to verify that the LDAP query is operational.
n.
Click
OK
to close the
Find Exchange Recipients
dialog box.
o.
Click
Finish
to create the address list.
Important:
It may take a few minutes for the server to build the address list. You may want to wait a few
minutes before proceeding.
49# # 0RGXOH#:=#0DQDJLQJ#6HUYHU#2EMHFWV#LQ#([FKDQJH#5333#
(continued)
Tasks Detailed Steps
3.
Use Outlook to view and
verify the creation of the
address list.
a.
On the desktop, double-click
Microsoft Outlook
.
b.
On the
Tools
menu, click
Address Book
.
c.
In the
Show Names from the
drop-down box, click
All
your_servername
Contacts
.
Note:
Verify that the contacts match the city name specified by your address book list. If needed, use Active
Directory Users and Computers to review the contacts in your_servernameOU.
3.
(continued)
d.
Close the address book.
e.
Exit and log off from Outlook.
# 0RGXOH#:=#0DQDJLQJ#6HUYHU#2EMHFWV#LQ#([FKDQJH#5333# # 4:#
‹‹
#
0DQDJLQJ#$GPLQLVWUDWLYH#*URXSV#
„
8VLQJ#D#6LQJOH#$GPLQLVWUDWLYH#*URXS
„
:KHQ#WR#$GG#DQ#$GPLQLVWUDWLYH#*URXS
„
&UHDWLQJ#$GPLQLVWUDWLYH#*URXSV
An administrative group is a collection of Exchange 2000 Active Directory
objects that are grouped together for the purposes of permissions management.
The collection of administrative groups defines the administrative topology of
an Exchange organization. An administrative group can contain zero or more
policies, routing groups, public folder trees, monitors, servers, conferencing
services, and chat networks.
Administrative groups are implemented in Exchange 2000 with the following
goals:
„#
Provide a simple way to organize administrative objects into groupings for
navigation and granting permissions.
„#
Provide a mapping container for legacy Exchange sites in Exchange 2000.
„#
Provide a way to easily move objects between administrative groups.
„#
Limit exposure of administrative groups in the user interface for small and
medium companies that do not need administrative group functionality.
6OLGH#2EMHFWLYH#
7R#JLYH#DQ#RYHUYLHZ#RI#WKLV#
WRSLF1#
/HDG0LQ#
$Q#DGPLQLVWUDWLYH#JURXS#
DOORZV#\RX#WR#JUDQW#
SHUPLVVLRQV#IRU#D#FROOHFWLRQ#
RI#([FKDQJH#5333#REMHFWV1#
4;# # 0RGXOH#:=#0DQDJLQJ#6HUYHU#2EMHFWV#LQ#([FKDQJH#5333#
8VLQJ#D#6LQJOH#$GPLQLVWUDWLYH#*URXS#
„
1DPHG#)LUVW#$GPLQLVWUDWLYH#*URXS
„
+LGGHQ#IURP#9LHZ#%\#'HIDXOW
„
,QWHQGHG#IRU#6PDOO#DQG#0HGLXP#&RPSDQLHV
By default, Exchange 2000 has a single administrative group called First
Administrative Group. This administrative group is hidden from view in
Exchange System Manager. You can choose to view this object, at which point
the containers for servers, policies, and connectors move from the top-level
hierarchy to the administrative group container.
Small to medium companies typically never need to use more than the First
Administrative Group.
You can change the name of First Administrative Group, after it is visible in the
user interface.
6OLGH#2EMHFWLYH#
7R#H[SODLQ#KRZ#
([FKDQJH#5333#RSHUDWHV#
ZLWK#D#VLQJOH#DGPLQLVWUDWLYH#
JURXS1#
/HDG0LQ#
:KHQ#\RX#LQVWDOO#
([FKDQJH#5333/#D#VLQJOH#
DGPLQLVWUDWLYH#JURXS#LV#
FUHDWHG1#
# 0RGXOH#:=#0DQDJLQJ#6HUYHU#2EMHFWV#LQ#([FKDQJH#5333# # 4<#
:KHQ#WR#$GG#DQ#$GPLQLVWUDWLYH#*URXS#
„
&RQWURO#$FFHVV#WR#6SHFLILF#*URXSV#RI#2EMHFWV
„
6PDOO#WR#0HGLXP#2UJDQL]DWLRQV#0D\#2QO\#1HHG#WKH#)LUVW#
$GPLQLVWUDWLYH#*URXS
„
3ROLFLHV#&UHDWHG#LQ#2QH#$GPLQLVWUDWLYH#*URXS#0D\#%H#
$SSOLHG#7KURXJKRXW#WKH#2UJDQL]DWLRQ
The typical reason for creating an additional administrative group is to group
servers for permissions management. For example, if your company has two
distinct sets of administrators that manage different computers running
Exchange 2000 Server, you could create two administrative groups.
The following examples illustrate the administrative group concept and the
flexibility it affords.
„#
In a distributed environment, control over management of the
Exchange 2000 system is distributed to company regions or divisions.
Typically, a central Information Technology (IT) group manages standards
and guidelines, but not actual administration. In this scenario, we would see
at least one administrative group per region or division.
This is by far the most common scenario in medium and large sized
companies with multiple divisions or geographically dispersed offices.
„#
In a centralized environment, a single central IT group maintains complete
control of administration. This scenario is typical in small and medium-
sized companies, but could be employed by large customers with high
bandwidth connectivity to their regional offices. In this scenario, very few
administrative groups are required.
6OLGH#2EMHFWLYH#
7R#GLVFXVV#ZKHQ#LW#LV#
DSSURSULDWH#WR#DGG#DQ#
DGPLQLVWUDWLYH#JURXS#WR#DQ#
([FKDQJH#5333#
RUJDQL]DWLRQ1#
/HDG0LQ#
([FKDQJH#5333#6HWXS#
SURYLGHV#D#VLQJOH#
DGPLQLVWUDWLYH#JURXS#IRU#DOO#
REMHFWV#LQ#WKH#QHZ#
RUJDQL]DWLRQ1#