Tài liệu Lab 4.2.1 Configuring ISDN BRI (U-Interface) ppt
Bạn đang xem bản rút gọn của tài liệu. Xem và tải ngay bản đầy đủ của tài liệu tại đây (152.7 KB, 6 trang )
1 - 6 CCNA 4: WAN Technologies v 3.0 - Lab 4.2.1 Copyright 2003, Cisco Systems, Inc.
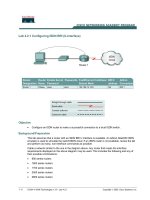
Lab 4.2.1 Configuring ISDN BRI (U-Interface)
Objective
• Configure an ISDN router to make a successful connection to a local ISDN switch.
Background/Preparation
This lab assumes that a router with an ISDN BRI U interface is available. An Adtran Atlas550 ISDN
emulator is used to simulate the switch/ISDN cloud. If an ISDN router is not available, review the lab
and perform as many, non-interface commands as possible.
Cable a network similar to the one in the diagram above. Any router that meets the interface
requirements displayed on the above diagram may be used. This includes the following and any of
their possible combinations:
• 800 series routers
• 1600 series routers
• 1700 series routers
• 2500 series routers
• 2600 series routers
2 - 6 CCNA 4: WAN Technologies v 3.0 - Lab 4.2.1 Copyright 2003, Cisco Systems, Inc.
Please refer to the chart at the end of the lab to correctly identify the interface identifiers to be used
based on the equipment in the lab. The configuration output used in this lab is produced from 1721
series routers. Any other router used may produce slightly different output. Conduct the following
steps on each router unless specifically instructed otherwise.
Start a HyperTerminal session as.
Note: Refer to the erase and reload instructions at the end of this lab. Perform those steps on all
routers in this lab assignment before continuing.
Step 1 Configure the routers
Configure all of the following according to the chart:
• The hostname
• The console
• The virtual terminal
• The enable passwords
If there is a problem completing this, refer to the Network Address Translation (NAT) configuration
lab.
Step 2 Verifying the ISDN BRI switch type
a. Not all ISDN switch types are the same worldwide and the first step is to configure the following:
• The ISDN TE1 device
• The router
• What ISDN switch type is in use
This information will be provided by the ISDN telco provider. In this case, the ISDN Switch type,
supported by the Adtran simulator, is National ISDN-1, North America. It is configured, on the router,
using the IOS keyword basic-ni. To check the ISDN BRI status, issue the following command
before issuing any configuration commands:
Ottawa#show isdn status
b. What is the Layer 1 status?
__________________________________________________________________________
c. What is the ISDN switch type?
________________________________________________
Step 3 Specifying the switch type
a. To specify the ISDN switch type use the isdn switch-type command at the global
configuration mode prompt. The different switch types available may be reviewed using the
isdn switch-type ? command:
Ottawa#configure terminal
Ottawa(config)#isdn switch-type ?
b. How many different switch types are available?
____________________________________
c. To configure the National ISDN-1 switch type:
Ottawa(config)#isdn switch-type basic-ni
3 - 6 CCNA 4: WAN Technologies v 3.0 - Lab 4.2.1 Copyright 2003, Cisco Systems, Inc.
Step 4 Verifying switch status
a. Check the state of the ISDN Interface again .
Ottawa#show isdn status
b. What is the Layer 1 status?
__________________________________________________________________________
c. What is the ISDN switch type?
________________________________________________
Step 5 Activate the BRI connection
Activate the ISDN BRI using the no shutdown command at the interface configuration prompt.
Ottawa#configure terminal
Ottawa(config)#interface bri 0
Ottawa(config-if)#no shutdown
Step 6 Review switch status
a. At this stage the ISDN BRI should be physically active and one TEI should have been
negotiated.
Ottawa#show isdn status
a. What is the Layer 1 status?
__________________________________________________________________________
b. What is the ISDN switch type?
________________________________________________
c. Has the Layer 2 status changed?
______________________________________________
Step 7 Configuring ISDN SPIDs
Depending on region, ISDN service profile identifiers (SPIDs) may have to be specified for the ISDN
Switch to respond to the ISDN TE1 correctly. The SPIDs, supported by the Adtran simulator, are
specified as isdn spid1 and isdn spid2. To configure the SPIDs issue the following commands:
Ottawa(config)#interface bri 0
Ottawa(config-if)#isdn spid1 51055510000001 5551000
Ottawa(config-if)#isdn spid2 51055510010001 5551001
Step 8 Review switch status
a. Check the state of the ISDN Interface again:
Ottawa#show isdn status
b. What does the output specify about spid 1?
______________________________________
c. What does the output specify about spid 2?
______________________________________
4 - 6 CCNA 4: WAN Technologies v 3.0 - Lab 4.2.1 Copyright 2003, Cisco Systems, Inc.
d. Careful examination of this output shows that the assigned SPID values have not been sent to
the ISDN switch and verified. The reason for this is that they were specified after the ISDN
interface was enabled. To send the SPID values the interface must be reset.
Step 9 Resetting the interface
a. To manually reset the ISDN BRI interface issue the command clear interface bri 0. This
will cause all ISDN parameters to be renegotiated. Issue the clear command on the router and
then check the ISDN interface status. SPID1 and SPID2 will now be sent and validated:
Ottawa#clear interface bri 0
Ottawa#show isdn status
b. Have SPID1 and SPID2 been sent and verified?
__________________________________________________________________________
Step 10 Save the configuration and reboot
a. Save the configuration and reboot the router. This time, verify that the ISDN Interface has
correctly negotiated with the ISDN switch. Review activity on the ISDN Interface using the show
isdn active command:
Ottawa#copy running-config startup-config
Ottawa#reload
Ottawa#show isdn active
b. The history table has a maximum of?
__________________________________________________________________________
c. History table data is retained for a maximum of?
__________________________________________________________________________
Upon completion of the previous steps, finish the lab by doing the following:
• Logoff by typing exit
• Turn the router off
• Remove and store the cables and adapter
5 - 6 CCNA 4: WAN Technologies v 3.0 - Lab 4.2.1 Copyright 2003, Cisco Systems, Inc.
Erasing and reloading the router
Enter into the privileged exec mode by typing enable.
If prompted for a password, enter class (if that does not work, ask the instructor).
Router>enable
At the privileged exec mode enter the command erase startup-config.
Router#erase startup-config
The responding line prompt will be:
Erasing the nvram filesystem will remove all files! Continue? [confirm]
Press Enter to confirm.
The response should be:
Erase of nvram: complete
Now at the privileged exec mode enter the command reload.
Router(config)#reload
The responding line prompt will be:
System configuration has been modified. Save? [yes/no]:
Type n and then Enter.
The responding line prompt will be:
Proceed with reload? [confirm]
Press Enter to confirm.
In the first line of the response will be:
Reload requested by console.
After the router has reloaded the line prompt will be:
Would you like to enter the initial configuration dialog? [yes/no]:
Type n and then Enter.
The responding line prompt will be:
Press RETURN to get started!
Press Enter.
Now the router is ready for the assigned lab to be performed.