Tài liệu Hiển thị File Excel trong ASP.NET sử dụng C Sharp ppt
Bạn đang xem bản rút gọn của tài liệu. Xem và tải ngay bản đầy đủ của tài liệu tại đây (146.7 KB, 13 trang )
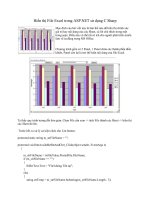
Hiển thị File Excel trong ASP.NET sử dụng C Sharp
Mục đích của bài viết này là làm thế nào để hiển thị chính xác
giá trị hay nội dung của các Sheet, cả lời chú thích trong một
trang aspx. Điều này có thể rất có ích cho người phát triển muốn
làm về tự động trong MS Office.
Chương trình gồm có 2 Panel, 1 Panel chứa các thành phần điều
khiển, Panel còn lại là nơi thể hiện nội dung của file Excel.
Ta thấy quy trình tương đối đơn giản: Chọn File cần xem -> tách File thành các Sheet -> hiển thị
các Sheet đó lên.
Trước hết, ta xử lý sự kiện click cho List button:
protected static string m_strFileName = "";
protected void btnAvailableShtAndChrt_Click(object sender, EventArgs e)
{
m_strFileName = txtfileValue.PostedFile.FileName;
if (m_strFileName == "")
{
lblErrText.Text = "File không Tồn tại";
}
else
{
string strTemp = m_strFileName.Substring(m_strFileName.Length - 3);
strTemp = strTemp.ToUpper();
if (strTemp == "XLS")
{
drpShtAndChrt.Items.Clear();
GetListofSheetsAndCharts(m_strFileName, true, drpShtAndChrt);
}
else
{
lblErrText.Text = "File được chọn không đúng định dạng yêu cầu";
}
}
}
Trong hàm này, ta xây dựng Hàm GetListofSheetsAndCharts(m_strFileName, true,
drpShtAndChrt) để tách File thành các Sheet và Chart, có nội dung như sau:
public void GetListofSheetsAndCharts(string strFileName, bool bReadOnly, DropDownList
drpList)
{
Excel.Workbook workbook = null;
try
{
if (!bReadOnly)
{
// mở chế độ Write.
workbook = appOP.Workbooks.Open(strFileName, 2, false, 5, "", "", true,
Excel.XlPlatform.xlWindows, "\t", false, true, 0, true, 1, 0);
}
else
{
// Mở chế độ Read
workbook = appOP.Workbooks.Open(strFileName, 2, true, 5, "", "", true,
Excel.XlPlatform.xlWindows, "\t", false, true, 0, true, 1, 0);
}
// Đọc File Excel.
object SheetRChart = null;
int nTotalWorkSheets = workbook.Sheets.Count;
int nIndex = 0;
for (int nWorkSheet = 1; nWorkSheet <= nTotalWorkSheets; nWorkSheet++)
{
SheetRChart = workbook.Sheets[(object)nWorkSheet];
if (SheetRChart is Excel.Worksheet)
{
ListItem lstItemAdd = new ListItem(((Excel.Worksheet)SheetRChart).Name +
"*WorkSheet", nIndex.ToString(), true);
drpList.Items.Add(lstItemAdd);
lstItemAdd = null;
nIndex++;
}
else if (SheetRChart is Excel.Chart)
{
ListItem lstItemAdd = new ListItem(((Excel.Chart)SheetRChart).Name + "*Chart",
nIndex.ToString(), true);
drpList.Items.Add(lstItemAdd);
lstItemAdd = null;
nIndex++;
}
}
if (workbook != null)
{
if (!bReadOnly)
{
// Đóng chế độ Write
workbook.Save();
workbook = null;
}
else
{
// Đóng chế độ Read
workbook.Close(false, false, Type.Missing);
workbook = null;
}
}
}
catch (Exception expFile)
{
Response.Write(expFile.ToString());
}
finally
{
if (workbook != null)
{
if (!bReadOnly)
{
// Đóng chế độ Write
workbook.Save();
workbook = null;
}
else
{
// Đóng chế độ Read
workbook.Close(false, false, Type.Missing);
workbook = null;
}
}
}
}
Ta để ý thấy hàm này có 3 tham số truyền vào: Tên File, Chế độ mở File và tên của
DropDownList.
Sau khi ta đã thực hiện xong bước tách File Excel thành các Sheet và chart, ta chỉ cần lựa chọn
các Sheet hoặc các Chart để hiển thị lên. Ta xử lý sự kiện click nút Display:
protected void btnDisplay_Click(object sender, EventArgs e)
{
if (drpShtAndChrt.SelectedIndex != -1)
{
string strSheetorChartName = drpShtAndChrt.SelectedItem.Text;
// Ta phải xóa bỏ các ký tự "*" vì tên của các Sheet trong Excel không cho phép có kí tự
này.
char[] delimiterChars = { '*' };
string[] strTemp = strSheetorChartName.Split(delimiterChars);
if (strTemp[1] == "WorkSheet")
{
DisplayExcelSheet(m_strFileName, strTemp[0], true, lblErrText);
}
else if (strTemp[1] == "Chart")
{
DisplayExcelSheet(m_strFileName, strTemp[0], true, lblErrText, true);
}
}
}
Ở trong hàm này ta phải kiểm tra xem ta lựa chọn File để hiển thị là Sheet hay là Chart. Ta dùng
kỹ thuật Overloadding cho hàm DisplayExcelSheet() để thực hiện. Nếu là Sheet thì ta gọi hàm
DisplayExcelSheet(m_strFileName, strTemp[0], true, lblErrText) với 4 tham số kèm theo. Còn
ngược lại, nếu là Chart thì ta phải gọi hàm có 5 tham số.
public bool DisplayExcelSheet(string strFileName, string strSheetRChartName, bool
bReadOnly, Label lblErrorText)
{
return DisplayExcelSheet(strFileName, strSheetRChartName, bReadOnly, lblErrText,
false);
}
public bool DisplayExcelSheet(string strFileName, string strSheetRChartName, bool
bReadOnly, Label lblErrorText, bool bIsChart)
{
appOP.DisplayAlerts = false;
Excel.Workbook workbook = null;
Excel.Worksheet worksheet = null;
Excel.Chart chart = null;
try
{
if (!bReadOnly)
{
// Mở chế độ Write.
workbook = appOP.Workbooks.Open(strFileName, 2, false, 5, "", "", true,
Excel.XlPlatform.xlWindows, "\t", false, true, 0, true, 1, 0);
}
else
{
// Mở chế độ Read.
workbook = appOP.Workbooks.Open(strFileName, 2, true, 5, "", "", true,
Excel.XlPlatform.xlWindows, "\t", false, true, 0, true, 1, 0);
}
// Đọc File Excel.
if (bIsChart)
{
chart = (Excel.Chart)workbook.Charts[strSheetRChartName];
}
else
{
worksheet = (Excel.Worksheet)workbook.Sheets[strSheetRChartName];