Tài liệu Windows Vista For Dummies P2 pdf
Bạn đang xem bản rút gọn của tài liệu. Xem và tải ngay bản đầy đủ của tài liệu tại đây (1.41 MB, 20 trang )
select the paths of previously opened folders from a drop-down menu. Surprise
of surprises, clicking this drop-down button immediately converts the Vista path
separated by black triangles into the old backslash-separated and mushed-
together pathname of Windows XP. That’s the way that all the paths to all the
previously opened folders on the drop-down menu appear as well!
However, the moment that you click one of the old-fashioned mushed-together
pathnames on this drop-down menu, Vista immediately converts it back into the
new-fangled path separated by right-pointing black triangles.
For example, suppose earlier in my work session, I opened the Program Files
folder on my computer’s local hard drive, given the designation Local Disk (C:),
and I now want to reopen it in Windows Explorer. When I click the address bar’s
drop-down button, this path appears on the drop-down menu:
C:\Program Files
However, as soon I click the C:\Program Files item on this pull-down menu, Vista
opens this folder and displays the following path on Windows Explorer’s
address bar following an initial folder icon:
᭤ Computer ᭤ Local Disk (C:) ᭤ Program Files ᭤
Note how the new Vista pathname designations with the right-pointing triangles
are more accurate than the old ones in describing the actual process you fol-
lowed to open the current folder. In the previous example, I actually selected the
Computer link on the Start menu followed by double-clicking the Local Disk (C:)
icon in the Computer window and the Program Files folder icon. The older desig-
nations with the backslashes are, however, more accurate in describing the
actual location of the folder in the computer’s hierarchy of directories and files.
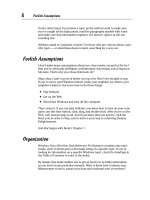
Making the most of the Details pane
The Details pane at the bottom of the window gives you extra information about
the folder or file that’s currently selected in the main section of Windows
Explorer. When a folder is selected, the categories of this information can
include the folder name, number of files, and the date the folder was last modi-
fied. When a file is selected, the categories of the information can include the
filename, size, type, date created, date last modified, and date last accessed, as
well as any keywords that you’ve assigned to the file such as title, authors, and
rating. In the case of graphic files and Excel workbook files, Vista also automati-
cally displays a tiny thumbnail of the image or initial worksheet on the left side
of the Details pane (see Figure 1-9).
Sometimes you need to enlarge the size of the window to display all the cate-
gories and information about the file currently selected in the Details pane.
Remember that you can also increase the height of the Details pane by dragging
its top border upward.
16
Part 1: The Vista User Experience
03_783269 ch01.qxp 11/20/06 5:07 PM Page 16
The information displayed in the Details pane can be quite helpful in identifying
a folder or file for use. Moreover, the tags, ratings, and keywords assigned to
particular files can be used in doing searches for the file. (
See
“Search” later in
this part).
Vista enables you to add tags and edit keywords that you can assign to a file
directly from the Details pane. After clicking the file icon in Windows Explorer to
select it, you then position the mouse pointer over the category in the Details
pane and then, when an outline appears around the current entry and the pointer
becomes an I-beam shape, click the insertion point in the field and type the new
tag or keyword or edit its contents. Depending upon the type of file (text, graphic
image, audio, or video), you are able to edit various fields on this tab.
After you add or edit a tag, you then need to click the Save button that appears
the moment you set the insertion point in one of the fields to save the new data
as part of the file. Click the Cancel button if you decide not to add the tag or
save the editing change.
When you select a music or graphics file, you can give the file a rating between
one and five stars by clicking the star (from left to the right) that represents the
highest star you want to give it.
Figure 1-9
Ah, That’s What They Did with It!
17
03_783269 ch01.qxp 11/20/06 5:07 PM Page 17
Displaying the Search pane and Preview pane
Vista’s version of Windows Explorer offers you the use of two extra panes that
aren’t normally displayed in the window. These are the Search pane (
see
“Search” later in this part), which appears immediately beneath the address bar
when displayed (by clicking Organize
᭤ Layout ᭤ Search Pane) and the Preview
pane, which appears on the right side of the window when displayed (by click-
ing Organize
᭤ Layout ᭤ Preview Pane).
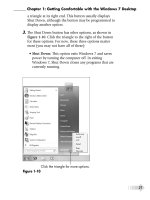
Figure 1-10 shows Windows Explorer with all its auxiliary panes — Navigation,
Search, Details, and Preview — displayed. Because I selected one of the chapter
files created in Microsoft Word in an open folder, the Preview pane in this figure
displays the first part of the actual document text.
Note that when you select a Microsoft Excel workbook file, the Preview pane dis-
plays the first part of the initial worksheet. So too, when you select a graphics
file, the Preview pane displays a larger version of the graphic image. When you
select a folder rather than a file icon, the Preview pane displays a large semi-
open folder on its side with its best representation of the types of documents it
contains (assuming the folder’s not empty).
Figure 1-10
18
Part 1: The Vista User Experience
03_783269 ch01.qxp 11/20/06 5:07 PM Page 18
Moreover, when you select a video clip or a movie file (perhaps created with
Windows Movie Maker —
see
Part 7) in Windows Explorer, the Preview pane
displays the first frame of the video file with a video controller beneath com-
plete with Stop, Play/Pause, and Switch to Full Mode buttons that you can use
to actually preview the video from start to finish if you so desire.
Likewise, when you select an audio file in Windows Explorer, the Preview pane
displays a stock image of a multimedia file (including a music file above the same
controller with its Stop, Play/Pause, and Switch to Full Mode buttons). You can
then use the Play/Pause button to play the selected audio file from the Preview
pane.
Click the Switch to Full Mode button in the Preview pane if you want to listen
to the selected video or audio file in a separate Windows Media Player window.
Doing this gives you access to the full array of playback features of this much-
improved media player application (
see
“Windows Media Player 11” in Part 7
for details).
Restoring the Classic pull-down menus to Windows Explorer
If you’re anything like me, in your time working with earlier versions of Windows
such as 98, ME, and XP, you’ve come to rely upon the so-called Classic pull-down
menus in the Explorer Window and, to a lesser extent, the ordering and arrange-
ment of items on the Start menu that you now know so well. Fortunately, you
can easily restore some of the good old classic look and feel of bygone Windows
versions to Vista anytime you want to.
By far the most important classic element to know how to restore to Vista is the
display of the Classic pull-down menus (File, Edit, View, Tools, and Help) in the
Windows Explorer windows. To bring back these very valuable (and in rare
cases indispensable) menus to all your Explorer windows, click Organize
᭤
Folder and Search Options to open the Folder Options dialog box. There, click
the View tab and then select the Always Show Menus check box at the top of the
Advanced Settings list box before you click OK. After this check box is selected,
these pull-down menus automatically appear on their own row between the
address bar and the toolbar in every Windows Explorer window you open
(including windows opened by clicking the Computer, Network, and Control
Panel links on the Start menu).
You can also restore the Classic pull-down menus to your Explorer windows by
pressing the Alt key one time. Press the Alt key a second time to once again hide
the menus.
Restoring the Classic Windows Start menu
Although I personally do not prefer the rather sloppy cascading submenu
arrangement of the Start menu in older Windows versions, preferring instead
the tidy new self-contained Start menu of Vista, you can, if you want, return
Ah, That’s What They Did with It!
19
03_783269 ch01.qxp 11/20/06 5:07 PM Page 19
quite readily to the tried-and-true Start menu of your mother’s Windows. (After
all, the Classic Start menu does include a Run option immediately above the old
familiar Shut Down option.)
To make the switch back, right-click the Start button and then click Properties
on its shortcut menu to open the Taskbar and Start Menu Properties dialog box
with its Start Menu tab selected. On this tab, you click the Classic Start Menu
option button and then click OK.
Note, however, that when you first switch back to the Classic Start menu in
Vista, this menu does not resemble so much the Windows XP Start menu as it
hearkens back to an even earlier vintage, more like the Start menu of Windows
98 (now that takes me back a bit).
You can however, customize the look and feel of the Classic Start menu. One way
to do this is to click the Default Programs option that now appears at the very
top of the Start menu and then click the Set Your Default Programs link in the
Default Programs Control Panel window. You can then select the programs such
as Internet Explorer, Windows Mail, and the like that you always want to appear
on the Start menu.
The other way to customize the Classic Start menu is to reopen its Properties
dialog box and then click its Customize button on the Start Menu tab to open the
Customize Classic Start Menu dialog box. There, you can use Add, Remove, and
Sort buttons as well as the check boxes in the Advanced Start Menu Options list
box to customize what items do and don’t appear on the menu and in what order.
Getting rid of the Vista glassiness
Let’s face it: You either love the shiny new Aero Glass look of Windows Vista or
you find it to be totally distracting and a big waste of your precious computer
resources. If you happen to hold the latter opinion, follow these steps to get rid
of the ritzy glassy look and go back to the old clunky opaque view of yesteryear:
1.
Right-click anywhere on the Vista desktop and then click the Personalize
item on its shortcut menu.
2.
Click the Window Color and Appearance link in the Personalization
Control Panel window.
3.
Click the Open Classic Appearance Properties for More Color Options link
at the bottom of the Window Color and Appearance Control Panel window.
4.
Click the Windows Classic selection in the Color Scheme list box and then
click OK.
And that’s all there is to it: Vista fades to black. When the screen comes back up,
in place of all that glittery, semitransparent taskbar and windows nonsense,
every Vista screen now has a thick-as-mud look and feel that would do Windows
95 proud!
20
Part 1: The Vista User Experience
03_783269 ch01.qxp 11/20/06 5:07 PM Page 20
Just click the Enable Transparency check box in the Window Color and
Appearance Control Panel window to remove its check mark if you’re happy
with the default Windows Vista color scheme and only want to get rid of the
transparency effects.
Adopting a Classic view of the Control Panel
Finally, you may find the default look of the Vista Control Panel (which is, fortu-
nately a little less sparse than the Category View of the Windows XP Control
Panel) not to your liking. Switching back to the display of rows of individual
Control Panel icons (in alphabetical order from Add Hardware through Windows
Update) is really simple.
Click the Control Panel link on the Start menu and then click the Classic View
link in its Navigation pane immediately beneath Control Panel Home. Just
remember that when the Control Panel is in Classic View, you must double-click
the Control Panel icon whose settings you want to modify in order to open its
dialog box.
Click the Control Panel Home link in the Navigation pane to return to the default
category display.
Things that haven’t changed a bit
Although it may seem as though quite a bit of the user interface is radically dif-
ferent, you’ll be glad to know that many, many of the ways of doing things in
Windows Vista have remained the same. Here’s a short list of such things to give
you an idea of just how much you already know how to do:
ߜ
You still move a window by dragging it by its title bar (which is a bit easier
given the larger size in Vista) and minimize, maximize, and close windows
with these buttons in the upper-right corner.
ߜ
You still resize windows by dragging one of their side borders or corners.
ߜ
All items still have shortcut menus associated with them that are opened
by right-clicking them.
ߜ
All your common shortcut keystrokes such as Ctrl+C (for Copy), Ctrl+X (for
Cut), Ctrl+V (for Paste), Ctrl+Z (Undo) as well as Alt+
← for Back, Alt+→ for
Forward, Alt+F4 for Close Current Window (or shut down Vista if all win-
dows are closed) still work just as before.
ߜ
You can still modify the desktop by selecting a new desktop background
image, screen saver, as well as add standard desktop icons (such as
Documents, Computer, and Internet Explorer) if you don’t like having
to choose them from the Start menu — right-click the desktop and then
click Personalize on its shortcut menu to open the Personalization Control
Panel window.
Ah, That’s What They Did with It!
21
03_783269 ch01.qxp 11/20/06 5:07 PM Page 21
ߜ
You can still map folders located on your network to virtual drive letters
(up to Z just as long as they don’t duplicate drive letters already assigned
to physical devices connected to the machine) that appear each time you
log on to the computer — just choose Tools
➪
Map Network Drive when the
Classic menus are displayed in Windows.
ߜ
You can still add desktop shortcuts for any item (drive, program, folder, or
file) on your computer, network, or the Internet that you can then open by
double-clicking —
see
“Displaying additional desktop icons” later in this
part for details.
Flip and Flip 3D
When you have many windows open in Vista, the Flip and Flip 3D (also known as
the Window Switcher) features provide you with two quick methods for activat-
ing the window you want to work by displaying it on the top of the others.
To use the Flip feature, hold down Alt+Tab. Vista displays a band in the middle of
the desktop showing thumbnails of each open window in the order in which they
were opened (refer to Figure 1-3). To activate a new window, press Alt+Tab (or
hold down the Alt key as you press
→ or ←) until the thumbnail of that window
is highlighted and its name appears centered above in the band. Then release the
Alt key along with Tab or the left or right arrow key. To minimize all the open win-
dows as buttons on the Vista taskbar, highlight the Desktop, Windows Explorer
thumbnail that appears as the last image on the right of the group.
To use the Flip 3D feature (refer to Figure 1-4), click the Switch between
Windows button (shown in left margin) on the Quick Launch toolbar. Vista
then dims the background of the desktop and displays all open windows in
3-D cascading arrangement. If your mouse is equipped with a center wheel,
you can then zip (and I mean zip) through the 3-D stack by turning the wheel
(forward to flip backward through the stack and backward to flip forward).
As soon as you’ve brought the image of the window you want to activate to the
front of the 3-D stack, click anywhere on the image. Vista then returns the desk-
top to normal, collapsing the 3-D stack while at the same time activating the
window you clicked by placing it on top. If your mouse doesn’t have a center
wheel, you can still select a window to activate by clicking the part of it that is
exposed in the 3-D stack.
When all the open windows in Vista are minimized as buttons on the taskbar —
as after clicking the Show Desktop button (shown in left margin) on the Quick
Launch toolbar — remember that you only need to position the mouse pointer
over each button to display a thumbnail of its window. Then when you see the
image of the window you want to activate, click its button on the taskbar to dis-
play it on the Vista desktop either full-screen or in its previous position and size.
22
Part 1: The Vista User Experience
03_783269 ch01.qxp 11/20/06 5:07 PM Page 22
Personalize
Vista makes it easy for you to personalize your computer by selecting a new
desktop background image, a color scheme for the various Windows elements,
a screen saver to use when the computer has been idle for a certain period, as
well as the sound effects to play when different events take place.
The easiest way to open the Personalization window (see Figure 1-11) for chang-
ing these settings is by right-clicking anywhere on the desktop background and
then clicking Personalize at the bottom of the desktop’s shortcut menu.
Note that you can also open this dialog box through the Control Panel (Start
᭤
Control Panel) by first selecting the Appearance and Personalization link fol-
lowed by the Personalization link, but this method requires a whole lot more
steps to do the same thing.
The options for customizing Vista in the Personalization window include
ߜ
Window Color and Appearance to replace the Personalization window
with the Window Color and Appearance window (see Figure 1-12), where
you can select a new color and the amount of glassiness for the title bars of
windows, the Start menu, and taskbar. To select a Windows XP color
scheme, click the Open Classic Appearance Properties for More Options
link to open the Appearance Settings dialog box, where you then select or
customize one of its ready-made schemes.
Figure 1-11
Personalize
23
03_783269 ch01.qxp 11/20/06 5:07 PM Page 23