Tài liệu Examining the Regedit User inferface phần 2 ppt
Bạn đang xem bản rút gọn của tài liệu. Xem và tải ngay bản đầy đủ của tài liệu tại đây (32.9 KB, 7 trang )
The Load Hive… and Unload Hive… commands were first introduced to Regedit.exe
with the release of Windows XP and are also present in Regedit.exe version included
with the products of the Windows Server 2003 family. We saw above that these represent
the same functionality that was provided by the similarly named commands present in the
older application, Regedt32.exe. These commands allow you to load registry files
previously exported from the registry and saved in the registry hive format, or unload
registry hives, respectively. Note that only those registry keys that actually represent
physical hives can be saved in the registry hive format (a complete list of registry hives
was provided in Chapter 1
). Furthermore, the Load Hive… and Unload Hive…
commands are only applicable to the HKEY_USERS and HKEY_LOCAL_MACHINE
keys. Therefore, these commands will be available only if one of these registry keys is
selected. In all other cases, the commands will be grayed and unavailable. The hive that
you have loaded in the registry becomes one of the subkeys under the root keys
mentioned above.
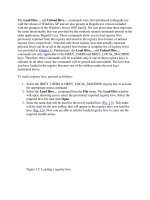
To load a registry hive, proceed as follows:
1. Select the HKEY_USERS or HKEY_LOCAL_MACHINE registry key to activate
the appropriate menu command.
2. Select the Load Hive… command from the File menu. The Load Hive window
will open, allowing you to select the previously exported registry hive. Select the
required hive file and click Open.
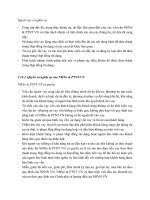
3. Enter the name that will be used for the newly loaded hive (Fig. 3.5
). This name
will be used for the new subkey that will appear in the registry after you load the
hive (Fig. 3.6
). Now you are able to edit the loaded registry hive to carry out the
required modifications.
Figure 3.5: Loading a registry hive
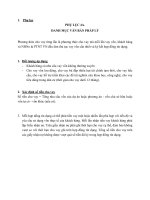
Figure 3.6: The newly loaded copy of the SYSTEM hive (SYS_COPY) now
appears as a nested subkey under HKEY_LOCAL_MACHINE root key
Note In order to be allowed to carry out this procedure, you need to log on to the
local system as the Administrator or a user belonging to the Administrators
group. If your computer is part of a network, network security policy will
also influence your ability to perform this operation.
4. Having finished the editing of the loaded registry hive, you can unload it by
selecting it, and then choosing the Unload Hive… command from the file menu.
You need to save any changes to the hive that you're going to unload, in order to
restore them later.
Note The Load Hive… and Unload Hive… commands can be particularly useful for
troubleshooting unbootable Windows installations. If you have a parallel OS
installation that is bootable, you can boot into that system, load the hive from the
damaged system, and edit it appropriately in order to eliminate the problem. More
detailed information and step-by-step instructions for this process will be provided
in Chapters 6
, 12, and 13.
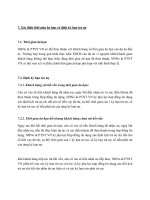
The Connect Network Registry… command allows you to edit the registry of a remote
computer. This command will be available only if the computer running Regedit is part
of a network that contains servers running Windows NT/2000, Windows Server 2003, or
Novell NetWare. To connect to a remote registry, you need to specify the name of the
computer where the remote registry is located (Fig. 3.7
). Note that the set of options
available for browsing and searching the network is significantly extended in comparison
to the functionality provided by the Registry Editor version supplied with Windows
NT/2000, where, actually, only the Browse option was available.
Figure 3.7: The Select Computer window now provides extended browsing and
searching functionality
Note To be able to carry out this procedure, you need to log on to the local system as the
Administrator or a user belonging to the Administrators group. If your computer is
part of a network, network security policy will also influence your ability to
perform this operation.
To disconnect the remote registry, use the Disconnect Network Registry… command. If
you are not currently part of a network, this command will be unavailable.
You can use the Print… command from the File menu to print the whole registry or only
a part it. The ability to print a selected branch of the registry is a convenient alternative.
Use the Exit command to close the Registry Editor window and terminate the registry-
editing session.
The Edit Menu Commands
The Edit menu contains commands that allow you to find and modify registry entries:
Modify
Modify Binary Data
New
Permissions
Delete
Rename
Copy Key Name
Find
Find Next
The Modify command is used for editing data contained in the registry entries. This
option will be available only if you select one of the entries displayed in the right pane of
the Registry Editor window. Modify Binary Data allows you to edit any data
(including other data types) in the binary-editor window. As with the previous command,
this will also become available only after you select one of the registry values listed in the
right pane of the registry-editor window.
The New command allows you to add new keys and value entries. Note that, in
comparison to the Regedit.exe version supplied with Windows NT/2000, which allowed
you to add only string data, binary data, and DWORD data, the newer version of
Regedit.exe supplied with Windows XP and Windows Server 2003 provides an extended
set of options. It also allows you to add multi-string and expandable-string data (Fig. 3.8
).
These options become available after selecting the New option. The same options will be
available in the right-click menu.
Figure 3.8: The New command allows you to add new keys, string, binary, DWORD,
multi-string, and expandable string values
Note As you certainly have noticed, even this extended functionality is rather limited,
because an actual list of existing registry data types (which was provided in Chapter
1) is much longer. For example, built-in registry editors don't allow you to manually
create the data such as, for example, REG_QWORD, REG_RESOURCE_LIST,
and so on. However, there are freeware utilities that provide such functions (for
example, the REGLN tool available for downloading from
allows to create registry values of the REG_LINK data
type). Of course, if you decide to use any of the tools of this type, you must do so at
your own risk, because they are even more dangerous than registry editors.
Other options of the Edit menu, such as Rename and Delete, allow you to delete and
rename the value entry. You can also delete the value entry by selecting it and clicking
the <Del> key. To rename the value entry, right-click it, select the Rename command,
and enter the new name.
Note Deletion of registry keys and value entries using the Regedit.exe utility is
irreversible. Regedit.exe has no Undo command. Because of this, you should be
very careful when deleting keys and value entries. Windows will display a warning
message prompting you to confirm your intention to delete the registry entry. After
you confirm it, it will be impossible to cancel the operation.
The Copy Key Name command allows you to copy the selected key name to the
clipboard. Later, you can paste the copied key name using the Paste command present in
any text editor. Remember that the registry is a hierarchical database and the path to the
registry entry you need may be very long and difficult to memorize. Because of this,
many users appreciate this feature. The Copy Key Name command is easy to use in
combination with other commands such as Find and Find Next; you may use it for
various purposes, including registry editing and inserting key names into the text.
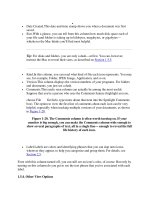
Commands such as Find/Find Next are used for searching registry keys and value
entries. When you select the Find command from the Edit menu, the Find dialog opens,
allowing you to describe the key, value entry, or its data (Fig. 3.9
). You can search for
keys, value entries or data in any combination. The values to search for can be both text
and numeric.
Figure 3.9: The Find dialog
To find the registry entry you need, enter the value to be searched into the Find what
field. You can also restrict the search range by selecting one of the following options
listed in the Look at group: