Tài liệu Group Policy Objects phần 3 ppt
Bạn đang xem bản rút gọn của tài liệu. Xem và tải ngay bản đầy đủ của tài liệu tại đây (33.56 KB, 6 trang )
1. The Group Policy Object Editor will launch, and it will be focused on the selected
GPO. Under the GPO name, you see two nodes: Computer Configuration and
User Configuration. To demonstrate administrative templates, let's focus on the
User Settings. Expand the User Configuration node, then expand the
Administrative Templates node. You'll see a tree of folders representing the
available areas for administrative template controls (Fig. 11.13
).
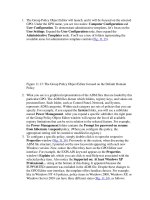
Figure 11.13: The Group Policy Object Editor focused on the Default Domain
Policy
2. What you see is a graphical representation of the ADM files that are loaded by this
particular GPO. The ADM files dictate which folders, registry keys, and values are
presented here. Each folder, such as Control Panel, Network, and System,
represents ADM categories. Within each category are sets of policies that you can
specify. For example, if you expand the System folder, you will see a subfolder
named Power Management. After you expand a specific subfolder, the right pane
of the Group Policy Object Editor window will expose the list of all available
registry limitations that can be set in relation to the selected feature. For example,
the Power Management folder contains the Prompt for password on resume
from hibernate / suspend policy. (When you configure this policy, the
appropriate setting will be created or modified in registry.)
3. To configure a specific policy, simply double-click it to open the respective
Properties window (Fig. 11.14
). Previously in this section, when discussing the
ADM file structure, I pointed out the new keywords appearing with each new
Windows version. Now, notice the effect they have on the GPO Editor user
interface. For example, the EXPLAIN keyword appears in the Properties
window's Explain tab, which you can click to read Help text associated with the
selected policy item. Also notice the Supported on: At least Windows XP
Professional… string at the bottom of this dialog. It appeared because the
SUPPORTED statement was included in the ADM file. Despite these changes to
the GPO Editor user interface, the template offers familiar choices. For example,
like in Windows NT 4.0 policies, policy items in Windows 2000, Windows XP, or
Windows Server 2003 can have three different states (Fig. 11.14
), as follows:
o
Not Configured — The particular registry value behind this policy item is
not changed, regardless of its state.
o
Disabled — This particular policy item is disabled. That is, if the policy is
Prompt for password on resume from hibernate / suspend — when it is
disabled, each user can decide whether to automatically lock his or her
computer after performing a resume operation.
o
Enabled — This policy item is enforced at all times.
Figure 11.14: Policy items in Windows 2000, Windows XP or Windows Server
2003 can have one of three states: Not Configured, Enabled, or Disabled
4. If multiple GPOs are applied to a user or machine, two identical policy items from
different GPOs could contradict each other (i.e., one enables an item and the other
disables it). In this case, it's the "last-writer-wins" approach that resolves the
conflict. The last writer may not always be obvious because GPOs can reside at
the site, domain, or OU levels, and each of level can have multiple GPOs. I
already mentioned the order of precedence in the Directory (Local, Site, Domain,
OU). In addition, a set of up/down buttons next to the list of available GPOs
allows the order of precedence to be set within a container. The higher a GPO is in
the list, the later it is processed. Later settings override previous ones.
Once you set all of the policy items within a GPO, where is this information kept? As
previously mentioned, it is replicated in the SYSVOL directory in the Group Policy
Template for that GPO. Both machine- and user-based administrative template settings
are stored in a file called Registry.pol. However, each is stored in its own folder. For
example, user-specific Registry.pol is located in %SystemRoot%\sysvol\
domain\policies\<GPO_GUID>\User. Registry.pol replaces the Ntconfig.pol and
Config.pol files, which were used in Windows versions earlier than Windows 2000.
However, unlike Ntconfig.pol, Registry.pol is not a valid registry hive file. You can't load
it into a temporary hive, nor can you view it. It is a text file, but it contains non-printable
characters and cannot be edited using a text editor, such as Notepad.
However, one drawback of Windows NT 4.0 policies was the effect of tattooing. When
you remove a policy from the domain, the entries are left in the registry for the affected
user or machine. This is not the case in Windows 2000 and later. In these newer versions,
if you disable or remove a GPO that has made registry changes, the corresponding
changes are also removed from the registry.
In Windows NT 4.0, the default path for policy restrictions was in HKCU or HKLM,
under the Software\MS\Windows\CurrentVersion\Policies keys. (See the full path
previously given in this section.) Starting with Windows 2000, the default path for policy
settings has been changed to HKCU and HKLM under the Software\Policies key. As long
as your ADM templates make changes to either of these policy keys, any tattooing is
cleaned up when you remove a GPO. Of course, you are not limited to these keys. You
could easily create an ADM file that enforces registry policy on HKLM\Software\Myapp.
However, if a custom ADM file has been created that strays from the well-known keys,
those custom keys won't be cleaned up when the GPO is removed.
How Software Installation Works
Another important GPO feature that directly affects the system registry is Software
Installation. Any application carrying the label "Designed for Windows" must use
registry. Any time a setup program runs, it reads the registry information to determine if
all the components necessary to complete the installation procedure successfully are
present in the system. It then adds new configuration data to the registry. For this reason,
Setup programs — including Windows Setup and setup utilities that install third-party
software and/or device drivers — always hold the first position in the list of components
using the system registry.
At this point, we come to an important issue. Software installation and distribution
technology has undergone significant advances in recent years. Before proceeding with a
discussion of these technological improvements, ask yourself a simple question: How are
you installing software today? If you're still running from machine to machine with the
CD-ROM media and forcing users to take a coffee break for 30 to 60 minutes while you
install and test the required application, your method may be inefficient. For a home
office or small network (about 10 machines), this may be acceptable. When the number
of computers, users, and applications increases, this method quickly becomes a "poor
administrative experience". Massive deployments today involve thousands of computers,
most of which are administrated remotely. Therefore, it was necessary to develop
management software that can remotely deliver most standard software packages to a
client.
Understanding this, Microsoft introduced the Software Installation feature, a tool that
enables software distribution and desktop configuration management via Active
Directory. Using this feature, you can present the required applications for installation to
users or machines within specific domain, site, or OU by adding that application to a
GPO in Active Directory. The effect of this action is that users subject to that GPO have
the required applications installed for them. Of course, the installation does not happen
all at once; this would render the machine useless under the weight of simultaneous
application installations. Rather, the applications are installed in a "just-in-time" fashion,
depending on the configuration within the GPO.
The Windows Server 2003 family includes several improved technologies and features
that significantly ease the task of OS and add-on software deployment:
Remote Installation Services (RIS). Administrators can use RIS servers to deploy
all editions of Windows 2000, Windows XP Professional, and Windows Server
2003 (except Windows 2000 Datacenter Server and Windows Server 2003,
Datacenter Edition.) Automated deployment is enhanced with tighter security,
improved performance to major components in RIS — such as Trivial File
Transfer Protocol (TFTP) — and Hardware Abstraction Layer (HAL) filtering to
ensure that images are recognized only by machines with a compatible HAL.
User State Migration. Migrating files and settings for multiple users in a corporate
environment is easier with the User State Migration Tool (USMT). USMT gives
administrators command-line capabilities when they customize specific settings or
make unique modifications to Registry. In addition, Windows Server 2003
includes a Files and Settings Transfer Wizard designed for individuals or small-
office users. The wizard is also useful in a corporate network environment for
employees who receive a new computer and need to migrate their own files and
settings without the support of an IT department or help desk.
Windows Installer. Managing software applications in a corporate environment
has traditionally burdened organizations with high costs. With Windows Installer,
administrators can greatly simplify the process of customizing installations,
updating and upgrading applications, and resolving configuration problems.
Windows Installer can also manage shared resources, enforce consistent file
version rules, and diagnose and repair applications at run time.
To deliver an application to users or machines, you normally use the Group Policy Object
Editor MMC snap-in focused on the desired GPO. When you are ready to deliver a
specific application to users:
1. Place the installation package on the network share. Make sure that it is accessible
to the clients.
2. Start the Active Directory Users and Computers MMC snap-in, right-click the
name of the domain or OU of interest, and select the Properties command from
the context menu. Then go to the Group Policy tab, highlight the required GPO,
and click the Edit button.
3. The Group Policy Object Editor will launch, and it will be focused on the selected
GPO. Expand the console tree and locate the Software installation nodes both
under Computer Configuration | Software Settings and User Configuration |
Software Settings (Fig. 11.15
). The Software Installation feature allows you to
deliver applications to computers and users. For example, you can make
applications A and B available to computers within a given domain and make
applications C and D available to users within that domain. The effect of this setup
will be as follows: Applications A and B will be installed for all users who work
on computers subject to that GPO. Additionally, applications C and D will be
installed for all users subject to that GPO who logon at the same machine. The
example presented in Fig. 11.15
shows several applications published for domain
users.
Figure 11.15: Publishing several applications using the Group Policy Editor MMC
snap-in
4. Right-click the Software installation node under Computer Configuration |
Software Settings or User Configuration | Software Settings, depending on
whether you want to make the application available to computers or users within a
given domain or OU. From the right-click menu, select New | Package
commands. You will be prompted to specify the network path to the application's
distribution package.
Note The Software Installation feature supports a new package setup format called