Tài liệu The Spotlight Window phần 1 doc
Bạn đang xem bản rút gọn của tài liệu. Xem và tải ngay bản đầy đủ của tài liệu tại đây (31.89 KB, 6 trang )
3.2. The Spotlight Window
As you may have noticed, the Spotlight menu doesn't list every match on your hard drive.
Unless you own one of those extremely rare 60-inch Apple Skyscraper Displays, there
just isn't room.
Instead, Spotlight uses some fancy behind-the-scenes analysis to calculate and display the
20 most likely matches for what you typed. But at the top of the menu, you usually see
that there are many other possible matches; it says something like "Show All," meaning
that there are other candidates. (Mac OS X no longer tells you how many other results
there are.)
There is, however, a second, more powerful way into the Spotlight labyrinth. And that's
to use the Spotlight window, shown in Figure 3-2
.
3.2.1. Spotlight Window from Spotlight Menu
If the Spotlight menu—its Most Likely to Succeed list—doesn't include what you're
looking for, click Show All (or just press Return or Enter). You've just opened the
Spotlight window.
Now you have access to the complete list of matches, neatly listed in what appears to be a
standard Finder window.
3.2.2. Opening the Spotlight Window Directly
You can also open the Spotlight window directly, without using the Spotlight menu as a
trigger.
Actually, there are three ways to get to the Spotlight window (Figure 3-2
):
•
-F (for Find, get it?). When you choose File Find (or press -F), you
get an empty Spotlight window, ready to fill in for your search.
•
Option- -Space bar. This keystroke opens the same window. But instead of
starting empty and filling up, this window starts with a list of every single thing on
your Mac and winnows down as you type a search query.
Tip: You can change this keystroke to just about anything you like. See Section
3.3.1.
•
Open any desktop window, and type something into the Search box at upper-right.
Presto—the mild-mannered folder window turns into the Spotlight window,
complete with search results.
Once you type something to search for, the results are identical.
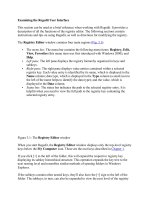
Figure 3-2. The Spotlight window either lists nothing (top)—or everything on your
hard drive (bottom), depending on how you open it. Either way, it's ready to search
your entire hard drive (except other people's Home folders). But Spotlight has many
tricks up its software sleeve.
3.2.3. The Basic Search
When the Spotlight window opens, you can start typing whatever you're looking for into
the Search box at the upper right.
As you type—or, more realistically, a second or two after you type each letter—the
window changes to reveal a list of the files and folders whose names contain what you
typed. It's just like the Spotlight menu, but in a window with no 20-item results limit
(Figure 3-2
, bottom).
While the searching is going on, a sprocket icon whirls away in the lower-right corner.
To cancel the search in progress, click the button next to the phrase you typed. That
button also clears the box so you can type a different word or phrase.
3.2.4. Power Searches
The real beauty of the Spotlight window, though, is that it can hunt down icons using
extremely specific criteria; it's much more powerful (and complex) than the Spotlight
menu. If you spent enough time setting up the search, you could use this feature to find a
document whose name begins with the letters Cro, is over one megabyte in size, was
created after 10/1/07 but before the end of the year, was changed within the last week,
has the file name suffix .doc, and contains the phrase "attitude adjustment." (Of course, if
you knew that much about a file, you'd probably know where it is without having to use
the Search window. But you get the picture.)
To use the Search window, you need to feed it two pieces of information: where you
want it to search, and what to look for. You can make both of these criteria as simple or
complex as you like.
3.2.5. Where to Look
The three phrases at the top of the window—This Mac,"Folder Name,"and Shared— are
buttons. Click one of these to tell Spotlight where to search:
•
This Mac means your entire computer, including secondary disks attached to it (or
installed inside).
•
"Letters to Congress"(or whatever the current window is) limits the search to
whatever window was open when you called up the Spotlight window. So, for
example, if you want to search your Pictures folder, open it first and then hit -
F. You'll see the "Pictures" button at the top of the window, and you can click it to
restrict the search to that folder.
Note: If no folder window is open when you press -F, this button says
"Casey" (or whatever); it identifies your Home folder. That is, Spotlight is
prepared to search all your stuff on this Mac.
Shared. Click this button to expand the search to your entire network and all the
computers on it. (This assumes, of course, that you've brought their icons to your
screen as described in Chapter 13
. If there aren't any shared folders or disks, this
button doesn't appear at all.)
If the other computers are Macs running Leopard, Spotlight can even search their files
just the way it does on your own Mac—finding words inside the files, for example. If
they're any other kind of computer, Spotlight can only search for files by name.
Tip: If the object of your quest doesn't show up, you can adjust the scope of the search
with one quick click on another button at the top of the window, like This Mac or Shared.
Spotlight updates the results list.
3.2.6. Search by Name/Search by Contents
The two other buttons at the top of the Spotlight window are also very powerful:
•
Contents. This button, the factory setting, works just the way Spotlight usually
does. It's prepared to search for the words inside your files, along with all the
metadata attached to them.
•
File Name. All of this searching-inside-files business is well and good. But there's
no denying that sometimes, you already know a file's name—you just don't know
where it is. In this case, it's far faster to search by name, just as people did before
Spotlight came along. The list of results will be far shorter, and you'll spot what
you want much faster. That's why this button is so welcome.
Tip: If you press Shift as you open the File menu (or as you press -F), the Find
command changes to Find by Name. It opens the Find window, preset to search for icons
by name. What a shortcut!
3.2.7. Complex Searches
If all you want to do is search your entire computer for files containing certain text, you
may as well use the Spotlight menu described at the beginning of this chapter.
Figure 3-3. By repeatedly clicking the + button, you can turn on as many criteria as
you'd like; each additional row further narrows the search.
The power of the Spotlight window, though, is that it lets you design much more specific
searches, using over 125 different search criteria: date modified, file size, the "last
opened" date, color label, copyright holder's name, shutter speed (of a digital photo),
tempo (of a music file), and so on. Figure 3-3
illustrates how detailed this kind of search
can be.
To set up a complex search like this, you'll use the second row of controls at the top of
the window.
And third, and fourth, and fifth. Each time you click one of the + buttons at the right end
of the window, a new criterion row appears, whose pop-up menus you can use to specify
what date, what file size, and so on. Figure 3-3
shows how you might build, for example,
a search for all photo files that you've opened within the last week that contain a
Photoshop layer named Freckle Removal.
To delete a row, click the – button at its right end.
Tip: If you press Option, the + button changes into a … button. When you click it, you
get sub-rows of parameters for a single criterion. And a pop-up menu that says Any, All,
or None appears at the top, so that you can build what are called exclusionary
searches.The idea here is that you can set up a search for documents created between
November 1 and 7 or documents created November 10 through 14. Or files named
Complaint that are also either Word or InDesign files.The mind boggles.
Here's a rundown of the ways you can restrict your search, according to the options you
find in the first pop-up menu of a row. Note that after you choose from that first pop-up
menu (Last Opened, for example), you're supposed to use the additional pop-up menus to
narrow the choice ("within last," "2," and "weeks," for example), as you'll read below.
Note: It may surprise you that choosing something from the Kind pop-up menu triggers
the search instantly. As soon as you choose Applications, for example, the window fills
with a list of every program on your hard drive. Want a quick list of every folder on your
entire machine? Choose Folders. (Want to see which folders you've opened in the last
couple of days? Add another row.)If you also type something into the Search box at the
very top of the window—before or after you've used one of these pop-up menus—the list
pares itself down to items that match what you've typed.
3.2.7.1. Kind
When the first pop-up menu says Kind, you can use the second pop-up menu to indicate
what kind of file you're looking for: Applications, Documents, Folders, Images, Movies,
Music, PDF files, Presentations, Text files, or Other.
For example, when you're trying to free up some space on your drive, you could round up
all your movie files, which tend to be huge. Choosing one of these file types makes the
window begin to fill with matches automatically and instantly.
And what if the item you're looking for isn't among the nine canned choices in the second
pop-up menu? What if it's an alias, or a Photoshop plug-in, or some other type?