Tài liệu 2D Artwork and 3D Modeling for Game Artists- P4 doc
Bạn đang xem bản rút gọn của tài liệu. Xem và tải ngay bản đầy đủ của tài liệu tại đây (3.43 MB, 50 trang )
24. Click Unfold in the Automatic section of the Command Panel to lay the
selected area out flat, as in Figure 5.29.
124
5.
U-V Mapping the RF-9 Plasma Gun with DeepUV
Figure 5.27 Scale
the trigger selection
down to size and
move it next to the
grip’s faces.
Scale and move
Figure 5.28 Select
the curved notch in
the back side of the
grip.
TEAMFLY
Team-Fly
®
Please purchase PDF Split-Merge on www.verypdf.com to remove this watermark.
25. Rotate the RF-9 so you can see the front of the grip.
26. Repeat steps 23 and 24 for the notch in the front, just behind the trigger
(see Figure 5.30).
125
Mapping the RF-9
Figure 5.29 Click
the Unfold button
under Automatic in
the Command Panel
to group and flatten
the notch area.
Automatic: Unfold
Figure 5.30 Scale
and position the
curve selection, and
do the same for the
front of the grip.
Please purchase PDF Split-Merge on www.verypdf.com to remove this watermark.
27. Using any of the selection tools, select the remaining bits and pieces all at
once, and pack, scale, and move them over to the rest of the grip and trigger
group (see Figure 5.31). These pieces represent texturing detail so minute
that you don’t need to do much except apply a general painting later on, so
don’t bother trying to organize them (unless you really want to).
126
5.
U-V Mapping the RF-9 Plasma Gun with DeepUV
Figure 5.31 Select
the remaining pieces,
and pack, scale, and
move them to the
rest of the group.
Pack, scale, and move
Sharing U-V Space
Notice that the two halves of the grip are nearly, if not perfectly, iden-
tical. In such cases, if any texture coordinates cross or overlap each
other, the texture at that point on the texture map will duplicate (or
smear, if the points are crossed) itself on the 3D model once the tex-
ture is applied.This is known as sharing U-V space. In the case of iden-
tical coordinate sections, like the sides of the grip, you could flip one
side to match the other, and then place one exactly on top of the
other.That way, you only have to texture one side, and the texture
would be placed onto both. Although this will save space on your tex-
ture map, I’d rather have a model that has unique texture on all sides.
Please purchase PDF Split-Merge on www.verypdf.com to remove this watermark.
That concludes the unwrapping of the grip
and trigger! No doubt you’re freaking out
about now due to all the steps required to
unwrap such as small area. Most of the U-V
mapping from here on out involves the same
repetitive stuff, but you’ll get the hang of it in
no time.
Step 2: Unwrap
the Rear Hoop
It’s time to unfold the top hoop at the back of the barrel. Because this is one of
those goofy shapes that’s one solid piece, I’d like to keep the U-V map for it
together. The problem is, because DeepUV
doesn’t come with a torus-style unwrapping
technique, you’ll need to split the hoop
into two parts, flatten the sections, and then
re-attach them. Here’s how:
1. Pan and zoom over to the rear hoop.
2. Use any one of the selection tools to
select all points of the hoop (make
sure the Back Faces option is
checked), up to and including where
the hoop meets the barrel.
3. Using the Rotate tool, rotate around
the model, selecting/deselecting
points until you’re satisfied.
4. Click Cut in the Tools section of the
Command Panel, then drag the red
clump away from the rest at the top-
left corner of the texture map (see
Figure 5.32).
127
Mapping the RF-9
NOTE
In case you’re having trouble,
I’ve saved each of the steps as
individual .rh3 files in the
Chapter 5 Data section on
the CD-ROM.
TIP
Before you unwrap the rear hoop,
remember to save your work.
Clicking File, Save, doesn’t do the
trick if the program bails for any rea-
son; instead, click File, Save As, and
overwrite your previous .rh3 file.
Make sure you save it to this format
so all information is retained!
NOTE
Even though it’s most efficient to have
both 3D Studio Max and DeepUV
open at the same time, both of these
programs are memory hogs. If you’re
running low on space, try shutting
down all other programs. Otherwise,
you can always manually fetch the
updated U-V coordinates later, but
only if you’ve saved your .rh3 file!
Please purchase PDF Split-Merge on www.verypdf.com to remove this watermark.
5. There are two ways to map this
selection: Interactive: Planar and
Automatic: Planar 2. For the
sake of expediency, let’s use the
Automatic: Planar 2 method. To
do so, click Planar 2 in the
Automatic section. You should
end up with a side view of the
selection, as in Figure 5.33.
6. Select only one half of the hoop,
and cut it away from the other
half. To do so, start by right-
clicking on the RF-9 in the 3D
viewport, and selecting View,
Right (or whatever view will produce a perpendicular view to the hoop).
7. Pan and zoom over to the hoop.
8. Click the Rectangular Selection tool, and uncheck the Back Faces option at
the very top of the screen. This enables you to grab only those points that
are visible in the viewport.
9. Drag a rectangle around the entire hoop, thereby selecting one half of the
hoop (see Figure 5.34).
128
5.
U-V Mapping the RF-9 Plasma Gun with DeepUV
Figure 5.32 Select
all points of the rear
hoop, click Cut, and
drag the cluster to
the center of the tex-
ture map.
Cut hoop
from group
NOTE
When you map interactively, you per-
form the operation manually.The
great thing about interactive mapping
is that you can manually specify the
way DeepUV uses the selected tech-
nique when viewing the U-Vs.The
Interactive mapping options, like their
Automatic counterparts, are located in
the Command Panel, but may be col-
lapsed; just click the + sign in the sec-
tion’s top-left corner to view them.
Please purchase PDF Split-Merge on www.verypdf.com to remove this watermark.
10. In selecting the hoop, you may have grabbed points on the barrel, which will
show up as a tiny red dot in the tiny blue cluster in the top-left portion of the
texture map. To deselect them, hold down the Alt key and apply any of the
selection tools to that area.
11. Notice that the hoop in the texture map is now red and blue, indicating that
half of the points have been selected. Click Cut in the Command Panel to
separate them from the other side of the hoop.
12. Using the Move tool, drag one half away from the other (see Figure 5.35).
129
Mapping the RF-9
Figure 5.33 Select
Automatic: Planar 2
to start mapping the
hoop.
The Planar 2 button
Figure 5.34 View
the RF-9 from the
right and use the
Rectangular Selection
tool with Back Faces
unchecked to select
one half of the
hoop’s points.
Uncheck
Deselect
Please purchase PDF Split-Merge on www.verypdf.com to remove this watermark.
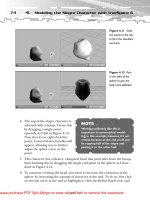
13. The two halves of the hoop are the
U-Vs as viewed by DeepUV straight
on from the right, in a planar fash-
ion, but they are not relaxed—that
is, the halves are not taking on
their natural volumetric form as
they would in 3D space. To see
what I mean, with all points of only
one half selected, click Relax in the
Tools section of the Command
Panel. In a few seconds you’ll see
DeepUV gently relax the points so
they even out.
14. Repeat step 13 for the other half (see Figure 5.36).
15. Next, join the two halves to create a single, 2D map representing the hoop.
To begin, with the top half selected, choose Edit, Transform, Flip Horizontal.
This flips the back portion of the hoop, so it faces toward you.
16. Position both halves as I have in Figure 5.37. You want to join the outer
edges of both halves, because these represent the top of the hoop.
17. Use the Lasso tool to select the points at the joined edges of both halves.
130
5.
U-V Mapping the RF-9 Plasma Gun with DeepUV
Figure 5.35
Deselect any bogus
points, excise half of
the hoop from the
other half, and move
it away.
Cut half and move
NOTE
Relaxing the points at this time is
not required; I just wanted you to
see the Relax feature in action.
Relaxing is a way to get your U-V
mapped portions to rest naturally
on the texture map.That way, when
it comes time to actually texture,
the bitmap won’t distort or smear
when applied to the model.
Please purchase PDF Split-Merge on www.verypdf.com to remove this watermark.
18. Here’s the cool part: With the edge points selected, click Join in the Tools
section. Because the selected points actually neighbor/belong to each other,
DeepUV will allow them to re-join each other, just as they were joined before
you cut the one half away from the other. Figure 5.38 shows the halves joined
as one.
131
Mapping the RF-9
Figure 5.36
Choose Relax for each
half so the points
spread themselves
proportionately.
Figure 5.37
Select the outer points of
each half.These points
represent the top of the
hoop.
Please purchase PDF Split-Merge on www.verypdf.com to remove this watermark.
19. Select the entire hoop in the texture map area, and once again click Relax.
This will relax all the points naturally, and you should end up with a nicely
unfolded hoop as shown in Figure 5.39.
20. That’s it for the hoop; scale it down and move it aside. (Just try to keep track
of where things are so you know what’s what when you arrange your texture
map at the end!)
132
5.
U-V Mapping the RF-9 Plasma Gun with DeepUV
Figure 5.38 Click Join
in the Tools section to join
the two halves together.
The Join button
Figure 5.39
Select all of the
hoop’s points and
click Relax.
The Relax button
Please purchase PDF Split-Merge on www.verypdf.com to remove this watermark.
Step 3: Unwrap the Barrel
The barrel is the long shaft that connects the front muzzle to the grip and back
hoop. Normally, for a shape like this, you could use Interactive: Cylinder mapping
to quickly unwrap the thing, but I’d rather iso-
late and unfold the back and bottom first,
because they will get separate texture detail,
before unfolding the rest of the barrel.
1. Select the Rectangular Selection tool,
and check the Back Faces option to
select it so you can see all points of the
barrel.
2. In the 3D window, switch to a side view of
the RF-9 so you can see it perpendicularly.
3. Create a rectangular selection around the entire barrel.
4. Chances are, your selection includes points from the grip and rear hoop
(and muzzle, but hold off on that a second). Deselect them by dragging
around them while holding down the Alt key, as I have done in Figure 5.40.
133
Mapping the RF-9
Seams
Now is a good time to quickly explain seams.When you paint the textures
on your completed texture map, the U-Vs as laid out will correspond to
locations on your 3D model. In the previous example, the hoop’s halves
were joined at the top halves, and not the bottom halves.That way, when
DeepUV relaxed them and the whole thing became flat, the outer edges
represented the seam, underneath the hoop.You could just as well have
joined the halves together using the bottom points, but that would leave a
noticeable seam at the top half. It’s better, if you have the option, to re-join
halves in a way that puts the seam in a location that’s difficult to see, if not
totally invisible, to the players in the video game.
TIP
Remember, before you unwrap
the barrel, save your work by
clicking File, Save As, and over-
writing your previous .rh3 file.
Please purchase PDF Split-Merge on www.verypdf.com to remove this watermark.
5. Zoom into the model and deselect any other bogus points that are part of
the muzzle (remember, press and hold the Alt key as you click to deselect, or
press and hold the Shift key as you click to add to your selection). Be sure to
rotate the model around and zoom in close so you don’t miss anything.
6. When you’re satisfied with your barrel’s selection, click Cut to separate it
from the rest of the weapon.
7. Use the Move tool to drag the red clump that represents the barrel’s U-V
coordinates away from the small blue dot at the top-left of the texture map.
8. In the Right view, zoom in on the back of the barrel.
9. Using the Rectangular Selection tool, select the back end of the barrel.
10. Deselect any points of the grip or top hoop that you may have inadvertently
selected.
11. When satisfied with your back selection, click Cut (see Figure 5.41).
12. The back end can be planarly mapped, but the Automatic: Planar 1 and
Planar 2 options won’t know to project the planar mapping toward the rear
of the gun. For this reason, you’ll need to map the back end interactively. To
begin, expand the Interactive section and click the Plane button.
134
5.
U-V Mapping the RF-9 Plasma Gun with DeepUV
Figure 5.40 Select
all points of the bar-
rel in the Front view,
and then deselect the
points in the grip and
trigger group.
Deselect these
TEAMFLY
Team-Fly
®
Please purchase PDF Split-Merge on www.verypdf.com to remove this watermark.
13. You’ll see three gizmos float along the X, Y, and Z, axes of the gun; these
allow you to manually rotate the projection to your liking. Because the rear
face of the gun is along the Z axis, however, all you need to do is tell it to
look along that axis. To do so, click the Selection button under Centering in
the Command Panel.
14. Pull down the Align axis drop-down
list and select +Z (see Figure 5.42).
You should end up with a nice planar
mapping of the back end along the
positive Z axis.
15. Relax, scale, and move the newly
unfolded rear face away from the tex-
ture map.
16. The rest of the barrel is now essen-
tially a hollow tube with no end
caps—or, more precisely, a cylinder.
To map it, click the Cylinder button in
the Interactive section of the Command Panel.
135
Mapping the RF-9
Figure 5.41 Cut
the barrel selection
away from the rest of
the gun; select the
back end and cut it
away too.
Cut and move
barrel group
NOTE
If your model’s axial orientation is
different from mine, you may need
to align your mapping techniques
along axes other than those I’ve
specified. For this reason, if I tell you
to align the axis on a particular
coordinate, such as −X, you may
need to experiment with other axes,
such as +Z, to get the same results.
Please purchase PDF Split-Merge on www.verypdf.com to remove this watermark.
17. Click the Selection button under Centering to tell DeepUV to center its
analysis on the selection.
18. Pull down the Align axis drop-down list and select +Z to tell DeepUV to per-
form the cylindrical projection along the positive Z axis. You should end up
with a nicely unwrapped barrel, as in Figure 5.43.
19. The barrel has unwrapped itself wonderfully. Thinking ahead, however, I’d
like to texture this weapon such that both sides of the barrel are attached to
136
5.
U-V Mapping the RF-9 Plasma Gun with DeepUV
Figure 5.42 Apply
Interactive: Plane
mapping along the
positive Z axis to the
rear face of the RF-9.
The Plane
button
The Selection
button
Figure 5.43 Apply
Interactive: Cylinder
mapping along the
positive Z axis to the
rest of the barrel.
The Cylinder
button
Please purchase PDF Split-Merge on www.verypdf.com to remove this watermark.
either side of its top, leaving the
bottom portion dangling off to one
side. You can accomplish this by
clicking and dragging the Y axis’s
control handle (the green dot with
two arrows encircling it in the 3D
model) to rotate the projection
along the Z axis. As you’re drag-
ging, look to the left of the screen
at the unwrapped barrel; you
should see the map slowly shift.
Stop when the bottom portion
of the gun is all the way to one side
(see Figure 5.44).
20. Scale and move your unwrapped bar-
rel away from the texture map.
137
Mapping the RF-9
NOTE
The Y-axis control rotates itself
perpendicularly to the Z axis,
which is why you’re rotating that
one instead of the other two. If you
were to rotate the Z-axis control,
all hell would break loose and your
mapping would be ruined.
Figure 5.44
Rotate the Y-axis
gizmo so that the
bottom face of the
barrel is positioned
on the outside of the
barrel’s U-V map.
Click and drag
to reorient the
seams
TIP
If you’re scaling this stuff using
the Free Transform method,
make sure to hold down Ctrl
during the scaling.That way it
will scale proportionally without
distorting the mapping.
Please purchase PDF Split-Merge on www.verypdf.com to remove this watermark.
Step 4: Unwrap the
Front Hoop and Hose
The front hoop and hose are just two bent cylinders, like the rear hoop; you can
isolate and unfold them in the same manner. (I’ll walk you through this one
quickly since you already know how to do it.)
1. Create a rectangular selection
around the top hoop (be sure the
Back Faces option is checked).
2. Deselect any bogus points not
belonging to the hoop.
3. Choose the Cut button in the
Command Panel’s Tools section.
4. Move the red dot away from the group at the upper-left of the texture map.
5. You’ll need a planar view of the hoop from the side; I clicked the Planar 2
button in the Automatic section of the Command Panel (see Figure 5.45).
6. There will be shared points that bridge both ends of the hoop; these belong
to the top of the muzzle. Carefully select the points on both ends and cut
them away.
7. Move the excised points to the top-left portion of the map so you can reas-
sign them with the rest of the muzzle in the next section (see Figure 5.46).
138
5.
U-V Mapping the RF-9 Plasma Gun with DeepUV
TIP
Before you unwrap the front hoop
and hose, save your work by click-
ing File, Save As, and overwriting
your previous .rh3 file.
Figure 5.45
Select the top hoop,
cut it away, and
choose Automatic:
Planar 2 as a
mapping technique.
Please purchase PDF Split-Merge on www.verypdf.com to remove this watermark.
8. Click the Rectangular Selection tool.
9. Uncheck the Back Faces.
10. Select half of the hoop in a perpendicular 3D view, just as you did with the
back hoop.
11. Cut the hoop in half, moving one half of it away from the other.
12. Relax both halves of the hoop (see Figure 5.47).
139
Mapping the RF-9
Figure 5.46
Select and cut away
the bogus points
belonging to the top
of the muzzle.
Figure 5.47 Select
half of the hoop in a
perpendicular 3D
view, cut it away, and
relax it. Relax the
other side as well.
Please purchase PDF Split-Merge on www.verypdf.com to remove this watermark.
13. Click Edit, Transform, Flip Vertically to flip one side of the hoop upside
down so you can get the edges to meet.
14. Using the Lasso tool, select the edge points of both sides, and click Join.
15. Select the entire hoop and click Relax (see Figure 5.48).
16. Repeat the steps in this section to unwrap the hose.
Step 5: Unwrap the Muzzle
The remaining, unmapped points all clumped together at the top-left of the tex-
ture map represent the muzzle. This is the most difficult portion of the RF-9 to
unwrap, because it’s awkwardly shaped and
has an inner area representing the plasma
chamber. After you’ve removed and
mapped the front portion, however, the
remaining part of the muzzle is somewhat
cylindrical, which dictates what type of map-
ping technique you’ll use.
1. Select the clump that represents the
muzzle, along with those stray points from the top of the muzzle.
2. Move the selection to the center of the texture map and click Join. This will
re-join all those stray points of the muzzle.
3. Click the Plane button in the Interactive section of the Command Panel.
4. Click Selection to center the mapping on the selection.
5. Pull down the Align axis drop-down list and select −X to have the projection
aim at the muzzle from the side, or X axis. (I selected −X instead of +X to
flip the muzzle upside down, as shown in Figure 5.49.)
140
5.
U-V Mapping the RF-9 Plasma Gun with DeepUV
Figure 5.48 Select
the edge points of
each side, join them,
and then relax the
entire structure.
TIP
Before you unwrap the front
hoop and hose, save your work by
clicking File, Save As, and over-
writing your previous .rh3 file.
Please purchase PDF Split-Merge on www.verypdf.com to remove this watermark.
6. Before you unwrap the muzzle like a cylinder, let’s remove the front face so it
can be textured separately. Zoom in on the front points, select them, and
click Cut.
7. Apply Automatic: Planar 1 mapping to the excised points. You should end up
with the front face of the muzzle.
8. Click Relax to put the muzzle’s face in its natural form, scale it, and move it
away from the map (see Figure 5.50).
9. The cone inside of the muzzle is next. Zoom in close to the single point that
makes the tip of the cone and select it.
10. The point fades from red to blue as it shoots out toward the end of the muz-
zle; this gives you a good indication as to what points to select at the front.
11. With the inner cone’s points selected, click the Cut button.
12. Apply an Automatic: Planar–style mapping to the inner cone (see Figure
5.51). It won’t be necessary to relax this cone section, since it represents the
inside of the weapon and will get textured mostly with black color anyway.
13. Select the rest of the muzzle.
141
Mapping the RF-9
Figure 5.49
Select the remaining,
unmapped points of
the muzzle and
apply Interactive:
Plane mapping along
the X axis.
Please purchase PDF Split-Merge on www.verypdf.com to remove this watermark.
14. Click the Cylinder button in the Interactive section of the Command Panel,
and center the mapping on the selection.
142
5.
U-V Mapping the RF-9 Plasma Gun with DeepUV
Figure 5.50
Select the front
points of the muzzle
and cut them away.
Then, choose
Automatic: Planar 1
to map the front face
flat.
Figure 5.51 Select
and cut away the
inner cone of the
muzzle, and apply an
Automatic: Planar
mapping to it.
Please purchase PDF Split-Merge on www.verypdf.com to remove this watermark.
15. I’d like to use the seam instead of hiding it this time, so let’s put it on top
(that is, the outer edges of the mapping should represent the top of the
gun). To make the top of the muzzle visible, pull down the Align axis drop-
down list and select −Z (because you’re looking at the z-axis underneath).
16. You may need to roll the cylindrical mapping over so that the bottom of the
muzzle is in the center of the flattened map. To do so, click and drag one of
the gizmos that’s aligned with the long axis of the barrel (mine’s the green Y-
axis gizmo) in the 3D view. You should end up with a map that looks like the
one in Figure 5.52.
17. That’s it! Now, just relax the muzzle selection and move it out of the way.
Step 6:
Pack the Map
Now it’s time to arrange all of the unfolded
pieces of the RF-9 into the gray square (this
square, remember, represents the actual tex-
ture map you’ll be painting later on). The
tough part is getting everything to fit within
the area! You can do this one of two ways:
either let DeepUV automatically pack them in for you (which I don’t recommend,
because it might not arrange things to your liking) or do it yourself.
143
Mapping the RF-9
Figure 5.52
Map the rest of the
muzzle with
Interactive: Cylinder
mapping. Align the
projection so that the
seam is on the top of
the gun.
The Cylinder button
Drag to rotate seam
TIP
Of course, you should save your
work by clicking File, Save As,
and overwriting your previous
.rh3 file before you pack the
map into the texture-map area!
Please purchase PDF Split-Merge on www.verypdf.com to remove this watermark.