Tài liệu 2D Artwork and 3D Modeling for Game Artists- P6 docx
Bạn đang xem bản rút gọn của tài liệu. Xem và tải ngay bản đầy đủ của tài liệu tại đây (3.21 MB, 50 trang )
224
8.
Inorganic Texture Tutorials with Photoshop
Bevel and Emboss
Inner Bevel
Chisel Hard
50%
Down
5 pixels
5 pixels
AM
FL
Y
Style:
Style:
Technique:
Depth:
Direction:
Size:
Soften:
TE
Now the texture is ready for finalization for your game’s level. Reduce the image to
256 × 256 pixels, set it as a pattern, and fill a large blank canvas with it. The end
result is a nice, even texture that has a more realistic look to it. In Figure 8.42, I
made a simple room with a long wall and slapped this texture on it. The wall is 512
pixels high by 2048 pixels wide.
Figure 8.42 The
finalized texture tiled
on the wall of a simple room.
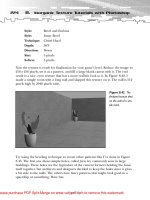
Try using the beveling technique to create other patterns like I’ve done in Figure
8.43. The first one shows simple holes, called form ties, commonly seen in large
buildings. These holes are the byproduct of the cement formers holding the form
itself together, but architects and designers decided to keep the holes since it gives
a bit style to the walls. The others have fancy patterns that might look good in a
spaceship or something. Have fun.
®
Team-Fly to remove this watermark.
Please purchase PDF Split-Merge on www.verypdf.com
Cement Textures
225
Figure 8.43
Other bevel patterns
I created that look
interesting when
properly placed.
Creating Randomly Tileable Sets
Many game engines allow you to create and import a sequence of textures that the
game will randomly tile on the wall, floor, or whatever object of your choice. This
can greatly improve upon the monotony of a wall that has the same texture tiled all
over it, as well as speeding up the process of skinning large walls at the same time.
For instance, if you applied the texture from Figure 8.38 onto a large wall and
stood back to view it entirely, you’d easily notice that it is a single tileable texture
repeated in all directions (see Figure 8.44). To avoid this, you can create a randomly tileable set of textures (typically somewhere from four to 10), each of which
is just a bit different but seamlessly blends with any of the others in any direction.
Figure 8.44
A single tileable
texture is noticeable
when viewed from a
distance.
Noticeable
repetition
Please purchase PDF Split-Merge on www.verypdf.com to remove this watermark.
8.
226
Inorganic Texture Tutorials with Photoshop
Making a randomly tileable set can be easy or difficult, depending on what type of
texture you’re dealing with. In the case of Figure 8.38, slightly modifying the inner
portion of the image, and then saving it as another filename is easy enough. The
set could then appear as in Figure 8.45, in which each image is similar to and
tileable with the others. To instigate the set, all you have to do is follow whatever
level editor’s proper nomenclature to indicate that it is in fact a randomly tileable
set. For example, in the case of Half-Life, simply start each texture’s name with a
– sign, followed by a sequence number starting with 0, and then the name, like so:
–0
–1
–2
–3
cementwall.bmp
cementwall.bmp
cementwall.bmp
cementwall.bmp
Figure 8.45
A randomly tileable
set of textures
applied to a wall is
more realistic than
using a single texture.
Creating Seamlessly Tileable
Cement from an Image
Using digital images of real-world items to create textures of those items for your
game is usually the way to go if you’re trying to make your environment realistic.
There are, however, advantages to making textures completely from scratch. For
one, you have complete control of the texture’s constitution—that is, the texture
will be thoroughly uniform, the lighting will be the way you want it, and so on.
Please purchase PDF Split-Merge on www.verypdf.com to remove this watermark.
Cement Textures
227
When you take a picture of something in the real world, however, you have to work
around your environment. Maybe the sun wasn’t splashing evenly on your brick
wall, and you got weird shadows all over the place. Or maybe the flash from your
camera made a lovely but unwanted halo smack in the middle of the stop sign you
were snapping. The point is, there are ups and downs to both ways of accomplishing texture creation, which is why I’m trying to show you both.
For this section, I used a digital image (cement_pic.jpg on the CD-ROM) of an area
of cement that had a bit of personality, thinking it might look nice when adjusted
and offset for tiling:
1. Isolate an area that seems relatively uniform (I’m eyeballing an
area in the upper-right portion of
the image).
2. Select the Rectangular Marquee
tool and set its options to Style:
Fixed Size with a selection size of
128 × 128 pixels.
3. Select a portion that you think
might tile smoothly and evenly,
copy the selection, and paste it
into a new document (see Figure
8.46).
TIP
A quick trick to finding areas of an
image that are somewhat balanced
(that is, finding a norm that has few
highlights or shadows) is to use
levels (Ctrl+L) in Photoshop. In the
Levels dialog box, just slide the
Midtones slider all the way to the
right; the nasty areas will either be
brightly highlighted or darkly shadowed.Then click the dialog box’s
Cancel button and pick an area that
seems to be in between those areas.
Figure 8.46
Isolate a homogenous
area of cement of
the cement_pic.jpg
image.
Please purchase PDF Split-Merge on www.verypdf.com to remove this watermark.
228
8.
Inorganic Texture Tutorials with Photoshop
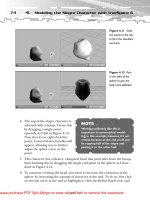
4. The texture (and the original image) is very hazy and bright, and should be
adjusted before you continue. Press Ctrl+L to open the Levels dialog box,
and slide the Midtones slider to the right a bit, and click OK. Now it looks a
bit more like cement (see Figure 8.47).
Figure 8.47
Adjust the midtones
of the image with
the Levels dialog box.
5. Set the texture as a pattern and fill a blank image with it to see how it looks.
Even without the Offset filter applied, it looks pretty good! Still, it’s a good
idea to offset it to make sure the colors blend smoothly. Click Filter, Other,
Offset, and enter one-half the amount of the length and width of the image
(64 × 64 pixels).
6. Use the Clone Stamp tool to copy homogenous areas of the texture over any
internal seams, areas that contain blemishes, or other items that stand out.
(As you make adjustments, preview your work by making it a pattern again
and again and filling a large canvas with it.) Figure 8.48 shows a before and
after of this step.
Figure 8.48 Offset
the texture and use
the Clone Stamp tool
to get rid of things
that stand out.
Please purchase PDF Split-Merge on www.verypdf.com to remove this watermark.
Rock and Stone Textures
229
Now you have a good tileable base texture of cement to work with. Try adding
bevel effects and whatnot, and creating tileable sets to add to your collection. Also
try making a cinderblock pattern using the brick technique you practiced at the
beginning of this chapter.
TIP
It’s good to know the makeup of real-world materials when building
your textures. For example, when making formed cement walls,
engineers don’t just take a batch of plain, smooth cement and pour
it into a form to make the wall block. If they did, the mildest of
vibrations or pressure over time would cause the cement to
become very unstable or even break apart. Instead, they mix the
cement with cracked stones and put a thick grid of ribbed steel
rods, called rebar (reinforcement bar), into the center of the
cement formers.That means that if you decide to make a cement
wall that has been blasted away in one area by, say, a 50mm shell,
you’ll want keep in mind that in the real world, cement walls contain stone and rebar, and render them accordingly.
Rock and Stone Textures
Creating stone textures from scratch is a little more complicated, but it opens up a
world of fun with alpha-channel bump mapping. The most difficult part, I think, is
making them seamless, especially when dealing with pictures.
Mineral Rock
Let’s start off with a basic rock-base tutorial that you can use for almost any type of
rock on any planet—just try changing the foreground and background colors for
different results.
1. Start a new 512 × 512-pixel RGB image.
2. Select any foreground and background you want; this will be the mineral
representation in the rock. I typically use earthy colors that involve some sort
of reddish-brown, like hex# 751C00 and hex# 4C2901.
Please purchase PDF Split-Merge on www.verypdf.com to remove this watermark.
230
8.
Inorganic Texture Tutorials with Photoshop
3. Choose Filter, Render, Clouds; the results are shown in Figure 8.49.
Figure 8.49
Apply the Clouds
filter with an earthcolored foreground
and background.
Filter:
Foreground:
Background:
Render, Clouds
hex# 751C00
hex# 4C2901
4. Using the Channels palette, start a new channel.
5. Choose Filter, Render, Difference Clouds, and then press Ctrl+F a few times
to repeat this action. Do this until the black and white mix is somewhat even
(see Figure 8.50). This will be your displacement map when you render the
mineral layer—that is, the whiter areas will represent the high spots on the
texture, while the blacker areas will represent the low spots.
Figure 8.50 Start
a new channel and
apply the Difference
Clouds filter several
times.
Please purchase PDF Split-Merge on www.verypdf.com to remove this watermark.
Rock and Stone Textures
231
6. In the Layers palette, click on the background layer to make it is the current
working selection.
7. Click Filter, Render, Lighting Effects, and
adjust the settings as I have in Figure 8.51
(make sure the directional light is positioned
as mine is). Also, make sure Alpha 1 is
selected in the Texture Channel list—this is
the black and white alpha channel you just
made, which this filter will use as a displacement map.
TIP
Later on, try playing around
with all the sliders to produce an enormous variety of
effects, from making the texture rock-like, to bubbly plastic, to lizard skin.
Figure 8.51 Click
the Lighting Effects
filter and use the
Alpha 1 channel as a
displacement map.
8. Click OK; Figure 8.52 shows the results. Try going back and forth between
this new texture and the Alpha 1 displacement channel in the Channels
palette to see how the map was used to create all the bumps and valleys. You’ll
use maps like this when making 3D terrain meshes later on in this part.
Figure 8.52 The
resulting rock texture,
post Lighting Effects.
Please purchase PDF Split-Merge on www.verypdf.com to remove this watermark.
232
8.
Inorganic Texture Tutorials with Photoshop
9. Before you offset the image for tiling and use the Clone Stamp tool to get rid
of the internal seams, I want you to see the power of the Alpha displacement
channel in a bit more depth. Press Ctrl+Z to undo the Lighting Effects filter,
and go back to the Channels palette. Click on the Alpha 1 channel to select it.
10. Let’s tighten up the channel a bit to further enhance the ridges and valleys.
Click Image, Adjust, Levels (Ctrl+L), and slide the Midtones and Highlights
markers over to the left a little. This will enhance and sharpen the white
areas and subsequently will make the resulting texture much more mountainous (see Figure 8.53).
Figure 8.53 Adjust
the levels of the
alpha channel to
enhance the white
areas.
11. Select the background layer in the Layers palette, and apply the Lighting
Effects filter as you did in step 7. Figure 8.54 shows the updated results with
respect to the new alpha map.
Figure 8.54 Apply
the Lighting Effects
filter once more using
the new Alpha 1
map.
Please purchase PDF Split-Merge on www.verypdf.com to remove this watermark.
Rock and Stone Textures
233
These textures aren’t the best for making walls and whatnot, but work well when
wrapped around boulders and such. For more on U-V mapping and skinning
objects, see Part II, “Unwrapping the U-Vs With DeepUV,” and Chapters 11 and 12,
where I show you how to create skin textures for a weapon and character model.
Granite
This texture uses the same displacement technique as the last, only you’ll apply a
few other filters to bring out the quartz-like sparkles you see in granite.
1. Start a new 512×512-pixel RGB image. (These dimensions aren’t cast in
stone, no pun intended. It’s just convenient to start things off big, square,
and divisible by 16.)
2. Fill the canvas with black, or near-black.
3. Press D, and then press X. This sets the foreground to white and the background to black.
4. Choose Filter, Pixelate, Pointillize. Set the Cell Size to 6 and click OK (see
Figure 8.55). This provides that quartz-type look to the texture.
Figure 8.55 Fill
the canvas with
black, then apply the
Pointillize filter.
5. Create a new channel in the Channels palette.
Please purchase PDF Split-Merge on www.verypdf.com to remove this watermark.
8.
Inorganic Texture Tutorials with Photoshop
6. Choose Filter, Render, Difference Clouds a few times. Enhance the midtones
and highlights by adjusting their levels (Ctrl+L) a bit to the left (see Figure
8.56).
AM
FL
Y
Figure 8.56 Apply
the Difference Clouds
filter to a new Alpha
channel, then adjust
the levels.
TE
234
7. To the Alpha channel, apply Filter, Texture, Grain. This blotches up the displacement map (see Figure 8.57).
Figure 8.57 Apply
the Grain filter to the
Alpha channel.
Filter:
Intensity:
Contrast:
Grain Type:
Texture, Grain
25
50
Clumped
®
Team-Fly to remove this watermark.
Please purchase PDF Split-Merge on www.verypdf.com
Rock and Stone Textures
235
8. In the Layers palette, click on the background layer to select it (alternatively,
remain in the Channels palette and click on the RGB channel—this will do
the same thing).
9. Click Filter, Render, Lighting Effects, making sure Alpha 1 is selected in the
Texture Channel list (see Figure 8.58). My settings are attached to the image;
try playing around to get different effects. I also cranked down the height of
the map to make the rock smoother.
Figure 8.58 Apply
the Lighting Effects
filter to the background layer, using
the Alpha 1 map for
displacement.
Filter:
Light Type:
Intensity:
Focus:
Gloss:
Material:
Exposure:
Ambience:
Texture Channel:
Height:
Render, Lighting Effects
Directional
35
69
−25
0
0
−18
Alpha 1
35
I think granite has a gazillion variations, and is usually more black and white, but
this could suffice. Try doing a final levels adjustment to enhance the texture.
Please purchase PDF Split-Merge on www.verypdf.com to remove this watermark.
236
8.
Inorganic Texture Tutorials with Photoshop
Sandstone
Here’s an easy one that makes a great base for a raised pattern:
1. Start a new 512×512 RGB image.
2. Set the foreground color to a light yellow-orange, like hex# EBC459, and fill
the canvas with it.
3. Choose Filter, Noise, Add Noise (see Figure 8.59).
Figure 8.59 Fill
the canvas with an
off-yellow and apply
the Noise filter.
Filter:
Amount:
Distribution:
Monochromatic:
Noise, Add Noise
5%
Gaussian
(checked)
4. Start a new channel in the Channels palette.
5. Choose Filter, Render, Difference Clouds, and repeat a few times (see Figure
8.60).
Figure 8.60 In a
new Alpha channel,
apply the Difference
Clouds filter a few
times.
Please purchase PDF Split-Merge on www.verypdf.com to remove this watermark.
Rock and Stone Textures
6. Choose Filter, Blur, Gaussian Blur to decrease the map’s displacement
strength.
7. Apply the Noise filter with the same settings as before (see Figure 8.61).
Figure 8.61 Apply
the Gaussian Blur
and Noise filters to
the Alpha channel.
Filter:
Radius:
Filter:
Amount:
Distribution:
Monochromatic:
Blur, Gaussian Blur
4.0 pixels
Noise, Add Noise
5%
Gaussian
(checked)
8. In the Layers palette, click on the background layer to select it. Then apply
the Lighting Effects filter using Alpha 1 as a texture channel (see Figure
8.62).
Figure 8.62 Apply
the Lighting Effects
filter to the background layer.
Please purchase PDF Split-Merge on www.verypdf.com to remove this watermark.
237
238
8.
Inorganic Texture Tutorials with Photoshop
Filter:
Light Type:
Intensity:
Focus:
Gloss:
Material:
Exposure:
Ambience:
Texture Channel:
Height:
Render, Lighting Effects
Directional
21
69
−25
0
0
0
Alpha 1
21
Sandstone with a Pattern
Now let’s make a worthwhile pattern out of this base texture. You’ll need to have
View, Snap, and View, Show, Grid, enabled. You’ll also need to adjust the increments of the grid to coincide with the thickness of the pattern’s lines. Click Edit,
Preferences, Units and Rulers, and change both Rulers and Type to Pixels. Then,
under Edit, Preferences, Guides and Grid, change Gridlines to every 21 pixels, and
Subdivisions to 1. I had to do a little math to figure out the right amounts for this
pattern; you’ll understand when we’re finished.
1. With the sandstone texture you just created (which should include the Alpha
displacement channel), click Image, Image Size, and change the Width and
Height settings to 504 pixels. This will align the grid precisely onto the texture (see Figure 8.63).
Figure 8.63
Enable Grid and
Snap, and adjust the
grid values as shown.
Resize the image to
504 pixels.
Please purchase PDF Split-Merge on www.verypdf.com to remove this watermark.
Rock and Stone Textures
239
2. Offset the texture for tiling. To do so, click Filter, Other, Offset, and set the
Horizontal and Vertical values to one-half of the image’s dimensions—in this
case, 252 pixels for both.
3. The detail is so fine in this image that you can hardly notice the internal
seams, but try using the Clone Stamp tool to get rid of any that are noticeable.
4. Start a new layer. This will be the pattern layer to which you’ll add a style to
raise it away from the base.
5. Set the foreground color to a maroon color, like hex# BA6F1F.
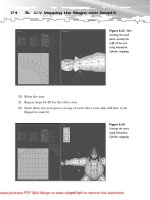
6. Using the Rectangular Marquee tool, make and fill selections with the foreground color as I have in the top-left quadrant of the image (see Figure 8.64).
Figure 8.64 Use
the Rectangular
Marquee tool to create and fill the first
quarter of the pattern.
7. Make a copy of this layer.
Please purchase PDF Split-Merge on www.verypdf.com to remove this watermark.
240
8.
Inorganic Texture Tutorials with Photoshop
8. Click Edit, Transform, Flip Horizontal, and move the copy over to the right
to complete the top half of the pattern (see Figure 8.65).
Figure 8.65
Duplicate the pattern
layer, flip it, and move
it to the right.
9. Press Ctrl+E to merge the two pattern layers.
10. Make a duplicate of the top pattern.
11. Click Edit, Transform, Flip Vertical, and then move the duplicate to the bottom to complete the pattern (see Figure 8.66).
12. Merge the two pattern layers again so just one layer exists above the background layer.
Figure 8.66
Complete the pattern
by duplicating the
top, flipping it, and
moving it to the bottom.
Please purchase PDF Split-Merge on www.verypdf.com to remove this watermark.
Rock and Stone Textures
241
13. Turn off the grid by clicking View, Show, Grid (Ctrl+Alt+’).
14. To add some texture, click Filter, Noise, Add Noise, using the same settings
as before.
15. Click Filter, Render, Lighting Effects, again using the same settings as before
(use the Alpha map you created earlier for the texture channel).
16. Click OK. Not to shabby, eh? You could stop here and use this as a tileable
texture if you want (see Figure 8.67).
Figure 8.67 Add
Noise and apply the
Lighting Effects filter
to the pattern’s layer.
17. Here’s where you can go nuts with styles. Double-click the pattern’s layer to
bring up the Styles screen, and apply a bevel of your choice. In Figure 8.68, I
applied an outer bevel with Contour checked. Not bad, eh?
Figure 8.68 Apply
a bevel to the pattern’s layer.
Please purchase PDF Split-Merge on www.verypdf.com to remove this watermark.
242
8.
Inorganic Texture Tutorials with Photoshop
Style:
Style:
Technique:
Depth:
Direction:
Size:
Soften:
Angle:
Style:
Contour:
Range:
Bevel and Emboss
Outer Bevel
Chisel Hard
100%
Up
4
4
90 degrees
Contour
Cone - Inverted
50%
I think this is quite nice now. Just reduce the image to suit your needs and tile it. I
used this pattern along the walls in the room in Figure 8.69.
Figure 8.69 The
final texture, reduced
and tiled on walls in
a room.
Please purchase PDF Split-Merge on www.verypdf.com to remove this watermark.
Rock and Stone Textures
243
Hot Lava
I invented this texture by accident; here’s how it’s done:
1. Fill a new 512 × 512-pixel RGB canvas with pure black.
2. In the Channels palette, start a new channel.
3. Press D to reset the foreground and background colors to white and black, respectively.
TIP
You are recording
your texture
implementations
in the Actions
palette, aren’t you?
4. Click Filter, Render, Clouds.
5. Click Filter, Render, Difference Clouds. Press Ctrl+F several times to reapply
this filter until you get a nice mix of black and white (see Figure 8.70).
Figure 8.70 Apply
the Clouds filter, then
apply the Difference
Clouds filter several
times to a new Alpha
channel.
6. Click Image, Adjust, Levels.
7. Slide the Shadows marker to the right a bit to flood out the black areas (you
want a nice, thick filling of black, which you’ll fill with molten-hot colors (see
Figure 8.71).
Figure 8.71 Adjust
the levels in the
Alpha channel to
enhance the
shadows.
Please purchase PDF Split-Merge on www.verypdf.com to remove this watermark.