Tài liệu Windows Forms Controls and Data Binding ppt
Bạn đang xem bản rút gọn của tài liệu. Xem và tải ngay bản đầy đủ của tài liệu tại đây (25.15 KB, 9 trang )
Windows Forms Controls and Data Binding
Many properties of most Windows Forms controls can be attached, or bound, to a data
source. After they are bound, the value in the data source changes the value of the bound
property and vice versa. You have already seen data binding in action by using the
TextBox and DataGridView controls in the DisplayProducts project in Chapter 23. The
controls on the form were bound to BindingSource objects belonging to a DataSet
containing records from the Suppliers and Products table in the database.
Windows Forms controls support two types of data binding: simple and complex. Simple
data binding allows you to attach a property of a control or form to a single value in a
data source, and complex data binding is specifically used to attach a control to a list of
values. Simple data binding is useful for controls such as TextBox or Label that only
display a single value. Complex data binding is more commonly used with controls that
can display multiple values, such as ListBox, ComboBox, or DataGridView.
Defining a DataSet and Using Simple Data Binding
You use simple data binding to display a single value from a data source. A data source
can be almost anything, from a cell in a DataSet to the value of a property of another
control to a simple variable. You can perform simple data binding at design time by using
the Data-Bindings property of a control. In the exercises that follow, you will define a
new DataSet that defines a data source returning a single row, and then bind the Text
property of a Label control to a BindingSource object for this DataSet.
Defining a DataSet class
1. In Visual Studio 2005, create a new project called ProductsMaintenance in the
\Microsoft Press\Visual CSharp Step by Step\Chapter 24 folder in your My
Documents folder by using the Windows Application template.
2. In the Project menu, click Add New Item.
The Add New Item dialog box appears, displaying templates for objects that can
be added to a project.
3. In the Add New Item dialog box, click the DataSet template, type
NorthwindDataSet.xsd for the name, and then click Add.
NOTE
DataSet definitions should always be created in a file with the extension “.xsd.”
DataSet definitions are actually XML schemas, which Visual Studio 2005 uses to
generate C# code when the application is built.
The DataSet Designer window appears.
4. In the Toolbox, expand the DataSet category if necessary, and then click the
TableAdapter tool. Click anywhere in the DataSet Designer window.
A DataTable and TableAdapter object are added to the DataSet Designer window,
and the TableAdapter Configuration Wizard appears.
5. In the Choose Your Data Connection page of the TableAdapter Configuration
Wizard, click Next.
NOTE
The Choose Your Data Connection page in the TableAdapter Configuration
Wizard will either display NorthwindConnectionString or
YourServer\sqlexpress.Northwind.dbo for the data connection, depending on
whether you have left Visual Studio 2005 running since performing the exercises
in Chapter 23, or have closed it down and restarted it. Either data connection will
work for this exercise.
6. If the “Save the connection string to the application configuration file” page
appears, specify that the connection string should be saved with the name
NorthwindConnectionString and click Next.
The Choose a Command Type page appears.
7. The “Choose a Command Type” prompts you to specify how the TableAdapter
should access the database. You can provide your own SQL statements, you can
get the Wizard to generate stored procedures that encapsulate SQL statements for
you, or you can use pre-existing stored procedures that a database developer has
already created. Select Use SQL statements, and then click Next.
The Enter a SQL Statement page appears.
8. Type the following SQL SELECT statement that calculates the number of rows in
the Products table:
9. SELECT COUNT(*) AS NumProducts
FROM Products
10. Click Advanced Options.
The Advanced Options dialog box appears.
Apart from retrieving data from the database, a TableAdapter object can also
insert, update, and delete rows. The Wizard will generate SQL INSERT,
UPDATE, and DELETE statements automatically, using the table you specified in
the SQL SELECT statement (Products in this example).
11. The SQL SELECT statement used to fetch data simply counts the number of rows
in the Products table. It does not make sense to generate SQL INSERT, UPDATE,
or DELETE statements as this value is not directly updateable. Clear the
“Generate Insert, Update, and Delete statements” check box and then click OK.
12. In the Table Adapter Configuration Wizard, click Next.
The “Choose Methods to Generate” dialog box appears.
13. A TableAdapter can generate two methods for populating a DataTable object with
the rows retrieved from the database: the Fill method which expects an existing
DataTable or DataSet as a parameter which is filled with the data, and the GetData
method which creates a new DataTable and fills it. Leave both methods selected,
and then click Next.
14. The Wizard uses the information you have supplied and generates the new
TableAdapter class. Click Finish to close the Wizard.
A TableAdapter class called DataTable1TableAdapter, and a corresponding
DataTable class called DataTable1, appear in the DataSet Designer window.
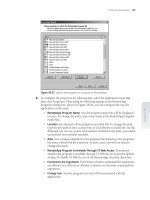
15. In the DataSet Designer window, click the DataTable1 item. Using the Properties
window, change its Name property to NumProductsTable. Click the
DataTable1TableAdapter and change its name to
NumProductsTableTableAdapter. The objects in the DataSet Designer window
should look like the following graphic:
Notice that NumProductsTable DataTable contains a single column called
NumProducts. This column is filled with the value of the NumProducts expression
(the number of rows in the Products table), when the underlying SQL SELECT
statement runs.
16. On the Build menu, click Build Solution.
This action generates the the code and objects for the DataSet, so that they can be
used in the next exercise.
TIP
You can view the code that is generated by Visual Studio 2005 by expanding
NorthwindDataSet.xsd in the Solution Explorer, and double-clicking the file
NorthwindDataSet. Designer.cs that appears. Be careful not to change any of this code,
however.
In the next exercise, you will bind to the value retrieved by the
NumProductsTableAdapter from the database into the NumProducts DataTable in the
NorthwindDataSet DataSet to the Text property of a Label control. When the application
runs, the label will display the number of rows in the Products table.
Bind to a column in a DataTable
1. Display Form1 in the Design View window. In the Solution Explorer, change the
filename from Form1.cs to ProductsForm.cs. When prompted, click Yes to rename
all references to Form1 in the project.
2. Using the Properties window, change the Text property to Products Maintenance.
3. Add a Label control to the form. Change the Text property of the control to
Number of Products:, and set its Location property to 25, 34.
4. Add another Label control to the form. Set the Location property of the control to
131, 34, and change its (Name) property and Text property to numProducts.
5. Expand the (DataBindings) property for the numProducts label. Click the Text
property (inside DataBindings), and then click the drop-down menu that appears.
A window appears displaying a tree view of data sources. Expand the Other Data
Sources node, expand Project Data Sources, expand NorthwindDataSet, expand
NumProductsTable, and then click NumProducts. This action binds the Text
property of the Label control to the NumProducts column in the
NumProductsTable DataTable.
Visual Studio 2005 generates an instance of the NorthwindDataSet class called
northwindDataSet, an instance of the NumProductsTableAdapter class called
numProductsTableAdapter, and a BindingSource object called
numProductsTableBindingSource, and adds them to the form.
6. Click the numProductsTableBindingSource object underneath the form. Using the
Properties window, click the DataSource property. This property identifies the
DataSet object that the BindingSource uses to connect to the database; notice that
it refers to northwindDataSet.
7. Click the DataMember property. This property specifies the DataTable object in
northwindDataSet that acts as the source of the data; it is set to
NumProductsTable.
8. Click the numProducts label again, and expand the (DataBindings) property.
Examine the Text property again, and notice that it is set to
numProductsTableBindingSource – NumProducts.
9. View ProductsForm.cs in the Code and Text Editor window and locate the
ProductsForm_Load method.
This method, which was generated by Visual Studio 2005, runs when the form
opens. It contains the following statement:
this.numProductsTableAdapter.Fill(this.northwindDataSet.NumProductsTable);
From this set of objects, properties, and the code, you should be able to deduce
how label2 gets its data from the database:
1. The numProductsTableAdapter object connects to the database and
retrieves the number of rows in the Products in the database by executing
its SQL SELECT statement.
2. The numProductsTableAdapter uses this information to fill the
NumProductsTable DataTable object in the northwindDataSet object when
the form starts.
3. The numProductsTableBindingSource object connects the NumProducts
column in the NumProductsTable DataTable object in the
northwindDataSet object to the Text property of label2.
10. Build and run the application.
The Label control displays the number of rows in the Products table (probably 77
if you have not changed any of the data since the database was created).
11. Close the form and return to the Visual Studio 2005 programming environment.