Tài liệu Windows Server 2008 Inside Out- P19 pptx
Bạn đang xem bản rút gọn của tài liệu. Xem và tải ngay bản đầy đủ của tài liệu tại đây (1.25 MB, 50 trang )
In the Specify A Printer dialog box, choose a method for fi nding the network printer as
follows:
Choose Find A Printer In The Directory if you want to search Active Directory for
the printer.
Choose Connect To This Printer, and type the printer name or browse the net-
work for shared printers just as you’d browse in My Network Places.
Choose Connect To A Printer On The Internet if you want to enter the Uniform
Resource Locator (URL) of an Internet printer.
When the printer is selected, click OK. Select whether the printer is the default used by
Windows applications by selecting Yes or No and then clicking Next. Click Finish to
complete the operation.
Connecting to Shared Printers Using the Command Line and Scripts
With any Windows operating system, you can connect users to shared printers using
the command line and scripts. In a logon script that uses batch scripting or at the com-
mand line, you can use the Net Use command to connect to a network printer. Consider
the following example:
net use \\corpsvr02\engmain /persistent:yes
Here, you use the Net Use command to add a persistent connection to the EngMain
printer on CORPSVR02. That’s all there is to it.
You could also use Microsoft VBScript in a logon script to set a printer connection. With
VBScript, you must initialize the variables and objects you plan to use and then call
the AddWindowsPrinterConnection method of the Network object to add the printer
connection. If desired, you can also use the SetDefaultPrinter method of the Network
object to set the printer as the default for the user. After you are done using variables
and objects, it is good form to free the memory they use by setting them to vbEmpty.
Consider the following example:
Option Explicit
Dim wNetwork, printerPath
Set wNetwork = WScript.CreateObject("WScript.Network")
printerPath = "\\corpsvr02\engmain"
wNetwork.AddWindowsPrinterConnection printerPath
wNetwork.SetDefaultPrinter printerPath
Set wNetwork = vbEmpty
Set printerPath = vbEmpty
Here, you use the AddWindowsPrinterConnection method to add a connection to the
EngMain printer on CORPSVR02. You then use the SetDefaultPrinter method to set the
printer as the default for the user.
Setting Up Print Servers 867
Chapter 26
Please purchase PDF Split-Merge on www.verypdf.com to remove this watermark.
Deploying Printer Connections
As you’ve seen, it is fairly easy to connect to shared printers. That said, however, you
can make the process even easier by deploying printer connections to computers or
users via the Group Policy objects (GPOs) that Windows applies. When choosing
whether to deploy printer connections to computers or users, keep the following in
mind:
Deploy to groups of computers when you want all users of the computers to
access the printers. For per-computer connections, Windows adds or removes
printer connections when the computer starts.
Deploy to groups of users when you want users to be able to access the printers
from any computer they log on to. For per-user connections, Windows adds or
removes printer connections when the user logs on.
To deploy printer connections to computers running Windows Vista or later, you must
follow these steps:
1. In Print Management, expand the Print Servers node and the node for the server
you want to work with.
2. Select the server’s Printers node. In the main pane, right-click the printer you
want to deploy and then select Deploy With Group Policy. This displays the
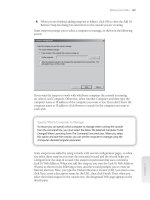
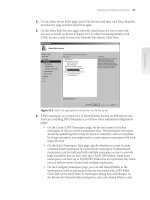
Deploy With Group Policy dialog box, shown in Figure 26-12.
Figure 26-12 Choose the GPO you want to work with.
3. Click Browse. In the Browse For Group Policy Object dialog box, select the GPO
to use and then click OK.
Chapter 26
868 Chapter 26 Deploying Print Services
Please purchase PDF Split-Merge on www.verypdf.com to remove this watermark.
4. Do one or both of the following and then click Add to create a print connection
entry:
To deploy the printer connection on a per-user basis, select the The Users
That This GPO Applies To (Per User) check box under Deploy This Printer
Connection To The Following.
To deploy the printer connection on a per-computer basis, select the The
Computers That This GPO Applies To (Per Machine) check box under
Deploy This Printer Connection To The Following.
5. Repeat steps 3 and 4 to deploy the printer connection to other GPOs.
6. Click OK to save the GPO changes.
To deploy printer connections to computers running versions of Windows earlier than
Windows Vista, you must follow these steps:
1. In the Group Policy Management Console (GPMC), right-click the GPO for the
site, domain, or organizational unit you want to work with and then select Edit.
This opens the policy editor for the GPO.
2. In the Group Policy Management Editor, do one of the following:
To deploy the printer connections on a per-computer basis, double-click the
Windows Settings folder in the Computer Confi guration node. Then click
Scripts.
To deploy the printer connections on a per-user basis, double-click the Win-
dows Settings folder in the User Confi guration node. Then click Scripts.
3. Using Windows Explorer, copy PushPrinterConnections.exe from the
%SystemRoot%\System32 folder to the Computer\Scripts\Startup, User\Scripts\
Logon, or the User\Scripts\Logoff folder for the related policy. Policies are stored
in the %SystemRoot%\Sysvol\Domain\Policies folder on domain controllers.
4. In the Group Policy Management Editor, right-click Startup or Logon and then
select Properties.
5. In the Startup Or Logon Properties dialog box, click Show Files. If you copied
the executable to the correct location in the Policies folder, you should see the
executable.
6. In the Startup Or Logon Properties dialog box, click Add. This displays the Add A
Script dialog box.
7. In the Script Name text box, type PushPrinterConnections.exe and then
click OK.
Setting Up Print Servers 869
Chapter 26
Please purchase PDF Split-Merge on www.verypdf.com to remove this watermark.
Confi guring Point and Print Restrictions
In Group Policy, the Point And Print Restrictions setting controls several impor-
tant aspects of printer security. For Windows XP Professional and later versions of
Windows, the setting controls the servers to which a client computer can connect for
point and print. For Windows Vista and later, the setting controls security warnings
and elevation prompts when users point and print as well as when drivers for printer
connections need to be confi gured. Table 26-1 summarizes how this policy setting is
used.
Table 26-1 Point and Print Restrictions
When the Policy Setting Is… The Policy Works As Follows
Enabled Windows XP and Windows Server 2003 clients can only
point and print to an explicitly named list of servers in
the forest. Windows Vista and later clients can point
and print to any server. You can confi gure Windows
Vista and later clients to show or hide warning and
elevation prompts when users point and print and
when a driver for an existing printer connection needs
to be updated.
Not Confi gured Windows XP and later clients can point and print to any
server in the forest. Windows Vista and later clients also
will not show a warning and elevation prompt when
users point and print or when a driver for an existing
printer connection needs to be updated.
Disabled Windows XP and later clients can point and print to
any server. Windows Vista and later clients also will
not show a warning and elevation prompt when users
point and print or when a driver for an existing printer
connection needs to be updated.
By default, Windows Vista and Windows Server 2008 allow a user who is not a mem-
ber of the local Administrators group to install only trustworthy print drivers, such
as those provided by Windows or in digitally signed print driver packages. When you
enable the Point And Print Restrictions setting, you also allow users who are not mem-
bers of the local Administrators group to install printer connections deployed using
Group Policy that include additional or updated print drivers that are not in the form
of digitally signed print driver packages. If you do not enable this setting, users might
need to provide the credentials of a user account that belongs to the local Administra-
tors group.
You can enable and confi gure the Point And Print Restrictions setting in Group Policy
by following these steps:
1. In the Group Policy Management Console (GPMC), right-click the GPO for the
site, domain, or organizational unit you want to work with and then select Edit.
This opens the policy editor for the GPO.
Chapter 26
870 Chapter 26 Deploying Print Services
Please purchase PDF Split-Merge on www.verypdf.com to remove this watermark.
2. In the Group Policy Management Editor, expand User Confi guration\
Administrative Templates\Control Panel and then select the Printers node.
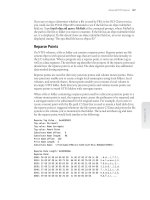
3. In the main pane, double-click Point And Print Restrictions. In the Point And
Print Restrictions Properties dialog box, shown in Figure 26-13, select Enabled.
Figure 26-13 Configure point and print restrictions.
4. When you enable pointing and printing restrictions, you can confi gure policy
so that users can only point and print to a named list of servers. To enforce this
restriction, select the related check box and enter a list of fully qualifi ed server
names separated by semicolons. To remove this restriction, clear the Users Can
Only Point And Print To These Servers check box.
5. When you enable pointing and printing restrictions, you can confi gure policy
so that users can only point and print to servers in their forest. To enforce this
restriction, select the related check box. To remove this restriction, clear the Users
Can Only Point And Print To Machines In Their Forest check box.
6. When you install drivers for a new connection, Windows Vista and later clients
can show or not show a warning or elevation prompt. Use the related selection list
to choose the desired option.
7. When you update drivers for an existing connection, Windows Vista and later
clients can show or not show a warning or elevation prompt. Use the related
selection list to choose the desired option. Click OK to save your policy settings.
Setting Up Print Servers 871
Chapter 26
Please purchase PDF Split-Merge on www.verypdf.com to remove this watermark.
Managing Printers Throughout the Organization
Print Management should be your tool of choice for working with printers and print
servers. After you install Print Services, Print Management is available as a stand-alone
console on the Administrative Tools menu. You can also add Print Management as a
snap-in to any custom console you’ve created. Using Print Management, you can install,
view, and manage all of the printers and Windows print servers in your organization.
Managing Your Printers
Print Management allows you to manage local print servers. You can manage and moni-
tor other print servers in the organization by adding them to the console, provided
these print servers are running Windows 2000 or later. If the printer provides a Web-
based management interface, Print Management can display additional information
about the printer’s status, its physical properties, and its confi guration, and sometimes
allows remote administration.
To manage a remote print server, you must be a member of the local Administrators
group on the print server or a member of the Administrators group in the domain of
which the print server is a member. When you select a print server’s Printers node, as
shown in Figure 26-14, the main pane lists the associated printer queues by printer
name, queue status, number of jobs in the queue, and server name. If you right-click
Printers and then select Show Extended View, you can turn on the Extended view.
Extended view makes it easy to track the status of both printers and print jobs by dis-
playing detailed information about the print job. Additionally, if the printer has a Web
page, Extended view displays a Printer Web Page tab that lets you directly access the
printer’s Web page.
Figure 26-14 Use Print Management to manage your print servers and printers.
To add print servers to Print Management, follow these steps:
1. In Print Management, right-click the Print Servers node in the left pane and then
select Add/Remove Servers.
Chapter 26
872 Chapter 26 Deploying Print Services
Please purchase PDF Split-Merge on www.verypdf.com to remove this watermark.
2. In the Add/Remove Servers dialog box, shown in Figure 26-15, you’ll see a list of
the print servers you’ve previously added. Do one of the following and then click
Add The Local Server:
In the Add Servers list box, type or paste the names of the print servers you
want to add, using commas to separate computer names.
Click Browse to display the Select Print Servers dialog box. Click the print
server you want to use and then click Select Server.
3. Repeat the previous step as necessary and then click OK.
Figure 26-15 Add print servers to Print Management so that you can manage and
monitor them.
To remove print servers from Print Management, follow these steps:
1. In Print Management, right-click the Print Servers node in the left pane and then
select Add/Remove Servers.
2. In the Add/Remove Servers dialog box, you’ll see a list of the print servers that are
being monitored. Under Print Servers, select one or more servers, and then click
Remove.
Migrating Printers and Print Queues
You can use the Printer Migration Wizard to move printers and their print queues from
one print server to another. This is an effi cient way to consolidate multiple print servers
or replace an older print server.
Managing Printers Throughout the Organization 873
Chapter 26
Please purchase PDF Split-Merge on www.verypdf.com to remove this watermark.
When you move printers, the server on which the printers are currently located is the
source server, and the server to which you want to move the printers is the destination
server. With this in mind, you can move printers to a new print server by following
these steps:
1. In Print Management, right-click the source server and then click Export Printers
To A File. This starts the Printer Migration Wizard.
2. On the initial page, shown in Figure 26-16, note the printer-related objects that
will be exported and then click Next.
Figure 26-16 Review the printer objects to be exported.
3. On the Select The File Location page, click Browse. In the dialog box provided,
select a save location for the printer migration fi le. After you type a name for the
fi le, click Open.
4. Printer migration fi les are saved with the .printerExport extension. Click Next to
save the printer settings to this fi le.
5. After the wizard completes the export process, click Open Event Viewer to review
the events generated during the export process. If an error occurred during
processing, you can use the event entries to determine what happened and
possible actions to take to resolve the problem. When you are fi nished, exit the
Event Viewer.
6. On the Exporting page, click Finish to exit the Printer Migration Wizard.
7. In Print Management, right-click the destination server and then click Import
Printers From A File. This launches the Printer Migration Wizard.
Chapter 26
874 Chapter 26 Deploying Print Services
Please purchase PDF Split-Merge on www.verypdf.com to remove this watermark.
8. On the Select The File Location page, click Browse. In the dialog box provided,
select the printer migration fi le you created previously, as shown in Figure 26-17,
and then click Open.
Figure 26-17 Select the printer migration file.
9. Click Next. Note the objects that will be imported and then click Next. On the
Select Import Options page, shown in Figure 26-18, choose one of the following
options in the Import Mode selection list:
Keep Existing Printers; Import Copies
When you choose this option and
existing printer queues have the same names as those you are importing,
the wizard will create copies to ensure that the original printer queues and
the imported printer queues are both available.
Overwrite Existing Printers
When you choose this option and existing
printer queues have the same names as those you are importing, the wizard
will overwrite the existing printer queues with the information from the
printer queues you are importing.
10. On the Select Import Options page, choose one of the following options in the
List In The Directory list:
List Printers That Were Previously Listed
Choose this option to ensure that
only printers that were previously listed are listed in Active Directory.
List All Printers
Choose this option to ensure that all printers are listed in
Active Directory.
Don’t List Any Printers
Choose this option to ensure that no printers are
listed in Active Directory.
Managing Printers Throughout the Organization 875
Chapter 26
Please purchase PDF Split-Merge on www.verypdf.com to remove this watermark.
Figure 26-18 Choose the import options for the migration.
11. Click Next to begin the import process. After the wizard completes the import
process, click Open Event Viewer to review the events generated during the
import process. If an error occurred during processing, you can use the event
entries to determine what happened and possible actions to take to resolve the
problem. When you are fi nished, exit the Event Viewer.
12. On the Importing page, click Finish to exit the Printer Migration Wizard.
Monitoring Printers and Printer Queues Automatically
You can use print fi lters to display only the printers, printer queues, and print drivers
that meet specifi c criteria. Through automated notifi cation, you can also use printer
fi lters to automate monitoring of printers.
In Print Management, you can view existing fi lters by expanding the Custom Filters
node. If you expand the Custom Filters node and then select a fi lter, the main pane
will show all printers or print drivers that match the fi lter criteria. Print Management
includes the following default print fi lters:
All Printers
Lists all printers associated with print servers that have been added
to the console
All Drivers
Lists all print drivers associated with print servers that have been
added to the console
Printers Not Ready
Lists all printers that are not in a Ready state, such as those
with errors
Printers With Jobs
Lists all printers associated with print servers that have active
or pending print jobs
Chapter 26
876 Chapter 26 Deploying Print Services
Please purchase PDF Split-Merge on www.verypdf.com to remove this watermark.
You can create a new custom fi lter by follow these steps:
1. In Print Management, right-click the Custom Filters node and then select Add
New Printer Filter. This starts the New Printer Filter Wizard.
2. On the Printer Filter Name And Description page, enter a fi lter name and
description. If you’d like the number of matching items to be displayed after the
fi lter name, select the Display The Total Number Of Printers… check box. Click
Next.
3. On the Defi ne A Printer Filter page, defi ne the fi lter by specifying Field,
Condition, and Value to match in the fi rst row. If you want to further narrow the
possible matches, defi ne additional criteria as necessary in the second, third, and
subsequent rows. Click Next when you are ready to continue.
Note
When you use fi lters for monitoring and notifi cation, you’ll use the Queue Status fi eld
most. This allows you to receive notifi cation when a printer has a specifi c status. You can
match the following status values: Busy, Deleting, Door Open, Error, Initializing, IO Active,
Manual Feed Required, No Toner/Ink, Not Available, Offl ine, Out Of Memory, Out Of
Paper, Output Bin Full, Page Punt, Paper Jam, Paper Problem, Paused, Printing, Process-
ing, Ready, Toner/Ink Low, User Intervention Required, Waiting, and Warming Up.
Note
When you are matching conditions, you can match when an exact condition exists or
does not exist. For example, if you want to be notifi ed only of conditions that need atten-
tion, you can look for Queue Status conditions that are not exactly the following: Delet-
ing, Initializing, Printing, Processing, Warming Up, and Ready.
4. On the Set Notifi cations page, you can specify whether to send an e-mail, run a
script, or both when the specifi ed criteria are met. Click Finish to complete the
confi guration.
You can modify an existing custom fi lter by follow these steps:
1. In Print Management, expand the Custom Filters node. Select and then right-click
the fi lter you want to work with. On the shortcut menu, select Properties.
Note
When you use fi lters for monitoring and notifi cation, you’ll use the Queue Status fi eld
most. This allows you to receive notifi cation when a printer has a specifi c status. You can
match the following status values: Busy, Deleting, Door Open, Error, Initializing, IO Active,
Manual Feed Required, No Toner/Ink, Not Available, Offl ine, Out Of Memory, Out Of
Paper, Output Bin Full, Page Punt, Paper Jam, Paper Problem, Paused, Printing, Process-
ing, Ready, Toner/Ink Low, User Intervention Required, Waiting, and Warming Up.
Note
When you are matching conditions, you can match when an exact condition exists or
does not exist. For example, if you want to be notifi ed only of conditions that need atten-
tion, you can look for Queue Status conditions that are not exactly the following: Delet-
ing, Initializing, Printing, Processing, Warming Up, and Ready.
Managing Printers Throughout the Organization 877
Chapter 26
Please purchase PDF Split-Merge on www.verypdf.com to remove this watermark.
2. In the fi lter’s Properties dialog box, use the options provided to manage the fi lter
settings. This dialog box has the following three tabs:
General
Shows the name and description of the print fi lter. Enter a new
name and description as necessary.
Filter Criteria
Shows the fi lter criteria. Enter new fi lter criteria as necessary.
Notifi cation
Shows the e-mail and script options. Enter new e-mail and
script options as necessary.
Chapter 26
878 Chapter 26 Deploying Print Services
Please purchase PDF Split-Merge on www.verypdf.com to remove this watermark.
W
hen you point to Print in an application and click, the document is supposed to
print on a printer somewhere. Most users don’t care to know how or why print-
ing works; they only care that it works. In that respect, printing is like networking ser-
vices—something most people take for granted until it doesn’t work the way they expect
it to or it stops working altogether. The problem with this way of thinking is that next
to fi le and networking services, print services are the most used feature of the Windows
operating system. It takes a lot of behind-the-scenes work to ensure that printing is as
easy as point and click.
Managing Printer Permissions
By default, everyone with access to the network can print to a shared printer. This
means any user with a domain account or any user logged on as a guest can print to any
available printer. Because this isn’t always what is wanted, you might want to consider
whether you need to restrict access to a printer. Restricting access to printers ensures
that only those users with appropriate permissions can use a printer.
With specialty printers, such as those used for color or large-format printing, you’ll fi nd
that restricting access to specifi c groups or individuals makes the most sense. But you
might also want to restrict access to other types of printers as well. For example, you
might not want everyone with network access to be able to print. Instead, you might
want only users with valid domain accounts to be able to print. While you are confi gur-
ing printer security, you might also want to confi gure printer auditing to track who is
using printers and what they are doing.
Understanding Printer Permissions
Printer permissions set the maximum allowed access level for a printer. These permis-
sions are applied whenever someone tries to print, whether the person is connected
locally or remotely, and include both special and standard permissions.
Managing Printer Permissions . . . . . . . . . . . . . . . . . . . . 879
Managing Print Server Properties . . . . . . . . . . . . . . . . . 885
Managing Printer Properties . . . . . . . . . . . . . . . . . . . . . 890
Managing Print Jobs . . . . . . . . . . . . . . . . . . . . . . . . . . . . 907
Printer Maintenance and Troubleshooting . . . . . . . . . . 909
CHAPTER 27
Managing and Maintaining
Print Services
879
Please purchase PDF Split-Merge on www.verypdf.com to remove this watermark.
Special permissions are assigned individually and include the following:
Read Permissions
Allows users to view permissions
Change Permissions
Allows users to change permissions
Take Ownership
Allows users to take ownership of a printer, its print jobs,
or both
The standard printer permissions available are the following:
With this permission, users can connect to a printer and submit documents
for printing. They can also manage their own print jobs. If a user or group has
Print permission, it also has the special permission called Read Permissions for
any documents it prints.
Manage Printers
With this permission, users have complete control over a
printer and can set printer permissions. This means they can share printers,
change permissions, assign ownership, pause and restart printing, and change
printer properties. If a user or group has the Manage Printers permission, it also
has the special permissions called Read Permissions, Change Permissions, and
Take Ownership for any documents on the printer.
Manage Documents
With this permission, users can manage individual print
jobs. This allows them to pause, restart, resume, or cancel documents. It also
allows them to change the order of documents in the queue. It doesn’t, however,
allow them to print, because this permission is assigned separately. If a user or
group has Manage Documents permission, it also has the special permissions
called Read Permissions, Change Permissions, and Take Ownership for the
printer.
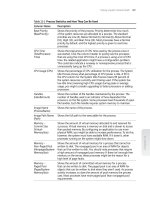
By default, the permissions on printers are assigned as shown in Table 27-1.
Table 27-1 Default Printer Permissions
Group Print Manage Documents Manage Printers
Creator Owner Yes
Everyone Yes
Administrators Yes Yes Yes
Power Users Yes Yes Yes
Print Operators Yes Yes Yes
Server Operators Yes Yes Yes
As you examine printer permissions, keep in mind that if a user is a member of a group
that is granted printer permissions, the user also has those permissions and the per-
missions are cumulative. This means that if one group of which the user is a member
has Print permission and another has Manage Printers permission, the user has both
permissions. To override this behavior, you must specifi cally deny a permission.
Chapter 27
880 Chapter 27 Managing and Maintaining Print Services
Please purchase PDF Split-Merge on www.verypdf.com to remove this watermark.
TROUBLESHOOTING
Check permissions on the spool folder
By default, the spool folder is located on the system drive. The default permissions give
Full Control to Administrators, Print Operators, Server Operators, and the SYSTEM user.
System is the account under which the Print Spooler service runs, and this account needs
Full Control to be able to create and manage spool fi les. Administrators, Print Operators,
and Server Operators are given full control so that they can spool documents and clear
out the spool folder if necessary. Creator Owner has special permissions that grant Full
Control so that anyone that prints a document can manage it. Authenticated Users are
given Read & Execute permissions so that an authenticated user can access the spool
folder and create fi les and folders. If these permissions get changed, print spooling
might fail.
Confi guring Printer Permissions
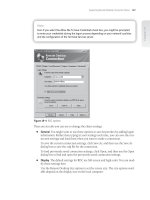
To view or manage the permissions of a printer, right-click the printer in Print Manage-
ment, and then select Properties. In the Properties dialog box, select the Security tab,
shown in Figure 27-1. You can now view the users and groups that have printer permis-
sions and the type of permissions they have.
Figure 27-1 View or set printer permissions.
To grant or deny printer permissions, follow these steps:
1. In Print Management, expand the Print Servers node and the node for the server
you want to work with.
TROUBLESHOOTING
Managing Printer Permissions 881
Chapter 27
Please purchase PDF Split-Merge on www.verypdf.com to remove this watermark.
2. Select the server’s Printers node. In the main pane, right-click the printer you
want to work with and then select Properties.
3. In the printer Properties dialog box, click the Security tab. On the Security tab,
click Add. This opens the Select Users, Computers, Or Groups dialog box, as
shown in Figure 27-2.
Figure 27-2 Specify the users or groups to add.
4. The default location is the current domain. Click Locations to see a list of the
available domains and other resources that you can access. Because of the
transitive trusts in Windows Server 2008, you can usually access all the domains
in the domain tree or forest.
5. Type the name of a user or group account in the selected or default domain, and
then click Check Names. The options available depend on the number of matches
found as follows:
When a single match is found, the dialog box is automatically updated as
appropriate and the entry is underlined.
When no matches are found, you’ve either entered an incorrect name part
or you’re working with an incorrect location. Modify the name and try
again, or click Locations to select a new location.
If multiple matches are found, select the name(s) you want to use, and then
click OK.
6. To add additional users or groups, type a semicolon (;), and then repeat this
process.
7. When you click OK, the users and groups are added to the Group Or User Names
list for the printer.
8. Confi gure access permissions for each user and group added by selecting
an account name and then allowing or denying access permissions. If a user
or group should be granted access permissions, select the check box for the
permission in the Allow column. If a user or group should be denied access
permissions, select the check box for the permission in the Deny column.
Chapter 27
882 Chapter 27 Managing and Maintaining Print Services
Please purchase PDF Split-Merge on www.verypdf.com to remove this watermark.
Note
If you give a group a permission, such as Print, the related special permission, Read Per-
missions, is also granted. For this reason, you usually need not confi gure special permis-
sions for printers.
9. When you’re fi nished, click OK.
Assigning Printer Ownership
The owner of a printer has permission to manage its documents. By default, the SYS-
TEM user is listed as the current owner of a printer and the printer’s actual creator is
listed as a person who can take ownership. Ownership can be taken or transferred in
several ways. Any administrator can take ownership. Any user or group with the Take
Ownership permission can take ownership. You can take ownership using the printer’s
Properties dialog box. Right-click the printer, and then select Properties. On the Secu-
rity tab of the Properties dialog box, display the Advanced Security Settings dialog box
by clicking Advanced. Next, click the Owner tab, as shown in Figure 27-3.
Figure 27-3 Assigning printer ownership.
If you are an administrator or a current owner of a fi le or folder, you can grant permis-
sion to take ownership of the printer. Click Other Users Or Groups to display the Select
User, Computer, Or Group dialog box. Type the name of a user or group, and click
Check Names. If multiple names match the value you entered, you’ll see a list of names
and will be able to choose the one you want to use. Otherwise, the name will be fi lled in
for you, and you can click OK.
Note
If you give a group a permission, such as Print, the related special permission, Read Per-
missions, is also granted. For this reason, you usually need not confi gure special permis-
sions for printers.
Managing Printer Permissions 883
Chapter 27
Please purchase PDF Split-Merge on www.verypdf.com to remove this watermark.
Auditing Printer Access
Auditing printer access can help you track who is accessing printers and what they are
doing. You confi gure auditing policies on a per-printer basis. In Print Management,
right-click the printer to be audited, and then select Properties. In the Properties dialog
box, click the Security tab, and then click Advanced. In the Advanced Security Settings
dialog box, click the Auditing tab, shown in Figure 27-4.
Figure 27-4 Specify to which users and groups auditing should apply.
Now use the Auditing Entries list box to select the users, groups, or computers whose
actions you want to audit. To add specifi c accounts, click Add, and then use the Select
User, Computer, Or Group dialog box to select an account name to add. If you want to
audit actions for all users, use the special group Everyone. Otherwise, select the specifi c
user groups or users, or both, that you want to audit. When you click OK, you’ll see the
Auditing Entry For Printer Name dialog box, shown in Figure 27-5.
The Apply Onto drop-down list box allows you to specify whether the actions should be
audited for:
This Printer Only
Documents Only
This Printer And Documents
After you make a selection, under Access, select the Successful or Failed check boxes,
or both, for each of the events you want to audit. The events you can audit are the same
as the printer permissions discussed previously. Click OK when you’re fi nished. Repeat
this process to audit other users, groups, or computers. Any time printers for which
you’ve confi gured auditing are accessed, the action is written to the system’s security
log, where it’s stored for your review. The security log is accessible from Event Viewer.
Chapter 27
884 Chapter 27 Managing and Maintaining Print Services
Please purchase PDF Split-Merge on www.verypdf.com to remove this watermark.
Figure 27-5 Specify the actions to audit for the designated user, group, or computer.
Managing Print Server Properties
Print server properties control the global settings for all printers on a server. You can
access print server properties from Print Management. In Print Management, when you
select a server node, you’ll see additional nodes for Drivers, Forms, Ports, and Printers.
By selecting these nodes, you can determine the drivers, forms, ports, and printers that
are confi gured on the print server. By right-clicking the print server and then selecting
Properties, you can confi gure settings for all printers, including the following:
Forms
Ports
Drivers
Advanced settings
Viewing and Creating Printer Forms
Forms are used by print servers to defi ne the standard sizes for paper, envelopes, and
transparencies. Print servers have many predefi ned forms from which you can choose,
but you can also defi ne your own forms.
To view the current settings for a printer form, right-click the print server in Print Man-
agement and then select Properties. Then click the Forms tab, as shown in Figure 27-6.
Managing Print Server Properties 885
Chapter 27
Please purchase PDF Split-Merge on www.verypdf.com to remove this watermark.
Use the Forms On list to select the form you want to view. The form settings are shown
in the Form Description (Measurements) area.
Figure 27-6 View and configure forms for paper, envelopes, and transparencies.
To create a new form, follow these steps:
1. Access the Forms tab of the Print Server Properties dialog box. Use the Forms On
list box to select the existing form on which you want to base the new form.
2. Select the Create A New Form check box, and then enter a new name for the form
in the Form Name fi eld.
3. Use the fi elds in the Form Description (Measurements) area to set the paper size
and margins. When you are fi nished, click the Save Form button to save the form.
Although you can’t change or delete the default forms, you can delete forms users have
created. In Print Management, select the Forms node for the server, right-click the form,
and then select Delete.
Viewing and Confi guring Printer Ports
Ports are used to defi ne the interfaces and TCP/IP addresses to which the print server
can connect. Using the Print Server Properties dialog box, you can view and manage all
the ports confi gured for use on the print server. This gives you one location for viewing,
adding, deleting, and confi guring ports.
Chapter 27
886 Chapter 27 Managing and Maintaining Print Services
Please purchase PDF Split-Merge on www.verypdf.com to remove this watermark.