Tài liệu InDesign CS5 Bible- P11 doc
Bạn đang xem bản rút gọn của tài liệu. Xem và tải ngay bản đầy đủ của tài liệu tại đây (1.25 MB, 50 trang )
Chapter 18: Flowing Text through a Document
455
Adjusting columns in text frames
After you create a text frame and flow text into it, you can still change the number of columns in it.
First, select the text frame with a selection tool or the Type tool (or Shift+click to select multiple
text frames and change all their columns simultaneously). Then choose Object ➪ Text Frame
Options or press Ô+B or Ctrl+B to open the Text Frame Options dialog box (shown earlier in
Figure 18.2).
You can also use the Control panel to quickly change the number of columns by entering a value
in the Columns field when you’ve selected a text frame. The Control panel also has buttons for sev-
eral controls found in the Text Frame Options dialog box, as Figure 18.3 shows. Note that these
buttons may not appear unless you disable other buttons to make room for them using the
Customize option in the Control panel’s flyout menu.
Tip
Although programs such as InDesign have long offered multiple-column text frames, many designers still draw
each column as a separate frame. Don’t do that! Creating individual frames for each column makes it all too
easy to have columns of slightly different widths and slightly different positions, so you can wind up with text
that doesn’t align properly. Plus, if you use the Text Frame Options feature to create columns, you can easily
change the number of columns; there’s no need to resize existing text frames or relink them.
n
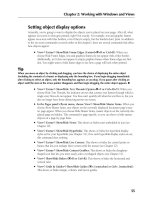
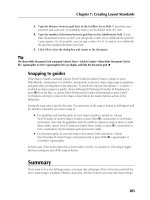
FIGURE 18.3
The Control panel buttons that provide options available in the Text Frame Options dialog box
Number of Columns
Balance Columns
Align Top
Align Bottom
Gutter
Unbalance Columns
Align Center
Justify Vertically
Note that the options in the Text Frame Options dialog box’s Columns area work differently
depending on whether Fixed Column Width is selected or deselected:
l
If it is not selected, InDesign subtracts from the text frame’s width the space specified for
the gutters. The program then divides the remaining width by the number of columns to
figure out how wide the columns can be. For example, a 10-inch-wide text frame with
three columns and a gutter of
1
⁄
2
inch ends up with three 3-inch columns and two
1
⁄
2
-inch
gutters. The math is (10 – (2 × 0.5)) ÷ 3.
28_607169-ch18.indd 45528_607169-ch18.indd 455 4/22/10 7:58 PM4/22/10 7:58 PM
Please purchase PDF Split-Merge on www.verypdf.com to remove this watermark.
Part V: Text Fundamentals
456
l
If it is selected, InDesign resizes the text frame to fit the number of columns you selected
at the indicated size, as well as the gutters between them. For example, if in a 10-inch-
wide text frame you specify a column width of 5 inches and a gutter of
1
⁄
2
inch, and you
choose three columns, you end up with a 15-inch-wide text frame containing three 5-inch
columns and two
1
⁄
2
-inch gutters. The math is (5 × 3) + (2 × 2).
Select the Preview option to see the effects of your changes before finalizing them.
New Feature
The Text Frame Options dialog box has a new option, Balance Columns, that if selected tells InDesign CS5 to
make the bottom of columns align as evenly as possible, rather than let the text frame end with one column
much shorter than the others.
n
Tip
You can also use the Columns field in the Control panel to change the number of columns but not set any other
options such as gutter size. The Columns field appears only if you have selected a frame with the Type tool and
have the Control panel set to display the Paragraph pane (the ¶ icon is selected).
n
Placing rules between columns
The use of vertical rules (thin lines) between columns — called intercolumn rules — is an effective
way to separate columns with small gutters. This is often done in newspapers, in which columns
and gutters are usually thin. It can also add visual interest and a sense of old-fashioned authority; it
was a common technique for newspapers a century ago and is still used by the august Wall Street
Journal, for example.
Unfortunately, InDesign does not provide an automatic method for creating intercolumn rules. To
get around this lack, you need to draw lines on the page — in the center of the gutters — with the
Line tool. Because you might resize text frames or change the number of columns while designing
a document, you should add the vertical rules at the end of the process. In a document with a stan-
dard layout, such as a newspaper or magazine, you can place the rules between columns in text
frames on the master page so that they’re automatically placed on every page. As always with such
objects, you can modify them on individual document pages as needed (just be sure to
Shift+Ô+click or Ctrl+Shift+click to select them when working in your document pages).
When drawing rules between columns, use the rulers to precisely position the lines. After you’ve
drawn the lines, Shift+click to select all the lines and the text frames, and then choose Object ➪
Group or press Ô+G or Ctrl+G. When the lines are grouped to the text frame, you can move them
all as a unit. Doing so also prevents someone from accidentally moving a vertical rule later.
Tip
Keep the width of intercolumn rules thin: usually a hairline (
1
⁄
4
point) or
1
⁄
2
point. Larger than that is usually too
thick and can be confused with the border of a sidebar or other boxed element.
n
28_607169-ch18.indd 45628_607169-ch18.indd 456 4/22/10 7:58 PM4/22/10 7:58 PM
Please purchase PDF Split-Merge on www.verypdf.com to remove this watermark.
Chapter 18: Flowing Text through a Document
457
Managing Other Text Frame Behaviors
The Text Frame Options dialog box lets you control several other key aspects of text placement
within a frame, not just the number and size of columns. Three of these controls — all of which
are in the General pane — affect the placement of text relative to the frame itself:
l
Inset Spacing: These options let you bring text in from the frame boundary. Rectangular
frames have four options: Top, Bottom, Left, and Right. Other frames just have one option
that applies to the entire frame: Inset. You typically use Inset Spacing when you have a
stroke around or a background behind the text frame, so the text does not print at the
very edge of the frame.
Tip
Use the Make All Settings the Same iconic button (the chain icon) in the area that contains the Inset Spacing
fields in the Text Frames Options dialog box’s General pane to make adjusting common offset values easier. If
the chain is unbroken, changing any offset automatically changes the other offsets to the same value. If the
chain is broken, you can adjust each offset independently of one another. Click the button to toggle between
the two modes.
n
l
Vertical Justification: This section lets you specify how text aligns vertically within the
frame. Use the Align popup menu to choose the desired alignment: Top, Center, Bottom,
or Justify. If you choose Justify, InDesign spreads the text out so that it fills the frame
from top to bottom, adding space between lines and paragraphs as needed to do so.
You can control the maximum amount of space allowed between paragraphs by entering
a value in the Paragraph Spacing Limit field, but note that doing so could result in
InDesign’s adding more space between lines than between paragraphs if that’s what it
takes to fill the frame. Note that in a multicolumn text frame, vertical justification applies
only to the last column.
New Feature
In InDesign CS5, the vertical justification capability now works in text frames of all shapes, not just rectangular
text frames.
n
l
Ignore Text Wrap: This option is in its own untitled section. If selected, it lets text in the
text frame overprint another object, even if text wrap is set for that object. You’ll use this
rarely. An example of when you might want to select this option is when you have a head-
line that you want to overprint a graphic that body text wraps around.
Cross-Reference
I cover the Text Frame Options dialog box’s column settings earlier in this chapter. For more details on the
baseline grids options in the dialog box’s Baseline Options pane, see Chapter 7.
n
28_607169-ch18.indd 45728_607169-ch18.indd 457 4/22/10 7:58 PM4/22/10 7:58 PM
Please purchase PDF Split-Merge on www.verypdf.com to remove this watermark.
Part V: Text Fundamentals
458
Working with Overset Text
Even as you add text frames and pages, you can have more text than your layout has room for.
Called overset text, this excess text doesn’t appear anywhere in your layout. So how do you find
overset text?
InDesign provides two ways:
l
Look at the out port of the last text frame in a story chain. If it is a red cross, that means
there is more text in the story that isn’t placed in the layout. (If the out port is an empty
black square, no unplaced text remains.)
l
Open each story in the Story Editor and look at the ruler along the left side of the text,
just to the right of the list of currently applied paragraph styles. Overset text is indicated
by the Overset indicator and is furthermore noted with a red line to the right of the text.
(Chapter 19 explains how to use the Story Editor.)
After you’ve identified your overset text, you then can edit the text to fit the space you do have; use
tracking controls to tighten the spacing for a line here and there to get rid of widows that take up
excess space; reformat text to fit the space you do have; add more space, such as through creating
additional pages; or rebalance the space available by making some stories longer and others
shorter. You can often use a combination of these techniques, in a process called copyfitting.
Summary
When text doesn’t fit within a single text frame — as is the case in almost any multipage publica-
tion — you need to link (or thread) the text frames. You can do this manually, threading one text
frame to the next, or you can have InDesign automatically add pages containing threaded text
frames. After frames are threaded, you can still reflow text by breaking text threads and rerouting
the threads.
In addition to flowing text through the threaded frames, you can flow it through multiple columns
within each frame. You can change the number of columns or their widths within a frame at any
time. To distinguish columns more visually, you can draw vertical lines between columns and
group them with the text frames.
To control when text starts at the top of a column, frame, or page, InDesign offers both local and
style-based options to force breaks.
When your story has more text than you have room for in your layout — something you can iden-
tify by looking at a story’s last text frame’s out port or by using the Story Editor — you need to use
a combination of editing, formatting, and layout techniques to make everything fit.
The Text Frame Options dialog box lets you control vertical spacing between paragraphs in a text
frame, the text’s inset amount relative to the frame edges, and whether the frame’s text honors text-
wrap settings in overlapping objects.
28_607169-ch18.indd 45828_607169-ch18.indd 458 4/22/10 7:58 PM4/22/10 7:58 PM
Please purchase PDF Split-Merge on www.verypdf.com to remove this watermark.
459
CHAPTER
Editing, Spell-checking,
and Replacing Text
IN THIS CHAPTER
Editing text, including
highlighting, cutting and
pasting, and deleting
Using the Story Editor
Correcting mistakes as you
type
Checking spelling as you type
or all at one time
Customizing the spelling and
hyphenation dictionaries
Searching and replacing words
and formats
Placing notes in text
M
ost users do the bulk of their writing and editing in a word
processor before bringing the files into InDesign for layout.
That doesn’t mean you shouldn’t perform word processor functions in
InDesign, however. It makes a lot of sense to write captions, headlines, and
other elements that need to fit a restricted area, as well as to take care of
copy editing and minor revisions. InDesign lets you do such writing and
editing in the actual layout or in a built-in text editor that mimics TextEdit
for the Mac or WordPad for Windows, except it does layout-specific things
for you as well, such as tracking line counts.
Either way, you’ll extensively use InDesign’s editing and search-and-replace
functions, as well as the spell-checker, to refine your content.
Editing Text
When you’re working in a layout in InDesign, you have the basic editing
capabilities found in a word processor: cutting and pasting, and deleting and
inserting text. These capabilities work very much like other text editors and
word processors, so you should be able to use the techniques you already
know to edit text within InDesign.
Controlling text view
Before you begin to edit text, you need to see it. In many layout views, the
text is too small to work with. Generally, you zoom in around the block of
text using the Zoom tool. For quick access to the tool, press Z. (Except when
29_607169-ch19.indd 45929_607169-ch19.indd 459 4/22/10 7:59 PM4/22/10 7:59 PM
Please purchase PDF Split-Merge on www.verypdf.com to remove this watermark.
Part V: Text Fundamentals
460
the cursor is in a block of text! In that case, you need to click the Zoom tool.) Then click to zoom
in. To zoom out, press and hold Option or Alt when clicking.
Another way to zoom in is to use the keyboard shortcut Ô+= or Ctrl+=. Each time you use it, the
magnification increases. Zoom out by pressing Ô+– [hyphen] or Ctrl+– [hyphen].
It’s best to use the Ô+= or Ctrl+= method when your text cursor (text-insertion pointer) is already
on or near the text you want to zoom into; the cursor location is the center point for the zoom.
Use the Zoom tool when your pointer is not near the text you want to magnify, and then move
the Zoom pointer to the area you want to magnify and click once for each level of desired
magnification.
In addition to seeing the text at a larger size, it also helps you see the spaces, tabs, and paragraph
returns that exist in the text. Choose Type ➪ Show Hidden Characters, choose Hidden Characters
from the View Options iconic popup menu in the application bar, or press Option+Ô+I or
Ctrl+Alt+I (refer to Figure 19.1).
FIGURE 19.1
To help you see spaces, breaks, and other control characters, special symbols can appear on-screen (they
do not print). Top row, from left to right: regular space, nonbreaking space, fixed-width nonbreaking
space, em space, en space, thin space, hair space, punctuation space, quarter space, third space, figure
space, and flush space. Second row: tab and right tab. Third row: discretionary hyphen and nonbreaking
hyphen. Fourth row: forced line break (new line), discretionary line break, paragraph return, column
break, frame break, page break, even page break, and odd page break. Fifth row: note, indent to here, end
nested style here, non-joiner, and end-of-story marker.
Navigating text
To work at a different text location, click in a different text frame or another location in the current
text frame. You can also use the four arrow (cursor) keys on the keyboard to move one character to
the right, one character to the left, one line up, or one line down. Add Ô or Ctrl to the arrow keys
29_607169-ch19.indd 46029_607169-ch19.indd 460 4/22/10 7:59 PM4/22/10 7:59 PM
Please purchase PDF Split-Merge on www.verypdf.com to remove this watermark.
Chapter 19: Editing, Spell-checking, and Replacing Text
461
to jump one word to the right or left, or one paragraph up or down. The Home and End keys let
you jump to the beginning or end of a line; add Ô or Ctrl to jump to the beginning or end of a
story. (A story is text within a text frame or that is linked across several text frames, as described in
Chapter 18.) Note that if your story begins or ends in a text frame on another page, InDesign
brings you to that page.
Highlighting text
To highlight text, you can always use the old click-and-drag method, or you can add the Shift key
to the navigation commands in the previous section. For example, while Ô+→ or Ctrl+→ moves
the cursor one word to the right, Shift+Ô+→ or Ctrl+Shift+→ highlights the next word to the
right. Likewise, Shift+Ô+End or Ctrl+Shift+End highlights all the text to the end of the story.
For precise text selections, double-click to select a word and its trailing space (punctuation is not
selected) and triple-click to select a paragraph. If you need the punctuation trailing a word,
double-click and then press Shift+Ô+→ or Ctrl+Shift+→ to extend the selection. To select an
entire story, choose Edit ➪ Select All or press Ô+A or Ctrl+A.
To deselect text, choose Edit ➪ Deselect All, or press Shift+Ô+A or Ctrl+Shift+A. More simply, you
can select another tool or click another area of the page.
Cutting, copying, and pasting text
After you’ve highlighted text, you can press Ô+X or Ctrl+X to remove it from its story and place it
on the Clipboard for later use. Use Ô+C or Ctrl+C to leave the text in the story and place a copy
on the Clipboard. Click anywhere else in text — within the same story, another story, or another
document — and press Ô+V or Ctrl+V. If you’re menu-driven, the Edit menu provides the equiva-
lent Cut, Copy, and Paste commands as well.
The Paste without Formatting command (choose Edit ➪ Paste without Formatting or press Shift+Ô+V
or Ctrl+Shift+V) is handy when you have formatted text from another document or application that
you want in your InDesign document without all that formatting applied. What you get is the raw
text pasted with the current InDesign paragraph or character style applied to it — with current
meaning whatever style is applied where you insert the text.
Deleting and replacing text
To remove text from a document, you can highlight it and choose Edit ➪ Clear or press Delete or
Backspace. You can also simply type over the highlighted text or paste new text on top of it.
If text is not highlighted, you can delete text to the right or left of the cursor. On the Mac, press
Delete to delete to the left. To delete to the right, if you have a Mac keyboard with a numeric key-
pad, press Clear, Del, or Delete→ (the key name has changed over the years). In Windows, press
Backspace to delete to the left and Delete to delete to the right.
29_607169-ch19.indd 46129_607169-ch19.indd 461 4/22/10 7:59 PM4/22/10 7:59 PM
Please purchase PDF Split-Merge on www.verypdf.com to remove this watermark.
Part V: Text Fundamentals
462
Tip
If you double-click a text frame with any tool other than a drawing or frame tool, InDesign automatically
switches to the Type tool and places the insertion point where you double-clicked. (This also works for text
paths and table cells.) You can switch back to a selection tool by pressing Esc.
n
Cross-Reference
InDesign CS5 lets you track changes in your layout, as Chapter 24 explains.
n
Undoing text edits
Remember to take advantage of InDesign’s multiple undos while editing text. Choose Edit ➪ Undo
and Edit ➪ Redo any time you change your mind about edits. The Undo and Redo keyboard com-
mands are definitely worth remembering: Ô+Z and Shift+Ô+Z or Ctrl+Z and Ctrl+Shift+Z.
Using the Story Editor
Editing in a layout can be difficult, such as having to scroll up and down through multiple col-
umns or change zoom levels based on the current text size. To let you get around that problem,
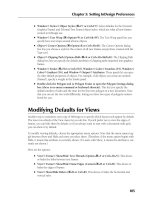
InDesign offers the Story Editor. This window, shown in Figure 19.2, lets you edit text without the
distractions of your layout. It presents your text without line breaks or other nonessential format-
ting. You just see attributes such as boldface and italics and, in a separate pane to the left, the
names of the styles that have been applied.
FIGURE 19.2
The Story Editor
29_607169-ch19.indd 46229_607169-ch19.indd 462 4/22/10 7:59 PM4/22/10 7:59 PM
Please purchase PDF Split-Merge on www.verypdf.com to remove this watermark.
Chapter 19: Editing, Spell-checking, and Replacing Text
463
New Feature
When you open the Story Editor window, InDesign CS5 now remembers the Story Editor window location and
dimensions from the last time you used it.
n
After clicking in a text frame, you open the Story Editor by choosing Edit ➪ Edit in Story Editor or
by pressing Ô+Y or Ctrl+Y. The Story Editor displays all text in that story (all the frames that
threaded to the one you selected).
Tip
The Story Editor can appear in its own tab, making it easy to switch between the Story Editor and your layout
views — just click the desired tab. (Chapter 2 explains the tabbed display for the document window.) Just drag
the default, free-floating Story Editor window into the tabs at the top of the document window, and InDesign
converts it into a tabbed window. (Drag it out to make it free-floating again.)
n
In the Story Editor, you use the same tools for selecting, deleting, copying, pasting, and searching
and replacing as you would in your layout. The Story Editor is not a separate word processor but is
simply a way to look at your text in a less distracting environment for those times when your focus
is on the meaning and words, not the text appearance.
You set preferences for text size and font in the Story Editor Display pane of the Preferences dialog
box (choose InDesign ➪ Preferences ➪ Story Editor Display or press Ô+K on the Mac, or choose
Edit ➪ Preferences ➪ Story Editor Display or press Ctrl+K in Windows), as detailed in Chapter 3.
You can also set whether drag and drop is allowed for text within the Story Editor by using the
Drag and Drop Text Editing controls in the Preference dialog box’s Type pane. (By default,
InDesign allows drag and drop within the Story Editor.)
The Story Editor can also identify overset text, as explained in Chapter 18.
Correcting Spelling Mistakes
Whether you’re entering text directly in InDesign or importing text files from elsewhere, there are
bound to be spelling mistakes. After all, we’re all human. Fortunately, InDesign offers a few ways
to take care of these misspellings.
InDesign’s spell-check features flag three types of possible editorial problems: repeated words such
as an an, words with odd capitalization such as the internal capitalization (called intercaps) in soft-
ware and company names (such as InDesign), and words not found in the spelling dictionary that
may be spelled incorrectly. You can customize the spelling dictionary, and you can purchase other
companies’ spelling dictionaries to add words from disciplines such as law and medicine, as well as
add dictionaries for other languages.
29_607169-ch19.indd 46329_607169-ch19.indd 463 4/22/10 7:59 PM4/22/10 7:59 PM
Please purchase PDF Split-Merge on www.verypdf.com to remove this watermark.
Part V: Text Fundamentals
464
Fixing spelling on the fly
I’ve long taken it for granted that on my word processor, text can be corrected as I type. Microsoft
Word, for example, has a feature called AutoCorrect that lets you specify corrections to be made as
you type, whether they are common typos or the expansion of abbreviations to their full words
(such as having Word replace tq with thank you).
InDesign offers the same functionality, which it calls Autocorrect (with a lowercase c). You enable
Autocorrect in the Autocorrect pane of the Preferences dialog box (choose InDesign ➪ Preferences ➪
Autocorrect or press Ô+K on the Mac, or choose Edit ➪ Preferences ➪ Autocorrect or press Ctrl+K
in Windows).
Note
Autocorrect works only for text you type in InDesign after you’ve turned Autocorrect on; it does not correct
imported or previously typed text.
n
It’s easy to configure Autocorrect:
1.
In the Autocorrect pane, select the Enable Autocorrect option to turn on this feature.
Tip
You can also enable Autocorrect by choosing Edit
➪
Spelling
➪
Autocorrect.
n
2.
If you want InDesign to automatically fix capitalization errors, select the
Autocorrect Capitalization Errors option. Typically, this finds typos involving capital-
izing the second letter of a word in addition to the first. For example, InDesign would
replace FOrmat with Format.
3.
Choose the dictionary whose spelling and capitalization rules you want InDesign to
use from the Language popup menu. The default is based on the language you selected
when you installed InDesign.
4.
To add your own custom corrections, click Add. This opens the Add to Autocorrect
List dialog box. Type the typo text or code you want InDesign to watch for in the
Misspelled Word field and the corrected or expanded text you want InDesign to substi-
tute in the Correction field. Click OK or press Enter when done, or click Cancel or press
Esc to close the dialog box without adding anything.
Note
Oddly, you cannot use special symbols such as — or ™, not even InDesign’s symbol codes (such as entering
the ^+ code for an em dash), in the Correction field.
n
5.
Click OK to close the Preferences dialog box when done.
To remove an autocorrection, just select it in the Autocorrect pane’s Misspelled Word list and click
Remove.
29_607169-ch19.indd 46429_607169-ch19.indd 464 4/22/10 7:59 PM4/22/10 7:59 PM
Please purchase PDF Split-Merge on www.verypdf.com to remove this watermark.
Chapter 19: Editing, Spell-checking, and Replacing Text
465
Using the Edit button in the Autocorrect pane, you can edit both the default autocorrections and
any you added yourself. Clicking this button opens the Edit Autocorrect List dialog box, in which
you then edit the contents of the Misspelled Word and/or Correction fields, then click OK or press
Enter to save the edited autocorrection.
Checking spelling as you type
You can have InDesign check your spelling as you type by simply choosing Edit ➪ Spelling ➪
Dynamic Spelling. You can also choose Spelling ➪ Dynamic Spelling from the contextual menu if
you are using the Type tool. If that menu option is selected, InDesign checks the spelling as you
type, as well as the spelling of any text already in the document. Suspected errors are highlighted
with red squiggly underlining so that you can correct them as needed.
Note
You can’t have InDesign help you correct misspellings with as-you-type spell-checking. If you want InDesign to
suggest proper spelling, you need to use the Check Spelling dialog box, which is covered in the next section.
n
Using the Check Spelling dialog box
The other method you can use to check spelling is the Check Spelling dialog box, which gives
you more control. First, it lets you choose what part of the document to spell-check. Second, it
The Misspelled Word and Correction fields are case-sensitive unless both entries are all lowercase. If
you’re not careful with how and when you capitalize text in these fields, you won’t get the automated
correction you expect.
The basic rule is this: Capitalize text in either field only if you are trying to fix capitalization errors.
InDesign assumes you are fixing capitalization if you use any capital letters in these fields.
Thus, if you type indesign in the Misspelled Word field and InDesign in the Correction field, InDesign
converts the indesign, Indesign, inDesign, and other miscapitalized variations to the properly capital-
ized InDesign. However, if you type Indesign in the Misspelled Word field and InDesign in the
Correction field, InDesign corrects only Indesign, not indesign and other miscapitalized variations.
Therefore, get in the habit of entering your text in lowercase in these fields. For example, if you type
portino in the Misspelled Word field and portion in the Correction field, InDesign corrects portino,
Portino, POrtino, and so on.
If you want to fix both spelling and capitalization errors at the same time, do it this way: Type the word
in the Misspelled Word field in lowercase and the word in the Correction field as you want it capital-
ized. For example, type indseign in Misspelled Word and InDesign in Correction. This way, any
instance of indseign — no matter how it is capitalized — is replaced with the properly spelled and
capitalized InDesign.
The Importance of Capitalization in Autocorrection
29_607169-ch19.indd 46529_607169-ch19.indd 465 4/22/10 7:59 PM4/22/10 7:59 PM
Please purchase PDF Split-Merge on www.verypdf.com to remove this watermark.
Part V: Text Fundamentals
466
provides suggestions on correct spelling and lets you add correctly spelled words that InDesign
doesn’t know about to its spelling dictionary. So even if you use the new dynamic spell-checking
feature, you still want to do a final spell-checking pass in the Check Spelling dialog box.
Specifying the text to check is a two-step process: First, set up the spell-check scope in the docu-
ment; then, specify the scope in the Search menu.
To set up the scope, do one of the following: highlight text; click in a story to check from the cur-
sor forward; select a frame containing a story; or open multiple documents. Just as in search and
replace, what you choose to open and select determines what scope options InDesign has for
spell-checking.
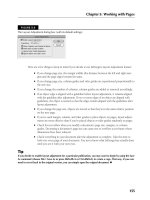
Then, open the Check Spelling dialog box (choose Edit ➪ Spelling ➪ Check Spelling or press Ô+I
or Ctrl+I) and choose an option from the Search popup menu: Document, All Documents, Story,
To End of Story, and Selection. Figure 19.3 shows the dialog box. How you set up the scope deter-
mines what options are available in the Search popup menu. For example, if you do not highlight
text, the Selection option is not available. However, you can change the scope setup in the docu-
ment while the Check Spelling dialog box is open. For example, you can open additional docu-
ments to check.
Tip
To check the spelling of a single word, double-click to highlight it and then open the spell-checker. The Check
Spelling dialog box’s Search popup menu is automatically set to Selection.
n
FIGURE 19.3
Use the Search popup menu in the Check Spelling dialog box to specify what text to spell-check.
29_607169-ch19.indd 46629_607169-ch19.indd 466 4/22/10 7:59 PM4/22/10 7:59 PM
Please purchase PDF Split-Merge on www.verypdf.com to remove this watermark.
Chapter 19: Editing, Spell-checking, and Replacing Text
467
Tip
Control+click or right-click a word, range of text, or a point in a text frame (using the Type tool) to get the
contextual menu from which you choose Check Spelling.
n
When you first open the Check Spelling dialog box and text is selected or the text cursor is active,
it immediately begins checking the spelling, going to the first suspect word. You can change the
scope of the search using the Search popup menu at any time.
If text is not selected or the text cursor is not active, the Check Spelling dialog box displays
Ready
to
Check
Spelling
at the top. To begin checking the text scope you specified in the Search
popup menu, click Start.
When adjusting the scope of the spell check in the Search popup menu, your choices are All
Documents, Document, Story, and To End of Story. You can also make the spell check case-
sensitive by selecting the Case Sensitive check box.
When the spell-checker encounters a word without a match in the dictionary or a possible capital-
ization problem, the dialog box displays
Not
in
Dictionary
at the top and shows the word.
When the spell-checker encounters repetition such as me me, the dialog box displays
Duplicate
Word
and shows the repeated words. Use the buttons along the right side of the dialog box to han-
dle flagged words as follows:
l
To leave the current instance of a Not in Dictionary word or Duplicate Word unchanged,
click Skip (which appears only after the spell check has started). To leave all instances of
the same problem unchanged, click Ignore All.
l
To change the spelling of a Not in Dictionary word, click a word in the Suggested
Corrections list or edit the spelling or capitalization in the Change To field. To make the
change, click Change.
l
To correct an instance of a Duplicate Word, edit the text in the Change To field and then
click Change.
l
To change all occurrences of a Not in Dictionary word or a Duplicate Word to the infor-
mation in the Change To field, click Change All.
l
To add a word flagged as incorrect — but that you know is correct — click Add to add
the word to InDesign’s spelling dictionary. (If you have multiple user-created dictionaries,
first choose the dictionary to add it to using the Add To popup menu.)
l
To add a word flagged as incorrect to a specific dictionary, click Dictionary. The resulting
Dictionary dialog box lets you choose which dictionary to add the word to, as well as what
language to associate it with. You can also specify hyphenation settings. I cover the
options in this dialog box later in this chapter.
l
To close the Check Spelling dialog box after checking all the specified text, click Done.
While you’re using Check Spelling, you can jump between the dialog box and the document at any
time. This lets you edit a possibly misspelled word in context or edit surrounding text as a result of
changed spelling. So if you find an instance of a a in front of apple, you can change the entire
29_607169-ch19.indd 46729_607169-ch19.indd 467 4/22/10 7:59 PM4/22/10 7:59 PM
Please purchase PDF Split-Merge on www.verypdf.com to remove this watermark.
Part V: Text Fundamentals
468
phrase to an apple rather than just replace the duplicate a a with a in the dialog box and have to
remember to later change a apple to an apple.
Working with multiple languages
Each word in InDesign can have a distinct language assigned to it (English, French, Spanish,
German, and so on). The word’s language attribute tells InDesign which dictionary to consult
when it’s spell-checking or hyphenating the word. For example, if you have the word frères in an
English sentence, you can change the language of that word so that the English spell-checker no
longer flags it — the French spell-checker is used instead and recognizes that the word is correctly
spelled.
Just because you have the ability to control language at the word level doesn’t necessarily mean
that you have to use it. In general, even when you’re publishing for an international audience, full
paragraphs or stories are in the same language. For example, if you have the same packaging for a
product sold in the United States and France, you might have one descriptive paragraph in English
and the other in French. The English dictionary also contains many common words with foreign
origins such as jalapeño, mélange, and gestalt.
To assign a language to text, highlight the text and choose an option from the Language popup
menu on the expanded Character panel. You can also set the language as part of a character or
paragraph style (see Chapters 20 and 21 for more details). In the Check Spelling dialog box, a field
above the Search menu shows the language of each word as it’s checked. Unfortunately, you can’t
change the language in that dialog box.
Note
There’s a language option called [No Language]; selecting it prevents spell-checking and hyphenation.
n
Customizing the Spelling and Hyphenation
Dictionaries
A spelling dictionary can never cover all the bases — you always have industry-specific words and
proper nouns not found in the dictionary in use. In addition, copy editors tend to have their own
preferences for how to hyphenate words. What they consider correct hyphenation may vary, and
some word breaks are preferred over others. To solve both these problems, you can customize
InDesign’s dictionaries by adding words and specifying hyphenation. InDesign handles both spell-
ing and hyphenation in one dictionary for each language, so you use the same controls to modify
both.
Changes made to a dictionary file are saved only in the dictionary file, not with an open document.
So if you add words to the English: USA dictionary, the modified dictionary is used for spell-
checking and hyphenating all text in documents that use the English: USA dictionary.
29_607169-ch19.indd 46829_607169-ch19.indd 468 4/22/10 7:59 PM4/22/10 7:59 PM
Please purchase PDF Split-Merge on www.verypdf.com to remove this watermark.
Chapter 19: Editing, Spell-checking, and Replacing Text
469
Tip
If you’re in a workgroup, be sure to share the edited dictionary file so that everyone is using the same spelling
and hyphenation settings. (The file is located in the
Dictionaries
folder inside the
Plug-ins
folder, which
is inside your
InDesign
folder.) You can copy it for other users, who must then restart InDesign or press
Option+Ô+/ or Ctrl+Alt+/ to reflow the text according to the new dictionary’s hyphenation.
n
Customizing the spelling dictionary
While spell-checking, you often find words that don’t match those in the dictionary. If you know that
the word is spelled correctly and likely to appear in your publications often, you might want to add it
to the dictionary. After you add it, that word is no longer flagged and you don’t have to click Ignore
to skip it; also, you can be sure that when it’s used, it is spelled as it is in the dictionary.
When adding words to the dictionary, you can specify their capitalization. For example, InDesign’s
dictionary prefers E-mail. You can add e-mail if you prefer a lowercase e, or email if you prefer to
skip the hyphen. If you’re adding a word that may have variations (such as e-mailing) be sure to
add those variations separately.
To add words to the dictionary:
1.
Choose Edit ➪ Spelling ➪ Dictionary. The Dictionary dialog box shown in Figure 19.4
appears.
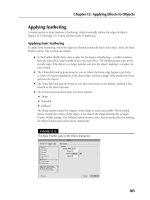
FIGURE 19.4
At left: Type a new term in the Word field and then click Add to include it in the spell-
ing dictionary. Be sure to select the Case Sensitive option for proper names and acro-
nyms. At right: Use tildes (~) to indicate hyphenation points and then click Add to
include them in the spelling dictionary.
29_607169-ch19.indd 46929_607169-ch19.indd 469 4/22/10 7:59 PM4/22/10 7:59 PM
Please purchase PDF Split-Merge on www.verypdf.com to remove this watermark.
Part V: Text Fundamentals
470
2.
Choose whether the addition to the dictionary affects just this document or all doc-
uments. To do so, use the Target popup menu, which lists the current document name
as well as User Dictionary (to change the dictionary file). The advantage of making the
spelling specific to the document is that all users, such as service bureaus, have the same
spellings; the disadvantage is that other documents won’t share this spelling.
3.
Choose the dictionary that you want to edit from the Language popup menu.
4.
Type or paste a word in the Word field. The word can include special characters such
as accents and hyphens, spaces, and a capitalization pattern to follow.
5.
If you want InDesign to accept only the added word with the capitalization typed in
the Word field, select the Case Sensitive option. This lets you add proper names, for
example, but have them still flagged when typed in all lowercase or with extra capital let-
ters. For example, if you type Healdsburg in the Word field and select Case Sensitive,
InDesign doesn’t flag Healdsburg but does flag healdsburg and HEaldsburg.
6.
If you want to edit the hyphenation, click Hyphenate. You can add, remove, or mod-
ify the number of tildes to change the hyphenation rules for the word, as covered in the
next section.
7.
Click Add.
8.
If you want to import a word list or export one for other users to import into their
copies of InDesign, click Import or Export as appropriate. You navigate to a folder
and choose a file name in a dialog box similar to the Open a File or Save dialog boxes.
Note that when you click Export, InDesign exports all selected words from the list. If no
words are selected, it exports all the words in the list.
9.
Continue to add words, and when you’re finished, click Done.
Tip
When you’re adding variations of words, you can double-click a word in the list to place it in the Word field as
a starting place.
n
Tip
Words added to the All Languages dictionary are used for spell-checking and hyphenation no matter what lan-
guage you’ve set InDesign to use. It’s a great way to make sure that universal terms — such as proper names or
industry-specific jargon — are properly spelled no matter what language is in use.
n
In addition to adding words through the Dictionary dialog box, you can click Add in the Check
Spelling dialog box when InDesign flags a word that you know is correct, as covered earlier in this
chapter.
To delete a word that you added to the dictionary, select it in the list and click Remove. To change
the spelling of a word you added, delete it and then add it again with the correct spelling. You can
see the words you’ve deleted since you opened the dialog box by choosing Removed Words from
the Dictionary List popup menu, so you can add back any deleted by error.
29_607169-ch19.indd 47029_607169-ch19.indd 470 4/22/10 7:59 PM4/22/10 7:59 PM
Please purchase PDF Split-Merge on www.verypdf.com to remove this watermark.
Chapter 19: Editing, Spell-checking, and Replacing Text
471
Customizing hyphenation points
Industries and publications usually have internal styles on how words hyphenate, especially if the
text is justified. For example, a bridal magazine that uses the term newlywed often may prefer that
it break at the end of a line as newly–wed. However, if that hyphenation would cause poor spacing,
the publisher might let it break at new–lywed as well. InDesign lets you modify the hyphenation
dictionary by specifying new, hierarchical hyphenation points.
Note
When you customize the hyphenation points, be sure to add variations of words (such as the plural form
newlyweds). InDesign sees each word as wholly unrelated and therefore doesn’t apply the hyphenation of, say,
newlywed to newlyweds.
n
To specify hyphenation points:
1.
Choose Edit ➪ Spelling ➪ Dictionary.
2.
Choose from the Language menu the dictionary that you want to edit.
3.
Type or paste the word in the Word field; you can also double-click a word in the
list.
4.
If you want, click Hyphenate to see InDesign’s suggestions for hyphenating the
word. You can then change the hyphenation according to Steps 5 and 6.
5.
Type a tilde (~, obtained by pressing Shift+`, the open single keyboard quotation
mark at the upper left of the keyboard) at your first preference for a hyphenation
point. If you don’t want the word to hyphenate at all, type a tilde in front of it.
6.
Type tildes in other hyphenation points as well. If you want to indicate a preference,
use two tildes for your second choice, three tildes for your third choice, and so on.
InDesign first tries to hyphenate your top preferences (single tildes), and then it tries your
second choices if the first ones don’t work out, and so on. The right side of Figure 19.4
shows an example.
7.
Click Add.
8.
Continue to add words until you’re finished and then click Done.
To revert a word to the default hyphenation, select it in the list and click Remove. To change the
hyphenation, double-click a word in the list to enter it in the Word field, change the tildes, and
then click Add. When you’re adding variations of words, you can double-click a word in the list to
place it in the Word field as a starting place.
Tip
If a word actually includes a freestanding tilde (not as an accent, as in ñ), type \~ to indicate that the character
is part of the word. Freestanding tildes are rare and happen mostly in World Wide Web addresses.
n
29_607169-ch19.indd 47129_607169-ch19.indd 471 4/22/10 7:59 PM4/22/10 7:59 PM
Please purchase PDF Split-Merge on www.verypdf.com to remove this watermark.
Part V: Text Fundamentals
472
Setting spelling and hyphenation dictionary
preferences
By default, when spell-checking and hyphenating text, InDesign consults dictionaries created by a
company called Proximity. Because spelling and hyphenation points vary from dictionary to dic-
tionary, and you may prefer one dictionary over another, you can purchase and install other com-
panies’ dictionaries to use instead of Proximity’s. However, it’s very hard to find commercial
alternatives to the Proximity dictionaries, so most users use the ones that come with InDesign and
update them as needed, or add their own user dictionaries to supplement them.
To replace a dictionary:
1.
Place the new dictionary file in the
Dictionaries
folder in the
Plug-ins
folder
inside your InDesign folder.
2.
Go to the Dictionary pane of the Preferences dialog box, shown in Figure 19.5.
(Choose InDesign ➪ Preferences ➪ Dictionary or press Ô+K on the Mac, or choose
Edit ➪ Preferences ➪ Dictionary or press Ctrl+K in Windows.)
FIGURE 19.5
If you purchase and install different hyphenation and spelling dictionaries, you can
select them in the Dictionary pane of the Preferences dialog box. You can also add your
own dictionaries.
29_607169-ch19.indd 47229_607169-ch19.indd 472 4/22/10 7:59 PM4/22/10 7:59 PM
Please purchase PDF Split-Merge on www.verypdf.com to remove this watermark.
Chapter 19: Editing, Spell-checking, and Replacing Text
473
3.
From the Language popup menu, choose which language’s dictionary you want to
replace. Dictionary files associated with that language appear in the list below the popup
menu.
4.
Use the four buttons under the list of dictionary files to modify the dictionary files
associated with the language. They are, from left to right:
l
Relink User Dictionary: This lets you select a replacement dictionary for the one
selected in the list. Navigate to the folder and dictionary file you want to use and then
click Open.
l
New User Dictionary: This creates a new, empty dictionary file that you can then
modify with the Dictionary dialog box, covered earlier in this chapter. The result is a
custom dictionary.
l
Add User Dictionary: This lets you add an existing dictionary to the selected lan-
guage. Thus, you can have multiple dictionaries per language, which is very useful for
handling industry-specific terms or trademarked terms, for example.
l
Remove User Dictionary: This removes a dictionary associated to a language. Note
that there must be at least one dictionary per language, so this button is grayed out
when only one dictionary remains in the list.
Tip
A fast way to fill a new custom dictionary with the desired words is to spell-check a bunch of documents con-
taining those special words. Add the words InDesign does not recognize to your custom dictionary, as
described earlier in this chapter.
n
5.
If you have multiple rules engines for hyphenation and spelling, choose the referred
rules engine from the Hyphenation and/or Spelling popup menu. Such rules engines
are rare, so you typically have only the default choice of Proximity for these two popup
menus.
6.
If you don’t want to use the language’s standard quotation characters, you can
change them in the Double Quotes and Single Quotes popup menus. You might
change the default quotation marks if you are publishing in one language but have exten-
sive phrases from other languages in them. For example, a French book that extensively
uses English passages (perhaps a literary article) might want to apply French quotation
marks (« ») to text tagged with one of the English languages.
7.
To regulate how hyphenation is handled, use the Compose Using popup menu. Your
choices are the following: User Dictionary, which has InDesign ignore the hyphenation
override settings that a user has made to this document (a great way to override some-
one’s incorrect hyphenation changes); Document, which uses only the hyphenations
specified in the document; and User Dictionary and Document, which uses hyphenation
settings from the dictionary as well as any hyphenation specified in the document. This
last setting is the default.
8.
To ensure consistent spelling and hyphenation, use the two options in the User
Dictionary section:
29_607169-ch19.indd 47329_607169-ch19.indd 473 4/22/10 7:59 PM4/22/10 7:59 PM
Please purchase PDF Split-Merge on www.verypdf.com to remove this watermark.
Part V: Text Fundamentals
474
l
Merge User Dictionary into Document. If selected, this option copies the user dic-
tionary into the document, so if the file is used by someone else who doesn’t have that
user dictionary, the spelling and hyphenation rules are nonetheless retained.
l
Recompose All Stories When Modified. If selected, this option rehyphenates and
changes quotation mark settings for all stories in the document, even those created
before the user dictionary was modified or added.
9.
Click OK.
Tip
If you change Dictionary Preferences with no documents open, the new dictionary becomes a program default
and applies to all new documents. If a document is open, the change applies only to that document.
n
Searching and Replacing
InDesign’s Find/Change dialog box (choose Edit ➪ Find/Change or press Ô+F or Ctrl+F) lets you
do everything from, for example, finding the next instance of curry in an article so that you can
insert extra spicy in red to finding all instances of a deposed chef’s name in six different documents.
If you know how to use the search-and-replace feature in any word processor or page-layout appli-
cation, you should be comfortable with InDesign’s Find/Change in no time.
Cross-Reference
The Find/Change dialog box lets you search for object attributes, not just text attributes. Chapter 11 covers
object search and replace.
n
Searching and replacing text
The Find/Change dialog box comes in two forms: reduced for finding and changing just text and
expanded for including attributes in a search. Click More Options to expand the dialog box to
include formatting options for your search and replace, and Fewer Options to reduce it.
Before starting a Find/Change operation, determine the scope of your search:
l
To search within a text selection, highlight it.
l
To search from a certain location in a story to the end of it, click in that location using the
Type tool to place the text cursor (also called the text-insertion point) there.
l
To search an entire story, select any frame or click at any point in a frame containing the
story.
l
To search an entire document, simply have that document open.
l
To search multiple documents, open all of them (and close any that you don’t want to
search).
29_607169-ch19.indd 47429_607169-ch19.indd 474 4/22/10 7:59 PM4/22/10 7:59 PM
Please purchase PDF Split-Merge on www.verypdf.com to remove this watermark.