Tài liệu Flash After Effects- P7 ppt
Bạn đang xem bản rút gọn của tài liệu. Xem và tải ngay bản đầy đủ của tài liệu tại đây (2.7 MB, 46 trang )
Shape Layers
237
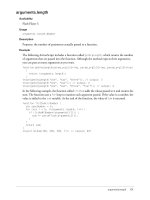
Exercise 3: Animating Shapes and Path Operations
Now that you have experimented with the Shape Layers and have a basic
understanding of their attributes, let’s create an animation using them. In this
exercise, you will also apply path operations to a Shape Layer. Path operations
offer distortion effects such as Pucker & Bloat, Twist, Zig Zag, and an auto-
animating Wiggle Paths. Figure 9.10 shows an example of each.
Figure 9.10: Examples of the path operations applied to a Shape Layer.
Another path operation that you will use is the Repeater. It creates virtual copies
of your shapes in the Comp Window. A project has been set up for you.
Open the
1.
03_Tunnel.aep project file located inside the 01_Shapes folder inside
Chapter_09. It contains one composition labeled Tunnel.
There is one Shape Layer in the Timeline. The shape is a rounded rectangle with
2.
a 10-pixel stroke and no fill. Twirl open Rectangle 1 to open the shape group.
Twirl open Transform: Rectangle 1 to view its transform properties.
Figure 9.11: Twirl open the shape group’s transform properties.
Original Shape
Twist
Pucker
Zig Zag
Bloat
Wiggle Paths
Chapter_09.indd 237 1/1/2008 1:01:42 PM
238
Chapter 9: Shapes and Sounds
Click on the
3.
stopwatch icon for Rotation to record a keyframe at the
beginning of the composition. Press the End key on the keyboard to move
the Current Time Indicator (CTI) to the end of the composition. Change the
Rotation value to 1x +0.0. The rounded square rotates 360 degrees.
Select
4.
Add in the Timeline or from the Toolbar and choose Repeater from the
popup menu. Three new squares appear to the right of the original shape. The
Repeater is a path operation that creates virtual copies of all paths, strokes,
and fills within a shape group. The virtual copies are only present in the Comp
Window and do not appear as new layers in the Timeline panel.
Figure 9.12: Add the Repeater path operation to the Shape Layer.
Twirl open
5.
Repeater 1. Change the Copies value to 20.
Twirl open the
6.
Transform: Repeater 1. You can define how each copy is
transformed by modifying its position, scale and rotation values, which
accumulate for each copy. Make the following changes:
Set the
3
Position values to 0.0, 0.0. This aligns all the copies
underneath the original shape.
Change the
3
Scale value to 70%. Now you can see how
the transform properties accumulate for each copy.
The replicated rounded squares recede into space.
Change the
3
Anchor Point value to 0.0, –10,0.
Scrub through the Timeline. Notice that the virtual copies rotate to follow
7.
the original shape. Move the CTI to the beginning of the composition.
Set the
3
Rotation value of the Repeater to 0x +10.0. This aligns
all the copies underneath the original shape. Click on the stopwatch icon
for Rotation to record a keyframe.
Press the
3
End key on the keyboard to move the CTI to the end
of the composition. Change the Rotation value to 0x +90.0.
Change the
8.
End Opacity value to 30. This adds the illusion of depth to
the rotating shapes as each copy lowers in opacity.
Change the
9.
Offset attribute under Repeater 1 to –2.0. This moves the objects
closer to the active camera, immersing you in the spinning vortex.
Chapter_09.indd 238 1/1/2008 1:01:42 PM
Shape Layers
239
Click on the
10.
RAM preview. Save your project. Let’s add a distortion effect to
this animation. Select Add in the Timeline or from the Toolbar and choose Twist
from the popup menu. A Twist 1 attribute appears in the Timeline. Twirl
it open and change the Angle value to 360.0. Let’s apply some visual effects.
Figure 9.13: Apply the Twist path operation to the Shape Layer.
With the Shape Layer 1 highlighted in the Timeline, select
11.
Effect > Generate >
CC Light Burst 2.5. In the Effect Controls panel, change the Intensity to 500.00
and the Ray Length to 150. This creates an interesting abstract background.
Figure 9.14: Apply the CC Light Burst 2.5 effect to create a kaleidoscope effect.
Chapter_09.indd 239 1/1/2008 1:01:42 PM
240
Chapter 9: Shapes and Sounds
Let’s experiment with one more visual effect. Before you do that, disable the
12.
CC Light Burst effect in the Effect Controls panel by clicking on its FX icon .
Select
13.
Effect > Distort > CC Flo Motion. The effect is added to the Effect
Controls panel underneath CC Light Burst. This effect pinches and pulls the
entire layer. Change the Knot 1 value to 275.0, 200.0. This centers the knot
in the Comp Window. Change the Amount 1 value to 40.
Figure 9.15: Apply the CC Flo Motion to dramatically distort the Shape Layer.
Keep experimenting with other effects and path operations to tweak the
14.
animation to whatever you want. If you want some inspiration, click on the
Brainstorm button at the top of the Timeline panel. This displays multiple
variations of the selected property using randomized settings. To apply any of
the variations, click on the check mark icon over each thumbnail image.
Figure 9.16: Use Brainstorm to explore different possibilities for your composition.
When you are satisfied with your composition, render it out as a Flash Video
15.
(FLV) file to use in Flash as an animated background. Why render to a FLV
format instead of a Flash SWF file? Even though you are working with vec-
tor information in a Shape Layer, it will not export as vectors. All Shape Layers
rasterize when exported or rendered from After Effects.
Chapter_09.indd 240 1/1/2008 1:01:43 PM
Digital Audio Basics
241
Digital Audio Basics
Let’s take a detour for a moment and enter the world of digital audio. Up to
this point in the book, you have been using After Effects for visual effects and
animation without incorporating a lot of audio. Sound greatly enhances the user
experience whether you are watching a video or interacting with elements in a
Flash movie. It is important to understand a few key principles about audio to
achieve great results when integrating it into Flash or After Effects.
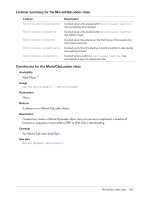
Figure 9.17: Vibrating objects generate waves of compressed air that we hear as sound.
What is sound? Vibrating objects, such as guitar strings or vocal cords, generate
waves of rapidly varying air pressure. Sound waves occur as repeating cycles
of pressure move out and away from the vibrating object. When these
vibrations reach our ears, we hear sound. The frequency, or pitch, refers to the
number of cycles (waves) per second. The amplitude, or intensity, of sound is
the size (height of the wave) of the variations. When you see audio waveforms
in software applications, they illustrate these pressure waves.
Figure 9.18: Audio waveforms are visually represented in Flash and After Effects.
Electronic representations of sound waves can be recorded in either digital or
analog formats. Analog recordings use audio tape, which is a very thin strip
of plastic, coated with magnetic particles. A microphone converts the sound
pressures into electric impulses. The electric impulses align with the magnetic
particles to create a pattern on the tape that represents the sound.
Computers record audio as a series of zeroes and ones. Digital audio breaks the
original waveform up into individual samples. This is referred to as digitizing or
Chapter_09.indd 241 1/1/2008 1:01:43 PM
242
Chapter 9: Shapes and Sounds
audio sampling. The sampling rate defines how often a sample is taken during
the recording process.
When audio is recorded at a higher sampling rate, the digital waveform
perfectly mimics the original analog waveform. Low sampling rates often distort
the original sound because they do not capture enough of the sound frequency.
The frequency of a sound is measured in Hertz (Hz), which means cycles per
second. A kilohertz (kHz) is a thousand cycles per second. Table 9.1 lists some
common sampling rates used in digital audio.
Table 9.1: Common digital audio sampling rates
Sampling Rate Usage
8,000 Hz Low quality with low file size used for the Web.
11,025 Hz Good for narration only. Do not use for music.
22,050 Hz Adequate quality and file size used in older multimedia.
44,100 Hz Audio CD quality, used for video and music.
48,000 Hz DVD quality, used for video and music.
The bit depth of each audio sample is equally as important as the sampling
rate. In digital audio, bit depth describes the amount of data contained in each
sample, measured in bits. You can compare audio bit depth to image bit depth.
The lower the number, the less detail captured, resulting in poorer quality sound.
Common examples of bit depth include CD audio, which is recorded at 16 bits,
and DVD-Audio that records up to 24-bit audio.
Once the audio has been sampled, it can be saved out into a number of file
formats. It should come as no surprise that After Effects can import a variety
of these audio file formats. The imported audio works like all the other footage
in the Project panel. An audio footage file is added to the Timeline as a layer.
You can have multiple layers of audio to mix the sounds together. Here are
some common audio file formats that can be imported into After Effects:
AIFF
3
(Audio Interchange File Format) is a standard audio format
for the Mac.
WAV
3
(Waveform Audio Format) is a standard audio format on
a Windows-based computer.
MP3
3
(Motion Picture Expert Group) is the file format of choice
for Flash movies. It uses a compression algorithm to remove certain
parts of sound that are outside the hearing range of most people.
As a result, the audio still sounds great to us with a small file size.
Let’s take a look at how to integrate and mix audio in a project in After Effects.
A composition has already been created. You will add several sound effects and
background music to an existing animation that originated in Flash. The Flash
scenes were exported to After Effects to be prepared for broadcast.
Chapter_09.indd 242 1/1/2008 1:01:43 PM
Digital Audio Basics
243
Exercise: Mixing Audio in After Effects
To see an example of what you will build in this exercise, locate and play the
WizardsBlast.mov in the Completed folder inside the 02_AudioMix folder in
Chapter_09. You will add audio in After Effects to a couple of scenes from an
animation. The final composition will be prepared for NTSC video.
Figure 9.19: Sound effects greatly enhance this animation.
Open the
1.
01_SoundEffects.aep project file located inside the 02_Audio folder
inside Chapter_09. It contains three compositions in the Project panel.
In the Project panel, double-click on
2.
Scene1_WizardBlast to open its Timeline
and Composition panel. The two-second composition contains an imported
Flash SWF file. After Effects was used to add the visual effects of the lightning,
lens flare, and sparks. Click on each solid layer and go to the Effect Controls
panel to see how the visual effects were applied.
Figure 9.20: Effects were layered on top of the imported Flash SWF animation.
Chapter_09.indd 243 1/1/2008 1:01:43 PM
244
Chapter 9: Shapes and Sounds
In the Project panel, double-click on
3.
Scene2_Monster to open its Timeline and
Composition panel. The three-second composition contains another imported
Flash SWF file with some visual effects added to it. The Glow and CC Flo
Motion effects were applied to the SWF layer to create the monster’s distortion.
Figure 9.21: Effects were applied directly to the Flash SWF animation.
In the Project panel, double-click on
4.
FinalComp to open its Timeline and
Composition panel. It contains both nested compositions and an Adjustment
Layer. The Broadcast Colors effect has been applied to the Adjustment Layer
to keep the composition’s color space within the range allowed for NTSC
broadcast video.
Comp Markers have also been inserted to assist you with adding the sound
effects. They are used to mark a point in time within the composition. These
markers do not move with the layers. To create a Comp Marker, click and drag
a marker icon from the top-right of the Timeline to the frame you wish to
mark. They are numbered in sequential order.
Figure 9.22: Comp Markers help label specific points in time within the composition.
Now that you are aware of how the composition is set up, let’s start adding the
5.
sound effects. All of the audio has already been imported into the Project panel.
The footage is contained in an Audio folder. Click and drag Blast.mp3 from the
Project panel to the Timeline. Position the audio at the top of the layer stack.
Release the mouse to create the new layer.
Chapter_09.indd 244 1/1/2008 1:01:44 PM
Digital Audio Basics
245
Move the CTI to align with
6.
Comp Marker 0. Click and drag the audio layer’s
duration bar to align it with the CTI (Figure 9.23). It doesn’t matter where the
audio is placed within the layer stacking order. Most often, the audio layers are
grouped together at either the top or bottom of the stack.
Figure 9.23: Add the Blast.mp3 audio file to the Timeline.
Click and drag
7.
Zap.mp3 from the Project panel to the Timeline. Move the CTI
to align with Comp Marker 1. Click and drag the audio layer’s duration bar to
align it with the CTI (Figure 9.24).
Figure 9.24: Add the Zap.mp3 audio file to the Timeline.
Click and drag
8.
Creature.mp3 from the Project panel to the Timeline. Move the
CTI to align with Comp Marker 2. Click and drag the audio layer’s duration bar
to align it with the CTI (Figure 9.25).
Figure 9.25: Add the Creature.mp3 audio file to the Timeline.
Click and drag
9.
Boom.mp3 from the Project panel to the Timeline. Move the
CTI to align with Comp Marker 3. Click and drag the audio layer’s duration bar
to align it with the CTI (Figure 9.26).
Figure 9.26: Add the Boom.mp3 audio file to the Timeline.
Click and drag
10.
Music.mp3 from the Project panel to the Timeline. It should
span the entire duration. With all the audio in place, click on the RAM preview
button to hear the audio. You can also hold down the Command (Mac) or
Control (Windows) key and scrub through the Timeline to hear the audio.
Chapter_09.indd 245 1/1/2008 1:01:44 PM
246
Chapter 9: Shapes and Sounds
You need to tweak a couple of the audio layers to synchronize them better
11.
with the visuals. Right-click or Control-click (Mac) on the Source Name column
header and select Columns > Duration.
Figure 9.27: Open the Duration column in the Timeline.
Right-click
12.
or Control-click (Mac) on the Source Name column header and
select Columns > Out.
Figure 9.28: Open the Out column in the Timeline.
First, let’s change the length of the
13.
Boom.mp3 layer’s duration bar. Select the
layer in the Timeline. Scrub through its Duration value until it reads 01;05. This
change speeds up the audio, creating more of a cartoon-like sound effect.
Figure 9.29: Change the duration of the Boom.mp3 layer’s duration bar.
Chapter_09.indd 246 1/1/2008 1:01:44 PM
Digital Audio Basics
247
Select the
14.
Zap.mp3 layer in the Timeline. Scrub through its Out value until the
end of the layer’s duration bar aligns with the CTI. The value should be around
03;12. This trims the audio, but doesn’t alter the playback.
Figure 9.30: Change the Out point of the Zap.mp3 layer’s duration bar.
Twirl open the
15.
Music.mp3 layer to reveal its Audio property. Twirl open the
Audio property to reveal the Audio Levels and Waveform. Twirl open the
Waveform layer to see a visual representation of the audio file. To scale the
waveform, position the cursor at the bottom of the Audio Waveform layer.
When the cursor changes to a double-cursor, click and drag to scale the layer.
Figure 9.31: Twirl open the Waveform layer to see a visual representation of the audio.
Currently the audio’s duration is longer than the composition’s. You are going
16.
to fade out the audio using the Audio Levels property. Move the CTI to the four
second mark (04:00). Click on the stopwatch icon next to Audio Levels to
record the current volume at that time.
Press the
17.
End key to move the CTI to the end of the composition. Lower the
Audio Levels value to –25.00 dB. This fades the music out at the end of the
composition. The waveform also changes to illustrate the fade out.
Figure 9.32: Fade out the Music.mp3 audio at the end of the composition.
Chapter_09.indd 247 1/1/2008 1:01:44 PM
248
Chapter 9: Shapes and Sounds
Click on the
18.
RAM preview to listen to the final composition. After Effects does
provide some effects that can be applied to audio layers. These include:
The
3
Backwards effect reverses a layer’s audio.
The
3
Bass & Treble effect increases or decreases the low frequencies (bass)
or the high frequencies (treble) of the audio.
The
3
Reverb effect simulates a spacious or acoustically live interior.
The
3
Stereo Mixer effect mixes the left and right channels of audio and pans
the entire signal from one channel to the other.
Select
19.
Composition > Make Movie to add the composition to the
Render Queue.
Click on
20.
Lossless next to Output Module. Set the Format to QuickTime movie.
Click on Format Options and set the compression setting to MPEG-4 Video.
Enable the
21.
Audio export for the music and sound effects. Set the sampling
rate to 48.000 kHz for DVD output. Set the bit depth to 16 Bit and make sure
the audio is exported in Stereo. Click OK.
Figure 9.33: Export the audio in the Format Options.
Click on
22.
Output To and select the Chapter_09 folder on your hard drive as
the final destination for the rendered movie. Click the Render button.
This completes the exercise that focused on mixing audio in After Effects. The
imported audio works like any other footage in the Project panel. Audio
footage appears as its own layer in the Timeline. You can have multiple layers
of audio to mix the sounds together. The Audio Levels property allows you to
keyframe the volume of the sound over time.
Sound is an important component in digital video and Flash movies. This
section of the chapter also discussed the fundamentals of audio. Some key
terms to remember include sampling rate and bit depth. The sampling rate
defines how often a sample is taken during the recording process. Bit depth
describes the amount of data contained in each sample, measured in bits. Both
work together in determining the quality of the digital sound. The higher the
values, the better the sound quality and bigger the file size.
Chapter_09.indd 248 1/1/2008 1:01:45 PM
Sound Visualization
249
Sound Visualization
This last part of the chapter deals with visualizing audio in After Effects using
the Audio Spectrum effect and converted keyframes. You will come full-circle
in this chapter as you animate Shape Layers to the beat of the music.
Sound visualization is a graphic representation of an audio signal. After Effects
provides a couple of methods that allow you to create this visualization at the
click of a mouse. To do the same thing in Flash requires a lot of ActionScript
knowledge and patience. After Effects makes it so easy and fast. Let’s first
explore the Audio Spectrum effect.
Exercise 1: The Audio Spectrum
Open a new After Effects project. Select
1.
Composition > New Composition.
The Composition Settings dialog box appears. You will set up the composition
to match the Flash file you are integrating the effect into.
Make the following settings and then click
2.
OK to create the new composition.
Composition Name:
3
Spectrum
Width:
3
550
Height:
3
400
Pixel Aspect Ratio:
3
Square Pixels
Frame Rate:
3
30
Duration:
3
0:00:17:00
Double-click inside the Project panel. In the Import File dialog box, locate
3.
and import the Spectrum.wav file in the Footage folder inside the 03_Visualize
folder. Click and drag the audio file from the Project panel to the Timeline.
Figure 9.34: Import the audio and add it to the Timeline.
Make sure the Timeline panel is highlighted. Select
4.
Layer > New > Solid. The
Solid Settings dialog box appears. Make the following settings:
Enter
3
AudioSpectrum for the solid name.
Click on the
3
Make Comp Size button.
Set the color of the solid layer to
3
Black.
Click
3
OK.
Chapter_09.indd 249 1/1/2008 1:01:45 PM
250
Chapter 9: Shapes and Sounds
Make sure the solid layer is still highlighted in the Timeline. Select
5.
Effect >
Generate > Audio Spectrum. A row of pink dots appears in the Comp Window
(Figure 9.35). The effect visually displays the audio using each dot to reflect the
magnitude in the sound’s frequency.
Figure 9.35: Apply the Audio Spectrum effect to the solid layer.
In the Effect Controls panel, select
6.
Spectrum.wav from the Audio Layer
popup menu. Click on the RAM Preview. As you can see, the dots swell or
shrink depending upon the frequency of the audio being played.
Figure 9.36: Set the audio layer to the Spectrum.wav in the Effect Controls panel.
The effect contains a lot of properties that control the spectrum. Let’s focus
7.
on a couple. You can apply the effect to a drawn path. Select the Pen tool
in the Tools panel.
In the Comp Window, draw a curved path on the solid layer using the Pen tool.
8.
Figure 9.37: Use the Pen tool to draw a path on the solid layer.
In the Effect Controls panel, select
9.
Mask 1 from the Path popup menu. The
audio spectrum attaches itself to the drawn path.
Chapter_09.indd 250 1/1/2008 1:01:46 PM
Sound Visualization
251
Change the
10.
Frequency bands value to 100. This generates more dots in the
spectrum. Change the Maximum Height value to 1500. This elongates the
frequency lines that appear. Click the RAM Preview to see the adjustments.
Figure 9.38: Adjust the Frequency bands and Maximum Height properties.
Increase the
11.
Thickness value to 40. Change the Softness value to 100. This
feathers the audio spectrum. Click the RAM Preview to see the adjustments.
Figure 9.39: Adjust the Thickness and Softness properties of the Audio Spectrum.
Use the color swatches to change the color of the audio spectrum to whatever
12.
you want. There are two swatches: the Inside and Outside Color.
As mentioned in Chapter 3, the Audio Spectrum effect renders as vectors.
13.
Select File > Export > Adobe Flash (SWF). This opens the Save File As dialog
box. Save the SWF file to the 03_Visualize folder in Chapter_09. The SWF
Settings dialog box appears. In the Images area, set After Effects to Ignore
Unsupported Features. For now, leave the Audio unchecked.
Chapter_09.indd 251 1/1/2008 1:01:46 PM
252
Chapter 9: Shapes and Sounds
Locate the exported SWF file and launch it in the Flash Player. It doesn’t look
14.
quite the same as it does in the Comp Window in After Effects. Certain properties,
such as Softness, do not translate well when exported to a Flash SWF format.
Figure 9.40: Launch the exported SWF file.
Close the Flash Player and return to After Effects. In the Effect Controls panel,
15.
decrease the Thickness value to 5. Change the Softness value to 0.
Select
16.
Analog Lines from the Display Options popup menu. The other option
available to you is Analog Dots. Experiment with both to see the difference.
Enable the
17.
Use Polar Path checkbox. Click the RAM Preview to see the results.
You may need to move the solid layer over to see the audio spectrum better.
You get a different effect, much like a star burst that animates to the music.
Save your project in After Effects. To migrate the sound visualization over to
18.
Flash, select File > Export > Adobe Flash (SWF). Do not include the audio in
the SWF file. It is better to keep the audio separate and import it into Flash or
write some code in ActionScript to load the audio using the Sound object.
Don’t forget that you have a ton of visual effects that you can apply to this
19.
solid layer. Figure 9.41 shows the CC Radial Fast Blur applied. If you do apply
an effect, the Audio Spectrum will no longer render as vectors so you need to
export the composition as a Flash Video (FLV) file to achieve a smaller file size.
Figure 9.41: You can apply other visual effects to enhance the Audio Spectrum.
Chapter_09.indd 252 1/1/2008 1:01:46 PM
Sound Visualization
253
Exercise 2: Audio Keyframes
In this exercise, you will explore how sound can be converted into keyframes
using a keyframe assistant. These keyframes are then capable of manipulating
other layer properties in the Timeline. You will be using an expression in After
Effects to synchronize a Shape Layer’s movement to the music.
Open
1.
02_AudioKeyframes in the 03_Visualize folder inside Chapter_09.
It contains one composition that holds a Shape Layer and an audio layer.
2.
Right-click or Control-click (Mac) on the audio layer. Select Keyframe Assistant
> Convert Audio to Keyframes from the context popup menu.
Figure 9.42: Convert the audio to keyframes using the Keyframe Assistant.
A new null layer named
3.
Audio Amplitude is added to the Timeline. Twirl open
the layer, and then twirl open Effects to reveal three Expression Controls effects:
Left Channel, Right Channel, and Both Channels (Figure 9.43).
The Convert Audio To Keyframes keyframe assistant analyzes the audio
amplitude within the Timeline and creates keyframes. The converted keyframes
represent the audio amplitude. Each Expression Controls effect contains Slider
properties that you can access and link to other layer properties such as Scale,
Rotation, and Opacity.
Figure 9.43: The keyframe assistant uses Expression Controls effects.
Twirl open
4.
Both Channels to reveal the converted keyframes.
Select the
5.
Shape Layer 1 layer in the Timeline. Twirl open the layer to reveal
its attributes and transform properties. Click on Add in the Timeline or Toolbar
and select the path operation Pucker & Bloat.
Twirl open
6.
Pucker & Bloat 1 to reveal the Amount value. You are going to use
the keyframes created by the keyframe assistant to link the changes in audio
amplitude to this path operation’s property.
Chapter_09.indd 253 1/1/2008 1:01:46 PM
254
Chapter 9: Shapes and Sounds
Hold down the
7.
Option key (Mac) or the Alt key (Windows) and click on the
stopwatch icon next to Amount. This enables expressions to control the
property (Figure 9.44).
Figure 9.44: Enable expressions for the Amount property.
Click on the
8.
spiral icon next to Expression: Amount — this is a Pick Whip tool.
Drag it up to the Slider property in the Both Channels layer (Figure 9.45). This
Pick Whip tool links the two properties together. Scrub through the Timeline.
Figure 9.45: Use the Pick Whip tool to link the two properties together.
The Shape Layer deforms slightly but not enough to effectively visualize the
9.
audio. To magnify the path operation, go to the expression in the Timeline and
click on it to access the code. At the very end of the expression add * 20.
Press Enter on the numeric keypad to accept the new expression.
Figure 9.46: Multiply the expression by 20 to exaggerate the Pucker & Bloat.
Whatever value the audio amplitude is set to is now multiplied by 20. Click on
10.
the RAM preview. Save your project.
Experiment with other Shape Layer attributes. Link them to the Audio
11.
Amplitude layer. Multiply the expression by different numbers to create some
interesting distortion effects. Have fun. Figure 9.47 shows an example of linking
other properties to the Audio Amplitude.
Chapter_09.indd 254 1/1/2008 1:01:47 PM