Tài liệu Thiết kế flash với flash cs5 part 41 pptx
Bạn đang xem bản rút gọn của tài liệu. Xem và tải ngay bản đầy đủ của tài liệu tại đây (471.63 KB, 5 trang )
ptg
268
Chapter 9
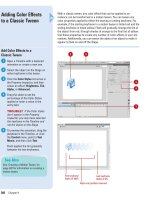
With a classic tween, any color effect that can be applied to an
instance can be transformed in a motion tween. You can tween any
color properties applied to either the starting or ending keyframe. For
example, if the starting keyframe in a motion tween is tinted red and the
ending keyframe is tinted yellow, Flash will gradually change the tint of
the object from red, through shades of orange to the final tint of yellow.
Use these properties to create any number of color effects in your ani-
mations. Additionally, you can tween the alpha of an object to make it
appear to fade on and off the Stage.
Adding Color Effects
to a Classic Tween
Add Color Effects to a
Classic Tween
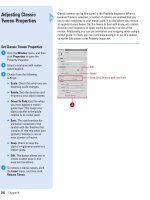
Open a Timeline with a tweened
animation or create a new one.
Select the object on the Stage on
either keyframe in the tween.
Click the Color Styles list arrow in
the Property Inspector, and then
select an effect: Brightness, Tint,
Alpha, or Advanced.
Drag the slider to set the
percentage of the Color Styles
applied or enter a value in the
entry field.
TROUBLE?
If the Color styles
don't appear in the Property
Inspector, you may have selected
the keyframe in the Timeline and
not the object on the Stage.
To preview the animation, drag the
playhead in the Timeline, or click
the Control menu, point to Test
Movie, and then click Test.
Flash applies the tint gradually
between the two keyframes.
5
4
3
2
1
2 5
First keyframe
Alpha of 100%
Last keyframe
Alpha of 0%
3
Alpha and position tweened
See Also
See "Creating a Motion Tween" on
page 242 for information on creating a
motion tween.
4
1
From the Library of Wow! eBook
ptg
Chapter 9 Animating with Classic Tweening
269
If you want to implement motion that is smoother, or that follows a
curve or some specific path, you can create a motion guide. A motion
guide has its own layer just above the layer containing the object. Flash
allows you to draw a line that you want your object to follow with any
of the built-in drawing tools. Because this layer is a guide, it will be
invisible in the exported Flash movie.
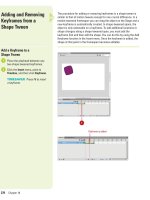
Creating a Classic
Motion Guide Layer
Create a Classic Motion Guide
Select the layer containing the
classic motion tween.
Right-click (Win) or Control-click
the layer containing the classic
tween, and then click Add Classic
Motion Guide.
Flash creates a new layer above
the selected layer and indents the
affected layer.
TIMESAVER
Press
Control+click (Mac) or right-click
(Win) the layer you want to add a
motion guide to, and then click
Add Motion Guide.
Click on the motion guide layer to
select it.
Draw a line on the Stage with any
of Flash's drawing tools to define
the path your object will follow.
4
3
2
1
1
2
4
Any line can be
used as a motion
guide.
3
From the Library of Wow! eBook
ptg
270
Chapter 9
Turn snapping on to easily animate along a classic motion guide. The
center point of the object must be on the classic motion guide path for
it to work, and snapping ensures that this happens. Once the classic
motion guide is created, all you have to do is drag the object in the first
and last frames of the tween to the classic motion path you drew and
Flash will draw the in-between frames along this path.
Animating Along a
Classic Motion Guide
Animate Along a Classic
Motion Path
Create a classic motion guide.
Click on the first keyframe of the
motion tween, and then click and
drag the object on the Stage onto
the start of the motion path.
The object snaps to the motion
path.
TROUBLE?
If the object
doesn't snap to the motion path,
verify that the Snap setting is
turned on in the Property
Inspector for this frame. The
objects on both the beginning and
ending keyframe must be snapped
to the motion guide line for the
motion to follow the guide line.
Click on the last keyframe of the
motion tween, and then click and
drag the object on the Stage onto
the end of the motion path.
The object follows the line you
drew located in the motion guide
layer.
3
2
1
3
See Also
See "Creating a Classic Motion Guide
Layer" on page 269 for information on
creating a motion guide.
1
2
From the Library of Wow! eBook
ptg
Chapter 9 Animating with Classic Tweening
271
When objects are tweened along a classic motion path, they remain in
their native orientation regardless of the path. For certain objects, such
as a circle, this is ok. For more complex objects, you must rotate the
object so that it follows the path in a more naturalistic way. A good
example of this sort of orientation in motion is in the path a car takes
while driving down a road-the car must rotate gradually as the road
curves to remain parallel with the road, and so, avoid disaster. Flash
can do this work for you when you set the Orient To Path option in the
motion tween settings.
Orienting Objects to a
Classic Motion Path
Animate Along a Classic
Motion Path
Animate an object along a classic
motion guide.
Click on the first keyframe of the
motion tween to select it.
Select the Orient To Path check
box in the Property Inspector.
The object will automatically
rotate to remain parallel with the
motion guide.
3
2
1
Tweening along a motion guide without
orientation can seem unnatural.
Orient to Path makes sure the baseline
is always parallel.
See Also
See "Animating Along a Classic Motion
Guide" on page 270 for information on
creating animation using a motion
guide.
2
3
From the Library of Wow! eBook
ptg
272
Chapter 9
With a classic tween, you can customize easing in or out of a motion
tween using the Edit button in the Property Inspector. The ease in and
out of a motion tween is the rate at which the change of location is
applied to an object. You can make an object move back and forth on
the Stage within a single tween or create more complex tweens. Flash
displays a graph representing the degree of motion in frames over time.
The percentage of change is the vertical axis and the number of frames
is the horizontal axis. The rate of change of the object is indicated by
the slope of the graph’s curve.
Easing In and Out of
a Classic Tween
Set Ease In and Out Motion
Tween Properties
Click the Window menu, and then
click Properties to open the
Property Inspector.
Select a keyframe with motion
tween applied.
Click the Edit button in the
Property Inspector.
Select or clear the Use One
Setting For All Properties check
box. Select it (default) to
customize one curve, clear it to
customize a curve for each curve
property (Position, Rotation, Scale,
Color, and Filters).
If cleared, use the Property list
arrow to select a curve.
Click a point on the ease line to
add a control point, and then drag
the control point to change ease in
and out. You can add and change
multiple points.
Drag a tangent point (hollow
circles on the sides of a control
point) to further change ease in
and out.
Click the Play or Stop buttons to
try the customized ease settings.
To reset setting to the default, click
Reset.
Click OK.
9
8
7
6
5
4
3
2
1
9
4
85
7 6
Last keyframe at 100%
First keyframe at 0%;
square handles (control points)
represent frame indicators.
Click a control point
(square handle) to
display its keyframe
and % of change.
3
From the Library of Wow! eBook