Tài liệu Thiết kế flash với flash cs5 part 79 docx
Bạn đang xem bản rút gọn của tài liệu. Xem và tải ngay bản đầy đủ của tài liệu tại đây (871.77 KB, 6 trang )
ptg
482
Chapter 20
Adobe AIR is a cross-operating system runtime that allows you to lever-
age your existing web development skills in Flash to build and deliver
Rich Internet Applications (RIAs) to more devices, including the web,
mobile, and desktop. You can create a new Flash file for AIR from the
Welcome page or the New dialog box by clicking Adobe AIR 2 (
New!
),
or use an existing Flash file (ActionScript 3.0), and then convert it to an
Adobe AIR file through the Publish Settings dialog box (
New!
). Before
you can publish a file to Adobe AIR, you need to have a digital certifi-
cate that represents the application publisher’s identify. After you pub-
lish an AIR application, you can install it by using the Installer Package
with the AIR extension and start the program like any other program on
your system. When you no longer want to use it, you can remove it like a
normal program too.
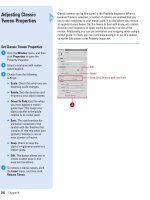
Specifying Adobe
AIR Options
Publish to Adobe AIR
Click the File menu, and then click
Publish Settings.
◆
You can also access AIR
Settings by clicking the Edit
button in the Property Inspector
or click the File menu, and then
click AIR Settings.
Select the Flash check box, and
then click the Flash tab.
Click the Player list arrow, and
then click Adobe AIR 2.
Click Settings.
Click the General tab.
Select from the following General
settings:
◆
Output File. Specifies where to
save the AIR file.
◆
File Information. Enter the
following file information: File
name, Name, Version, ID (a
unique identifier, no spaces or
special characters),
Description, Copyright, and
Window style.
◆
Profiles. Select profiles for the
application types you want to
create (
New!
).
6
5
4
3
2
1
2 3
4
From the Library of Wow! eBook
ptg
Chapter 20 Publishing a Movie
483
◆
Included files. Specifies which
additional files and folders to
include in the AIR file.
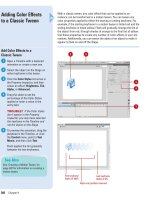
Click the Signature tab.
All Adobe Air applications must be
signed to be installed on another
system.
Click an option to select or create
a digital certificate or use AIR
Intermediate (AIRI) for temporary
use that will be signed later.
◆
Create Digital Signature. Click
Create, specify publisher and
organization information,
password, type (use default),
click Browse to select the
folder with the FLA file, and
then click OK. Enter the
password from the certificate,
and select the related options
as desired.
Click the Icons tab, select an
application icon size, and then
select an application icon.
Click the Advanced tab, specify
any associated file types, initial
window settings, install and
program menu folders.
Click Publish to publish it, and
then click OK, or click OK, and
then click OK to save settings.
11
10
9
8
7
Did You Know?
You can use certain versions of Adobe
AIR with certain versions of Flash.
Flash CS5 only supports and publishes
to AIR 2.0, Flash CS4 only supports and
publishes to AIR 1.1, and Flash CS3 only
supports and publishes to AIR 1.0.
5
6
8
11
7 9 10
Create certificate
From the Library of Wow! eBook
ptg
484
Chapter 20
When you save a document, you have the ability to save more than just
Flash information. You can save copyright, camera, and even image cat-
egory information. This data is saved with the file as metadata in the
XMP format (Extensible Metadata Platform) in SWF files, and can be
recognized and accessed by any application, such as Adobe Bridge,
that reads XMP metadata. In addition, if an image is a photograph, you
can save data specifying the type of image, where it was shot, or the
camera used. You can even get information on shutter speed and f-stop.
You can do the same with video and audio data too. That information will
not only protect your intellectual property, but will supply you with vital
statistics on exactly how you created that one-of-a-kind image.
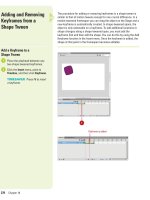
Inserting File
Information
Insert File Information into
a Flash Document
Open a document.
Click the File menu, and then click
File Info.
Click the Description tab, and then
enter information concerning the
author and any copyright
information.
Click the IPTC tab to enter
information concerning the
image's creator, description and
keywords, location where
photograph was taken, date
created, copyright, and usage
terms.
Click the Camera Data tab, which
reveals information about the
camera that took the image.
Click the Video Data tab or Audio
Data tab to reveal information
about video and audio data, and
then enter your video and audio
data.
Click the Mobile SWF tab or Audio
Data tab, and then enter file
information for a mobile SWF.
Click the Categories tab, and then
enter category keywords for
search purposes.
8
7
6
5
4
3
2
1
3
From the Library of Wow! eBook
ptg
Chapter 20 Publishing a Movie
485
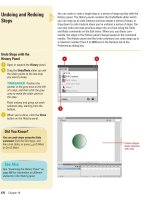
Click the Origin tab, and then
enter data pertaining to the origin
of the image.
Click the DICOM tab, and then
enter data pertaining to the Digital
Imaging and Communications in
Medicine.
Click the History tab to view
historical information about the
active document, such as dates
last opened and saved, and a list
of image adjustments.
Click the Advanced tab to view
additional information on the
active document, such as EXIF,
and PDF document properties.
Click the Raw Data tab to view
raw RDF/XML information.
Click OK.
14
13
12
11
10
9
Did You Know?
You can add metadata to files saved in
the PSD, PDF, EPS, PNG, GIF, JPEG,
and TIFF formats.
The information is
embedded in the file using XMP
(eXtensible Metadata Platform). This
allows metadata to be exchanged
between Adobe applications and
across operating systems.
You can use the XMP Software
Development Kit to customize the
creation, processing, and interchange
of metadata.
You can also use the XMP
kit to add fields to the File Info dialog
box. For information on XMP and the
XMP SDK, check the Adobe Solutions
Network.
4
8 121113
14
9
10
5
6
7
From the Library of Wow! eBook
ptg
486
Chapter 20
The most common way to display a Flash movie is on the Internet, using
an HTML document as the movie container. HTML creates tags that
embed the Flash movie in an HTML document for viewing on the Web.
Flash publish settings give you the ability to create an HTML document
specifically tailored to the active Flash document; including options to
use an HTML template, and control the playback and quality of the final
published document. You can also set options to specify the scale and
alignment of the movie as well as the way it opens.
Specifying HTML
Options
Specify HTML Options
Click the File menu, and then click
Publish Settings.
Select the HTML check box, and
then click the HTML tab.
Click the Template list arrow, and
then select a Flash container
template (including templates for
PocketPC devices).
Click the Dimensions list arrow,
and then click Match Movie,
Pixels, or Percent. If Pixels or
Percent, enter width and height.
The Match Movie option matches
the size of the Flash movie. The
Pixels option sets the exact size.
The Percent option allows for
scaling within a browser.
Select from the following Playback
options:
◆
Paused At Start. Select this
option to pause the Flash
movie, when loaded.
◆
Loop. Select this option to
cause the Flash movie to loop,
when loaded.
◆
Display Menu. Select this
option to have the HTML
document display a control
menu for the Flash document.
◆
Device Font. Select this option
to use device fonts in the Flash
document.
5
4
3
2
1
2
5
4
3
From the Library of Wow! eBook