Tài liệu Document Format and Contents doc
Bạn đang xem bản rút gọn của tài liệu. Xem và tải ngay bản đầy đủ của tài liệu tại đây (80.32 KB, 36 trang )
23
3.1.0 POLICY FORMAT
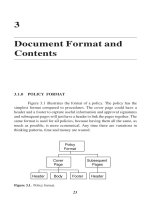
Figure 3.1 illustrates the format of a policy. The policy has the
simplest format compared to procedures. The cover page could have a
header and a footer to capture useful information and approval signatures
and subsequent pages will just have a header to link the pages together. The
same format is used for all policies, because having them all the same, as
much as possible, is more economical. Any time there are variations in
thinking patterns, time and money are wasted.
3
Document Format and
Contents
Figure 3.1. Policy format.
Header Body Footer
Cover
Page
Header
Subsequent
Pages
Policy
Format
24 Developing and Managing Engineering Procedures
This section shows how to develop a complete policy. The policy
is used to convey the date that it was released for use, and who prepared and
approved it. With a policy you will be answering the following questions:
• What is the policy title?
• What is the policy number?
• What date was the policy released?
• How many pages are there?
• Who prepared the policy?
• Who reviewed and approved the policy?
Policy (Page 1). The following is an example of the first page of a
policy. Identification information will need to be recorded on the first
page, such as the policy number, page number, and the signature of the
originator and approvers.
Policy (Page 1) - Preparation. Each of the following circled
numbers corresponds to the circled numbers on page 1 of the example
policy.
Title: Enter the title.
Example: Make or Buy Policy
Policy No.: Enter the policy number. (See Ch. 6
under Policy Numbers.)
Example: P-05
Release Date: Enter the date that the policy was
released for use.
Page: Enter the page number.
Example: Page 1 of 3. This method is best for
change control purposes.
Prepared By: Enter your name and the date when
the policy is complete.
Approved By: Enter your name and the date when
your review and approval are complete.
Policy (Page 2). Following is an example of the second page
of a policy. All of the information in the header is the same as page one.
Signatures are not required on subsequent pages; therefore, a footer is not
required.
Document Format and Contents 25
Example–Policy Page 1
Policy
Title: Policy No.:
Release Date: Page:
Cover Page
Prepared By:
Engineer: Date:
Approved By:
Engineering Manager: Date:
Vice President Engineering: Date:
26 Developing and Managing Engineering Procedures
Example–Policy Page 2
Policy
Title: Policy No.:
Release Date: Page:
Subsequent Pages
Document Format and Contents 27
Purpose Scope Definitions Policy
Policy
Sections
Figure 3.2. Policy sections.
Policy (Page 2) - Preparation. Each of the following circled
numbers below corresponds to the circled numbers on the subsequent
pages of the example policy.
Title: Enter the title. Same as page 1.
Example: Make or Buy Policy
Policy No.: Enter the policy number. Same as
page 1.
Example: P-01
Release Date: Enter the date that the policy was
released for use. Same as page1.
Page: Enter the page number.
Example: Page 2 of 3. Specify the number of the
page sequence.
3.2.0 POLICY CONTENT
Figure 3.2 illustrates the required sections of a policy. Policies must
be written in a format that is clear and easy to understand so that nothing is
left to interpretation. Use the company house style if one exists. If the
company does not have a style, the policy examples in this book can be used
as ISO 9000 guidelines, and they should be tailored to meet individual
company requirements.
3.3.0 EXAMPLE POLICY
See Appendix A for another example of a policy.
28 Developing and Managing Engineering Procedures
Policy
Title: Make or Buy Policy Policy No.: P-01
Release Date: 10/25/00 Page: 1 of 2
1.0 Purpose
The purpose of this policy is to provide guidance for engineering
personnel in making the decision of whether to make or buy a part
or an assembly.
2.0 Scope
This policy applies to all personnel involved in make-or-buy
decisions.
3.0 Definitions
Make Item: An item produced or work performed by the company.
Buy Item: An item that is produced or work performed outside the
company.
Must Make Item: An item or service which the company regularly
makes and is not available (quality, quantity, delivery, and other
essential factors considered) from outside vendors. Must Buy
Item: An item or service that the company does not have the
capacity to provide.
Can Make-or-Buy Item: An item or service that can be provided
by the company or outside vendor at prices comparable to the
company (considering quality, quantity, delivery, risk, and other
essential factors.)
Engineer: Date:
Approved By:
Engineering Manager: Date:
Example–Policy Page 1
Prepared By:
Vice President Engineering: Date:
Document Format and Contents 29
Example–Policy Page 2
Policy
Title: Make or Buy Policy Policy No.: P-01
Release Date: 10/25/00 Page: 2 of 2
4.0 Policy
4.1 Make-or-Buy Decisions
Make-or-buy decisions are to be based on good business practices.
The following factors are considered in arriving at make-or-buy decisions.
Total cost
Schedule considerations, including risk
Quality of product or service
Performance of item or service
Complexity of item or difficulty of administering control
Loading of functional organizations which would
normally perform the tasks to assure that adequate
capacity exists
Facilities and capital equipment requirements
Availability of competition, especially from small
business firms and labor surplus area firms
Quality of technical data package used for procurement
of an item or service
Technical and financial risks associated with potential
suppliers
4.2 Make-or-Buy Committee
There will be a Make-or-Buy Committee that will evaluate and
decide on all Make-or-Buy plans, items and services presented to it.
The Committee consists of the following members or their designees.
Project Manager – Chairperson
Engineering Manager
Manufacturing Manager
Quality Manager
Purchasing Manager
Finance Manager
Contract Administration
30 Developing and Managing Engineering Procedures
3.4.0 DEPARTMENTAL INSTRUCTION FORMAT
Figure 3.3 illustrates the format of a departmental instruction.
Departmental Instructions have a simpler format than engineering proce-
dures. The cover page can have a header and a footer to capture useful
information and approval signatures and subsequent pages will just have a
header to link the pages together. The same format is used for all depart-
mental instructions, because having them all the same, as much as possible,
is more economical. Any time there are variations in thinking patterns,
time and money are wasted.
Header Body Footer
Cover
Page
Header Body
Sebsequent
Pages
Departmental
Instruction
Format
Figure 3.3. Departmental instruction format.
This section shows how to develop a complete departmental
instruction. A departmental instruction is used to convey the date that it was
released for use, and who prepared and approved it. With departmental
instructions you will be answering the following questions:
• What is the title?
• What is the identification number?
• What date was it released?
• How many pages are there?
• Who prepared the departmental instruction?
• Who reviewed and approved the departmental
instruction?
Departmental Instruction (Page 1). Following is an example of
the first page of a departmental instruction. Identification information will
need to be recorded on the first page, such as the departmental instruction
number, page number, and the signatures of the originator and approver.
Document Format and Contents 31
Example–Departmental Instruction Page 1
Departmental Instruction
Title: Dept. Inst. No.:
Release Date: Page:
Cover Page
Prepared By:
Engineer: Date:
Approved By:
Engineering Manager: Date:
32 Developing and Managing Engineering Procedures
Departmental Instruction (Page 1) - Preparation. Each of the
following circled numbers corresponds to the circled numbers on page one
of the example departmental instruction.
Title: Enter the title.
Example: Master File Update
Dept. Inst. No.: Enter the departmental instruction
number. (See Ch. 6 under Departmental Instruction
Numbers.)
Example: D-01
Release Date: Enter the date that the departmental
instruction was released for use.
Page: Enter the page number.
Example: Page 1 of 3. This method is best for
change control purposes.
Prepared By: Enter your name and the date when
the departmental instruction is complete.
Approved By: Enter your name and the date when
your review and approval is complete.
Departmental Instruction (Page 2). Following is an example of
the second page of a departmental instruction. All of the information in the
header is the same as page one. Signatures are not required on subsequent
pages; therefore, a footer is not required.
Document Format and Contents 33
Example–Departmental Instruction Page 2
Departmental Instruction
Title: Dept. Inst. No.:
Release Date: Page:
Subsequent Pages
34 Developing and Managing Engineering Procedures
3.5.0 DEPARTMENTAL INSTRUCTION CONTENTS
Figure 3.4 illustrates the required sections of a departmental
instruction. Departmental instructions must be written in a format that is
clear and easy to understand where nothing is left to interpretation. Use
the company house style if one exists. If the company does not have a
style, the departmental instruction examples in this book can be used as
ISO 9000 guidelines, and they should be tailored to meet individual
company requirements.
Departmental Instruction (Page 2) - Preparation. Each of the
following circled numbers below corresponds to the circled numbers on the
subsequent pages of the example departmental instruction.
Title: Enter the title. Same as page 1.
Example: Master File Update
Dept. Inst. No.: Enter the departmental instruction
number. Same as page 1.
Example: D-01
Release Date: Enter the date that the departmental
instruction was released for use. Same as page 1.
Page: Enter the page number.
Example: Page 2 of 3. Specify the number of the
page sequence.
Figure 3.4. Departmental instruction sections.
3.6.0 EXAMPLE DEPARTMENTAL INSTRUCTION
See Appendix B for another example of a departmental instruction.
Purpose Definitions Overview Procedure
Departmental
Instruction
Sections
Document Format and Contents 35
Departmental Instruction
Title: Where-Used Input Dept. Inst. No.: D-01
Release Date: 6/19/00 Page: 1 of 5
1.0 Purpose
The purpose of this procedure is to provide instructions, and assign
responsibilities for inputting the Where-Used information, for
parts and assemblies, into the computer.
2.0 Definitions
Class 1 Change-Interchangeable: A part (1) possesses such physi-
cal characteristics as to be equivalent in reliability, and maintain-
ability, to another part; and (2) is capable of being exchanged for
the other item (a) without alteration for fit, and (b) without alter-
ation of adjoining items.
Class 2 Change-Non-Interchangeable: A change that is not inter-
changeable, that affects form, fit and function.
Form – The manufactured structure, shape, and material
composition of an item or assembly.
Fit – The size and dimensional aspect of an item or assembly.
Function – The actual performance and level of performance of an
item or assembly.
Class 3 Change-Documentation Only: Documentation is used to
indicate changes to documentation, drawings, and bills of materials,
etc., which are strictly error corrections and do not affect the
manufacturing process.
Prepared By:
Engineer: Date:
Approved By:
Engineering Manager: Date:
Example–Departmental Instruction Page 1
36 Developing and Managing Engineering Procedures
Departmental Instruction
Title: Where-Used Input Dept. Inst. No.: D-01
Release Date: 6/19/00 Page: 2 of 5
3.0 Overview
3.1 A Where-Used check will be performed on all Class 1 or 2
changes, and Class 3 changes which are noted as “Must Trace.”
Engineering will be responsible for the accuracy of the Where-
Used research and will perform the Where-Used look-ups when:
Processing an Engineering Change that
changes an old part number to inactive.
Processing Class 1 or 2 Engineering Changes.
All part numbers that are changed must have a Where-Used
performed.
3.2 The originator of an Engineering Change is responsible
for obtaining a Where-Used look-up prior to starting a Change
Control Board meeting. The Where-Used must be present at the
Change Control Board meeting.
3.3 The Engineering Change Cover Sheet will be verified to
insure that the products listed on the cover sheet are consistent
with the results of the Where-Used in determining the Top Levels
(product types) that are affected by the change.
3.4 All old numbers noted on the Where-Used reflect the
product, model, feature/option and customer name of the next
assemblies that may be affected by the change.
3.5 If all applications of the old part numbers are to be af-
fected by the change, then the Engineering Change Cover Sheet
should be marked accordingly.
3.6 If all of the applications of the old part numbers that are to
be affected by the change are not impacted, then the Engineering
Change Cover Sheet will be marked accordingly. Justification for
excluding certain part numbers from the change must be noted in
the Where-Used by the originator of the Engineering Change.
3.7 The Bill of Material is the report that will be the source of
most information on the Where-Used. Customer names will be
obtained from the Engineering Change.
Example–Departmental Instruction Page2