Tài liệu Module 5: Securing Web Pages ppt
Bạn đang xem bản rút gọn của tài liệu. Xem và tải ngay bản đầy đủ của tài liệu tại đây (1.28 MB, 78 trang )
Contents
Overview 1
Lesson: ASP Forms-Based Authentication 2
Lesson: .NET Code Access and Role-Based
Security 9
Lesson: Overview of ASP.NET
Authentication Methods 16
Lesson: Working with Windows-Based
Authentication in ASP.NET 30
Lesson: Working with ASP.NET
Forms-Based Authentication 37
Review 55
Lab 5: Securing Web Pages 57
Module 5: Securing
Web Pages
Information in this document, including URL and other Internet Web site references, is subject to
change without notice. Unless otherwise noted, the example companies, organizations, products,
domain names, e-mail addresses, logos, people, places, and events depicted herein are fictitious,
and no association with any real company, organization, product, domain name, e-mail address,
logo, person, place or event is intended or should be inferred. Complying with all applicable
copyright laws is the responsibility of the user. Without limiting the rights under copyright, no
part of this document may be reproduced, stored in or introduced into a retrieval system, or
transmitted in any form or by any means (electronic, mechanical, photocopying, recording, or
otherwise), or for any purpose, without the express written permission of Microsoft Corporation.
Microsoft may have patents, patent applications, trademarks, copyrights, or other intellectual
property rights covering subject matter in this document. Except as expressly provided in any
written license agreement from Microsoft, the furnishing of this document does not give you any
license to these patents, trademarks, copyrights, or other intellectual property.
2002 Microsoft Corporation. All rights reserved.
Microsoft, MS-DOS, Windows, Windows NT, ActiveX, Active Directory, Authenticode, Hotmail,
JScript, Microsoft Press, MSDN, PowerPoint, Visual Basic, Visual C++, Visual Studio, and
Windows Media are either registered trademarks or trademarks of Microsoft Corporation in the
United States and/or other countries.
The names of actual companies and products mentioned herein may be the trademarks of their
respective owners.
Module 5: Securing Web Pages iii
Instructor Notes
This module explains how to secure the Web pages that compose a Web
application through the use of Active Server Pages (ASP) and Microsoft
®
ASP.NET forms-based authentication. After completing this module, students
will be able to implement forms-based authentication in both ASP and
ASP.NET Web applications.
After completing this module, students will be able to:
!
Implement forms-based authentication in an ASP Web application.
!
Define the purpose of code access and role-based security in the Microsoft
.NET Framework.
!
Describe the different authentication methods that are supported by
ASP.NET and explain how each method is configured.
!
Implement Microsoft Windows
®
-based authentication in an ASP.NET Web
application.
!
Implement forms-based authentication in an ASP.NET Web application.
To teach this module, you need the following materials:
!
Microsoft PowerPoint
®
file 2300A_05.ppt
!
Hypertext Markup Language (HTML) code sample file
2300A_05_code.htm
!
HTML and Flash animation files: 2300A_05_A05_1662.htm and
2300A_05_A05_1662.swf
!
HTML and Flash animation files: 2300A_05_A10_1663.htm and
2300A_05_A10_1663.swf
Presentation:
75 minutes
Lab:
30 minutes
Required materials
iv Module 5: Securing Web Pages
To prepare for this module:
!
Read all of the materials for this module.
!
Complete the practices and lab.
!
Visit the Microsoft MSDN
®
.NET Security page at
!
Read about Microsoft Passport at .
!
Read the MSDN article, “.NET My Services and .NET Passport User
Authentication Overview,” which is available at
library/en-us/dndotnet/html//myservpassp.asp.
!
Read the MSDN Magazine article, “An Overview of Security in the .NET
Framework,” which is available at
dnnetsec/html/netframesecover.asp.
!
Read the MSDN article, “Secure Coding Guidelines for the .NET
Framework,” which is available at
dnnetsec/html/seccodeguide.asp.
!
Read the MSDN Magazine article, “An Introductory Guide to Building and
Deploying More Secure Sites with ASP.NET and IIS, Part 2,” which is
available at
ASPSec2/aspsec2.asp.
!
Read Module 6, “Code Access Security,” and Module 7, “Role-Based
Security and Isolated Storage,” in Course 2350, Securing and Deploying
Microsoft .NET Assemblies.
!
Read the MSDN Magazine article, “Security in .NET: Enforce Code Access
Rights with the Common Language Runtime,” which is available at
Preparation tasks
Module 5: Securing Web Pages v
How to Teach This Module
This section contains information that will help you to teach this module.
Lesson: ASP Forms-Based Authentication
It is possible that students will have an understanding of ASP forms-based
authentication before coming to this class. If so, you can briefly review the
content in this lesson and then move on to ASP.NET Windows-based and
forms-based authentication.
Mention that setting the Internet Information Services (IIS) authentication
method to Anonymous access enables the authentication process to pass
through IIS, where it is handled by the ASP logon page. At this point, the
developer is responsible for making sure that the user is authenticated (by
checking the user’s credentials) and authorized.
The difference between authentication and authorization in an ASP Web page is
minimal. Authentication means that the Session variable that was set in the
logon page exists. Authorization can be implemented by checking that the
Session variable is set to a certain value.
Have the students access the unsecured and secured pages on the London
computer in the 2300Demos/Mod05 folder. After the students access both the
unsecured and secured pages, explain the code in the Logon.asp and
SecurePage.asp pages in the Mod05 folder of the 2300Demos Web application
project:
1. In Microsoft Visual Studio
®
.NET, open the 2300Demos solution.
2. Open the Logon.asp page in the Mod05 folder of the 2300Demos project.
If a password is entered, a Session variable is set.
3. Open the SecurePage.asp page.
There is code at the top of the page that looks for a value in the Session
variable. If the Session variable is not set, the page redirects the user to the
logon page.
4. Open the UnsecurePage.asp page.
This page does not have the code at the top of the page that checks for a
value in the Session variable.
Overview of ASP Forms-
Based Authentication
Creating an ASP Logon
Pa
ge
Validating the Session
Variable
Instructor-Led Practice:
Using Forms-Based
Authentication in an
ASP Web Application
vi Module 5: Securing Web Pages
Lesson: .NET Code Access and Role-Based Security
Microsoft .NET code access security is relevant mostly to Windows
applications that run on a client computer. However, because code access
security is a new feature of the Microsoft .NET Framework, it needs to be
covered. Do not spend a lot of time on this material.
Quickly explain that you can add attributes to the functions in your Web
application to restrict its access to resources. This is beyond the scope of this
course, and therefore, no examples are given.
Role-based security has been covered in earlier modules in this course and
should not be a new term to students. This slide just introduces the Identity and
Principal objects and how they relate to role-based security in a .NET Web
application.
Lesson: Overview of ASP.NET Authentication Methods
In this lesson, briefly describe the .NET authentication methods and the
Web.config file. Windows-based authentication and forms-based authentication
are covered in more detail in the following lessons.
This animation compares the three authentication methods that are supported by
ASP.NET, and it shows how the authentication methods differ, both from the
client perspective and on the Web server.
Explain to students the advantages and disadvantages of each ASP.NET
authentication method. Ultimately, the Web client that will use the Web
application will dictate which authentication method can be used. In most cases,
forms-based authentication will have the most widespread support because
Anonymous access is supported by all Web browsers.
The Web.config file is mentioned briefly in Module 4, “Internet Information
Services Authentication,” in Course 2300, Developing Secure Web
Applications. However, this topic provides an opportunity to explain
Web.config files in more detail and show how the different Web.config files in
the folder structure relate to one another. It is import for students to understand
the hierarchy of Web.config files and their settings, and when settings in one
Web.config file override those settings in another Web.config file.
When discussing the <authentication> section, mention that this section can
appear only in the Web.config file in the virtual root of a Web application. The
<authorization> section can appear in Web.config files in subfolders. When
discussing the <authorization> section, note how roles can be used to avoid
specifying individual users in the Web.config file.
Compare applying authorization settings for a single Web page with applying
authorization settings for the entire Web application.
This practice provides students with an opportunity to see how the authorization
settings in multiple Web.config files interrelate.
Overview of Code
Access Security
Overview of Role-Based
Securit
y
Multimedia: ASP.NET
Authentication Methods
Comparing the ASP.NET
Authentication Methods
Configuring ASP.NET
Web Applications
Authentication and
Authorization
Configuration Settings
in Web.config
Securing a Single Web
Pa
ge
Practice: Using
Web.config Files
Module 5: Securing Web Pages vii
Lesson: Working with Windows-Based Authentication in ASP.NET
By default, the Web.config files in newly created Visual Studio .NET Web
applications are configured to use Windows-based authentication. Note that this
is the setting that is specified in the <authentication> tag for new Visual Studio
.NET Web applications. This is not the default behavior when the
<authentication> tag is not present, which is the equivalent of the None setting.
This is an instructor-led practice. You will start the practice by configuring the
Web server on the London computer and showing the code in the Web pages.
Then, students will access the pages in the http://London/2300Demos/Mod05
folder and answer the questions.
Lesson: Working with ASP.NET Forms-Based Authentication
This animation delves into ASP.NET forms-based authentication in more detail,
explaining how ASP.NET authenticated and nonauthenticated requests are
handled. Note that the animation uses the term “authentication cookie,” which
can also be described as an “authentication ticket.”
Briefly mention creating a logon page here. Creating the logon page is covered
in more detail in the next two topics.
When you authenticate a user through forms-based authentication, an
authentication ticket is created and sent to the user. The authentication ticket
can be either a persistent cookie, which lasts for 50 years by default, or an
in-memory cookie. To create a persistent cookie that expires after a certain
amount of time, you create the authentication cookie first, and then set a
property of the cookie before sending it to the user. Show students the code to
do this, which is located at the end of the topic.
The RedirectFromLoginPage method will redirect the user either to the
originally requested page or to default.aspx. For example, the method will
redirect to default.aspx if a user opens the logon page first. If there is no
default.aspx page in your Web application, this could cause a “page not found”
error. Therefore, you can check the page that RedirectFromLoginPage is
going to redirect to, and if it is default.aspx, manually create the authentication
ticket and redirect the user to an existing page in your Web application by using
the Response.Redirect method. Show students the code to do this, which is
located at the end of the topic.
Mention to students that you would not normally hard code the user names and
roles when defining roles. This information would typically come from a
database.
Show the code for the full Application_AuthenticateRequest event procedure
and point out how the roles are only assigned if the user is authenticated (for
example, is not anonymous) and is authenticated by using forms-based
authentication. By using forms-based authentication, you can lower the
overhead of using role-based security in a Web application.
How to Enable
Windows-Based
Authentication
Instructor-Led Practice:
Using Windows-Based
Authentication
Multimedia: Forms-
Based Authentication
How to Enable Forms-
Based Authentication
The
FormsAuthentication
Ob
ject
Creating a Logon Page
Using Role-Based
Security with ASP.NET
Forms-Based
Authentication
viii Module 5: Securing Web Pages
This is an instructor-led practice. You will start the practice by configuring the
Web server on the London computer and showing the code in the Web pages.
Then, students will access the pages in the http://London/2300Demos/Mod05
folder and answer the questions.
When students are redirected to the ASPXLogin.aspx page, show them that the
Uniform Resource Locator (URL) contains the page ASPXSecurePage1.aspx,
which is needed to redirect the user to the requested page, if the entered
credentials are validated.
This topic is a summary of the primary differences between ASP and ASP.NET
forms-based authentication. The most significant difference is that developers
must program most of the logic in an ASP Web application, while there are
features in ASP.NET that will do some of this logic either automatically or
through configuration settings.
Lab 5: Securing Web Pages
The TailspinToys Web application is both an Internet and an extranet Web
application. Introduce the lab with a group brainstorming session about which
Web pages need to be secured for the extranet part of the TailspinToys Web
application and what would be the best way to secure them. The lab secures the
following pages:
!
In the ASP Web application, the extranet pages will be secured manually in
the logon page by code that checks for a Session variable.
!
In the ASP.NET Web application, the extranet pages will be placed in a new
folder named Resellers and secured with a <location> section in the
Web.config file.
At the end of the lab, reiterate how forms-based authentication was
implemented in the two Web applications and why.
Instructor-Led Practice:
Using ASP.NET Forms-
Based Authentication
Comparing ASP and
ASP.NET Forms-Based
Authentication
Module 5: Securing Web Pages ix
Customization Information
This section identifies the lab setup requirements for a module and the
configuration changes that occur on student computers during the labs. This
information is provided to assist you in replicating or customizing Microsoft
Official Curriculum (MOC) courseware.
Lab Setup
To complete this lab, students can either continue working in the Tailspin Toys
Visual Studio .NET projects that they used in previous labs, or they can start
with new files.
To start with new files, students must complete the following steps.
!
Create the Web applications for the ASP exercises
1. Copy all of the contents of the ASP starter folder install_folder\Labfiles\
Lab05\ASP\Starter\TailspinToys to the TailspinToys IIS virtual directory at
C:\Inetpub\wwwroot\TailspinToys.
2. Copy all of the contents of the ASP starter folder install_folder\Labfiles\
Lab05\ASP\Starter\TailspinToysAdmin to the TailspinToys IIS virtual
directory at C:\Inetpub\wwwroot\TailspinToysAdmin.
!
Create the Web applications for the ASP.NET exercises
1. Copy all of the contents of the ASP.NET folder install_folder\Labfiles\
Lab05\ASPXVB\Starter\TailspinToys.NET to the TailspinToys.NET IIS
virtual directory at C:\Inetpub\wwwroot\TailspinToys.NET.
2. Copy all of the contents of the ASP.NET folder install_folder\Labfiles\
Lab05\ASPXVB\Starter\TailspinToysAdmin.NET to the
TailspinToysAdmin.NET IIS virtual directory at C:\Inetpub\wwwroot\
TailspinToysAdmin.NET.
!
Configure the TailspinToysAdmin and TailspinToysAdmin.NET Web
applications to use Integrated Windows authentication
• Use IIS to turn off Anonymous access, leaving only Integrated Windows
authentication, for the TailspinToysAdmin and TailspinToysAdmin.NET
Web applications.
Lab Results
Performing the lab in this module causes the Resellers.aspx and
OrderStatus.aspx pages to move into a Resellers folder in the
TailspinToys.NET Web application.
Module 5: Securing Web Pages 1
Overview
!
ASP Forms-Based Authentication
!
.NET Code Access and Role-Based Security
!
Overview of ASP.NET Authentication Methods
!
Working with Windows-Based Authentication in
ASP.NET
!
Working with ASP.NET Forms-Based Authentication
*****************************
ILLEGAL FOR NON
-
TRAINER USE
******************************
When forms-based authentication is used to secure Web pages, all user
authentication is performed by the Web application and not by the Microsoft
®
Windows
®
operating system or by Internet Information Services (IIS)
authentication. User names, passwords, and other information about the user are
typically stored in either a database or the Active Directory
®
directory service.
Forms-based authentication is often used for personalization, where content is
customized for a known user. In this situation, identification is often the
primary objective, rather than authentication, so it is enough to merely store the
user name in a database and then use that user name to access the user’s
personal information.
In this module, you will learn how to implement forms-based authentication in
both Active Server Pages (ASP) and Microsoft ASP.NET Web applications.
The code samples in this module are provided in both Microsoft
Visual Basic
®
.NET and C#.
After completing this module, you will be able to:
!
Implement forms-based authentication in an ASP Web application.
!
Define the purpose of code access and role-based security in the Microsoft
.NET Framework.
!
Describe the different authentication methods that are supported by
ASP.NET and explain how each method is configured.
!
Implement Windows-based authentication in an ASP.NET Web application.
!
Implement forms-based authentication in an ASP.NET Web application.
Introduction
Note
Objectives
2 Module 5: Securing Web Pages
Lesson: ASP Forms-Based Authentication
!
Overview of ASP Forms-Based Authentication
!
Creating an ASP Logon Page
!
Validating the Session Variable
!
Instructor-Led Practice: Using Forms-Based
Authentication in an ASP Web Application
*****************************
ILLEGAL FOR NON
-
TRAINER USE
******************************
ASP forms-based authentication is based on a custom logon page that you
create. Any unauthenticated users are directed to this form for authentication
before they are allowed access to protected Web pages.
In this lesson, you will learn how ASP forms-based authentication works and
how to implement it.
After completing this lesson, you will be able to:
!
Describe how ASP forms-based authentication works.
!
Create an ASP logon page that creates a Session variable for authenticated
users.
!
Validate a Session variable.
Introduction
Lesson objectives
Module 5: Securing Web Pages 3
Overview of ASP Forms-Based Authentication
Set Session
Variable
Someone
Username:
Password:
Submit
********
Authorized
Check for Session
Variable
Session
Variable
Session
Variable
Return
Secure
Page
Return
Secure
Page
Client Requests Page
Authenticated
Not Authenticated
Redirect to Logon Page
Not Authenticated Authenticated
IIS
IIS
IIS
Authorized
Access Denied
1
1
3
3
2
2
*****************************
ILLEGAL FOR NON
-
TRAINER USE
******************************
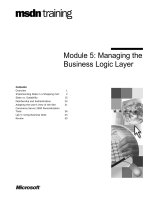
ASP forms-based authentication uses Session variables to keep track of whether
a user is authenticated or not authenticated. User access to protected Web pages
is granted or denied based on the values that are contained in these Session
variables.
ASP forms-based authentication follows these steps when authenticating users:
1. A client generates a request for a protected ASP Web page.
2. The IIS authentication mode is set to Anonymous access, so the request
passes directly through IIS to ASP.
3. The protected Web page checks whether a valid Session variable is attached
to the client’s request.
If there is no Session variable attached to the request:
a. The protected Web page redirects the client to a logon page, where the
user then enters the required credentials, usually a user name and a
password.
b. The application code in the logon page checks the credentials to confirm
their authenticity, usually against the credentials that are stored in a
database or in Active Directory. If the user is authenticated, the logon
page creates a Session variable that contains the information about the
user.
c. If authentication fails, the request is returned with an Access Denied
message.
If a valid Session variable is attached to the request, the user has been
authenticated to use the page and access is then granted to the requested
secure page.
Introduction
How ASP authenticates
users
4 Module 5: Securing Web Pages
To implement forms-based authentication in your ASP Web applications, you
must:
1. Set the IIS authentication mode to Anonymous authentication.
2. Create a logon page that verifies the user’s credentials and creates a Session
variable for the authenticated user.
3. Add code to each protected Web page that verifies the existence of a valid
Session variable and that then either redirects the user to the requested Web
page if the Session variable is valid, or redirects the user to the logon page if
the Session variable does not exist.
ASP forms-based authentication relies on the maintenance of session state to
determine the identity of the user. After forms-based authentication is
implemented, the secured Web pages cannot be accessed by the user unless a
specific Session variable is set. If this Session variable is not set, your ASP
code redirects the user to a logon page.
To maintain session state in ASP pages, the user must have cookies enabled on
his or her browser. Therefore, forms-based authentication will work only for
those users who have cookies enabled on their computers.
Steps to implementing
ASP forms-based
authentication
Limitations of ASP
forms-based
authentication
Module 5: Securing Web Pages 5
Creating an ASP Logon Page
!
Verify user credentials
!
Create a Session variable
!
Redirect to a secure page
If (bLogonSuccessful) Then
sID = 'read from database
Session("ID") = sID
End If
If (bLogonSuccessful) Then
sID = 'read from database
Session("ID") = sID
End If
Response.Redirect "SecurePage.asp"
Response.Redirect "SecurePage.asp"
*****************************
ILLEGAL FOR NON
-
TRAINER USE
******************************
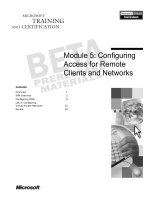
After your Web server is configured to use Anonymous authentication, you can
create a logon page that verifies user credentials and creates a Session variable
for the authenticated user.
To verify a user’s credentials, you need to create a logon page that checks user
credentials against the credentials that are in a database or in Active Directory.
If the user’s credentials are not valid, the logon page returns an Access Denied
message to the user.
For more information about accessing Microsoft SQL Server
™
data
securely from ASP pages, see Module 7, “Securing Microsoft SQL Server,” in
Course 2300, Developing Secure Web Applications.
If the user’s credentials are valid, the user is authenticated, and you can then
create a Session variable with some personal information about the user, such
as the user name.
The Session object stores the information that is needed for a particular user
session. Variables that are stored in the Session object are not discarded when
the user moves between pages in the Web application; instead, these variables
persist for the entire user session.
The IIS Web server automatically creates a Session object when a Web page
from the Web application is requested by a user who does not already have a
session. The Web server destroys the Session object when the user’s session
expires or is abandoned.
Session state (or the ability of a Web application to retain user
information across Web page requests) is maintained only for browsers that
support cookies and that have cookies enabled.
Introduction
Verifying user
credentials
Note
Creating a Session
variable
Im
portant
6 Module 5: Securing Web Pages
You can store information in the Session object by assigning a value to a named
entry in that object. The following example assigns the user ID, which is
retrieved from a database, to the entry "ID" in the Session object:
If (bLogonSuccessful) Then
sID = 'read from database
Session("ID") = sID
End If
After a Session variable is set, you can access the information that is in the
Session object from other pages in the Web application by reading the value
from the Session variable. The following example uses the user's ID to read
order information from the database:
<%
rsOrders = GetOrderInformation(Session("sID"))
%>
After the user has been authenticated, you can redirect the user from the logon
page to the requested secure page, as shown in the following example:
Response.Redirect "SecurePage.asp"
Redirect to a secure
page
Module 5: Securing Web Pages 7
Validating the Session Variable
!
Authentication
"
Verify the Session variable and redirect the client to the
logon page if the Session variable is not valid
!
Authorization
"
After the user is authenticated, determine whether he or
she is authorized to view the requested Web page
<% If Session("ID") = "" Then
Response.Redirect "Login.asp"
End If %>
<% If Session("ID") = "" Then
Response.Redirect "Login.asp"
End If %>
<% If Session("Role") != "Admin" Then
Response.Redirect "Login.asp"
End If %>
<% If Session("Role") != "Admin" Then
Response.Redirect "Login.asp"
End If %>
*****************************
ILLEGAL FOR NON
-
TRAINER USE
******************************
To implement ASP forms-based authentication, you need to determine which
Web pages in your Web application require secure access. You then must add
code to each secure page to verify the existence of a Session variable. If the
Session variable does not exist, the user is not authenticated. You then redirect
the user to the logon page, as shown in the following example:
<% If Session("ID") = "" Then
Response.Redirect "Login.asp"
End If
%>
You should protect the logon page by using Secure Sockets Layer (SSL)
and use a full path to the logon page by using Hypertext Transfer Protocol
Secure (HTTPS); for example, https://server/site/private/login.asp. You will
learn more about SSL in Module 8, “Protecting Communication Privacy and
Data Integrity,” in Course 2300, Developing Secure Web Applications.
You can implement authorization in an ASP Web page by using Session
variables. In each secured page of the Web application, you must verify that a
Session variable is set to a certain value. If the Session variable is set, the user
is then authorized to view the page.
For example, a second Session variable, Role, can be set in the logon page. The
Role Session variable is set to the user's role in the Web application. When the
user accesses a secured page, the Role Session variable is checked to determine
whether the user has the proper authorization to view the page. The following
example secures a Web page for only users in the Admin role:
<% If Session("Role") != "Admin" Then
Response.Redirect "Login.asp"
End If
%>
Introduction
Note
Authorization
8 Module 5: Securing Web Pages
Instructor-Led Practice: Using Forms-Based Authentication in an
ASP Web Application
!
Instructor will:
"
Secure an ASP Web application by using
forms-based authentication
!
Students will:
"
Try to view unsecured and secured Web
pages
!
Time:
"
5 minutes
*****************************
ILLEGAL FOR NON
-
TRAINER USE
******************************
In this instructor-led practice, you will see how to implement forms-based
authentication in an ASP Web application.
!
Access the secured ASP Web application
1. In Microsoft Internet Explorer, browse to the http://London/2300Demos/
Mod05/UnsecurePage.asp page.
What happens?
You can access the page.
____________________________________________________________
2. Click SecurePage to browse to the SecurePage.asp page.
What happens?
You are redirected to the Logon.asp page.
____________________________________________________________
3. Enter any nonblank strings for the user name and password, and then click
Log On.
4. Click SecurePage to browse to the SecurePage.asp page again.
What happens?
You can now access the page.
____________________________________________________________
Introduction
Module 5: Securing Web Pages 9
Lesson: .NET Code Access and Role-Based Security
!
Overview of Code Access Security
!
Overview of Role-Based Security
*****************************
ILLEGAL FOR NON
-
TRAINER USE
******************************
The.NET Framework provides technologies that can be used for securing
managed code (or code assemblies.) These technologies include code access
security and role-based security, both of which are implemented by using a
common infrastructure that is supplied by the common language runtime. The
common language runtime allows code to perform only those operations that
the code has permission to perform.
The runtime uses objects that are called permissions to enforce restrictions on
managed code. There are three kinds of permissions, each with a specific
purpose:
!
Code access permissions. These permissions represent access to a protected
resource or the ability to perform a protected operation.
!
Identity permissions. These permissions indicate that code has the
credentials that support a particular kind of identity.
!
Role-based security permissions. These permissions provide a mechanism
that is used for discovering whether a user (or the agent acting on the user's
behalf) has a particular identity or is a member of a specified role.
Although developing secure code assemblies can be an important role in
developing secure Web applications, secure code assemblies are beyond the
scope of this course. This lesson provides a brief overview of code access
security and role-based security, and it explains how these technologies can be
used to secure code assemblies in your Web applications. Later in this module,
you will also learn how you can integrate role-based security with ASP.NET
forms-based authentication.
For more information about developing secure assemblies by using the
.NET Framework, see Course 2350, Securing and Deploying Microsoft .NET
Assemblies.
Introduction
Note
10 Module 5: Securing Web Pages
After completing this lesson, you will be able to:
!
Define the purpose of code access security in the .NET Framework.
!
Define the purpose of role-based security in the .NET Framework.
Lesson objectives
Module 5: Securing Web Pages 11
Overview of Code Access Security
!
Code access security is based on:
"
Security policy
"
Evidence
"
Permissions
!
Functions performed by code access security
!
Code access security and ASP.NET Web applications
*****************************
ILLEGAL FOR NON
-
TRAINER USE
******************************
The .NET Framework enforces security restrictions on managed code (or code
assemblies) through the use of code access security. Code access security
assists in:
!
Protecting computer systems from malicious or error-filled code.
!
Allowing code from unknown origins to run safely.
!
Protecting trusted code from intentionally or accidentally compromising
security.
Through the use of code access security, you can specify the set of operations
that your code should be allowed to perform, and you can specify the operations
that your code should never be allowed to perform. Code access security checks
are beneficial because they prevent luring attacks, in which unauthorized code
calls your code and causes it to something on behalf of the unauthorized code.
When you add code access security to the code that is in your Web
application, there will be a performance downside because code access security
requires the common language runtime to walk up the stack to enforce code
access security settings for every method that uses code access security.
Code access security works through a combination of security policy, evidence,
and permissions.
Every assembly that runs is granted a set of permissions by the .NET
Framework to access various system resources. A group of permissions is
called a permission set. These permissions are based on security policy. The
security policy uses evidence about an assembly to determine which
permissions to grant to that assembly. Therefore, the .NET Framework uses the
security policy to plot evidence about an assembly to a set of permissions for
that specific assembly.
Introduction
Note
Security policy
12 Module 5: Securing Web Pages
Evidence is a set of information about the identity and origin of an assembly.
Evidence may include:
!
The assembly’s strong name, consisting of a unique public key, a simple
name, and the version.
!
The assembly’s publisher, from the Microsoft Authenticode
®
signature.
!
The zone from which the assembly originates, such as the local computer,
intranet, or Internet zones.
!
The location from which the assembly originates, expressed as a Uniform
Resource Locator (URL), universal naming convention (UNC) path, or local
computer folder.
!
The cryptographic hash of the assembly.
The security system uses this evidence about the assembly to determine which
permissions to grant, based on the existing security policy.
Permissions represent rights to access certain computing resources. For
example, actions protected by permissions include reading and writing of files
on the file system, accessing environment variables, and making calls to
Microsoft ADO.NET for database access.
In the .NET Framework, code access security performs the following functions:
!
Defines permissions and permission sets that represent the right to access
various system resources
!
Enables administrators to configure the security policy by associating sets of
permissions with groups of code (code groups)
!
Enables code to request the permissions that it requires to run, in addition to
the permissions that would be useful to have, and specifies which
permissions the code must never have
!
Grants permissions to each assembly that is run, based on the permissions
that are requested by the code and on the operations that are permitted by
the security policy
!
Enables code to require that its callers have specific permissions
!
Enables code to require that its callers possess a digital signature, thereby
allowing only callers from a particular organization or Web site to call the
protected code
!
Enforces restrictions on code at run time by comparing the granted
permissions of every caller on the call stack to the permissions that the
callers must have
Evidence
Permissions
Functions performed by
code access security
Module 5: Securing Web Pages 13
By default, code that runs on the same computer as where it resides has full
access to resources on that computer. Therefore, your ASP.NET Web
applications, which run on the Web server, are not denied access to resources
on the Web server by code access security.
There are a few scenarios in which you might consider implementing code
access security in your Web applications. Two such scenarios are:
!
If you have an Internet hosting Web server (such as an Internet Service
Provider (ISP)) and you allow your clients to run ASP.NET Web
applications, you may not want to trust all of the code assemblies on these
hosted Web sites. If you do not want to trust all of the assemblies, you can
restrict access from these assemblies to resources, such as the file system
and registry.
!
If your Web application downloads assemblies from the Internet to the
client computer, you can use code access security to restrict how these
assemblies access resources on the client computer.
For more information about code access security, search for the topic
“Code Access Security” in the Microsoft Visual Studio
®
.NET documentation,
see Course 2350, Securing and Deploying Microsoft .NET Assemblies, and see
Course 2557, Building COM+ Applications Using Microsoft .NET Enterprise
Services.
Code access security
and ASP.NET Web
applications
Note
14 Module 5: Securing Web Pages
Overview of Role-Based Security
!
Role-based security associates groups of users with
permissions
!
Identity objects encapsulate information about the
authenticated user, such as the user name and
authentication type
"
Windows identity, generic identity, and custom identity
!
Principal objects represent the security context under
which code is running
"
Windows principal, generic principal, and custom
principal
*****************************
ILLEGAL FOR NON
-
TRAINER USE
******************************
A role-based security model uses the authenticated identity information about
the user to make decisions about security authorization. The authenticated
identity information typically consists of the user’s logon name and the roles
that are associated with that user.
Role-based security in the .NET Framework extensively uses two concepts:
identities and principals. An identity encapsulates the user’s logon name, and a
principal encapsulates the user’s membership information that is associated
with his or her role. The runtime provides functionality to perform authorization
checks by using identity and principal-related objects directly, or by using
imperative or declarative permission checks.
Role-based security in the .NET Framework also allows developers to use
Windows user and group information, or to use custom authentication and
authorization by using generic principals and identities.
An Identity object encapsulates information, such as the user name and
authentication type, about the user or entity that is being validated. The .NET
Framework provides three kinds of Identity objects:
!
Windows identity. This object represents the identity of the user based on a
method of authentication that is supported by the Windows operating
system. A Windows identity provides the ability to impersonate another
user, thereby allowing resources to be accessed on behalf of that other user.
!
Generic identity. This object represents the identity of the user based on a
custom authentication method, such as forms-based authentication, which is
defined by the Web application.
!
Custom identity. This object represents an identity that encapsulates custom
user information.
Introduction
Identity object
Module 5: Securing Web Pages 15
A Principal object represents the security context under which code is running.
This security context can include the identity of the user, as represented by an
associated Identity object, and the roles that are associated with the user.
A role defines a group of related users of a Web application. For example, a
banking Web application might impose limits on the withdrawal amounts that
can be transacted, based on a user’s role. In this scenario, bank tellers may be
authorized to process withdrawals that are less than a specified amount,
whereas managers may be allowed to process withdrawals above the specified
amount.
Role-based security in the .NET Framework supports three kinds of Principal
objects:
!
Windows principal. This principal represents Windows users and their roles.
The roles are the Windows groups that the user is a member of.
!
Generic principal. This principal represents the users and roles that exist
independent of Windows users and their roles. Essentially, the generic
principal is a simple solution for application authentication and
authorization.
!
Custom principal. This principal represents application-specific role
information.
Managed code can discover the identity or the role of a principal through a
Principal object, which contains a reference to an Identity object. In most
network environments, user accounts represent people or programs, whereas
group accounts represent certain categories of users and the rights that they
possess. Similarly, .NET Framework Identity objects represent users, whereas
roles represent memberships and security contexts. In the .NET Framework, the
Principal object encapsulates both an Identity object and its roles. .NET
Framework applications grant rights to the principal based on its identity or,
more commonly, based on its role membership.
For more information about role-based security, see the topic “Role-
Based Security” in the Visual Studio .NET documentation.
Principal object
How role-based security
works
Note