Tài liệu Security and Performance Management doc
Bạn đang xem bản rút gọn của tài liệu. Xem và tải ngay bản đầy đủ của tài liệu tại đây (509.06 KB, 30 trang )
1
○○○○○○○○○○○○○○○○○○○○○○○○○○○○○○○○○○○○○○○○○○○○○○○○
8
Security and
Performance Management
Terms you’ll need to understand:
✓ IP access control lists
✓ Authentication
✓ Authorization
✓ Accounting
✓ Remote Authentication Dial-In User Service (RADIUS)
✓ Terminal Access Controller Access Control System
(TACACS)
✓ Private Internet Exchange (PIX) Firewalls
✓ Demilitarized zones (DMZ)
✓ Encryption
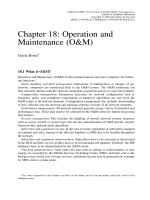
✓ Weighted Fair Queuing (WFQ)
✓ Priority queuing
✓ Custom queuing
Techniques you’ll need to master:
✓ Describing why security and traffic filtering is important
on Cisco routers
✓ Determining the proper placement of Access Control Lists
to efficiently filter traffic
✓ Understanding the characteristics of AAA, RADIUS,
and TACACS
✓ Knowing the queuing methods available on Cisco routers
2
○○○○○○○○○○○○○○○○○○○○○○○○○○○○○○○○○○○○○○○○
Chapter 8
This chapter focuses on methods that can be used to provide you with a secure
network. The aim of this chapter is to familiarize you with common security
options and performance management queuing methods. This chapter covers
the following CCIE blueprint objectives as determined by the Cisco Systems
CCIE program:
➤ Security—Authentication, Authorization, and Accounting (AAA); Terminal
Access Controller Access Control System (TACACS); RADIUS; PIX
firewalls; demilitarized zones (DMZ); encryption; public/private keys; Data
Encryption Standard (DES)
➤ Access Lists—Standard access lists and extended access lists, to include where
and how to place and design them
➤ Performance Management—Traffic management queuing, Weighted Fair
Queuing (WFQ), Resource Reservation Protocol (RSVP), traffic shaping,
load balancing
As with other chapters in this book, additional information is provided for complete-
ness and in preparation for additional subjects as the CCIE Program expands.
Basic Network Security
Network security is one of the primary concerns in today’s networks. Many busi-
nesses must protect sensitive data from competitors or financial details from un-
authorized personnel. A good security policy protects your network against
corruption, failure, and compromised data.
Cisco IOS provides a number of security features, including the following:
➤ Authentication, Authorization, and Accounting (AAA)
➤ Support for security server protocols, including RADIUS, TACACS, Extended
TACACS, and TACACS+
➤ Traffic Filtering options using access lists
➤ Firewalls and DMZs
➤ Network data encryption
➤ Traffic-filtering options using access lists
All the security methods described in this chapter are designed to stop unauthorized
access to your router network. This section covers the security methods outlined
in the preceding list, beginning with a discussion of Access Control Lists.
3
○○○○○○○○○○○○○○○○○○○○○○○○○○○○○○○○○○○○○○○○
Security and Performance Management
Standard and Extended IP Access Lists
Standard and extended access lists are used to filter IP traffic. An access list is
basically a set of permit or deny statements. Standard access lists are used to con-
trol IP traffic based on the source address only. Extended access lists can filter on
source and destination addresses. Extended access lists can also be used to filter
on specific protocols and port numbers. Let’s look at how a Cisco router handles
access lists.
Access Lists on Cisco Routers
By default, a Cisco router permits all IP and TCP traffic unless an access list is
defined and applied to the appropriate interface. Figure 8.1 illustrates the steps
taken if an access list is configured on a Cisco router.
If an incoming packet is received on a router and no access list is defined, the
packet will be forwarded to the IP routing software. If an access list is defined
and applied, the packet will be checked against the list, and the appropriate per-
mit or deny action will be taken. The default action taken by any access list is to
permit any explicitly defined statements and then to deny everything else.
Note: If the keyword out or in is not applied by the administrator when defining an
IP filter on an interface, the default action is to apply the filter on the Outbound traffic.
Standard IP Access Lists (1 through 99)
As mentioned earlier in this chapter, standard IP access lists are used for filtering
on the source address only. The Cisco IOS syntax is as follows:
Incoming
packet
Drop
packet
Process
packet
Process
packet
Access
list
configured?
Is
packet
permitted?
Yes
Yes
No
No
Figure 8.1 Access list decision taken by a Cisco router.
4
○○○○○○○○○○○○○○○○○○○○○○○○○○○○○○○○○○○○○○○○
Chapter 8
access-list access-list-number {deny | permit} source ...
...[source-wildcard]
The following describes the purpose of each field:
➤ access-list-number—A number from 1 through 99 that defines a standard
access list number. New versions of IOS 12.0 or later also have standard ac-
cess lists ranging from 1300-1999.
➤ deny—IP packet will be denied if a match is found.
➤ permit—IP packet will be permitted if it matches the criteria as defined by
the administrator.
➤ source—Source IP address or network. Any source address can be applied by
using the keyword any.
➤ source-wildcard (optional)—Wildcard mask that is to be applied to the source
address. This is an inverse mask, which is further explained with a few ex-
amples later in this section. The default is 0.0.0.0, which specifies an exact
match.
After applying the access list command as described in the preceding text, you
must apply the access list to the required interface using the following command:
ip access-group {access-list-number | name}{in | out}
The following describes the purpose of each field:
➤ access-list-number—A number in the range from 1 through 99 that defines
a standard access list number.
➤ name—If you are using named access lists then that “name” will be refer-
enced here.
➤ in—keyword that designates the access list as an inbound packet filter.
➤ out—keyword that designates the access list as an outbound packet filter.
This is the default action.
The wildcard mask mentioned earlier in the access-list command is used to match
the source address. When the wildcard mask is set to binary 0, the corresponding
bit field must match—if it is set to binary 1, then the router does not care to
match any bit or it is an inconsequential e bit. For example, the mask 0.0.255.255
means that the first two octets must match but the last two octets do not need to
match. Hence, the commonly used phrases care bits (0’s) and don’t care bits (1’s).
For further clarification, let’s look at some examples of using access lists.
5
○○○○○○○○○○○○○○○○○○○○○○○○○○○○○○○○○○○○○○○○
Security and Performance Management
Suppose you have found a faulty NIC card with the address 141.108.1.99/24.
You have been asked to stop packets from being sent out Serial 0 on your router
but to permit everyone else. In this situation, you need to deny the host address
141.108.1.99 and permit all other host devices. The following access list would
fulfill this requirement:
access-list 1 deny 141.108.1.99 0.0.0.0
access-list 1 permit 141.108.1.0 0.0.0.255
Next, you would apply the access list to filter outbound (the keyword out is sup-
plied) IP packets on the Serial 0 interface, like this:
Interface Serial 0
ip access-group 1 out
Let’s look at a more complex example of using a standard access list. In this
example, suppose you have 16 networks ranging from 141.108.1.0 to 141.108.16.0,
as shown in Figure 8.2. You have assigned even subnets to the Accounting
Internet
Cisco
Router, R1
7500
141.108.1.0
141.108.3.0
141.108.5.0
141.108.7.0
141.108.9.0
141.108.11.0
141.108.13.0
141.108.15.0
Odd
Networks
141.108.2.0
141.108.4.0
141.108.6.0
141.108.8.0
141.108.10.0
141.108.12.0
141.108.14.0
141.108.16.0
Even
Networks
Sales Department
(denied Internet
access)
Accounting
Deparment
S0/0
Figure 8.2 Standard access list example.
6
○○○○○○○○○○○○○○○○○○○○○○○○○○○○○○○○○○○○○○○○
Chapter 8
department and odd subnets to Sales. You do not want the Sales department to
access the Internet, as shown in Figure 8.2. To solve this issue, you configure a
standard access list. Figure 8.2 displays a simple requirement to block all odd
networks from accessing the Internet.
You could configure the router to deny all the odd networks, but that would
require many configuration lines.
Note: Access lists are CPU process intensive because the router has to go through every
entry in the access list for each packet until a match is made. If you wish to determine
the actual effect an access list has on your router then compare the CPU processes prior
to and after activating an access list, remember to check on a regular basis in order to
see the big picture.
Instead, let’s say that you permit only even networks with one configuration line.
To accomplish this, you need to convert all networks to binary to see if there is
any pattern that you can use in the wildcard mask. Table 8.1 displays the number
1 through 16 in both decimal and binary format.
Notice that odd networks always end in the binary value of 1 and even networks
end with 0. Therefore, you can apply your access lists to match on the even net-
work and deny everything else. Even numbers will always end in binary 0. You do
Table 8.1 Example calculation of numbers in binary.
Decimal Binary
1 00000001
2 00000010
3 00000011
4 00000100
5 00000101
6 00000110
7 00000111
8 00001000
9 00001001
10 00001010
11 00001011
12 00001100
13 00001101
14 00001110
15 00001111
16 00010000
7
○○○○○○○○○○○○○○○○○○○○○○○○○○○○○○○○○○○○○○○○
Security and Performance Management
not care about the first seven bits, but you must have the last bit set to 0. The
wildcard mask that will apply this condition is 111111110. This converts to deci-
mal value of 254. Hence, the following access list will only permit even networks:
access 1 permit 141.108.2.0 0.0.254.255
The preceding access list will match networks 2, 4, 6, 8, 10, 12, 14, and 16 in the
third octet. The default action is to deny all else, so only even networks will be
allowed and odd networks will be blocked by default. Next, you would apply the
access list to the outbound interface. Listing 8.1 describes the full configuration.
Let’s take a minute to briefly review inverse masks. Assume that you want to let
in a certain number of hosts. If we were routing to these hosts, we would define
the hosts as 150.124.10.0 255.255.255.240. To use the same limits in an access
list, we would take the subnet mask and subtract it from 255.255.255.255 as
follows:
255.255.255.255 minus 255.255.255.240 equals 0.0.0.16
Listing 8.1 Access list example.
Interface 0/0
ip access-group 1 out
access-list 1 permit 141.108.2.0 0.0.254.255
Extended Access Lists
Extended access lists range from 100 through 199 and 2,000 through 2,699. IP
extended access lists (expanded range) in IOS 12.0 and greater. Alternatively, you
can use a named access list with later releases of the IOS 12.0 or later. As men-
tioned earlier in this chapter, extended access lists can be applied to both source
and destination addresses as well as filter protocol types and port numbers. Lets
look at some examples of extended access lists that will allow you to filter several
different types of traffic:
For Internet Control Message Protocol (ICMP), you can also use the syntax
shown in Listing 8.2.
Listing 8.2 Access list for ICMP traffic.
access-list access-list-number [dynamic dynamic-name
[timeout minutes]] {deny | permit} icmp source source-wildcard
destination destination-wildcard [icmp-type [icmp-code]
[icmp-message] [precedence precedence] [tos tos] [log]
For Internet Group Management Protocol (IGMP), you can use the syntax shown
in Listing 8.3.
8
○○○○○○○○○○○○○○○○○○○○○○○○○○○○○○○○○○○○○○○○
Chapter 8
Listing 8.3 Access list for IGMP traffic.
access-list access-list-number [dynamic dynamic-name
[timeout minutes]] {deny | permit} igmp source source-wildcard
destination destination-wildcard [igmp-type]
[precedence precedence] [tos tos] [log]
For TCP, you can use the syntax shown in Listing 8.4.
Listing 8.4 Access list for TCP traffic.
access-list access-list-number [dynamic dynamic-name
[timeout minutes]] {deny | permit} tcp source source-wildcard
[operator port [port]] destination destination-wildcard
[operator port [port]] [established] [precedence precedence]
[tos tos] [log]
For User Datagram Protocol (UDP), you can use the syntax shown in Listing 8.5.
Listing 8.5 Access list for UDP traffic.
access-list access-list-number [dynamic dynamic-name
[timeout minutes]] {deny | permit} udp source source-wildcard
[operator port [port]] destination destination-wildcard
[operator port [port]] [precedence precedence] [tos tos] [log]
As you can see, extended access lists have a range of options to suit any require-
ment. The most commonly used extended access list options are:
➤ access-list-number—Provides a number ranging from 100 through 199 that
defines an extended access list.
➤ deny—Denies access if the conditions are matched.
➤ permit—Permits access if the conditions are matched.
➤ protocol—Specifies the protocol you are filtering. Some common options
include eigrp, gre, icmp, igmp, igrp, ip, ospf, tcp, and udp.
➤ source—Specifies the source address.
➤ source-wildcard—Specifies the wildcard mask.
➤ destination—Identifies the destination network.
➤ destination-wildcard—Identifies the destination mask.
You should be able to demonstrate your understanding of standard and
extended access lists. You are not expected to memorize the available
options in an extended access list. The options are provided in this
chapter for your reference only. When constructing access lists the
built in help feature is extremely helpful.
9
○○○○○○○○○○○○○○○○○○○○○○○○○○○○○○○○○○○○○○○○
Security and Performance Management
The example in Listing 8.6 permits Domain Naming System (DNS) packets,
ICMP echo and echo replies, OSPF, and BGP packets. (BGP runs over TCP
using port 179). In Listing 8.6, the access list numbered as 100 is not concerned
about specific host addresses or networks, but rather ranges of networks.
Listing 8.6 Extended access list example.
access-list 100 permit tcp any any eq smtp
! Permits Simple Mail Transfer Protocols
access-list 100 permit udp any any eq domain
! Permits DNS queries
access-list 100 permit icmp any any echo
! Permits ICMP ping requests
access-list 100 permit icmp any any echo-reply
! Permits ICMP replies
access 100 permit ospf any any
! Permits OSPF packets
access 100 permit tcp any any eq bgp
! Permits BGP to any device
In Listing 8,6, the any keyword is shorthand for 0.0.0.0 255.255.255.255, which
means that the address of the device is irrelevant. This address can be entered in
shorthand as any. If any IP packet arrives to the router and does not match the
specified criteria, the packet will be dropped.
The Cisco CD documentation provides additional quality examples of access
lists. You should take some time to study Cisco’s examples. For further informa-
tion, see the “Need to Know More” section at the end of this chapter.
Authentication, Authorization, and Accounting (AAA)
AAA provides a method used to identify which users are logged into a router and
each user’s authority level. AAA also provides the capability to monitor user ac-
tivity and provide accounting information.
To start AAA on a Cisco router, you issue the aaa new-model IOS
command.
Let’s now define the what Authentication, Authorization, and Accounting is and
a common example on a Cisco router.
Authentication
Authentication allows the administrators to identify who can connect to a router,
by including the user’s user name and password. Normally, when a user connects
to a router remotely via Telnet, the user only needs to supply a password and the
10
○○○○○○○○○○○○○○○○○○○○○○○○○○○○○○○○○○○○○○○○
Chapter 8
administrator has no way of knowing the user’s user name. With AAA authenti-
cation, whenever a user logs on, the user must enter a user name and password
pair (which has been assigned by the administrator).
The following code snippet shows an example of a remote user accessing an AAA-
configured Cisco router:
User Access Verification
Username: benjamin
Password: xxxxxxxx
San-Fran>
As you can see in the preceding code, the user must enter a valid username and
password to gain access to the router. Typically, there is a database that contains
the valid usernames that reside locally on the router or on a remote security server.
Authorization
Authorization comes into play after authentication. Authorization allows ad-
ministrators to control the level of access users have after they successfully gain
access to the router. Cisco IOS allows certain access levels (called privilege levels)
that control which IOS commands the user can issue. For example, a user with a
0 privilege level cannot issue any IOS commands. A user with a privilege level of
15 can perform all valid IOS commands. The local or remote security server can
grant access levels.
You can display your privileged level on a Cisco router with the show privilege
command, as shown in the following code snippet:
R1#show privilege
Current privilege level is 15
Keep in mind that the higher the privilege, the more capabilities a user has with
the IOS command set.
Accounting
Accounting occurs after the authentication and authorization steps have been
completed. Accounting allows administrators to collect information about users.
Specifically, administrators can track which user logged into which router, which
IOS commands a user issued, and how many bytes were transferred during a
user’s session. For example, accounting enables administrators to monitor which
routers have had their configurations changed. Accounting information can be
collected by a router or by a remote security server. To display local account infor-
mation on a Cisco router collecting accounting information, you issue the show
accounting IOS command.
11
○○○○○○○○○○○○○○○○○○○○○○○○○○○○○○○○○○○○○○○○
Security and Performance Management
Note: You must use AAA if you intend to use RADIUS or TACACS security server
protocols.
After AAA is configured, you can use external security servers to run external
security protocols—such as RADIUS or TACACS—that will stop unauthorized
access to your network. Both RADIUS and TACACS can be implemented on
Cisco routers, so we’ll review these two protocols in the upcoming sections.
Remote Authentication Dial-In User Service (RADIUS)
RADIUS is a client-server based system that secures a Cisco network against
intruders. RADIUS is a protocol that is implemented in IOS that sends authen-
tication requests to a RADIUS server. A RADIUS server is a device that has the
RADIUS daemon or application installed. RADIUS must be used with AAA to
enable the authentication, authorization, and accounting of remote users.
When a RADUIS server authenticates a user, the following events occur:
➤ The remote user is prompted for a username and password.
➤ The username and password is encrypted and sent across the data network.
The RADIUS server accepts or rejects a user name and password pair. In some
instances, a user might be asked to enter more information (this is called a chal-
lenge response). For example, if a user’s password has expired, a RADUIS server
will prompt the user for a new password.
Let’s now examine the RADIUS configuration tasks required on a Cisco router.
Note: A RADIUS server is usually software that runs on a variety of platforms,
including Microsoft NT servers or a Unix host. RADIUS can be used to authenticate
router users, authenticate vendors, and even to validate IP routes.
Configuring RADIUS
The steps required to enable RADIUS are:
1. Use the aaa new-model command. AAA must be used with RADIUS.
2. Specify the RADIUS server with the radius-server host command.
3. Specify the password used between the router and the RADIUS server.
The following example displays the required configuration for a Cisco router to
authenticate users from the RADIUS server with the host address 10.99.34.50.
The password or key used between the router and RADIUS server is set to ccie:
radius-server host 10.99.34.50
radius-server key ccie
12
○○○○○○○○○○○○○○○○○○○○○○○○○○○○○○○○○○○○○○○○
Chapter 8
Please refer to the “Need To Know More?” section at the end of this chapter for
additional RADIUS references. Table 8.2 summarizes some useful RADIUS
commands.
To enable RADIUS to operate with AAA, you must use the keyword
radius when applying any AAA commands.
Now, let’s move on to TACACS, which is an alternative protocol to RADIUS.
Terminal Access Controller Access Control
System (TACACS)
Cisco IOS supports three versions of TACACS—TACACS, extended TACACS,
and TACACS+. All three methods authenticate users and deny access to users
who do not have a valid username and password pairing.
The first version of TACACS provides simple password verification and authen-
tication. Accounting is very limited in that only requests and denials are listed.
Next, extended TACACS replaced the first version of TACACS.
TACACS+, also referred to as TACACS plus, provides detailed accounting and
has to be used along with AAA (in other words, the aaa new-model command
must be enabled). TACACS+ supersedes the earlier releases of TACACS.
In general, TACACS provides a centralized security system that validates users
from any remote location. Typically, TACACS runs on a Windows NT station or
Table 8.2 Summary of common RADIUS commands.
Command Description
radius-server transmit <retries> Indicates the number of retries a router will
attempt before giving up.
radius-server timeout <seconds> Indicates the number of seconds a router
will wait before giving up on a response
from the RADIUS server.
radius-server dead-time <minutes> Specifies the number of minutes before a
router will decide that the RADIUS server is
unreachable.
ip radius source-interface <sub interface> Specifies the interface for outgoing RADIUS
packets.
radius server-host <ip address> Specifies a remote RADIUS server. You can
specify more than one.
radius server-key <password> Specifies the password used between the
router and the RADIUS server.