Tài liệu The Adobe Photoshop Cs4 Dictionary: The a to Z Desktop Reference of Photoshop- P1 pdf
Bạn đang xem bản rút gọn của tài liệu. Xem và tải ngay bản đầy đủ của tài liệu tại đây (4.79 MB, 50 trang )
Please purchase PDF Split-Merge on www.verypdf.com to remove this watermark.
The Adobe
Photoshop CS4
Dictionary
Please purchase PDF Split-Merge on www.verypdf.com to remove this watermark.
Picture credits
With thanks to the great guys at www.ablestock.com and
JupiterImages Corporation for their generous support in supplying
the tutorial images for this text. Copyright © 2009 Hamera and its
licensors. All rights reserved.
All other images and illustrations by the author © Philip Andrews
& Peter Bargh 2009. All rights reserved.
Author’s dedication
Always for Kassy-Lee and my great kids Adrian and Ellena.
Cheers to Peter Bargh for all his hard work making this title the
success it already is and my thanks to him for allowing me to
carry on the tradition he started.
Thanks also to the staff at Focal Press including Ben Denne, David
Albion and Lisa Jones and cheers to Melissa Read for crafting my
writing efforts.
My appreciation goes to Bryan O’Neil Hughes at Adobe for his
support, technical advice and Peter Eastway, photographer and
publisher for his Foreword. And thanks once more to Adobe
for bringing image enhancement and editing to us all through
their innovative and industry-leading products, and the other
hardware and software manufacturers whose help is an essential
part of writing any book of this nature. In particular I wish to
thank technical and marketing staff at Adobe, Microsoft, Canon,
Nikon, Sony, and Epson. Also to Manfred ‘Grids Rule!’ Huber for
his design guidance.
And finally my thanks to all the readers who continue to inspire
and encourage me with their generous praise and great images.
Keep emailing me to let me know how your imaging is going.
Please purchase PDF Split-Merge on www.verypdf.com to remove this watermark.
!-34%2$!-¬s¬"/34/.¬s¬(%)$%,"%2'¬s¬,/.$/.¬s¬.%7¬9/2+¬s¬/8&/2$
0!2)3¬s¬3!.¬$)%'/¬s¬3!.¬&2!.#)3#/¬s¬3).'!0/2%¬s¬39$.%9¬s¬4/+9/
&OCAL¬0RESS¬IS¬AN¬IMPRINT¬OF¬%LSEVIER
The Adobe
Photoshop CS4
Dictionary
The A to Z desktop reference of
Photoshop
Philip Andrews
Please purchase PDF Split-Merge on www.verypdf.com to remove this watermark.
Focal Press is an imprint of Elsevier
Linacre House, Jordan Hill, Oxford OX2 8DP, UK
30 Corporate Drive, Suite 400, Burlington, MA 01803, USA
First published 2009
Copyright © 2009, Philip Andrews. Published by Elsevier Ltd. All rights reserved
The right of Philip Andrews to be identified as the author of this work has been asserted in accordance with the
Copyright, Designs and Patents Act 1988
No part of this publication may be reproduced, stored in a retrieval system or transmitted in any form or by any
means electronic, mechanical, photocopying, recording or otherwise without the prior written permission of the
publisher
Permissions may be sought directly from Elsevier’s Science & Technology Rights Department in Oxford, UK: phone
(+44) (0) 1865 843830; fax (+44) (0) 1865 853333; email: Alternatively visit the Science
and Technology Books website at www.elsevierdirect.com/rights for further information
Notice
No responsibility is assumed by the publisher for any injury and/or damage to persons or property as a matter of
products liability, negligence or otherwise, or from any use or operation of any methods, products, instructions or
ideas contained in the material herein
British Library Cataloguing in Publication Data
A catalogue record for this book is available from the British Library
Library of Congress Cataloging-in-Publication Data
A catalog record for this book is available from the Library of Congress
ISBN: 978-0-240-52132-9
For information on all Focal Press publications
visit our website at www.focalpress.com
Printed and bound in Canada
09 10 11 12 13 12 11 10 9 8 7 6 5 4 3 2 1
Please purchase PDF Split-Merge on www.verypdf.com to remove this watermark.
v
A
B
C
D
E
G
F
IJK
H
L
XYZ
W
V
U
T
S
R
PQ
O
N
M
A–Z
CONTENTS
Accented Edges filter – Automate, Bridge
Background color – Button mode
Cache, Bridge – Cutout filter
Darken blend mode – Dust & Scratches filter
Edges – Eyedropper tool
Facet filter – Fuzziness setting
Gamut Warning – Guides, Smart
Halftone Pattern filter – Hue/Saturation adjustment layer
ICC profiles – Knockout
LAB color – LZW compression
Magic Eraser tool – Multiply blending mode
Navigator – Notes
Ocean Ripple filter – Overlay blend mode
Page Setup – Purge
Radial Blur filter – Rulers
Sample All Layers – Swatches palette
Test in Device Central – Type Masks
Underlining type – Use All Layers
Vanishing Point filter – Vivid Light blending mode
Warp – Workspace, Photoshop
XMP – ZoomView format
1
23
46
78
91
99
117
127
134
143
159
173
176
181
212
229
267
284
286
297
305
A–Z Entries
#ONTENTS
3TEPBY3TEP¬4ECHNIQUES
01 Importing photos into Bridge 309
02 Changing brightness 310
03 Adjusting contrast 311
04 Removing color casts 312
05 Sharpening 312
06 Speeding up Photoshop 313
07 Incorporating texture 314
08 Tinting and toning pictures 315
09 Cropping your photos 316
10 Creating panoramas 317
11 Convert color photos to black
and white 318
12 Color management 319
13 Simple line frame 320
14 Multi-layer copy 320
15 Photoshop animation 321
16 Web matting 321
17 Grouping photos 322
18 Non-destructive techniques 322
19 Adding color to black and
white photos 323
20 Recreating motion 323
21 Vignetting 323
22 Selection techniques 324
23 Layer masks 326
24 The Liquify filter 326
25 Compositing 326
26 Retouching marks and blemishes 327
27 Photoshop’s brushes 328
28 Rough frames 328
Foreword vi
Introduction vii
How to use this book viii
Please purchase PDF Split-Merge on www.verypdf.com to remove this watermark.
A–Z
vi
Photoshop CS4 A–Z
&OREWORD
Photoshop has been through some amazing changes since we
fi rst looked at it on a tiny Apple Macintosh screen last century.
It quickly asserted itself as the de facto image editing standard
and its feature list grew so extensively that there aren’t enough
options on our keyboards to make shortcuts for all of them.
Adobe has also addressed fundamental issues like speed, color
management and workfl ow, refi ning them to such an extent that
Photoshop today can be an unnoticed extension of the creative
process – assuming you know how to drive it.
What identifi es a skilled Photoshop user is their knowledge
of what is possible. Everything we do creatively is limited by
what we know or believe can be done. Extend our knowledge
of processes and immediately more possibilities arise. Nowhere
is this more evident than when you’re sitting down at your
computer and looking at your images in Photoshop.
Fortunately, by the time we get to play with Photoshop the
rocket science is hidden behind a system of clean menus and
a few mouse clicks, but even so, it’s essential to have a clear
understanding of what you’re doing and why.
This is where a book like this comes in handy. No matter how
thorough Adobe tries to be with its documentation, it’s still a
matter of translating the documentation into a practical reality.
And this is where a skilled photographer and writer like Philip
Andrews comes in.
I have worked with Philip for several years on Better Photoshop
Techniques magazine and I am constantly amazed at the
breadth and extent of his knowledge about all things Photoshop.
Not only does he know how to fi x or alter something, he has half
a dozen options to tempt you creatively.
There are a lot of great Photoshop users in the world, but fi nding
one who is able to explain things in a way that everyone can
understand and relate to is an invaluable skill. Philip Andrews
stands tall among the best Photoshop educators in the world and
I know you’re going to enjoy reading his book.
And expanding your range of creative possibilities with
Photoshop CS4.
Peter Eastway G.M. Photog.
Co-Publisher
Better Photography Magazine
Better Photoshop Techniques Magazine
www.petereastway.com
FOREWORD/INTRODUCTION
Please purchase PDF Split-Merge on www.verypdf.com to remove this watermark.
A–Z
vii
)NTRODUCTION
Now in its eleventh release Photoshop is undoubtedly the King
of photo-editing software and, considering the host of new and
revamped features included in the CS4 version of the program,
its position at the top of the heap is assured.
The software is so popular with photographers, designers and
illustrators that it is truly hard to recall a time when we didn’t
have Photoshop at the center of our creative endeavors. With
the massive upsurge of digital camera owners there is now a
host of new photographers who are just discovering the pure
editing and enhancement power afforded by the program.
Given the success of previous editions it would have been easy
for Adobe to sit back and bask in the refl ected glory of the
program’s popularity but instead Adobe has been hard at work
improving what was already a great product. The CS4 version,
just like the releases before it, is a state-of-the-art image-
editing program full of the features and functions that digital
photographers and desktop image makers desire the most.
In fact, the program has become so comprehensive that
producing an illustrated A–Z book like this one is not just
a nicety, but has become a necessity. The software covers
so many areas that Photoshop users needed a quick ready-
reference guide to all the major tools and features. Peter
Bargh, in the fi rst few editions of this text, provided just such
a comprehensive guide to the program and here I add to his
excellent work. As was Peter’s approach, I haven’t stopped at
simply describing the tool or feature; I accompany the text with
illustrations of the software in action together with before and
after pictures of the applied changes.
All entries include shortcut keys, menu locations and are
cross-referenced to other Photoshop features that relate.
Many features also include step-by-step guides to their usage
and extended visual examples of the effects of using different
settings on your pictures and just as with the last edition I
have included a special techniques section that outlines key
techniques that you can use with your images.
Keep this ready reference handy for all those occasions when
you ask yourself ‘What does that do?’
But most of all keep enjoying your digital image making!
Philip Andrews
INTRODUCTION
Photoshop CS4 A–Z
Please purchase PDF Split-Merge on www.verypdf.com to remove this watermark.
A–Z
Photoshop CS4 A–Z
viii
Feature summary
Before and after examples
Step-by-step application
Edge tabs
Tips and reminders
CS4 features highlighted
(OW¬TO¬USE¬THIS¬BOOK
The before and after examples illustrate
how features, tools and techniques can be
used to change the way that your pictures
look.
There is a completely new step-by-step
section at the back of the book designed
to demonstrate how to use major tools
and features. These mini-tutorials can be
used to extend your understanding as well
as build your editing and enhancement
skills.
The colored edge tabs change for each letter
section. They can be used in conjunction
with the contents page to quickly thumb
through the book to locate a particular
group of entries.
Important ideas and techniques are
highlighted with the Remember icon
and the tips and tricks used by working
professionals are noted with the ‘Pro’s Tip’
ticked box.
Each feature and tool entry is headed with
a summary table that details the menu
where the feature can be found, any
keyboard shortcuts associated with the
tool, the version of Photoshop that contains
the feature and any other features that are
linked to the feature.
In order to make the most of this book, take a couple of minutes to read the
following. This will let me introduce a few of the special features that I have
included to help you fi nd the information that you need fast. Apart from the
basic A–Z structure that lists the topics, features and tools alphabetically, I have
also used the following design devices to make ‘search and locate’ missions
speedier and more productive.
The entries detailing new or substantially
changed or revamped features in Photoshop
CS4 are highlighted in red.
HOW TO USE THIS BOOK
Please purchase PDF Split-Merge on www.verypdf.com to remove this watermark.
Photoshop CS4 A–Z
aA
A
1
ABCDEFGHIJKLMNOPQRSTU-
VWXYZABCDEFGHIJKLM-
NOPQRSTUVWXYZABCDEFGHIJKLMNOPQRSTUVWX-
YZABCDEFGHIJKLMNOPQRSTUV
WXYZABCDEFGHIJKLMNOPQRSTUVWXYZA-
BCDEFGHIJKLMNOPQRSTUVWX-
YZABCDEFGHIJKLMNOPQRSTU-
VWXYZABCDEFGHIJKLMNOPQR
STUVWXYZABCDEFGHIJKLM-
NOPQRSTUVWXYZABCDEFGHI-
JKLMNOPQRSTUVWXYZABCDEF-
GHIJKLMNOPQRSTUVWXYZABCDEFGHIJKLMN
OPQRSTUVWXYZABCDEFGHI-
JKLMNOPQRSTUVWXYZABCDEF-
GHIJKLMNOPQRSTUVWXYZABC-
DEFGHIJKLMNOPQRSTUVWXYZABCDEFGHIJ
KLMNOPQRSTUVWXYZABCDEFGHIJKLMNOPQRSTU-
VWXYZABCDEFGHIJKLM-
NOPQRSTUVWXYZABCDEFGHI-
JKLMNOPQRSTUVWXYZABCDEF-
GHIJKLMNOPQRSTUVWXYZABC-
DEFGHIJKLMNOPQRSTUVWXYZABCDEFGH-
IJKLMNOPQRSTUVWXYZABCDE-
FGHIJKLMNOPQRSTUVWXYZAB-
CDEFGHIJKLMNOPQRSTUVWX-
YZABCDEFGHIJKLMNOPQRSTU-
VWXYZABCDEFGHIJKLM-
aA
1
2
3
2
3
1
Actions
Menu: Window > Actions
Shortcut: Alt/Opt F9 See
also:
Batch command,
Droplet
Version: 6.0, 7.0, CS, CS2, CS3, CS4
An action is a way of automatically
applying a techniCue to an image using a
prerecorded series of commands. Actions
are triggered either by pressing one or a
combination of keys or selecting the action
from the Actions palette (1). Many actions
are already supplied with Photoshop and
can be found at the bottom of the Actions
menu (2) by clicking on the side-arrow at
the top right of the Actions palette.
An action can be as simple as opening a
new canvas or as advanced as creating a
drop shadow on an existing picture or, as
in our example, making snow.
Ready-made actions can be downloaded
from the internet, saved to your hard drive
and then installed in Photoshop. Use the Load
Actions command (3) in the Actions menu to
search for and install the downloaded ATN
or Photoshop Actions fi le.
You can also create your own Photoshop
actions using the Record mode, so if there
are techniCues you fi nd particularly fi ddly
or ones you’ll want to use again, record the
commands as you run through them and
assign the action a shortcut key.
1. Actions can also be applied to
several images in one go using
the Batch command or created
into droplets.
2. If a command cannot be recorded you
can insert it manually using the Insert
Menu command.
3. If you make a mistake, keep going, you
can edit the script later.
4. Some settings may need modifying for
different images. Clicking on the box to the
left of the action will stop the script at that
point and bring up the dialog box so you
can manually adjust before continuing the
script.
Accented Edges fi lter
Menu: Filters > Brush Strokes > Accented Edges
Shortcut: Ctrl F See also: Ink Outlines fi lter
Version: 6.0, 7.0, CS, CS2,
CS3, CS4
The Accented Edges fi lter searches out
the edges within a picture and then
highlights them with a line. The size of
the line is controlled by the Edge Width
slider (1) in the fi lter’s dialog. The darkness
or lightness of the line is determined by
the Edge Brightness slider (2). A high
value produces a lightly colored edge that
appears like chalk and a low value, like the
one used in the illustration here, creates an
ink-like outline. The Smoothness slider (3)
is used to even out the roughness of jagged
edges of the line.
ACCENTED EDGES FILTER
Please purchase PDF Split-Merge on www.verypdf.com to remove this watermark.
A
aA
2
Photoshop CS4 A–Z
Active layer
Menu: –
Shortcut: – See also: –
Version: 6.0, 7.0, CS, CS2,
CS3, CS4
The Layers feature is great for creating
pictures that are made up of a variety of
parts. But the way in which the feature
works means that it is only possible to edit
or enhance one layer at a time. You must
activate the layer fi rst before applying
changes.
To select the layer, click on its thumbnail
in the Layers palette. At this point the layer
will change to a different color from the rest
in the stack. The layer is now active and
can be edited in isolation from the others
that make up the picture.
Add Noise fi lter
Menu: Filter > Noise > Add Noise
Shortcut: Ctrl F See also: Grain fi lter,
Texturizer fi lter
Version: 6.0, 7.0, CS, CS2,
CS3, CS4
Many photographers like to replicate
the look of fi lm grain in their digital
photographs. Using the Add Noise fi lter
is one way to introduce this texture into
your digital pictures. The fi lter adds random
speckled pixels to your picture. A small
amount of noise can be applied to gradients
to prevent banding when printed.
The fi lter uses a single Amount slider (1) to
control the strength of the texture effect.
The higher the setting the more obvious the
results will be. Two different types of texture
are provided – Uniform and Gaussian (2).
The Uniform option adds the noise evenly
across all the tones in the picture. In contrast
the Gaussian setting concentrates the
noise in the midtones with fewer changes
being applied to the highlight and shadow
areas.
Selecting the Monochrome option (3)
restricts the noisy pixels added to white,
black and gray only.
ACTIVE LAYER
1
2
3
Add to Favorites
Menu: –
Shortcut: – See also: Favorites
Version: CS3, CS4
The Favorites panel in Bridge provides
fast access to regularly visited folders and
directories. By default Bridge includes a
basic set of entries in the Favorites panel,
which includes Bridge Home, Able Stock
Photos, Adobe Photographers Directory,
Version Cue and Start Meeting.
In addition users can add their own
Favorites entries by right-clicking on specifi c
directories in the Folders panel and choosing
Add to Favorites (1) from the pop-up menu.
Shortcuts to these directories will then be
listed in the Favorites panel (2) providing
one-click access to regularly used folders.
Favorites entries are also
listed in the Adobe dialog
version of the OS fi le browser
that can be used to open
and save fi les in Photoshop.
When using the Adobe
dialog you can add folders
to the Favorites list by right-clicking on the
directory and choosing the Add to Favorites
menu entry.
1
2
Please purchase PDF Split-Merge on www.verypdf.com to remove this watermark.
Photoshop CS4 A–Z
aA
A
3
ADJUSTMENT BRUSH, ACR
Adjustment Brush, ACR
Menu: –
Shortcut: – See also: Camera Raw 5, Graduated
Filter
Version: CS4, ACR5
The Adjustment Brush (shortcut key - K)
is new for the version of Adobe Camera
Raw (ACR) that ships with Photoshop CS4.
The tool uses a Brush icon and is grouped
together with the other tools in the toolbar
that sits at the top of the ACR dialog. Here
you will also fi nd a new Graduated Filter
tool.
The Adjustment Brush is used to apply
some localized corrections to the photo.
This is a different way of enhancing raw
fi les as until this release all the changes are
made to the whole of the image.
Applying a localized correction is
essentially a two step process. First you
mark out the adjustment area (think
selection creation) and then you fi ne-tune
the degree and type of adjustments made
to this area.
For example, after painting on the
adjustment area using an Exposure value
of -2.80 EV so that the effects can be clearly
seen on the image, you can then change
to the Edit mode for the tool and drag the
Exposure value back to 0 and input a value
for Saturation instead.
You can also create a custom adjustment
mix that includes settings for multiple
image characteristics all applied to the
same adjustment area.
Before
After
Adjustments panel
Menu: Window > Adjustments
Shortcut: – See also: Mask panel, Adjustment
layers
Version: CS4
The new Adjustments Panel is a key
component in the workfl ow change in
Photoshop. Featuring not just existing core
adjustment features such as Levels, Hue/
Saturation, Exposure, Black and White,
Channel Mixer, Selective Color, Color
Balance, Photo Filter, but a completely
revised version of the Curves feature and a
brand new Vibrance adjustment tool.
For existing Photoshop users getting the
hang of how to operate the Adjustments
panel may take a little while, but once
mastered this new approach will provide
both effi ciency and quality gains way
beyond the effort needed to get over the
initial hump in the CS4 learning curve.
As well as grouping key adjustment
features together, the panel also provides
‘on image adjustments’ for Hue/Saturation
and Curves features. This provides the user
with the ability to click onto image areas in
the photo and apply changes by dragging
the mouse pointer either up or down or
side to side.
Also included is a wide variety of
customizable presets providing more
than 20 different starting points for typical
image enhancement tasks.
1
Adjustment layers
Menu: Layer > New Adjustment Layer
Shortcut: Layers palette button See also: Grain fi lter,
Fill layers
Version: 6.0, 7.0, CS, CS2, CS3
These special layers alter the look of the
layers that are arranged below them in the
stack. They act as a fi lter through which
the lower layers are viewed. You can use
adjustment layers to perform many of
the enhancement tasks that you would
normally apply directly to an image layer
without changing the image itself. CS3
contains 14 different adjustment layers,
which are grouped with the fi ll layers
under the Create Adjustment Layer button
(1) in the Layers palette or the Layer > New
Adjustment Layer menu. They are:
Levels – Adjusts the tones in the picture.
Curves – Adjust the tones in the picture.
Color Balance – Used for adding or
removing color casts from images.
Brightness/Contrast – revamped in CS3
to be less destructive, this feature lightens,
darkens and controls contrast.
Black and White – In CS3, this adjustment
customizes grayscale conversion and
tinting monochromes.
Hue/Saturation – Changes the color and
strength of color in photos.
Selective Color – Adjusts the hue of a
single group of colors.
Channel Mixer – Changes the color
makeup of individual channels and in the
Monochrome mode creates great black and
white conversions from color pictures.
Gradient Map – Changes the photo so
that all the tones are mapped to the values
of a selected gradient.
Photo Filter – Reproduces the color
changes of traditional photo fi lters.
Exposure – In CS3, designed for making
tonal changes to High Dynamic Range
images but also works on 8-/16-bit fi les
as well.
Invert – Reverses all the tones in a picture,
producing a negative effect.
Threshold – Converts the picture to pure
black and white with no grays present at
all.
Posterize – Reduces the total number of
colors in a picture and creates a fl at paint
(or poster)-like effect.
Please purchase PDF Split-Merge on www.verypdf.com to remove this watermark.
A
aA
4
Photoshop CS4 A–Z
ADJUSTMENTS PANEL PRESETS
Adobe Camera Raw –
Camera updates
Menu: –
Shortcut: – See also: Raw fi les, Camera
Raw
Version: CS2, CS3, CS4
When opening a Raw fi le in Photoshop,
the picture is fi rst displayed in the Adobe
Camera Raw (ACR) dialog (1). This
feature is Adobe’s Raw conversion utility
and is common to both Photoshop and
Photoshop Elements (although in slightly
different forms).
Adobe releases new versions of the
feature on a regular basis to ensure that
the utility stays up to date with the latest
camera models. The update needs to be
downloaded from www.adobe.com (2)
website and installed into the \Program
Files\Adobe\Photoshop CS4\Plug-Ins\File
Formats folder (3). To install simply drag
the ‘Camera Raw.8bi’ fi le into the folder.
The next time Photoshop is started, and a
Raw fi le opened, the new version of ACR is
used to display and convert the fi le.
For some installations of Photoshop the
ACR plug-in can now auto-update at
the same time that other Creative Suite
programs are patched or updated.
3
2
1
Adjustments panel
presets customize
Menu:
Window > Adjustments
Shortcut: – See also: Adjustments panel,
Adjustments panel presets
Version: CS4
The Presets in the Adjustment panel can
be easily customized and saved as a new
entry in the Preset menu.
(1) Start by selecting an existing preset
from the list. This will act as your starting
point. Next, make the changes or tweaks
that you require to the settings of the
adjustment.
(2) Now, click on the Settings icon in the
top right of the panel to display the menu.
Choose the Save Levels Preset option and
add a name for the new entry.
(3) The new preset will appear at the
bottom of the current list of entries for
the adjustment. Select the entry to apply
changes to an image.
2
3
1
Adjustments panel
presets
Menu: Window > Adjustments
Shortcut: – See also:
Adjustments panel, Adjustments
panel presets customize
Version: CS4
When selecting an adjustment type from
the button grouping at the top of the
Adjustment panel, the lower section of the
panel displays a set of adjustment presets.
The presets that ship with Photoshop cover
the major general image changes that are
applied to a photo.
Selecting one of the entries will
automatically apply the changes to the
photo and at the same time switch to the
adjustment dialog. For instance choosing
the Darker entry in the Levels Preset
will apply a levels change to darken the
image and the Levels adjustment panel
will be displayed. At this point you can
tweak the adjustment using the various
controls provided in the panel. For levels,
this means changing the white, midtone
and black input and white and black point
output sliders.
Please purchase PDF Split-Merge on www.verypdf.com to remove this watermark.
Photoshop CS4 A–Z
aA
A
5
ADOBE CAMERA RAW – CONVERT TO GRAYSCALE
Adobe Camera Raw –
Convert to Grayscale
Menu: –
Shortcut: – See also: Black & White,
Channel Mixer
Version: CS3, CS4, ACR4, ACR5
Adobe Camera Raw (ACR) ships with
Photoshop. Included in the Raw conversion
utility are some great tools for converting
to grayscale.
The conversion can be set using the
supplied checkbox in either the Basic or
HSL/Grayscale panel (1).
Once this option is selected the sliders in
the HSL/Grayscale panel switch to house
sliders that control the Grayscale Mix or
the customized mapping of colors to gray
(2). Using these controls it is possible to
customize the specifi c gray tone attributed
to a color range. In this way users can alter
the dominance of hues in the conversion
process and control the overall contrast of
the resulting monochrome.
Unlike the Channel Mixer control, which
provides similar control when used in the
Monochrome mode, there is no need to
ensure that the settings in this dialog add
up to 100% to ensure that no shadow or
highlight detail is lost. But as with all tonal
controls, the Clipping Warnings should be
used to help guide all changes (3).
1
2
3 3
Adobe Camera Raw –
HSL/Grayscale panel
Menu: –
Shortcut: – See also: Adobe Camera Raw –
Convert to Grayscale
Version: CS3, CS4,
ACR4, ACR5
Drawing inspiration from the type of
features that are included in Photoshop
Lightroom, the sliders in this panel
provide control of the Hue, Saturation
and Luminance of each color group (red,
orange, yellow, green, aqua, blue, purple
and magenta) independently (1).
Hue – Alters the slider color to a different
hue.
Saturation – Controls the strength or
vividness of the slider color.
Luminance – Alters the brightness of the
slider color.
By clicking the Convert to Grayscale option
(2) the panel also provides custom mapping
of the same color groupings to gray.
It is also important to note that the
settings between Adobe Camera Raw
and Lightroom are consistent and
interchangable.
2
1
Adobe Camera Raw –
Fill Light
Menu: –
Shortcut: – See also: Adobe Camera Raw –
Recovery, Camera Raw
Version: CS3,CS4,
ACR4, ACR5
One of the controls added to the Basic
panel in Adobe Camera Raw 4 (ACR) is
the Fill Light slider (1). Designed to help
lighten shadow or dark areas of the photo,
this slider concentrates on moving the
bottom quarter of tones in the histogram
towards the highlight end of the graph (to
the right). This action lightens these areas
of the photo.
The feature is meant to be used after the
black and white points of the picture have
been established using the Blacks and
Exposure sliders. Adjustments made with
the Fill Light control have less chance of
clipping highlights and shadows, as the
feature compresses and stretches the dark
tones rather than moving black or white
points. This said, it is still important to
ensure that the Clipping Warnings are
activated when making any tonal changes
in ACR.
1
Please purchase PDF Split-Merge on www.verypdf.com to remove this watermark.
A
aA
6
Photoshop CS4 A–Z
ADOBE CAMERA RAW – JPEG AND TIFF SUPPORT
Adobe Camera Raw –
Jpeg and Tiff support
Menu: –
Shortcut: – See also: Camera Raw,
Camera Raw 5
Version: CS3, CS4, ACR4, ACR5
The features and controls in Adobe Camera
Raw 4 and 5 can be applied to TIFF
and JPEG fi les as well as Raw captures.
Although enhancing TIFF and JPEG fi les
in this way doesn’t provide some of the core
advantages of working on the Raw fi les,
such as being able to change the camera
set White Balance options losslessly
during conversion, using ACR with these
other formats does provide two distinct
advantages:
The enhancements are made losslessly
1.
with all alterations being stored in
metadata attached to or embedded
within the picture fi le, and
It becomes possible to use the great
2.
controls in ACR4 and ACR5 such as
Split Toning, on non-Raw fi les.
JPEG and TIFF fi les can be opened directly
into ACR from Bridge by selecting the fi le
in the content space and then choosing
Open with Camera Raw from the right-
click menu (1).
In Photoshop CS3/CS4 use the File >
Open As option with Camera Raw format
selected (2). Once open in ACR the picture
is enhanced as normal before being saved
as a DNG fi le. The processed result appears
in Bridge complete with the Conversion
Settings icon that we traditionally
associated with processed Raw fi les (3).
2
3
1
Adobe Camera Raw –
Presets panel
Menu: –
Shortcut: – See also: Camera Raw,
Camera Raw 5
Version: CS3, CS4, ACR4,
ACR5
Adobe Camera Raw 4 and 5 include a Tab
area providing a place to store and access
previously saved conversion settings (1).
It was possible to save conversion settings
in previous versions of ACR but applying
these settings was possible by selecting
entries from the Settings menu (just below
the histogram) or via the right-click menu
options in the Bridge workspace. Having a
separate tab recognizes the importance of
customized settings presets to the workfl ow
of most photographers.
Options for saving loading and clearing
settings are housed in the menu accessed
via the menu button at the top left of the
panel (2).
An interesting inclusion in the menu is
the ability to Export conversion settings
to XMP (3), making it possible to transfer
previously embedded settings to .XMP
sidecar fi les.
Adobe Camera Raw –
Recovery
Menu: –
Shortcut: – See also: Camera Raw,
Camera Raw 5
Version: CS3, CS4, ACR4,
ACR5
Located in the Basic panel, the Recovery
slider is designed to provide fi ne control over
the highlight areas of a photo. Targeting
areas where details have been lost due to
being clipped to white in one of the three
color channels (Red, Green, Blue), ACR
reconstructs some of the tones using detail
from the other two color channels.
Some photographers think of the Recovery
slider as the Highlight section of the
Shadow/Highlight control.
This feature is great for correcting mild
overexposure but is unable to successfully
reconstruct detail where clipping has
occurred in multiple channels.
1
3
2
Please purchase PDF Split-Merge on www.verypdf.com to remove this watermark.
Photoshop CS4 A–Z
aA
A
7
ADOBE CAMERA RAW – RED-EYE REMOVAL
Adobe camera Raw –
Red-Eye Removal
Menu: –
Shortcut: E See also: Red Eye tool, Camera
Raw, Camera Raw 5
Version: CS3, CS4, ACR4,
ACR5
Adobe Camera Raw 4/5 includes a Red
Eye Removal tool designed to correct the
appearance of red eye in photos taken with
fl ash.
The tool is simple to use and as with all
controls in ACR the changes it applies are
non-destructive.
After selecting the tool from the toolbar (1)
at the top of the ACR workspace, click and
drag a rectangular marCuee around the
red eye in the photo. ACR automatically
locates the color red and replaces it with
a neutral, more natural looking gray by
desaturating this area of the photo.
Two fi ne-tuning adjustments are available
in slider form for the tool:
Pupil Size – determines the size of the area
altered by the feature.
Darken – controls the darkness of the
gray that is substituted for the red eye.
The size and shape of the marCuee used
to outline the area to be altered can be
changed by click-dragging the edge of
the frame. Red eye corrections can be
hidden from view by unchecking the
Overlay option in the tool’s options bar.
All corrections can be deleted by clicking
the Clear All button in the same bar.
Before
After
1
Before
After
Adobe Camera Raw –
Retouch tool
Menu: –
Shortcut: B See also: Spot Healing Brush,
Camera Raw,
Camera Raw 5
Version: CS3, CS4, ACR4,
ACR5
The Retouch tool was fi rst included in
Adobe Camera Raw in version 4. The tool
has two modes (1):
Heal – for matching underlying tones,
colors and details, and
Clone – to switch the feature so that it
behaves more like the Clone Stamp tool.
Designed for removing spots from photos
during the enhancement process, this
tool is non-destructive and its effects can
be removed at any time by clicking the
Clear All button. To hide the retouching
marCuees uncheck the Overlay option. To
remove a spot select the tool (2) and then
click-drag a circular marCuee from the
center of the mark. Automatically ACR
places a second linked circular marCuee
to indicate the area used as the source for
the retouching. You can click-drag this
source point to fi ne-tune the retouching
results. The size of an existing marCuee
can be altered by clicking the selection
and then altering the Radius value. Using
Synchronize there is also the option to
remove sensor dust spots over several
frames.
1
2
3
Please purchase PDF Split-Merge on www.verypdf.com to remove this watermark.
A
aA
8
Photoshop CS4 A–Z
4
5
Adobe Camera Raw –
Tone Curve
Menu: –
Shortcut: – See also: Camera Raw,
Camera Raw 5
Version: CS3, CS4, ACR4,
ACR5
The Curves feature that was introduced to
Adobe Camera Raw (ACR) in Photoshop
CS2 was been revamped for ACR 4,
which ships with Photoshop CS3. Now
called Tone Curve there are two modes in
which the feature can operate – Point and
Parametric (1).
Point – works like the previous version
of Curves allowing users to push and
pull the curve to manipulate the tones
within the photo (2). Click onto the curve.
Several standard curve shapes are supplied
as presets available from the drop-down
Curve menu at the top of the dialog (3).
Parametric – breaks the curve into four
tonal areas: highlights, shadows, lights
and darks, and then provides slider controls
to alter each range of tones independently
(4). Unlike the Point mode, these sliders (5)
are used to change the curve shape rather
than for direct manipulation of the curve.
You can also refi ne the adjustments by
altering the position and range of the tonal
quadrants via the three sliders directly
under the curve graph (6).
1
2
3
6
ADOBE CAMERA RAW – SPLIT TONING
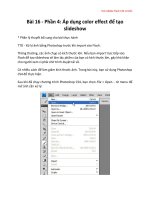
Adobe Camera Raw –
split toning
Menu: –
Shortcut: – See also: Colorize, Camera
Raw
Version: CS3, CS4, ACR4,
ACR5
Monochrome printers can rejoice as the
addition of this feature in Adobe Camera
Raw 4 and 5 means that you can tone
highlights and shadows independently
with the included Hue and Saturation
sliders.
The Hue option (7) controls the color of the
tint, whilst the Saturation (8) alters the
strength of the color. Both these settings
add color to the monochrome whilst still
retaining the detail of the original photo.
Holding down the Alt/Opt key whilst
moving the Hue slider will show the
selected color at 100% saturation, making
it easier to choose distinct color when using
low saturation settings.
This is similar to the effect gained when
using the Colorize option in the Hue/
Saturation control but with the added
advantage of being able to selectively tint
highlight and shadow areas.
Add to these controls the Balance slider (9),
which provides the ability to change the
point at which the color changes.
7
8
9
(1) Original grayscale
(2) 47(hue), 29(sat), 0(bal), 240(hue), 27(sat)
(3) 47, 29, 60, 240, 27
(4) 47, 29, -50, 240, 27
(5) 47, 43, 0, 14, 19
(6) 131, 15, 0, 14, 19
1 2 3
4 5 6
The pro trick for using this feature involves
holding down the Opt/Alt key while
dragging the Hue slider and you will see a
100% preview of the saturation color.
Please purchase PDF Split-Merge on www.verypdf.com to remove this watermark.
Photoshop CS4 A–Z
aA
A
9
Adobe Camera Raw –
Vibrance
Menu: –
Shortcut: – See also: Camera Raw,
Camera Raw 5
Version: CS3, CS4,
ACR4, ACR5
The Vibrance slider was a new addition to
the Basic panel of Adobe Camera Raw in
4. Like the Saturation control, Vibrance
controls the strength of the color in the
photo. Movements to the right boost the
color and movements to the left make the
vividness of the hue more subtle. But unlike
the Saturation slider, Vibrance manages
these changes selectively, targeting the
least saturated colors and protecting (to
some extent) skin tones.
This makes the new control the fi rst tool
to reach for when you want to boost the
color in your photos. The results are
easier to control and less likely to display
posterization or color clipping from over
application than the traditional Saturation
control.
ADOBE CAMERA RAW – VIBRANCE
1
2
Adobe Online
Menu: Help > Photoshop Online
Shortcut: – See also: –
Version: 6.0, 7.0, CS, CS2, CS3
CS2 users can be transported directly
to Adobe’s offi cial Photoshop (and
ImageReady) website by clicking on the
Picture icon (feather for CS and CS2)
at the top of the toolbar (1). This action
displays your default web browser and
automatically loads the Photoshop home
page.
For CS3 users the same web page is
displayed if you select Help > Photoshop
Online (2).
Adobe Photo
Downloader (APD)
Menu: Bridge: File > Get Photos from Camera
Shortcut: – See also: –
Version: CS3
Bridge CS3/4 (and Photoshop CS3/4)
ship with its own downloading utility for
transferring photos from your camera or
card reader directly to your computer.
The feature’s full name is the Adobe Photo
Downloader (APD). It contains both
Standard and Advanced modes.
In the Standard Dialog (1) you nominate
where the photos are located (card or
camera), where they are to be transferred
to, how to rename them during the
download process and whether to create
new destination folders for the transferred
images. Also included is the option to open
Bridge after the download is complete,
convert to DNG and save backup copies
of the pictures.
The Advanced Dialog (2) also contains
extra options for previewing the pictures to
be downloaded, selecting specifi c groups of
pictures to transfer and applying pre-saved
metadata templates and Author/Copyright
information on the fl y.
1
2
Please purchase PDF Split-Merge on www.verypdf.com to remove this watermark.
A
aA
10
Photoshop CS4 A–Z
Advanced Blending
Menu: File > Automate > Photomerge
Shortcut: – See also: Photomerge
Version: CS, CS2, CS3, CS4
The Advanced Blending option (1) in
the Photomerge workspace in CS and
CS2 provides an automatic approach to
balancing the color and tone of seCuential
pictures in a composition.
The feature is designed to even out slight
exposure or color differences that can occur
when creating source images.
When used in conjunction with the Preview
button the results can be reviewed on screen
before proceeding to the creation of the full
panorama.
On some occasions it is diffi cult to assess
the accuracy of the blending action via the
preview. If this occurs then create several
different panoramas applying different
Blending, Perspective and Mapping settings
for each.
CS3 users can fi nd a similar option in the
revamped Photomerge dialog just below the
include fi les list (2). Select the Blend images
together option to instruct Photomerge to
automatically match color and tone across
the range of source images used for the
panorama.
Airbrush
Menu: –
Shortcut: B then Airbrush button from
the options bar
See also: Brush tool
Version: 6.0, 7.0, CS, CS2, CS3, CS4
A painting tool that applies a color in
much the same way as a real airbrush.
The airbrush moved from the toolbar in
Photoshop 7.0 and now appears in the
brush tool’s options bar. Now you simply
choose airbrush as a style and select
how you want it to work from the Brush
palette.
Hold down the mouse and drag it around
to spray color evenly onto the canvas.
Hold it in the same place and color builds
up while spreading outwards. Covering
an area that’s already sprayed increases
color depth.
As with all brush modes you can specify
size, blending mode and opacity from the
bar that appears at the top of the page
when you click on a brush. There’s also
an option to adjust fl ow.
1. Select a start point, hold
down the Shift key and then
click an end point to paint a
straight line.
2. Use the airbrush on low pressure with
black paint to create shadows.
3. Press the Caps lock key to turn the
airbrush standard cursor into a precision
cross hair.
ADOBE PHOTO DOWLOADER – CONVERT TO DNG
1
2
Adobe Photo
Downloader – Convert
to DNG
Menu: Bridge: File > Get Photos From Camera
Shortcut: – See also: Adobe Photo Downloader
Version: CS4
For those users opting for DNG (Digital
NeGative) storage of their Raw fi les, the
conversion step can now be handled as the
fi les are transferred from your camera. The
version of Adobe Photo Downloader which
ships with CS4 contains a Convert to DNG
option. When selecting the feature you
have ability to choose the DNG settings via
the Settings button. These include:
JPEG Preview – Choose between no
preview, medium or full sized previews.
Compression – Select for lossless
compression to reduce the overall size of
the DNG fi le.
Image Conversion Method – Selecting
the Raw Image option store the photo in
the original ‘mosaic’ format. This is the
preferred option. The Linear Image option
converts the fi le to a ‘demosaic’ format.
Embed Raw File – Stores the original raw
fi le with the DNG conversion. This allows
the original to be extracted and used at a
later date.
Please purchase PDF Split-Merge on www.verypdf.com to remove this watermark.
Photoshop CS4 A–Z
aA
A
11
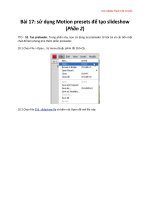
Anti-aliased text
Aliased text
After
Before
1
2
Aliasing
Menu: –
Shortcut: – See also: Anti-aliasing fonts,
Anti-aliasing
selections
Version: 6.0, 7.0, CS, CS2,
CS3, CS4
Even though the lettering system in
Photoshop is based on smooth-edged
(vector) technology, when type layers are
fl attened into the background, or the PSD
fi le is saved in the JPEG format, the type is
converted to pixels. One of the drawbacks
of using a pixel system is that curves and
diagonal lines are recreated with a series of
pixel steps. When viewed closely, or printed
very large, these steps can become obvious
and appear as a saw-tooth pattern. This is
called aliasing.
Anti-aliasing is a system where the effects
of these ‘jaggies’ are made less noticeable
by partially fi lling in the edge pixels. This
techniCue produces smoother looking
type overall and should be used in all print
circumstances and web applications.
Align Linked
Menu: Layer > Align
Shortcut: – See also: Arrange
Version: CS, CS2, CS3, CS4
The Aligned Linked feature was introduced
in Photoshop CS to make it easier to align
items within layers.
Select this option and one of the six align
options to make objects on linked layers
align to the top, center or bottom edge in
either horizontal or vertical directions.
In CS2 and CS3 the Align option also
functions with multi-selected layers that
are not linked.
The Align options are located in the
Layer menu (1) and are also present on
the options bar (2) when multi-layers are
selected.
ALIASING
Aligning type
Menu: –
Shortcut: – See also: Channels
Version: 6.0, 7.0, CS, CS2,
CS3, CS4
The terms alignment and justifi cation are
often used interchangeably and refer to
the way that a line or paragraph of text is
positioned on the image.
The left align feature will arrange all text
to the left of the text frame. When applied
to a group of sentences the left edge of the
paragraph is organized into a straight
vertical line whilst the right-hand edge
remains uneven or ragged.
Right align works in the opposite fashion,
straightening the right-hand edge of the
paragraph and leaving the left ragged.
Selecting the center text option will align
the paragraph around a central line and
leave both left and right edges ragged.
Select the type alignment before entering
the text into your document. Do this by
pressing the appropriate alignment button
in the Type tool’s options bar.
To change the alignment of existing text
use the cursor to highlight the letters and
then press the chosen alignment button.
Please purchase PDF Split-Merge on www.verypdf.com to remove this watermark.