Tài liệu 2D Artwork and 3D Modeling for Game Artists- P7 ppt
Bạn đang xem bản rút gọn của tài liệu. Xem và tải ngay bản đầy đủ của tài liệu tại đây (2.63 MB, 50 trang )
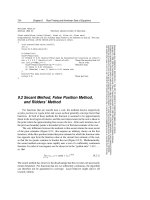
Image: Adjust, Levels
Input Levels: 151, 1.00, 173
Output Levels: 0, 255
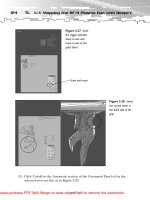
28. Ctrl+click the Alpha 1 channel to load the selection.
29. Create a new layer in the Layers palette, and fill the selection with the dark-
green foreground color (see Figure 8.120).
30. Choose Select, Inverse (Ctrl+Shift+I).
31. Press Q to enter Quick Mask mode.
274
8.
Inorganic Texture Tutorials with Photoshop
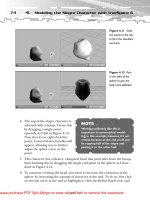
Figure 8.120
Select the Alpha 1
channel’s opacity to
load the mortar
selection. Fill the
selection with the
foreground color on
a new layer.
TEAMFLY
Team-Fly
®
Please purchase PDF Split-Merge on www.verypdf.com to remove this watermark.
32. In Quick Mask mode, choose Filter, Brush Strokes, Spatter (see Figure 8.121).
Filter: Brush Strokes, Spatter
Spray Radius: 19
Smoothness: 5
33. Press Q to exit Quick Mask mode.
34. Press Delete to create the choppy effect on the top layer. Then press Ctrl+D
to deselect it.
35. Choose Filter, Noise, Add Noise (about 10%).
36. Choose Filter, Texture, Craquelure to enhance the mortar (see Figure 8.122).
275
Rock and Stone Textures
Figure 8.121
Invert the selection
and enter Quick
Mask mode. Apply
the Spatter filter to
chop it up.
Figure 8.122
Apply the Noise and
Craquelure filters to
the mortar layer.
Please purchase PDF Split-Merge on www.verypdf.com to remove this watermark.
Filter: Noise, Add Noise
Amount: 10%
Distribution: Uniform
Monochromatic: (checked)
Filter: Texture, Craquelure
Crack Space: 20
Crack Depth: 7
Crack Brightness: 8
37. Click Stop on the Actions palette to stop recording.
That’s the wall texture in a nutshell. By itself, it will tile seamlessly; when viewed from
a short distance, however, a player will see the same bricks repeating themselves. You
need to record a final routine that will simply make a copy of the base texture, start a
new image, and replace only the whole stones in the image. By retaining the split edge
stones, you retain the ability to tile other textures with each other.
To accomplish this, record a new action that does the following:
1. Selects the first layer of the stone wall.
2. Copies the layer to a new image.
3. Copies the mortar layer to the new image.
4. Applies the Medieval Stone action to each of the six whole stones in the texture.
In Figure 8.123, the first texture is the one you just did. The second stems from an
action I made to replace only the six whole stones using the Medieval Stone action.
Now I have two textures whose edges tile seamlessly and whose stones are different
from each other. To complete the set, I created four different tiles using this
Medieval stone action (see Figure 8.124).
276
8.
Inorganic Texture Tutorials with Photoshop
Figure 8.123 The
second texture is
based on the first;
only the six whole
stones have been
replaced.
Matching
stone here
Matching
stone here
Please purchase PDF Split-Merge on www.verypdf.com to remove this watermark.
Metal
Being a very high-tech kind of guy, most of the video games I appreciate are fully
loaded with heavy machinery, futuristic equipment, spaceship hulls, underground
research labs, you name it. As with the other textures you’ve made, metal textures
can be hand-made, taken from photograph, and more often than not, a composite
of both. What I find most striking about texturing metal is how sharp and effective
beveling styles and displacement channels can be. Let’s start with a few simple tuto-
rials, then add to them as we go.
277
Metal
Figure 8.124
A completed stone
wall set.Any texture
in the set can be
randomly tiled with
any set member.
NOTE
From now on, creating any color
wall in seconds is just a matter of
setting new foreground and back-
ground colors, then playing the
Stone Wall action. I make tiles
for my set by playing a stone-
replacement action called
“Patternize,” consisting of the
steps I mentioned just before.
TIP
Notice that some of the stones in the
set have cracks in them—try adding a
stop just before the call to the Gaussian
Blur in the Stone Wall action.When you
play the action, the stop will pause the
action at that point; just spray thick
lines in your Alpha 1 channel where
some cracks would go. Click Play to
resume the action.
Please purchase PDF Split-Merge on www.verypdf.com to remove this watermark.
Basic Metal
This is a simple filter-based brushed metal procedure that can be applied to any
object requiring a finished metal look, like elevator doors or a control panel.
1. Start a new 600 × 600-pixel RGB image. (You’ll reduce it to 512 × 512 pixels
on the last step to get rid of the smearing effect.)
2. Set your foreground color to a medium gray, like hex# A7A6A6. Press
Alt+Backspace to fill the canvas with it.
3. Choose Filter, Noise, Add Noise (about 25%), as shown in Figure 8.125.
Filter: Noise, Add Noise
Amount: 25%
Distribution: Uniform
Monochromatic: (checked)
4. Choose Filter, Blur, Motion Blur (about 50 pixels), as shown in Figure 8.126.
278
8.
Inorganic Texture Tutorials with Photoshop
Figure 8.125 Fill
the image with gray
and apply the Add
Noise filter.
Figure 8.126
Apply the Motion
Blur filter.
Please purchase PDF Split-Merge on www.verypdf.com to remove this watermark.
Filter: Blur, Motion Blur
Angle: 0 degrees
Distance: 50 pixels
5. See the smearing/streaking that’s
going on at the left and right
edges? Crop it by clicking Image,
Canvas Size, and entering 512 for
both the width and height. Now
you have basic metal.
Shiny Metal
To the texture you created in the previous section, you can apply the Lighting
Effects filter coupled with a Curves adjustment to illuminate the metal texture’s
surface and enhance its specularity.
1. Using the completed metal texture from the previous example, choose Filter,
Render, Lighting Effects.
2. Use a spotlight for this one, making sure the light is pointing straight down
and high above, encompassing the entire texture. Don’t make the top of the
texture too bright; you only want to vary the surface shine so the Curves
function can do its job (see Figure 8.127).
279
Metal
NOTE
You can play around with the
Distance amount; setting it any-
where from 10 to 60 pixels yields a
texture that looks like real brushed
metal (the type you see on elevator
doors, panels, and whatnot).
Figure 8.127
Apply the Lighting
Effects filter to the
basic metal texture,
using a semi-distant
spotlight.
Please purchase PDF Split-Merge on www.verypdf.com to remove this watermark.
Filter: Render, Lighting Effects
Light Type: Spotlight (vertically)
Intensity: 28
Focus: 69
Gloss: 0
Material: 69
Exposure: 0
Ambience: 8
Texture Channel: (none)
3. To enhance the specularity,
click Image, Adjust, Curves.
4. Adjust the curve you see so
that it looks like the one in
Figure 8.128.
280
8.
Inorganic Texture Tutorials with Photoshop
Figure 8.128
Adjust the Curves
function to enhance
the texture’s
specularity.
NOTE
Feel free to play around with this to get
the shininess you want. Curves can be a
pain, and in most cases, only a seasoned
art pro will quickly know how to set the
Curve function appropriately. If you’re
having a hard time getting a curve just
right, try loading the shinymetal.acv
file in the Chapter 8 Data section on
the CD-ROM.
Please purchase PDF Split-Merge on www.verypdf.com to remove this watermark.
5. Choose Image, Adjust, Levels, and adjust the levels a bit to suit your taste
(see Figure 8.129).
Metal from an Image
The next time you go to any type of building that houses a public business, bring
your camera (of course, tell the people at the front desk what you’re doing before
you take any photos lest they nix you from the place). The countertops, bathrooms,
and elevators are bound to be trimmed out with brushed metal. These images
make outstanding base materials with which to work because their general compo-
sition is linear but slightly heterogeneous, ideal for beveling operations.
281
Metal
Figure 8.129
Adjust the levels to
suit.
NOTE
Why am I going into so much detail with textures? After all, most
games have textures that average at best 256×256 pixels! Well,
when you do concept art for the characters, box cover, posters,
and what have you, the artwork will need to be at least the detail
and resolution we start with, and averaging 3000×3000 pixels at
300 pixels/per inch! Start that image in Photoshop. Blank, it’s 25
MB. By the time you’re finished, it might be well over 100.
Please purchase PDF Split-Merge on www.verypdf.com to remove this watermark.
For this next example I want to give you some ideas for beveling metal. You’ll cre-
ate a set of institutional doors with some personality.
1. Open the brushedmetal.jpg file in the Chapter 8 Data section on the CD-
ROM (see Figure 8.130). This is a cropped image of the side of a gas pump
(see gaspump.jpg to view the original).
2. Make a copy of the background layer so there are two layers of metal.
3. Click on the bottom layer and fill it with black. That way, when a player
punches or tears through the metal, a void will be revealed. You can then put
other stuff between the background and the metal layers, like pipes and
wires.
4. Select the top layer.
5. Using the Rectangular Marquee tool, select the entire left half of the image.
(This might be easiest if you set the tool to Fixed Size, and enter 256 pixels
for the width and 512 pixels for the height.)
282
8.
Inorganic Texture Tutorials with Photoshop
Figure 8.130 The
brushedmetal.jpg
image.
Please purchase PDF Split-Merge on www.verypdf.com to remove this watermark.
6. Right-click on the selection and choose Layer Via Cut (see Figure 8.131).
This places the door halves on separate layers.
7. To raise the surface of the doors, double-click one of the door’s layers to
bring up the Styles screen and apply an inner bevel. Apply this same style to
the other door (see Figure 8.132).
Style: Bevel and Emboss
Style: Inner Bevel
283
Metal
Figure 8.131
Select half of the
image and cut it onto
its own layer.
Figure 8.132
Apply inner bevels to
both doors.
Please purchase PDF Split-Merge on www.verypdf.com to remove this watermark.
Technique: Smooth
Depth: 100%
Direction: Up
Size: 7
Soften: 0
8. Using the Rectangular Marquee tool, create a window by selecting the upper
half of one of the doors and pressing Delete to knock it out.
9. Click on the other door’s layer, move the selection, and delete it as well (see
Figure 8.133). Notice that the inner bevel applies itself to the windowed area.
10. With the rectangular selection still active, create a new layer between the
black background and the door halves.
11. Using the Gradient tool, fill the selection diagonally with a linear gradient.
If you go to the Gradient Editor, use the Copper gradient for this fill; this will
give the window a glass look—except that it’s brown (you’ll fix that in a
minute).
12. Move the selection to the other side and fill it again.
13. Click Image, Adjust, Desaturate. This gives the copper gradient a grayish look.
14. To simulate that shatter-proof look, add some little black lines to the win-
dows (see Figure 8.134).
284
8.
Inorganic Texture Tutorials with Photoshop
Figure 8.133
Make windows in the
doors.
TEAMFLY
Team-Fly
®
Please purchase PDF Split-Merge on www.verypdf.com to remove this watermark.
15. Merge the doors and windows onto a single layer by linking each layer
(except for the background layer), then clicking Layer, Merge Linked. This
way, you won’t disturb the individual layer styles.
16. Let’s put a sign on the doors. Open the authorized.psd file on the CD-ROM,
make a copy of it, and paste it into your image on the bottom-half of each door.
17. Double-click each sign’s layer to bring up the Styles screen, and apply a
downward outer bevel (see Figure 8.135). (Add whatever bevel you think
looks best. Sometimes, no bevel is good too!)
285
Metal
Figure 8.134
Create windows by
filling the rectangular
selections with a cop-
per gradient, then
desaturate.
Figure 8.135 Add
the authorized.psd
signs to both doors
and apply an outer
bevel to each.
Please purchase PDF Split-Merge on www.verypdf.com to remove this watermark.
Style: Bevel and Emboss
Style: Outer Bevel
Technique: Chisel Soft
Depth: 200%
Direction: Down
Size: 5
Soften: 0
18. Click on the layer with the doors and add a new layer directly above it.
19. Create rectangular selections on each door to represent impact shields, or
the spot where people most frequenty push the doors open.
20. Fill the selections using the Basic Metal technique from earlier in the
chapter.
21. Apply a bevel of your choice. I applied a small upward outer bevel, then
added rivets to the edges. (Don’t worry, rivets, screws, and the like are com-
ing up soon.) This will represent the basic, completed set of doors (see
Figure 8.136).
286
8.
Inorganic Texture Tutorials with Photoshop
Figure 8.136 Add
impact shields to the
doors using the Basic
Metal as a texture.
Apply a bevel for a
3D effect.
Please purchase PDF Split-Merge on www.verypdf.com to remove this watermark.
Rusted Metal
Rust varies greatly from bubbly dark brown spots to solid dark orange smears to . . .
well, you’ve seen it. It’s downright nasty (but quite delicious for texturing spaceship
interiors, I must add). The Photoshop default actions come with a rusted metal
procedure that’s alright, but let’s try this instead:
1. Start a 600×600-pixel RGB image. (You’ll crop the image back to 512×512
when you’re done to get rid of the edge bevels.)
2. Set the foreground to a reddish-brown, like hex# 2C0C01, and the back-
ground to a brownish-orange, like hex# 2C1407.
3. Choose Filter, Render, Clouds (see Figure 8.137).
Filter: Render, Clouds
Foreground: hex# 2C0C01
Background: hex# 2C1407
4. Choose Filter, Noise, Add Noise (see Figure 8.138).
287
Metal
Figure 8.137
Apply the Clouds fil-
ter using red-brown
and brown-orange
colors.
Figure 8.138
Apply the Noise filter.
Please purchase PDF Split-Merge on www.verypdf.com to remove this watermark.
Filter: Noise, Add Noise
Amount: 12%
Distribution: Uniform
Monochromatic: (checked)
5. Choose Filter, Noise, Median (see Figure 8.139).
Filter: Noise, Median
Radius: 1 pixels
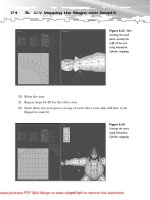
6. The base rusted panel is done. Now let’s add a bolted rail that spans the
width. To begin, use the Rectangular Marquee tool to select the upper half
of the texture.
7. Right-click on the selection, and choose Layer Via Copy (see Figure 8.140).
288
8.
Inorganic Texture Tutorials with Photoshop
Figure 8.139
Apply the Median
filter.
Figure 8.140
Make a rectangular
selection and copy it.
Please purchase PDF Split-Merge on www.verypdf.com to remove this watermark.
8. The copy of the selection you just made should be on its own layer now.
Double-click this layer to open the Styles screen, and apply an inner bevel to
raise the surface.
9. Change the Highlight Mode setting’s color from white to something dark
orange or it’ll look silly (see Figure 8.141).
Style: Bevel and Emboss
Style: Inner Bevel
Technique: Chisel Soft
Depth: 100%
Direction: Up
Size: 5 pixels
Soften: 0
Highlight Mode: Normal, dark-orange
10. Now for the bolts. To begin, start a new layer above the rail.
11. Select the Polygon tool, set its options to six sides, and create a large solid
hexagon in the middle of the screen.
12. Ctrl+click the layer to select the hexagon, then run through the basic Rusted
Metal routine to fill it (Clouds, Noise, Median).
289
Metal
Figure 8.141
Apply an inner bevel
to the new layer to
raise the surface.
Please purchase PDF Split-Merge on www.verypdf.com to remove this watermark.
13. Apply an outer bevel to the hexagon to give it depth, as shown in Figure
8.142. (I also added the Contour option to sharpen the depth a little.)
Style: Bevel and Emboss
Style: Outer Bevel
Technique: Chisel Soft
Depth: 100%
Direction: Up
Size: 5 pixels
Soften: 0
Highlight Mode: Normal, dark-orange
Style: Contour
Contour Shape: Linear
Range: 50%
14. Scale the bolt down to size and position it on the middle of the rail.
15. Make copies of the bolts and position them as you see fit. (I rotated a couple
of mine as well to make it more natural.)
16. Click Layer, Flatten Image.
290
8.
Inorganic Texture Tutorials with Photoshop
Figure 8.142 Add
a hexagon and fill it
with basic rust. Apply
an outer bevel to give
the hexagon depth.
Please purchase PDF Split-Merge on www.verypdf.com to remove this watermark.
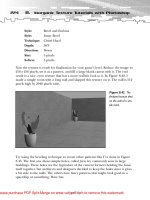
17. Click Image, Canvas Size, and change the canvas to 512×512 pixels to crop
out the edge bevels, if any (see Figure 8.143).
This is a good base panel for some type of equipment, or the outside of a boiler.
Notice that I placed the bolts so that when duplicates of the texture are placed
side-by-side, the bolts are evenly spaced (see Figure 8.144). I hope this texture will
inspire you to create some other designs—try making other marquee selections
and applying inner or outer bevels.
291
Metal
Figure 8.143
Scale, position, and
copy the bolt. Resize
the canvas to crop
the edge bevels.
Figure 8.144 The
rusty panel wrapped
around pipes.
Please purchase PDF Split-Merge on www.verypdf.com to remove this watermark.
Dripping Rust
Dripping rust is a popular texture. To render it, you simply create some type of selec-
tion and apply the Wind filter when in Quick Mask mode to get your selection to drip.
1. Start a new 512×512-pixel RGB image.
2. Repeat steps 1–5 of the Rusted Metal procedure.
3. Start a new layer.
4. Fill this layer with the entire Basic Metal procedure. The top layer should
now be metal, and the bottom layer should be rust.
5. Start a new layer on top of the Basic Metal layer.
6. Using the Lasso tool, create a selection in the shape of a crack or tear and fill
it with black (see Figure 8.145).
292
8.
Inorganic Texture Tutorials with Photoshop
NOTE
A word about bevels, drop shadows, and styles in general:Assume, when
making textures, that the global light for your game is a light source
positioned high overhead and not off at an angle—unless your game
company tells you otherwise. Just make sure that the Use Global Light
option is always checked in any Styles dialog box, that the default
(unless specified) light source is at 90 degrees high, and that your work
is saved as a PSD before you merge layers with styles.That way, you can
always retrieve your texture and readjust the global light in one go.
Figure 8.145
Create a Lasso selec-
tion on a separate
layer and fill it with
black.
Please purchase PDF Split-Merge on www.verypdf.com to remove this watermark.
7. To the black tear’s layer, apply an inner bevel to give it a little depth (see
Figure 8.146).
Style: Bevel and Emboss
Style: Inner Bevel
Technique: Chisel Soft
Depth: 200%
Direction: Down
Size: 2 pixels
Soften: 0
8. With the crack still active, press Q to enter Quick Mask mode. This is where
you’ll apply a dripping effect to the selection (see Figure 8.147).
293
Metal
Figure 8.146
Apply an inner bevel
to the tear to give it
depth.
Figure 8.147
Enter Quick Mask
mode with the
crack’s selection
active.
Please purchase PDF Split-Merge on www.verypdf.com to remove this watermark.