Tài liệu Create a Class That Implements the Interface You Defined docx
Bạn đang xem bản rút gọn của tài liệu. Xem và tải ngay bản đầy đủ của tài liệu tại đây (34.63 KB, 9 trang )
9.2 Create a Class That Implements the Interface You Defined
Now that you have defined the public interface of your class, you need to create a class
that will implement that interface, along with all of its methods and properties.
The place to start is with the properties of your class. You'll also need to create some
code to test your class, so you'll need to create a form that interacts with the instances of
the class.
Technique
This section uses a form with text boxes that mirror the properties of the CCustomer
class. Visual Basic .NET allows you to have classes and forms within the same .vb file,
so this section will have both in one file to make editing and debugging easier.
After setting up the form, you need to implement the class properties. If you have worked
with Property statements before, this technique will be old hat (although the syntax will
be new). If you have not worked with properties and classes, you will need the following:
•
A private variable for each property to store class data
•
Code to modify and return that data
Steps
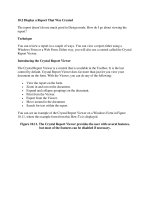
1. Create a Windows Form and name it frmHowTo9_2. Then place text boxes for
each of the properties of the class, naming the text boxes with the property name,
prefaced by txt. For example, the postal code text box should be named
txtPostalCode. Next add command buttons called cmdDelete, cmdSave,
cmdRetrieve, and cmdNew. Finally, add a RichTextBox control called rtbToString
to contain the output of the ToString method. (This enables you to see how the
Form maps to the data of the class. See Figure 9.1)
Figure 9.1. Arrange the controls on the form you created to look like this
form.
2. Add a class declaration block to frmHowTo9_2 and name the class CCustomer.
After the line Public Class CCustomer, type Implements ICustomer. This tells
Visual Basic that the CCustomer class includes all of the properties and methods
of the ICustomer interface as shown in Listing 9.9.
Listing 9.9 frmHowTo9_2.vb: The Empty Customer Class
Public Class CCustomer
Implements ICustomer
End Class
3. Copy all of the property and method declarations in the ICustomer interface, and
paste them within the CCustomer class block.
4. Visual Basic .NET requires that you specify which property or method in your
class implements which public member of your interface. After each property or
method declaration that you just pasted into the CCustomer class block, you must
add Implements ICustomer.[Property/Method Name].
Note
Visual Basic .NET allows you to have property and method names
in your class that differ from the public member names listed in
your interface. This feature exists because one class can
implement many interfaces, and those interfaces can have public
members of the same name. Although typing Implements
ICustomer.[Property/Method Name] after a property and method
with the same name-as in our example-might seem frustrating, it
will come in handy when you write more complex code.
5. By default, all methods, properties, and module-level variables are Public unless
an access modifier, such as Private or Protected, is used (see Table 9.2). It is,
however, good programming practice to use the Public access modifier, so be
explicit and add Public before each member.
Table 9.2. Visual Basic .NET Access Modifiers
Object Purpose
Private You can only access the member within the class.
Protected You can only access the member from classes that are derived
from (inherit from) the member's class.
Friend You can only access the member by objects within the same
project.
Protected
Friend
You can only access the member by derived classes within the
same project.
Public You can access the member by any object.
6. When you are finished, your code should look like Listing 9.10.
7. Listing 9.10 frmHowTo9_2.vb: The Empty CCustomer Class
8. Public Class Customer
9. Implements ICustomer
10.
11. Public ReadOnly Property CustomerID() As String _
12. Implements ICustomerData.CustomerID
13. Public Property CompanyName() As String Implements
ICustomerData.CompanyName
14. Public Property ContactName() As String Implements
ICustomerData.ContactName
15. Public Property ContactTitle() As String _
16. Implements ICustomerData.ContactTitle
17. Public Function Delete() As Boolean Implements ICustomerData.Delete
18. Note
Copying and pasting the code from the interface will result in code
with an invalid syntax because of the lack of End Property and
End Function/Sub lines. Although this doesn't matter for the
moment, it does disable Intellisense, which normally appears after
typing both Implements and the period after the Interface name. If
you want to enable Intellisense, press Enter at the end of each
property and method declaration. Doing so inserts the appropriate
End tag. When all the tags are in the class, Intellisense is
reenabled.
19. Add private variables directly below the class declaration to store class data, as
shown in Listing 9.11. You should have one variable for each property. As
mentioned in Chapter 3, "Viewing Data with ADO.NET," prefacing class-level
variables with "m" is a Visual Basic programming convention.
Listing 9.11 frmHowTo9_2.vb: Class Variable Declarations
Public Class CCustomer
Implements ICustomer
#Region "Class Variables"
Private mstrCustomerID As String
Private mstrCompanyName As String
Private mstrContactName As String
Private mstrContactTitle As String
Private mstrAddress As String
Private mstrCity As String
Private mstrRegion As String
Private mstrCountry As String
Private mstrPostalCode As String
Private mstrPhone As String
Private mstrFax As String
#End Region
20. Write code to set and return data for the properties. Place your cursor at the end of
a property declaration line, and press Enter. Visual Studio .NET automatically
inserts code blocks for setting and getting your property. If you have worked with
properties before, you might notice that Microsoft has changed the syntax. Listing
9.12 shows Visual Basic 6 property get and let declarations, each with its own
separate block.
Listing 9.12 Property Declarations in Visual Basic 6
Public Property Get PropertyName() As String
PropertyName = mstrClassVariable
End Property
Public Property Let PropertyName(ByVal strValue As String)
mstrClassVariable = strValue
End Property
In Visual Basic .NET, the property declaration has been combined in the format
shown in Listing 9.13.
Listing 9.13 Property Declarations in Visual Basic .NET
Public Property PropertyName() As String
Get
Return mstrClassVariable
End Get
Set(ByVal Value As String)
mstrClassVariable = Value
End Set
End Property
For each of your properties, add Return and the variable you declared in step 1 in
the Get block. In the Set block, type the name of a variable from step 1 and =
Value. All of your property declarations should now look like Listing 9.14.
Listing 9.14 frmHowTo9_2.vb: Some Property Declarations for the
CCustomer Class
Public ReadOnly Property CustomerID() As Customers.CCustomerID
Implements ICustomer.CustomerID
Get
Return mCustomerID
End Get
End Property
Public Property CompanyName() As String Implements
ICustomer.CompanyName
Get
Return mstrCompanyName
End Get
Set(ByVal Value As String)
mstrCompanyName = Value
End Set
End Property
21. To test your properties, you need to write a bit more code. First, you might want to
implement the ToString method that returns all the object's properties as a string.
Also, you will want a method that clears the form for use with a new object.
Listing 9.15 shows one way to implement ToString, with each property printing on
a separate line, as well as a ClearAllTextBoxes method.