Now, when the user submits a tutorial, an alert message will be displayed to the user. If the tutorial does not exist, the next page will be shown where the user can add the title, description, and tags.
Adding title, description, and tags to the tutorial
Now that the user has submitted the tutorial and we have checked that the tutorial does not exist already, it's time to add the title, description, and tags to the newly added tutorial through tutorialDetails.php. Let's first quickly create a user interface to add the title, description, and tags. <div class="add-details-div"> <form action="tutorialDetails.php" method="POST" > <span class="details-text"> Enter a title for the tutorial </span>
The user interface for tutorialDetails.php is shown in the following screenshot:
This page will be available to the user only when the session is valid.
[ 200 ]
This material is copyright and is licensed for the sole use by Richard Ostheimer on 18th June 2009
Please purchase PDF Split-Merge hildawww.verypdf.com to remove this watermark. 2205 on ave., , missoula, , 59801
Chapter 11
We will read the user ID through $_SESSION, and the details of the tutorials posted by the user using $_POST. $ownerid = $_SESSION["uid"]; $tutorialID = $_POST["tutorialID"]; $title = $_POST['title']; $desc = $_POST['desc']; $tags = $_POST['tags'];
We have all the details of the tutorials. So, let's update the same in the database. In the tutorials class we have a function for adding the tutorials description called add_tutorial_desc($title, $desc, $tutorialID). function add_tutorial_desc($title, $desc,$tutorialID){ $query = "UPDATE tutorials SET tutorial_title='".$title ."', tutorial_desc ='".$desc."' WHERE tutorialID =".$tutorialID ; return $query; }
We will insert the details of the tutorials using the query as follows: $query = "UPDATE tutorials SET tutorial_title='".$title ."', tutorial_desc ='".$desc."' WHERE tutorialID =".$tutorialID ;
For now, we are not adding any details about the tags. It needs a separate explanation that is covered in next section.
The resulting user interface after adding the details is as follows:
We also give a link to viewTutorial.php with the ID so that the user can see the recently added tutorial. [ 201 ]
This material is copyright and is licensed for the sole use by Richard Ostheimer on 18th June 2009
Please purchase PDF Split-Merge hildawww.verypdf.com to remove this watermark. 2205 on ave., , missoula, , 59801
Creating Delicious and Digg Bookmarks Manager
View tutorial
In the previous section we successfully created a tutorial. We were able to read back tutorialID of the latest inserted tutorial. Now, let's create a script called viewTutorial.php that will take tutorialID via $_GET. We need to query the database table tutorials for details with tutorialID as the last inserted ID. The following is the query to read the values for the recently inserted tutorial: $query="SELECT * FROM tutorials WHERE tutorialD=".$tutorialID;
The query returns an array with all the details of the particular tutorial. Loop the details, decorate it with CSS, and display it to the user. We have used the same logic and steps for reading the details of the list in our todonow application in Chapter 10. Refer to the viewList.php script.
Deleting tutorials
It's not enough to just submit tutorials. Sometimes, we realize that we have made the mistake of submitting a wrong tutorial. So, it's important to have a mechanism to delete the unwanted tutorials. We refer to these basic set of actions as CRUD, which stands for Create, Read, Update, and Delete. In this section we will be creating our delete function for the tutorials using the AJAX way. In the user profile page we will see all the tutorials submitted by the user. Along with each tutorial, we will also have the links for editing and deleting the tutorial. The point is to do it in such a way that we use an AJAX call and do not take the user to a new page. We will prompt the user with a JavaScript confirmation message to verify whether the user really wants to delete the tutorial.
[ 202 ]
This material is copyright and is licensed for the sole use by Richard Ostheimer on 18th June 2009
Please purchase PDF Split-Merge hildawww.verypdf.com to remove this watermark. 2205 on ave., , missoula, , 59801
Chapter 11
Take a look at the following screenshot to see what happens when a user clicks on the Delete link:
When the user clicks on Cancel, nothing happens. If the user clicks on OK, the following steps take place in the given sequence:
1. Read the tutorialID. 2. Read the tableID and rowID. 3. Delete the child row from the table. 4. Call the AJAX function to delete the data from the database. 5. Use the effects to highlight the updated row. While presenting the information about the tutorials submitted by the user, we also read tutorialID and place it under the Delete link along with the ID. The tutorial ID will be passed by calling a JavaScript function deleteTutorial(ID). function deleteTutorial(id) { var result = confirm("Are you sure you want to delete?"); if(result==true) { deletechildrow('mytutorials-table',id); } } [ 203 ]
This material is copyright and is licensed for the sole use by Richard Ostheimer on 18th June 2009
Please purchase PDF Split-Merge hildawww.verypdf.com to remove this watermark. 2205 on ave., , missoula, , 59801
Creating Delicious and Digg Bookmarks Manager
This function in return calls another JavaScript function deletechildrow(tableID, rowID), where we actually delete the child row from the table. function deletechildrow(tableID,rowID) {
var d = document.getElementById(tableID); var olddiv = document.getElementById(rowID); d.deleteRow(olddiv); alert("Tutorial Deleted"); }
Did we miss out anything? Yes, we did! We did not make a remote call to the server to delete the tutorial. I leave it to you to make that call. Let's add a little spice of effects while deleting the child row from the table. new Effect.Highlight($(id));
Search using real-time autocompletion
Does real-time autocompletion sound familiar? It's the same awesome feature of script.aculo.us that we learned about in Chapter 7. In this section we will build a simple real-time search of tutorials based on titles. When we aim at scaling large data in a real-world application, the autocompletion feature might slow down as it has to search through a lot of records. The idea here is to show how we can integrate the autocomplete feature into a web application� .
So, let's quickly create a user interface for searching. We will need a text box where the user will start typing the query and our system will search for it in real time. <div class="tutorial-search"> <label>Enter Your Search Terms</label> <input type="text" id="title" name="title"/> <div id="myDiv"></div>
<div id="result" name="result"></div>
</div>
[ 204 ]
This material is copyright and is licensed for the sole use by Richard Ostheimer on 18th June 2009
Please purchase PDF Split-Merge hildawww.verypdf.com to remove this watermark. 2205 on ave., , missoula, , 59801
Chapter 11
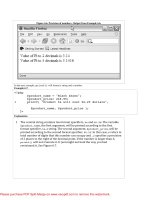
The screenshot corresponding to the above user interface script for searching is as follows:
Now it's time to start searching for the tutorials. On loading the page, we will invoke our JavaScript code for autocompletion. <script type="text/javascript"> window.onload = function() { new Ajax.Autocompleter( 'title', 'myDiv', 'fetchChoices.php' ); } </script>
In the code snippet that we have just seen, we are passing the ID of the text box as title, a <div> to host the result set as myDiv, and our script in fetchChoices.php that will get us the results.
The code for fetchChoices.php remains the same as the one we used in Chapter 7. The only difference is in the query that we pass to get the results. $query="SELECT * FROM tutorials WHERE tutorial_title LIKE '%".$value."%'";
[ 205 ]
This material is copyright and is licensed for the sole use by Richard Ostheimer on 18th June 2009
Please purchase PDF Split-Merge hildawww.verypdf.com to remove this watermark. 2205 on ave., , missoula, , 59801
Creating Delicious and Digg Bookmarks Manager
This wildcard search will get all the tutorials using LIKE, which gets the matching records. We are restricting the number of tutorials to 20 by using LIMIT in our query. Check out the following screenshot to see the resulting user interface:
On selecting the row from the list, we automatically redirect the user to view the tutorial.
Exploring the tag cloud features of 2.0 applications
Tags in web applications have become a standard for 2.0 applications. To a user and a developer of web applications, it really makes things simpler in terms of organizing or searching content. For example, the Delicious application really explored the power of using tags. The whole world started appreciating the art of quick-searching relevant content based
on tags. In this section we will learn and master the art of tags. The same concept and approach can be applied to any content in any web application. The logic remains the same. [ 206 ]
This material is copyright and is licensed for the sole use by Richard Ostheimer on 18th June 2009
Please purchase PDF Split-Merge hildawww.verypdf.com to remove this watermark. 2205 on ave., , missoula, , 59801
Chapter 11
Some of the key functionalities related to the tags in our bookmarker application include how to: •
Add tags to tutorials
•
Read all the tags in the database
•
Create a tag cloud
•
Search using tags
For implementing the tags, we have to create a separate class called tags, which we will be using in our applications. The tags class can be used with any web application.
Adding tags to tutorials
While adding the tutorial, we have skipped this part. So, let's first implement the process of adding tags to our tutorials. A user can add any number of tags to a tutorial. We have to collect all the tags that the user inputs, and then explode the string to get each word separately. The words are then put in an array and each word is inserted as a row in the tutorials_tags table. function add_tutorial_tags($tags, $tutorialID){ $temp_tags = explode(',', $tags); foreach ($temp_tags as $tag) { $tag = strtolower($tag); $query = "INSERT INTO tutorial_tags(tutorialID, tag) VALUES ('$tutorialID','".$tag."')"; $result = mysql_query($query); if($result) { continue; } } }
In the code above, we are reading the values as $tags. Using the explode() function, we will separate the words and the criteria for separation is ','. For each tag read, we will loop using the foreach loop and insert the data into the
database table. It's time for you to go ahead and add lots of tutorials along with tags.
[ 207 ]
This material is copyright and is licensed for the sole use by Richard Ostheimer on 18th June 2009
Please purchase PDF Split-Merge hildawww.verypdf.com to remove this watermark. 2205 on ave., , missoula, , 59801
Creating Delicious and Digg Bookmarks Manager
Reading all the tags in the database
Now that we have added our tags to tutorials, it is important to read them back. These tags will be used in the creation of our tag cloud, which we will display to the users. We are reading all the tags submitted by the users of the application, which can be a massive number. You may want to restrict the number of tags displayed by applying LIMIT to the query. We can also match the tags and display only the most used tags by counting the tags.
The function to read the tags from the database is as follows: function read_all_tags() { $query = "SELECT tag FROM tutorial_tags LIMIT 0,30 "; $result = mysql_query($query); if($result) { while($row = mysql_fetch_array($result)) { $all_tags[$row['tag']] = $row['tag']; }
return $all_tags; }
Creating a tag cloud
The playground has been prepped. We have added tags to the tutorials and read the tags from the database. What are we waiting for? Let's go ahead and create a tag cloud. In our applications we need to know how many times a tag was used by the users. Depending upon the weight of the usage of the tag, we will return the tags. Alternatively, we can also use the LIMIT clause in our query to restrict the number of tags displayed to users.
If you remember, we have an array of $all_tags returned from the above feature that is reading the tags from the database. $all_tags = $tutorials->read_all_tags();
Now, let's read these values and create our own tag cloud. foreach ($all_tags as $tag =>$value) { echo '
We are looping through each tag and creating a random-sized font (for each tag) on the page. Take a look at how the tag cloud looks in the following screenshot:
Search using tags
We have covered all the aspects from adding the tags and reading the tags to creating the tag cloud. Let's now take a look at the search function using tags. In the following piece of code, we are searching through all the tutorials submitted by the users. In a real-time application, you may need to display limited tutorials based on your application requirements. This module is an example for searching through all tutorials.
[ 209 ]
This material is copyright and is licensed for the sole use by Richard Ostheimer on 18th June 2009
Please purchase PDF Split-Merge hildawww.verypdf.com to remove this watermark. 2205 on ave., , missoula, , 59801
Creating Delicious and Digg Bookmarks Manager
If you look at the code that we used while creating a tag cloud, we have given a link for the searchTag.php script. This script is used for searching through the tags. I will only give you a hint in the form of a query. Just use this query and see what it
results in. $query = "SELECT tutorialID FROM tutorial_tags WHERE tag='".$tag."'";
This query will give you the resultant set for all the matching tutorials. Just loop the set and display the results to the user.
Don't forget to log out
This brings us to the most important task, especially if you are using a public system. Users need to log out so that the session is no longer valid and they need to give their credentials to access the system again. You can also use a session time-out feature from our login management system that we built in Chapter 3. Set session.gc.maxlifetime in the php.ini file. Using a variable, you can check the idle state time and the current session start time.
We will use the same log out script that we created in Chapter 3 for the login management system. The following screenshot shows the logout screen:
[ 210 ]
This material is copyright and is licensed for the sole use by Richard Ostheimer on 18th June 2009
Please purchase PDF Split-Merge hildawww.verypdf.com to remove this watermark. 2205 on ave., , missoula, , 59801
Chapter 11
Ideas for life
The Delicious and Digg applications are two huge projects. Here are some of the ideas that can also be added to our bookmarker application: •
Adding the user's picture
•
Searching using description
•
Adding categories for tutorials
•
Editing tutorial information using AJAX
•
Visiting a URL
Summary
Did you show off your application to your friends? You should! When everyone seems to be appreciating Digg and Delicious based applications, we can boast of having our own versions of the same. We have built some cool features such as submitting tutorials, real-time search, tag clouds, and adding tags. We must admit it was fun building them.
In the next chapter we will explore and build a better shopping search experience. Oh, I forgot! I have a lot of tutorials and I am off to bookmark my tutorials using the bookmarker application. Happy hacking!
[ 211 ]
This material is copyright and is licensed for the sole use by Richard Ostheimer on 18th June 2009
Please purchase PDF Split-Merge hildawww.verypdf.com to remove this watermark. 2205 on ave., , missoula, , 59801
This material is copyright and is licensed for the sole use by Richard Ostheimer on 18th June 2009
Please purchase PDF Split-Merge hildawww.verypdf.com to remove this watermark. 2205 on ave., , missoula, , 59801
Creating a Shopping Search Engine Still playing with our bookmarking application? Here is a reason to cheer up. In this chapter, along with the bookmarking tutorials, we will create a new shopping search engine. The shopping application is more about adding a rich user interface experience to the search functionality. We will learn how to integrate the features of the script.aculo.us library to our application. Keep your shopping list ready!
Application at a glance
Before we start coding our shopping application, let's give it a nice 2.0 name. For now, we will name it as Shop-Me. You can give it any name that you want.
So let's get started and get a complete picture of our application. As a user, our friend Jenny signs up with the application. She will be able to see the user profile home page. It has an option to Buy Products in which she has to drag products and place them under her selection zone. She can also search various products using real-time search, and the product details will be displayed in an AJAX way. We will provide Jenny with a tag cloud. For each tag, search products will be displayed to her. And finally, Jenny can log off.
This material is copyright and is licensed for the sole use by Richard Ostheimer on 18th June 2009
Please purchase PDF Split-Merge hildawww.verypdf.com to remove this watermark. 2205 on ave., , missoula, , 59801
Creating a Shopping Search Engine
To put all the above explained words in a user interface, check out the following screenshot:
Features and functionalities
Now that we are clear about the application, let's quickly walk through the features we are going to build into the Shop-Me application. The features we will be working on are listed here: •
The user management system
•
Searching products
•
Selecting the products to buy
•
Adding effects
•
Searching products using the tag cloud
So, let's help our friend Jenny with her shopping.
The user management system
We are going to build a user management system for our application. Not really! It is said that good programmers code, great programmers re-use. Honestly, we all want to be great programmers. Hence, we will re-use the user management system module created in Chapter 3. We will use the same database table schema for users, which we created earlier. The schema definition is given as follows: CREATE TABLE `users` ( `userID` int(11) NOT NULL auto_increment, `Username` varchar(40) NOT NULL, [ 214 ]
This material is copyright and is licensed for the sole use by Richard Ostheimer on 18th June 2009
Please purchase PDF Split-Merge hildawww.verypdf.com to remove this watermark. 2205 on ave., , missoula, , 59801
We will also be using the users class. The screenshot that follows will help us to quickly get started with the application:
Selecting the products to buy
We have a user management system and our user wants to select the products to buy. We all know Jenny. She just can't wait to buy her new handbag. Let's do a simple memory test here. Check out the following screenshot and see if you find it familiar:
[ 215 ]
This material is copyright and is licensed for the sole use by Richard Ostheimer on 18th June 2009
Please purchase PDF Split-Merge hildawww.verypdf.com to remove this watermark. 2205 on ave., , missoula, , 59801
Creating a Shopping Search Engine
There you go! Yes, we made this module in Chapter 5 while learning the drag and drop feature of script.aculo.us. Here, we are going to integrate the same module with our application. We will be using the same code and we will add our PHP sessions to make sure that only a registered and logged-in user can access and buy the products. session_start(); if (!(isset($_SESSION['login']) && $_SESSION['login'] != '')) { header ("Location: login.php"); }
We ensured that this page can be accessed only by the users who are logged in. We have created three products and have made them draggable. When dealing with data about products coming from database, you may need to change certain JavaScript code to make things draggable.
The products that we need to buy can be dragged and placed under the droppable area that we have created to hold the products. We make the created products draggable by using the following code: new Draggable('myProduct2',{revert:true});
When we make a product draggable, we can play with the product and drag it anywhere on the page. The products have been made draggable. Now, we will need a container to hold the products, or an area where we can drop the draggable elements. We can create a droppable area by defining the <div> with the code, as follows: Droppables.add(
'myDiv', { onDrop: addItem } );
[ 216 ]
This material is copyright and is licensed for the sole use by Richard Ostheimer on 18th June 2009
Please purchase PDF Split-Merge hildawww.verypdf.com to remove this watermark. 2205 on ave., , missoula, , 59801
Chapter 12
The attributes in the piece of code snippet that we have just seen are: •
myDiv: This is the area, <div>, or any portion of the page we want to make as
•
onDrop: We call the function addItem once we are done with dropping the
the droppable area
products in the droppable area
Have a look at the following screenshot and see how the application behaves:
Adding effects
Effects have been one of the most adorable features of script.aculo.us. We surely have done justice to this feature by using it in all the modules and applications that we created. We have used the effects to inform the user about any update, results, or responses. Users just love them! Some effects will also be added to our Shop-Me application to inform the users—in plain text—about what's happening in the application. As explained before, we can add effects with only one line of code.
[ 217 ]
This material is copyright and is licensed for the sole use by Richard Ostheimer on 18th June 2009
Please purchase PDF Split-Merge hildawww.verypdf.com to remove this watermark. 2205 on ave., , missoula, , 59801
Creating a Shopping Search Engine
In the Shop-Me application, in the buyProducts.php file, we add this magic line of code to add effects to our results: new Effect.Highlight($('note'));
Adding this line of code results in a neat, clean, and attractive text been shown to the user. Check out the following screenshot to see the code in action:
Searching products
We have given Jenny an option to buy the products that we have defined. But that's not really fair. We can do much better! We are now going to create a products table in our database. The schema for the products table is as follows: CREATE TABLE `products` ( `product_id` int(11) NOT NULL auto_increment, `product_title` varchar(200) NOT NULL, PRIMARY KEY ('product_id') ) ENGINE=InnoDB DEFAULT CHARSET=latin1 AUTO_INCREMENT=1;
We have used very basic attributes for the products. product_id and product_title are the only attributes we are considering for our Prototype. We will power this search feature with the autocompletion feature of script.aculo.us.
[ 218 ]
This material is copyright and is licensed for the sole use by Richard Ostheimer on 18th June 2009
Please purchase PDF Split-Merge hildawww.verypdf.com to remove this watermark. 2205 on ave., , missoula, , 59801
Chapter 12
After readying the database, it's time to create the user interface for searchProducts.php. The code for the interface is as follows: <div class="product-search"> <label>Enter Your Search Terms</label> <input type="text" id="title" name="title"/> <div id="myDiv"></div>
Check out what the interface looks like in the following screenshot:
It's show time! We are now going to add the autocompletion feature of script.aculo.us to our search. The following is the spicy JavaScript code to add the functionality to our application: window.onload = function() { new Ajax.Autocompleter( 'title', 'myDiv', 'fetchChoices.php', {afterUpdateElement:showProduct} ); }
[ 219 ]
This material is copyright and is licensed for the sole use by Richard Ostheimer on 18th June 2009
Please purchase PDF Split-Merge hildawww.verypdf.com to remove this watermark. 2205 on ave., , missoula, , 59801
Creating a Shopping Search Engine
The code is pretty much similar to what we did in Chapter 7 and even in our
bookmarking application. The only difference is the afterUpdateElement event in our definition. Let's get a clear picture by taking some help from the user interface. When our user, Jenny, starts typing the product name or title using the autocompletion feature, we give her suggestions about the available product names in the database. This is seen in the following screenshot:
So, now when Jenny selects a particular product using the Ajax.Request feature, we fetch the product information and display it in the empty <div>. Jenny sees the product information without having to refresh the page. When the user selects a product from the list of suggestions, the afterUpdateElement event gets called and the showProduct()function is invoked. The code for the showProduct()function is as follows: function showProduct(text,li) { var pars = 'product_id='+li.id; var url = 'getProduct.php'; new Ajax.Request(url, { method: 'POST', parameters:pars, onSuccess: showResult, onFailure:showError }); } [ 220 ]
This material is copyright and is licensed for the sole use by Richard Ostheimer on 18th June 2009
Please purchase PDF Split-Merge hildawww.verypdf.com to remove this watermark. 2205 on ave., , missoula, , 59801
Chapter 12
We are reading the product ID information, and we are passing it to getProduct.php using POST. The getProduct.php script at the server side will process the data and send the response back to the JavaScript function. Let's quickly take a look at the getProduct.php script. To read the product information, we are using the following query: $query="SELECT product_id, product_title FROM products WHERE product_id=".$value;
Executing the query above with $value as product_id, we read the product information and pass it back to our function showProduct. Using onSuccess, we will read the response from the server and put it back on the user interface. The snippet to display the response from the server is as follows: $('show-product').innerHTML = response;
Check out the corresponding interface to display the response from the server.
Searching products using the tag cloud
We created the tags class in our application in Chapter 11, and we will make use of the same class in our application here. Of course, we will be making the necessary changes to our database settings, queries, and table names. We will be searching products in two steps: 1. Generate a tag cloud. 2. View the products for a tag name. [ 221 ]
This material is copyright and is licensed for the sole use by Richard Ostheimer on 18th June 2009
Please purchase PDF Split-Merge hildawww.verypdf.com to remove this watermark. 2205 on ave., , missoula, , 59801
Creating a Shopping Search Engine
Generating a tag cloud
We have generated the tag cloud in the Chapter 11 tutorials using the read_all_tags() function from the tags class. Let's quickly see the code that helped us create a tag cloud. The following query will read all the tags for the products: function read_all_tags() { $query = "SELECT tag_name FROM product_tags"; $result = mysql_query($query); if($result) { while($row = mysql_fetch_array($result)) { $all_tags[$row['tag_name']] = $row['tag_name']; } return $all_tags; } }
The query we used in the code that we just saw is to read all the tags from the product_tags table. $query = "SELECT tag_name FROM product_tags";
Now, let's see the necessary changes we need to create our tag cloud. foreach ($all_tags as $tag =>$value) { echo 'href="http://localhost/book/shopping/searchTags.php?tag=' .$value.'" title="\'' . $tag . '">'.$value.''; }
In the code that we just saw, we are looping through each tag in the tagCloud.php script and making magic with CSS.
[ 222 ]
This material is copyright and is licensed for the sole use by Richard Ostheimer on 18th June 2009
Please purchase PDF Split-Merge hildawww.verypdf.com to remove this watermark. 2205 on ave., , missoula, , 59801
Chapter 12
View products for a tag name
So far, we have created our tag cloud and we have all our tags presented to the user. Now, when a user clicks on a tag, we need to display the products associated with the tag. Let's quickly add the function to our products class and then invoke it in our searchTags.php script. The code for the function that will fetch us all the products with a particular tag is as follows: function search_by_tags($tag) {
$query = "SELECT product_id FROM product_tags WHERE tag_name = '".$tag."'"; return $query; }
OK, now when we are done with executing our query, we will have a result set with the values of products that are matching our tag. We will take that result set, loop through it, and display it to the user. The code to loop through the result set is as follows: $result = $db->perform_query($query); if($result) { while($row=$db->fetch_array($result)) { echo "<div class='show-product-id'>Product ID:".$row[0]." </div>"; } }
Take a look at the following screenshot and see how the application looks:
[ 223 ]
This material is copyright and is licensed for the sole use by Richard Ostheimer on 18th June 2009
Please purchase PDF Split-Merge hildawww.verypdf.com to remove this watermark. 2205 on ave., , missoula, , 59801