Tài liệu Thiết kế flash với flash cs5 part 4 ppt
Bạn đang xem bản rút gọn của tài liệu. Xem và tải ngay bản đầy đủ của tài liệu tại đây (525.27 KB, 7 trang )
ptg
Working Within the Flash
Environment
Introduction
Getting to know the Flash authoring environment makes you
more effective and efficient as you create movies. You’ll get
to know the parts of the Flash window, which include the
Timeline, Stage, panels, and Property Inspector.
The Tools panel, also known as the Toolbox, contains tools
that you can use to draw, paint, select, and modify artwork.
The Timeline represents the overall structure of a Flash docu-
ment and controls the content. The Timeline consists of lay-
ers, frames, and scenes that make up a Flash document.
Layers are like transparent sheets stacked on top of one
another. Each layer can contain different images that appear
on the Stage. A frame displays content at a specific moment
on the Stage. The order in which frames appear in the
Timeline determines the order in which they appear in the
document. As you play a document, the playhead moves
through the Timeline displaying the current frame with each
layer on the Stage. If a project requires many animation
sequences with hundreds of frames, you can organize the
animations into scenes to make them easier to work with and
manage. Below the Timeline is the Stage, which provides a
place to compose the content for individual frames. Panels
are windows that allow you to view, organize, and change
elements and related options in a document. The Property
Inspector is a specialized panel that allows you to change
object-specific attributes and options.
Flash uses built-in keyboard shortcuts designed specifi-
cally for Flash. The built-in keyboard shortcuts are organized
into sets, which you can duplicate and customize to create
your own personalized set. Flash allows to you set prefer-
ences to customize the way you work in the program. As you
design and develop a movie, you can print frames to review
your work.
2
2
What You’ll Do
Examine the Flash Window
Use the Timeline
Work with Layers
View and Organize Layers
Change Layer Properties
Use Guide Layers
Work with Frames
Work with Scenes
Use the Edit Bar and Main Toolbar
Resize Panels
Use the Tools Panel
Work with Panels
Dock and Undock Panels
Group and Ungroup Panels
Create a Workspace
Create Keyboard Shortcuts
Set Flash Preferences
Work with Page Setup
Print a Document
29
From the Library of Wow! eBook
ptg
30
Chapter 2
When you start Flash, the program window
displays several windows of varying sizes you
can use to create a movie. These windows
include the Timeline/Stage, various panels,
and the Property Inspector. Depending on
your installation and previous program usage,
not all of these windows may appear, or addi-
tional ones may be visible. You'll do the bulk
of your work in Flash with these windows.
In Flash, windows appear in the work-
space with a title bar, such as the Timeline
window, or in a panel. A
panel
is a window
you can collapse, expand, and group with
other panels, known as a panel group, to
improve accessibility and workflow. A panel
appears with a shaded header bar, which
includes the window title and additional
options. A panel group consists of either indi-
vidual panels stacked one on top of the other
Examining the Flash Window
Document Window
Displays open Flash
documents, which includes a
Timeline, Edit bar, and Stage.
Timeline
Gives you a visual represent-
ation of every frame, layer
and scene in the document.
Stage
Provides a place to compose the
content for individual frames,
which includes drawing artwork
or arranging imported graphics.
Panel
Windows
Gives you
access to
authoring
tools and
attribute
settings
for
elements.
Property Inspector
Displays information about the
properties and attributes of
tools and graphic elements.
Tools Panel
Contains
drawing and
other related
tools to
create and
manipulate
graphics.
Main Toolbar
Contains buttons for commonly
used commands. Point to a
button to display a Tooltip.
Search Box
Allows you to search Adobe
Community Help online.
From the Library of Wow! eBook
ptg
Chapter 2 Working Within the Flash Environment
31
or related panels organized together with
tabs, such as the Components panel, to navi-
gate from one panel to another. The Flash
window displays the menu bar at the top. The
menu bar also contains a Workspace menu,
Search box, CS Live menu, Close button, and
resizing buttons.
A
menu
is a list of commands that you use
to accomplish specific tasks. A
command
is a
directive that accesses a feature of a program.
Flash has its own set of menus, which are
located on the menu bar along the top of the
Flash window. On a menu, a check mark iden-
tifies a feature that is currently selected (that
is, the feature is enabled or on). To disable
(turn off) the feature, you click the command
again to remove the check mark. A menu can
contain several check-marked features. A bul-
let (Win) or diamond (Mac) also indicates that
an option is enabled, but a menu can contain
only one bullet-or diamond-marked feature
per menu section. To disable a command with
a bullet or diamond next to it, you must select
a different option in the section on the menu.
When you perform a command frequently,
it's faster, and sometimes more convenient, to
use a shortcut key, which is a keyboard alter-
native to using the mouse. When a shortcut
key is available, it is listed beside the com-
mand on the menu, such as A+F3 (Mac) or
Ctrl+F3 (Win) for the Properties command on
the Window menu.
Flash (for Windows) also includes a Main
toolbar. The
Main toolbar
contains buttons for
the most frequently used commands. Clicking
a button on a toolbar is often faster than click-
ing a menu and then clicking a command.
When you position the pointer over a button,
a tooltip appears, displaying the button name.
The
Tools panel
contains a set of tools you
can use to create shapes, such as lines, rec-
tangles, rounded rectangles, and ellipses. You
can fill shapes with a color, pattern, or custom
tile. The shapes and buttons you create in
Flash are saved as media elements in the
layers.
The
Document window
displays open
Flash documents, which include a Timeline,
Edit bar, and Stage. Flash (for Windows) also
includes tabs to make it easier to switch back
and forth between documents. At the top of
the Document window is the Edit bar. The Edit
bar displays what editing mode you are work-
ing in, and allows you to switch scenes.
The
Timel
ine
organizes and controls
media elements over a linear timeline in rows
called channels and in columns called frames.
The Timeline displays a movie's Timeline and
monitors the playback frame-by-frame. A
frame represents a single point in a movie.
The Timeline includes layers that control dif-
ferent parts of the movie.
The
Stage
is the visible portion of a movie,
on which you determine where your media
elements appear. The Stage is the rectangle
area below the Timeline where you place
graphic content, including vector art, text
boxes, buttons, imported bitmap graphics, or
audio and video clips. You can define the
properties of your Stage, such as its size and
color.
The
Property Inspector
provides a conven-
ient way to view and change attributes of any
selected object or multiple objects on the
Stage in your movie. After you select an
object, relevant commands and associated
fields for it appear in the Property Inspector.
You can apply f ilter s, s uch as gradient con-
trols to text, buttons, and movie clips. In addi-
tion, you can display the Property Inspector
horizontally (like previous versions of Flash)
or vertically.
From the Library of Wow! eBook
ptg
32
Chapter 2
Using the Timeline
Change the Timeline Display
◆
To lengthen or shorten layer name
fields, drag the bar separating the
layer names and the frames in the
Timeline.
◆
To heighten or shorten the
Timeline, drag the bar separating
the Timeline and the Stage.
◆
To hide or show the Timeline
panel, click the gray bar to the
right of the Timeline tab.
Resize the Timeline Display
Do one of the following:
◆
If the Timeline is docked to the
program window, drag the bar
separating the Timeline from
the program window.
◆
If the Timeline is not docked to
the program window, drag the
size box in the lower right
corner.
1
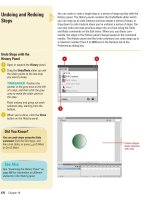
The Timeline represents the overall structure of a Flash document and
controls the content. The Timeline consists of layers, frames, and
scenes that make up a Flash document. Layers appear on the left side
of the Timeline and frames contained in each layer appear in a row to
the right of the layer. The Timeline header above the frames displays
the frame numbers. At the bottom of the Timeline, a Status bar appears,
displaying the current frame indicator, the current rate indicator, and
the elapsed time indicator. Sometimes it is hard to work with frames in
a small view in the Timeline. You can change the size of frames and dis-
play frames with tinted cells. In addition, you can display thumbnail
previews of frame content, which is useful for viewing animations.
Drag to
change length
of layer name
fields.
Drag edge to
change height
of Timeline.
Drag to resize
Timeline.
From the Library of Wow! eBook
ptg
Chapter 2 Working Within the Flash Environment
33
Change the Display of Frames in
the Timeline
Click the Frame View button in the
Timeline.
Select one of the following options
from the list:
◆
To change the width of frame
cells, click Tiny, Small, Normal,
Medium, or Large.
◆
To display thumbnails of the
content of each frame scaled to
fit the Timeline frames, click
Preview.
◆
To display thumbnails of each
full frame, click Preview In
Context.
This is useful for viewing
animation movement within
their frames.
◆
To decrease the height of frame
cell rows, click Short.
◆
To turn frame sequence tinting
on and off, click Tinted Frames.
◆
To disregard audio in the
Timeline, click Scrub Audio
(
New!
).
◆
To close the current tab, click
Close. To close all the tabs,
click Close Group.
2
1
2
Preview in
frame view
See Also
See “Working with Panels” on page 52
for information on using the Timeline
panel.
1
From the Library of Wow! eBook