Tài liệu Thiết kế flash với flash cs5 part 6 docx
Bạn đang xem bản rút gọn của tài liệu. Xem và tải ngay bản đầy đủ của tài liệu tại đây (802.84 KB, 7 trang )
ptg
42
Chapter 2
Working with Frames
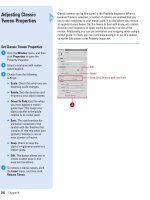
Select One or More Frames
◆
To select one frame, click on the
frame.
IMPORTANT
If the Span
Based Selection preference is
turned on, clicking a frame selects
the entire frame sequence
between two keyframes.
◆
To select multiple contiguous
frames, click the first frame in the
sequence, hold down Shift, and
then click the last frame in the
sequence.
◆
To select multiple noncontiguous
frames, A+click (Mac) or
Ctrl+click (Win) the frames you
want to select.
A frame displays content at a specific moment on the Stage. The order
in which frames appear in the Timeline determines the order in which
they appear in the document. The Timeline displays each frame in
sequential order from 1 to the end of the document. As you play a doc-
ument, the playhead moves through the Timeline displaying the current
frame with each layer on the Stage. When you work with frames, you
can select, insert, delete, and move frames in the Timeline. When you
move frames in the Timeline, you can place them on the same layer or
a different layer. If you want to display a specific frame in a document,
you can move the playhead to the frame in the Timeline to display the
frame content on the Stage. Another type of frame is called a keyframe.
A keyframe defines a change in an animation or uses actions to modify
a document.
Select one frame
Select multiple contiguous frames
Select multiple noncontiguous frames
Playhead
See Also
See “Using the Timeline” on page 32
for information on changing the view
size of frames in the Timeline.
Did You Know?
You can center the Timeline on the
current frame.
Click the Center Frame
button at the bottom of the Timeline.
From the Library of Wow! eBook
ptg
Chapter 2 Working Within the Flash Environment
43
Insert a Frame
Click the frame’s location in the
Timeline header, or drag the
playhead to the frame where you
want to insert a frame.
Click the Insert menu, point to
Timeline, and then click Frame.
Delete Frames
Select the frame, keyframe, or
sequence you want to delete.
Click the Edit menu, point to
Timeline, and then click Remove
Frames.
2
1
2
1
1
2
Did You Know?
You can move a frame sequence or
keyframe.
Drag the frame sequence or
keyframe to another location in the
Timeline.
You can copy a frame sequence or
keyframe.
Option+drag (Mac) or
Alt+drag (Win) the frame sequence or
keyframe to another location in the
Timeline.
Did You Know?
You can add labels to frames to refer-
ence in ActionScripts.
In the Timeline,
select the frame you want. In the
Property Inspector, enter a name in the
Name box under Label.
1
From the Library of Wow! eBook
ptg
44
Chapter 2
Working with Scenes
Open the Scene Panel and
Select a Scene
Click the Window menu, point to
Other Panels, and then click
Scene.
TIMESAVER
Press Shift+F2.
A list of scenes appears in order in
the panel. In a new document, the
Scene panel displays only the
default Scene 1.
Click the scene you want to
display.
Add a Scene
If necessary, open the Scene
panel.
Click the Add Scene button in the
Scene panel.
2
1
2
1
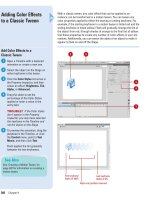
If a project requires a lot of animations with hundreds of frames, you
can organize the animations into scenes to make them easier to work
with and manage. The Scene panel makes it easy to display the number
of scenes in the document, select current scenes for editing, create
new scenes, duplicate scenes, delete scenes, and reorder them. You
can also use the Edit bar to select a scene to edit. When you select a
scene, Flash displays it on the Stage. When you publish a document as
a movie, the scenes play in order unless you add interactivity to play
them differently. Be aware that scenes are treated like self-contained
movies, so transitions between scenes with interactivity may not be
seamless.
2
2
New scene
Did You Know?
Flash names scenes in order based on
the highest number.
If you add Scenes
2 and 3, and then delete Scene 2, the
next time you add a scene, Flash
names it Scene 4.
From the Library of Wow! eBook
ptg
Chapter 2 Working Within the Flash Environment
45
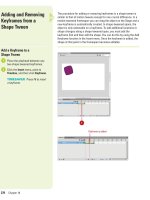
Rename a Scene
If necessary, open the Scene
panel.
Double-click the scene you want
to rename.
Type a new name.
Press Return (Mac) or Enter (Win).
Delete a Scene
If necessary, open the Scene
panel.
Click the scene you want to delete.
Click the Delete Scene button in
the Scene panel.
Click OK to confirm the deletion.
TIMESAVER
If you don’t want
to display the Confirmation dialog
box, press
A
+click (Mac) or
Ctrl+click (Win) the Delete Scene
button.
4
3
2
1
4
3
2
1
2 3
3
2
Did You Know?
You can undo the deletion of a scene.
If you mistakenly delete a scene, you
can undo; press A+Z (Mac) or
Ctrl+Z (Win).
You can reorder scenes in the Scene
panel.
In the Scene panel, drag a
selected scene up or down in the list.
Playing and Testing Scenes
After you finish creating and working with scenes in a Flash docu-
ment, you can quickly playback all the scenes in Flash or test a
scene in a browser with commands on the Control menu. To play-
back all scenes in the order in which they appear in the Scenes
panel, click the Control menu, and then click Play All Scenes. To test
the active scene, click the Control menu, and then click Test Scene.
To change the settings for the SWF file created using the Te st
Scene command, use the Publish Settings command on the File
menu.
For Your Information
From the Library of Wow! eBook
ptg
46
Chapter 2
Using the Edit Bar
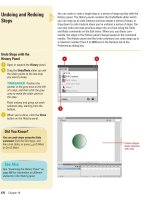
Show and Hide the Edit Bar
◆
To display the Edit bar, click the
Window menu, point to Toolbars,
and then click Edit Bar to select
the check mark.
◆
To hide the Edit bar, click the
Window menu, point to Toolbars,
and then click Edit Bar to deselect
the check mark.
The Edit bar contains controls and information for editing scenes and
symbols, and for changing the view size of the Stage. The Edit bar lets
you know what editing mode you are working in and allows you to switch
scenes. The Scene button allows you to edit a scene in document-editing
mode, while the Symbol button allows you to edit symbols in the symbol-
editing mode. The Back button on the Edit bar returns you to document-
editing mode.
Click to select (show) or
deselect (hide) the check mark.
Current scene or symbol being edited
Edit
bar
Back button
From the Library of Wow! eBook