Tài liệu Thiết kế flash với flash cs5 part 45 pdf
Bạn đang xem bản rút gọn của tài liệu. Xem và tải ngay bản đầy đủ của tài liệu tại đây (404.85 KB, 5 trang )
ptg
290
Chapter 10
With Inverse Kinematic (IK), you can use bones to create two types of
IK animations: those with symbols and those with shapes. For the sym-
bol type, you link them together as a chain. For the shape type, you add
bones inside the shape. When you add bones to a shape or symbol
instance, Flash creates a new pose layer. For a shape, Flash also con-
verts the selected shapes and bones into an IK shape object. The first
bone in an armature is the root bone. It appears with a circle around
the head of the bone. Each bone has a head, the round end, and a tail,
known as the pointed end.
Adding Bones to an
Armature
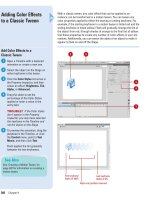
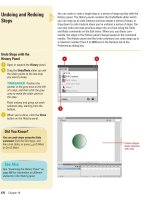
Add Bones to a Shape
Create one or more filled shapes
and arrange them the
configuration you want.
Select the entire shape on the
Stage.
Click the Bone tool on the Tools
panel.
Click inside the shape, and then
drag to another location within the
shape.
While you drag, a bone appears.
When you connect the points, a
solid bone appears between them.
Flash converts the selected shape
into an IK shape object and moves
it to a new pose layer in the
Timeline.
To add another bone, drag from
the tail of the first bone to another
location in the shape.
As you add bone instances, Flash
moves each one to a new pose
layer in the Timeline.
To create a branched armature,
click the head of an existing bone,
and then drag to create a new
branch of the first bone.
6
5
4
3
2
1
4
5
1
2
Armature layer
3
From the Library of Wow! eBook
ptg
Chapter 10 Animating with Shape Tweening
291
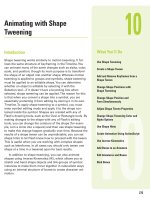
Add Bones to a Symbol
Arrange the instances in the
configuration you want.
Click the Bone tool on the Tools
panel.
Click the symbol instance that you
want as the root or head of the
armature.
Drag the symbol instance to
another symbol instance to
connect it.
While you drag, a bone appears.
When you connect the symbols, a
solid bone appears between the
symbols. As you add bone
instances, Flash moves each
instance to a new pose layer in the
Timeline.
To add another bone, drag from
the tail of the first bone to the next
symbol instance you want to add
to the armature.
To create a branched armature,
click the head of an existing bone,
and then drag to create a new
branch of the first bone.
You can add as many branches as
you want.
6
5
4
3
2
1
Did You Know?
You can move an armature.
Select the
IK shape object with the Selection tool,
and then drag any of the bones to
move it.
3
5
4
2
Symbols
From the Library of Wow! eBook
ptg
292
Chapter 10
After you add bones to an armature, you can change the position and
length of a bone, delete bones, and edit objects containing bones. An
armature can only be edited in pose layers that contain an initial pose
in the first frame in which the armature appears in the Timeline. To edit
the armature, you need to delete any additional poses after the first
frame of the armature. You can bone properties, such as motion speed,
joint rotation and motion, and springiness (life-like movement) (
New!
),
in the Property Inspector.
Editing Armatures
and Bones
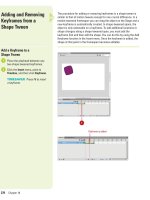
Edit Armatures, Bones, and
Related Objects
Select the bones and associated
objects you want:
◆
Bone. Click the Selection tool,
and then click a bone. You can
Shift-click to select multiple
bones.
◆
Armature. Double-click a bone.
◆
IK Shape. Click the shape.
◆
Symbol Instance. Click the
instance.
To move bones, do any of the
following:
◆
Bone. Drag a bone.
◆
IK Shape. Select the shape, and
then change its X and Y
position in the Property
Inspector.
◆
Bone End in IK Shape. Click the
Subselection tool, and then
drag the end of the bone.
◆
Bone Joint, Head, or Tail. Use
the Transform panel to move
the transformation point of the
symbol instance.
◆
Rotate a Bone. Shift-drag a
bone to rotate it with its child
bones without moving the
parent bone.
To delete bones, do either of the
following:
◆
Bone. Select the bones you
want to delete, and then press
Delete.
3
2
1
Selection tool
Armature layer
1
Transform panel
Symbols
From the Library of Wow! eBook
ptg
Chapter 10 Animating with Shape Tweening
293
◆
IK Shape or Symbol Instance.
Select the shape or symbol,
click the Modify menu, and
then click Break Apart.
To edit an IK shape, do any of the
following:
◆
Move the Position of a Bone.
Drag a bone endpoint to move
the position of a bone without
changing the IK shape.
◆
Display Control Points of the
Boundary. Click the stroke of
the IK shape.
◆
Move Control Point. Drag the
control point.
◆
Add Control Point. Click a part
of the stroke without any
control points. You can also use
the Add Anchor Point tool on
the Tools panel.
◆
Delete Control Points. Click a
control point to select it, and
then press Delete. You can also
use the Delete Anchor Point
tool on the Tools panel.
To set motion constraints, open the
Property Inspector, and then
specify the options you want (see
table for details) to move or
constrain joints, disable bone
rotation around joints, constrain
the rotation of a bone, make a
bone stationary, limit the motion
speed of a bone, or adjust the
springiness (
New!
) to bones.
◆
Enable or Disable Spring
Options. Select the pose layer
in the Timeline, and then select
or deselect the Enable check
box in the Spring section of the
Property Inspector.
5
4
4
3
IK shape
5
Properties Options
Location Displays the X and Y position, length, and angle.
Specify a speed percentage.
Joint: Rotation Select the Enable check box to allow joint rotation.
Select the Constrain check box to constrain the Min
and Max angles of rotation.
Joint: X or Y Select the Enable check box to allow the bone to
Translation move along the X or Y axis. A two-headed arrow
appears to indicate that X or Y axis motion is
enabled. Select the Constrain check box to limit the
amount of motion along the X or Y axis.
Spring Specify the Strength (stiffness)
(
New!
)
of the bone
spring. The higher the Strength, the stiffer the
spring. Specify the Damping (rate of decay)
(
New!
)
of the spring effect. The higher the Damping, the
faster the spring diminishes and the animation ends.
A 0 value equals full strength.
Bone Properties
From the Library of Wow! eBook
ptg
294
Chapter 10
When the stroke of an IK shape doesn’t distort in the way you want,
you can use the Bind tool to edit the connections between individual
bones and shape control points to create the appearance you desire.
By default, the control points of an IK shape are connected to the bone
that is nearest them. The Bind tool allows you to change it. You can
bind multiple control points to a bone and multiple bones to a control
point.
Binding Bones
Bind Bones to Shape Points
◆
Highlight Control Points
Connected to a Bone. Click the
Bind tool, and then click a bone.
The connected points are
highlighted in yellow while the
selected bone is highlighted in red.
◆
Add Control Points. Select a
bone, and then Shift-click an
unhighlighted control point.
◆
Remove Control Points. Ctrl-click
(Win) or Option-click (Mac) a
control point that is highlighted in
yellow.
◆
Highlight Bones Connected to a
Control Point. Click the Bind tool,
and then click the control point.
The connected bones are
highlighted in yellow while the
selected control point is
highlighted in red.
◆
Add Other Bones to a Control
Point. Select a control point, and
then Shift-click a bone.
◆
Remove a Bone from a Control
Point. Select a control point, and
then Ctrl-click (Win) or Option-
click (Mac) a bone that is
highlighted in yellow.
Bind
tool
Control points
Binded bones to shape points
From the Library of Wow! eBook