Tài liệu Thiết kế flash với flash cs5 part 47 doc
Bạn đang xem bản rút gọn của tài liệu. Xem và tải ngay bản đầy đủ của tài liệu tại đây (696.6 KB, 7 trang )
ptg
300
Chapter 11
You can use any filled shape as a mask. Flash ignores gradients, lines,
and the content in bitmaps—in all cases it just deals with the whole
shape. Use any of Flash's drawing tools to create a shape that will
define the viewable area of the linked layers below. Keep in mind that
mixing elements at different levels (editable shapes and symbols, for
example) can produce unexpected results. Try to use only one type of
element in any one mask: editable shapes, symbols, or groups.
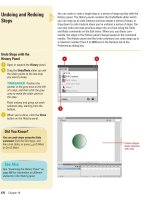
Drawing a Mask
Create a Mask Layer
Click to select the mask layer.
If the mask layer is locked, click on
the lock icon in the Lock Layer
column to unlock it.
Draw a shape with any of Flash's
drawing tools or drag a symbol
from the Library.
The area of the shape drawn, or
symbol used, is the area that will
be the visible area of the linked
layer(s) beneath the layer mask.
3
2
1
Any shape or shapes drawn on the
mask layer defines what is visible
in the linked layers beneath.
1 2
Circle shape
From the Library of Wow! eBook
ptg
Chapter 11 Creating Masks
301
To activate a mask, you simply lock it and any of the linked layers
beneath it. Linked layers are indented in the Layer Name region and
have tinted blue icons. You can lock and unlock a mask and its layers to
edit them and see the effects of the mask in the Flash development
environment. You can also use the Test command (in Flash
Professional) to view the masking effects in the Flash Player.
Activating a Mask
Activate a Mask
Open a document with a masked
layer.
Click the black dot in the lock
column of the mask layer to lock it.
The dot changes to a lock icon.
Click this dot on each linked layer
to lock all of them and see the
masking effect.
TIMESAVER
You can click the
Lock icon at the top of the lock
layers column to lock all the layers
in your Timeline simultaneously.
3
2
1
2
Shapes
drawn on
the mask
layer define
the visible
area.
From the Library of Wow! eBook
ptg
302
Chapter 11
Masks are editable. Which type of element you are using in the mask
layer defines the procedure for editing: editable shapes can be modi-
fied with Flash's drawing tools, while groups and symbols must be
edited in their own editing modes. Regardless, Flash only concerns
itself with the fill area. Changes to color, alpha, and other such attrib-
utes are ignored. To edit a mask, you must first unlock it. To view your
changes, simply re-lock the mask layer and all of its linked layers.
Editing a Mask
Edit a Mask
If the mask layer is locked, click on
the lock icon in the Lock Layer
column to unlock the layer and
enable it for editing.
Edit the shape of the mask or, if
using a group or symbol, enter the
group or symbol's editing mode.
Re-lock the mask layer and any
linked layers to view changes.
3
2
1
1
Add or delete
shapes, or draw
new ones with
any of Flash’s
drawing tools.
3
From the Library of Wow! eBook
ptg
Chapter 11 Creating Masks
303
To remove a mask layer entirely, select it and then click the
Delete Layer icon. You can also convert a mask layer back to a normal
layer in the Layer Properties dialog box. Additionally, you can remove
linked layers from a mask layer set by dragging them out of the
indented set.
Removing a Mask
Remove a Mask
Click on the mask layer to select it.
Click the Modify menu, point to
Timeline, and then click Layer
Properties.
Click the Normal option from the
Layer Type list.
Click OK.
The mask layer is converted into a
normal layer.
TIMESAVER
Press
Control+click (Mac) or right-click
(Win) the Layer Name area of the
mask layer you want to convert
back into a normal layer, and then
click Mask to deselect it.
4
3
2
1
3
4
Mask layer becomes a Normal layer.
1
From the Library of Wow! eBook
ptg
304
Chapter 11
Add layers to an existing mask by dragging them to any region within
the masked layer hierarchy. Simply drag it between layers already
linked, drag it under the mask layer, or drag it slightly up toward the
bottom of a masked layer set. There is no limit to the number of layers
that can be contained in a mask. Additionally, you can remove linked
layers by dragging them out and above the mask layer set.
Adding Layers to a
Mask
Link Additional Layers to
a Mask
To add additional layers to a mask,
do one of the following:
◆
Click and drag the layer below
the mask.
◆
Click and drag the layer until it
touches the bottom of a layer
already linked to the mask.
1
To add a layer to the top of or between the linked layers of
the mask set, click and drag the layer into the indented set.
To add a layer to the bottom of the mask set,
click and drag slightly below the set to link it.
Layers linked to the mask.
Any layer
can be
added to
an existing
mask layer
set.
Did You Know?
You can change the order of the linked
layers.
Masked layers behave the
same as other layers. Click and drag
the layers to reorder them in the
indented set.
From the Library of Wow! eBook