Tài liệu Snort Rules: Syntax and Keywords ppt
Bạn đang xem bản rút gọn của tài liệu. Xem và tải ngay bản đầy đủ của tài liệu tại đây (458.54 KB, 92 trang )
1
1
Snort Rules: Syntax and
Keywords
Paul Ritchey,
Jacob and Sundstrom, Inc.
V1.0.0
Welcome to the class titled ‘Snort Rules: Syntax and Keywords’. The purpose of this section is to
teach you the basic building blocks for writing Snort rules. These basic building blocks consist of
the syntax and keywords Snort provides for writing signatures and taking various types of actions. A
later section will take these building blocks and teach you how to apply them to make a complete
rule along with understanding the purpose of existing rules.
2
2
Agenda
!
Brief Overview
!
What is Snort?
!
Data Flow
!
What are rules?
!
Basic rule anatomy
!
Rule headers
!
Rule options
!
Rule files
!
Variables in rules
!
Reference: Packet Attributes
The purpose of this presentation to give you the knowledge necessary to fully understand rules and
how they are used with Snort for intrusion detection. You will first have a brief overview of Snort,
including the data flow within Snort and how everything is tied together. You will then learn what
rules are, their anatomy, and the syntax and options that can or must be used to properly define a
rule. You will then learn how to combine rules into rule files, and how to use variables to aid in
making your rule sets more easily updated or portable. The final section covers all of the packet
attributes Snort can examine to form complete signatures.
This presentation covers Snort version 1.7. If you are using a newer version of Snort, please
remember that new features may have been added or existing features may have been modified after
this presentation was assembled.
3
3
Brief Overview
This first section is a brief overview of Snort. It will provide a very basic overview of what Snort is
and some of the terminology used when describing rules.
4
4
What Is Snort?
• Intrusion Detection System (IDS).
• Payload based packet inspection.
• Header based packet inspection.
• Flexible alerting/logging capabilities.
• Limited response capabilities.
• Runs on most Unix platforms.
• Free (GPL).
• Customisable via plug-in architecture.
Snort is an intrusion detection system (IDS) made freely available by Marty Roesch at
.
Snort supports both header and payload inspection methods, allowing you to fully specify in a single
rule what constitutes a suspect packet. This flexibility allows you to build rules customized to your
site that greatly aid in minimizing false positives, but in a format that is in a human readable.
Snort is also flexible when detecting events, allowing you to choose from a variety of methods how
you want to be notified. Snort can output to files, databases, SAMBA alerts and various other ways.
Snort also has limited capability in responding to intrusion attempts by sending ‘resets’ or other
various packets.
Snort can be compiled to run on most flavors of Unix including: Linux, BSD variations, Solaris, HP-
UX, AIX, IRIX, Tru64 and even MacOS X. Snort will run on most operating systems that are
capable of compiling and installing libpcap (a requirement). A Windows version is also available
providing the same capabilities for the those not working in a Unix environment.
Note the last two items: It's free and you can customize it. Snort is available in source code form for
free under the standard GNU license. If Snort doesn't do something you need, write a plug-in! This
allows you to extend Snort beyond what Marty and the development team has provided you, and
allows you another means to customize its capabilities to your specifics site's needs.
5
5
Snort Data Flow
Packet Decoder
Preprocessor
(Plug-ins)
Detection Engine
(Plug-ins)
Output Stage
(Plug-ins)
Packet Stream
Sniffing
Snort
Data Flow
Alerts/Logs
The picture shown here depicts how a packet is moved through Snort, and illustrates how the
individual parts within Snort are used to provide a complete detection system. The terminology used
here can be a little confusing at first, but the key to understanding Snort it that it is simply a process
broken down into several logical steps, each of which is completely built around the concept of plug-
ins.
The first step is through the decoder. Libpcap captures a packet coming across the wire and hands it
to the decoder. The decoder takes the packet and fills in a data structure with the contents of the
packet, filling out the portions that apply to the packet type.
The next step is through any preprocessor plug-ins that were defined in the rule file, which is
covered later. Preprocessors take the data structure created by the decoder and can manipulate the
contents of the structure. (Note the keyword in the last sentence: manipulate.) Not other step in
Snort’s processing has the ability to manipulate the actual packet.
The data structure is then passed to the detection engine where rules are applied to determine if the
packet is to be alerted on, logged, etc. This step may or may not be the last step, which is
determined if a rule is triggered or not.
The output stage, if reached, is where the packet can be logged or alerted on. This last step can be
affected by the command line parameters used when starting Snort, or by some of the options
specified when configuring the source code before compilation.
6
6
Preprocessors
•
Lend total flexibility to packet analysis
•
Several are available right now
–
Port scan detection
–
HTTP protocol normalization
–
Tiny fragment detection
–
IP defragmentation
–
TCP stream reassembly
Preprocessor plug-ins are done after the packet decoding, but before the detection engine processing. They are
called only a single time per packet and may perform highly complex functions such as TCP stream assembly.
They can manipulate packet data and even call the detection engine directly.
The Tiny Fragment preprocessor was the first preprocessor written and was developed as something of a
prototype to demonstrate the usefulness of the preprocessor plug-in interface in Snort. It’s job is to look at the
size of fragments on the wire and raise an alert if a fragment is below a preset threshold size. This is useful for
detecting malicious fragmentation that is commonly used in an effort to circumvent network intrusion detection
systems that do not perform fragmentation. Commonly, these attacks fragment packets to the smallest size
allowed by the protocol in an effort to complicate the job of a NIDS sensor. An IDS can use this fact to detect
when these evasive tools are in use on the network, because packets which are fragmented by standard
commercial network equipment are seldom found to be smaller than 128 bytes.
The HTTP protocol normalization preprocessor takes HTTP URL strings and converts them to ASCII strings.
The tiny fragment detection preprocessor looks for fragments that are smaller than a threshold size you specify.
This can be used to detect subversive behaviour most likely from a crafted packet.
The portscan detection plug-in will generate alerts when an IP connects to a certain number of ports in a
predetermined time interval. These values are defined in the rules file. In the rules from www.snort.org, the
number of ports defaults to 3 and the time interval to 5 seconds. A preprocessor ignore rule can be used to
ignore known valid hosts that generate scan-like behaviour and trigger false alarms.
The IP defragmentation preprocessor takes fragmented IP packets and puts them back together for the detection
engine to consider. The defragmenter takes no arguments. This preprocessor largely supersedes the tiny
fragment preprocessor and it is probably not necessary to run the tiny fragment detector alongside the
defragmentation preprocessor.
The TCP stream reassembler analyses TCP streams and lets the Snort detection engine analyse application layer
data that may be spread across many packets. It can be configured with a list of ports to perform reassembly
upon, a timeout before flushing data on inactive streams, and a maximum amount of data to buffer.
7
7
Detection Engine
TCP Header
IP Header TCP Header data
Rule #1: Match?
yes
Rule #2: Match? Rule #X: Match?
yes yes
no
no
The Detection Engine is shown here. Decoded traffic from the packet decoder (after going through
any preprocessors) is then sent to the detection engine. It is possible to run Snort without applying a
rule set, but most times Snort is run with rules. The traffic is analyzed against the rules in the rule
files and if a signature and rule match is detected - some kind of logging or alerting is typically done.
Keep in mind that detection plug-ins can be operating with the rules to assist in finding more
activity.
Typically the detection engine is used with Snort based rules. These rules are single line rules in a
very human readable format. Snort also supports Berkeley Packet Filter (BPF) format for rules, so it
is possible to migrate an existing ‘rule’ set being used for Shadow over to Snort although you will
lose access to some of the functionality Snort provides.
8
8
Output
Alert File Log Directory
[**] NMAP TCP ping [**]
03/21-13:33.51:880120 1.2.3.4:1029 -> 192.168.5.5:80
TCP TTL: 46 TOS: 0X0 ID: 19678
****** A* Seq: 0XE4F00003 ACK: 0x0 Win: 0XC00
Directory name
:
1.2.3.4
File name:
TCP:1029-80
Contents:
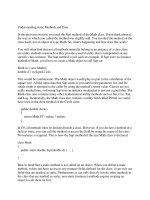
This slide attempts to show the results of finding some kind of malicious activity that matches a rule. We
have asked for Snort to alert and log the activity. Snort will either default to the logging file
‘/var/log/snort’, or a log directory that you select as a command line option. The log directory
will contain a subdirectory with a name of the IP number that directed the hostile activity. This
subdirectory contains a file name that specifies the protocol and the source and destination ports involved
in the activity. What you see on the right side of the slide is that we've received some activity from
hostile IP 1.2.3.4 and that becomes a directory name. In that directory, we find a file TCP:1029:80 which
says that 1.2.3.4 sent a TCP packet from source port 1029 to destination port 80.
If an alert rule fires, the packet will be logged and an entry including the alert message will be placed in
the alert file. When a packet is logged in its default format to a log file, the messages are also included
with the packet dumps. The reason that there is an alert file and a log file is that all alert rules have the
packets that cause the alerts logged, but log rules only send packets to the logging facility. The alert file
exists to store all the alerts in one place for easy lookup, while the various log files exist to provide an in
depth examination of the packets that caused alerts to go off, as well as a place to store packets that had
applicable log rules.
If we look at the contents of the alerts file, we see the output that tripped the alert. It appears that the
ACK (acknowledgement) number is 0 which should never happen in anything other than a normal TCP
SYN portion of a three-way-handshake, and so this is perceived to be an nmap scan that is attempting to
verify if the destination host 192.168.5.5 is alive. It is possible that 192.168.5.5 will respond with a
RESET to an unsolicited ACK to indicate it is alive.
9
9
Output, Continued
Alerts written
to syslog
Disable
alerts
Full logging
Full alerting
Fast
alerting
Disable
logging
Alerting via
Samba
Binary
logging
Database
logging
Database
Alerting
XML
Alerting
Database
logging
Snort has many different options that can be enlisted for outputting alerts. Default logging will write
to the Snort directory ‘/var/log/snort’ with a sub-directory structure recording the activity.
Snort can also log in tcpdump binary mode instead, or logging can be disabled entirely. There are
also plug-ins available to log to a database or output to an XML logging mechanism to make very
portable logs.
Full alerting does the normal alerting that we saw a couple of slides ago with analysis of the traffic
through the transport level. Fast alerting abbreviates the information that is recorded to a timestamp,
the alert message as identified in the rule, and the IP's and ports involved. Also, you can disable
alerting all together which might be done if Snort is being used simply as a collection agent and not
as a reporting agent.
Alerts can also be sent to a Windows host using Samba; this is useful if you or the Snort analyst has
a Windows workstation where you are most likely to do your daily work. Alerts can be written to
the UNIX syslog file, a database or even a highly portable XML output file if you so choose.
This slide shows a very small subset of the possible mechanisms Snort can use to record hostile
activity. It’s very likely that more will be added as time passes making Snort even more convenient
and valuable to use.
10
10
What Are Rules?
!
Rules define what Snort is to watch for.
!
Define ‘who’ and ‘what’ is involved.
!
Simple syntax, easy to read and create.
!
Inspect header, payload or both.
By defining rules, you tell Snort what traffic is to be considered hostile. Rules define everything
from the ‘who’ is involved (source and destination machines) to the ‘what’ is considered hostile
(invalid TCP flag settings, for example). The syntax and keywords are very simple and intuitive, but
they are very specific and must be followed closely. For those who have tried deciphering
complicated tcpdump filters (such as those used for Shadow), this is a welcome change and makes
keeping up with the latest trends in hacking much easier.
Rules can be written to be very specific, looking for particular payloads and packet attributes, or they
can be very general, specifying only a single IP or port. This allows you great flexibility and the
ability to fine tune individual rules to aid in minimizing false positives, or to look for specific types
of traffic.
11
11
Basic Rule Anatomy
!
Each rule has two parts:
!
Rule header – first portion.
!
Rule options – second portion.
!
Specific syntax, format and
keywords for each part.
An individual rule is broken into two general parts. The first part, the rule header, defines ‘who’
must be involved in order for the traffic to be considered by the rule options. The second part, the
rule options, define the ‘what’ must be involved. This includes packet header information (such as
TCP flag settings) or the contents of the payload.
Generally speaking, both sections are used for general rules. It is possible to specify rules with only
a rule header so that the specified action can be taken for the provided hosts and ports. This is
generally the case where pass rules are used to ignore traffic between specific hosts and ports, such
as port 53 traffic coming from a site’s DNS servers. Log rules sometimes use only a rule header to
specify specific traffic to be logged for later examination, for example all the FTP command channel
traffic for a particular server on the network.
12
12
Rule Header
This section covers the rule header portion of a rule. It covers the individual fields within the rule
header and the format each of the fields must be specified in.
13
13
Rule Header
!
Defines ‘who’ is involved
!
Protocol
!
Source and destination IPs
!
Source and destination ports
!
Direction of traffic
alert tcp !10.1.1.0/24 any -> 10.1.1.0/24 any (flags: SF; msg: “SYN-FIN scan”;)
Rule Header Rule options
The rule header is the first portion of each rule. It defines the network protocol and ‘who’ must be
involved. For each of the individual fields there are many options (with specific syntax) that can be
used to specify single values, ranges, or groups of values. Each field will be discussed in upcoming
slides, covering possible values and the proper syntax for each.
Note: Snort’s detection engine breaks the comparison of a packet into two parts, corresponding to
the parts of a rule. The first comparison compares the rule header to the packet. If the packet does
not fit the profile of one of the rule headers in a rules set, the detection engine moves on to the next
packet. If the packet does fit the profile of the rule header, then the detection engine continues on to
test the rule options.
14
14
Rule Header: Action
!
Action field tells Snort what to do.
!
Valid values include:
!
Alert – alert and log packet when triggered.
!
Log – log only when triggered.
!
Pass – ignore (drop) this traffic.
!
Activate – alert then turn on dynamic rule(s)
!
Dynamic – ignored until turned on by activate
rule, then act as log rule
!
Also possible to define your own.
alert
tcp !10.1.1.0/24 any -> 10.1.1.0/24 any
Action field
The first field in the rule header is the action field. This field instructs Snort as to what it is supposed to do if the
rule is triggered. There are currently three valid values for the action field:
Alert: This value instructs Snort to create an entry in the “alerts” file and to log the packet as well. The alert
file is a single file that contains all detects that were made. The information written to this file in the default
alert mode consists only of the packet header information. For the log entry, the same information that is
written to the alerts file is written to a directory structure and collection of individual files.
Log: This value instructs Snort to only make a log entry. No record of the traffic will be made in the alerts file.
Pass: When a rule is triggered that has ‘pass’ specified as the action, Snort will drop the packet and not do any
further processing of it. This is useful for example if you want to monitor for anonymous ftp attempts on your
network to non-anonymous ftp servers. You would write a pass rule to drop anonymous ftp attempts to your
valid anonymous ftp server. You would then use a second, normal, ‘alert’ rule to log the anonymous ftp
attempts.
Activate: These rules when triggered not only alert, but are also used to turn on other rules (dynamic) that
remain idle until turned on.
Dynamic: These remain idle (will not trigger) until turned on by an activate rule. Once turned on their
behavior is the same as ‘log’ rules.
It’s also possible to define your own action types which can be used to route rule output to various destinations.
This sophisticated usage will not be covered here, but can be explored at Snort’s web site – www.snort.org.
Note: The normal order rules are processed in is alert rules first, pass rules second and log rules last. To change
this default behavior, you must specify the ‘-o’ option which changes the order the rules are processed.
Specifying the ‘-o’ option changes the rule processing order to pass rules first, alert rules second and log rules
last. This was done when Snort was developed for public use to avoid having an errant pass rule accidentally
disable every alert and log rule in the system. The –o option was developed as an “expert mode” for people
once they understood how the rules system worked.
15
15
Rule Header: Protocol
!
Protocol field tells Snort what type of
network traffic the rule applies to.
!
Valid values include:
!
tcp
!
udp
!
icmp
alert tcp
!10.1.1.0/24 any -> 10.1.1.0/24 any
Protocol field
The protocol field in the rule header tells snort what type of network traffic the rule applies to. Snort
currently supports three different types of network traffic: TCP (Transmission Control Protocol),
UDP (User Datagram Protocol) and ICMP (Internet Control Message Protocol). Additional
protocols will be added in the future.
16
16
Rule Header: Source IP
!
Source IP field defines where hostile
traffic is originating from.
!
Specified in CIDR notation (Classless
Inter Domain Routing)
!
Possible to specify multiple
addresses in an IP List
alert tcp !10.1.1.0/24 any -> 10.1.1.0/24 any
Source IP field
In the source IP field you specify where the hostile traffic is originating from. It is possible to
specify the source IP from something as generic as a subnet, or as a specific host. It is also possible
to specify multiple addresses or subnets as the source when needed using a special syntax introduced
in Snort version 1.7. Specifying multiple IP addresses in a rule is called using an IP List.
The addresses are specified in CIDR notation, an easy to write and understand format. This format
includes as much of the address as needed, along with the number of bits in the network mask.
In situations where a rule uses the two-way traffic flow for the traffic direction field (‘<>’), this
address can represent either a source or destination address and is paired with the port data on the
same side of the direction field.
17
17
Rule Header: Source IP (Cont.)
Format: Address/netmask or any or
[address/netmask,address/netmask…]
Address = x.x.x.x
Netmask = bits of network mask
24.0.0.0/8 = Class A
135.1.0.0/16 = Class B
192.168.5.0/24 = Class C
192.168.5.5/32 = Host address
Special keywords
:
any - match all addresses
! - negate address (!192.168.5.5/24 - all but 192.168.5.5)
$HOME_NET – variable defined elsewhere in rules file.
This slide depicts the supported formats you can specify the source IP in using CIDR notation.
Examples are provided for the standard network classes (A, B, C) as well as for specifying a specific
host. For locations where subnetting is used, specify the number of bits in the the network mask that
you are using (such as 30).
For rules that apply to any traffic, specify the keyword ‘any’ which matches all possible IP
addresses. Use the negation operator (‘!’) to apply a rule to all traffic except the specified host or
network.
A new syntax was introduced with Snort version 1.7 which allows you to specify more than on
address at a time. To do this, specify the list of addresses in CIDR notation, separating them by a
comma. The entire list is then enclosed by brackets (‘[‘, ‘]’). Note: Do not leave any spaces when
using this format. At this time Snort’s rule parser cannot support spaces embedded in the address
list.
In order to make your rules more portable, it’s also possible to use a variable which is defined
elsewhere (command line option or rules file) to specify the source IP. Variables and their usage are
discussed in a later section.
The formats specified here also apply when to the destination IP field, which is covered on a later
slide.
18
18
Rule Header: Source Port
!
Source Port field defines from what
port on the source host the traffic
originates from.
!
Specified as a number or range.
alert tcp !10.1.1.0/24 any -> 10.1.1.0/24 any
Source Port field
The source port field is used to specify the port on the source host that the traffic is originating from.
The source port can be specified as a specific number, range of numbers, or the keyword ‘any’
which represents all possible source ports.
The syntax used for the source port field is the same as the destination port field, which is discussed
later.
Another point that needs to be made is in reference to the ICMP protocol. The ICMP protocol does
not use ports like TCP and UDP. Since the rule syntax requires ports to be listed for the source and
destination, they must still be included for rules that apply to the ICMP protocol. For ICMP Snort
will ignore the value entered for the ports, but it is traditional to specify the keyword ‘any’.
19
19
Rule Header: Source Port (cont.)
Valid formats
static port: 111
all ports: any
range: 33000:34000
negation: !80
less than or equal: :1023
greater than or equal: 1024:
This slide depicts the many ways you can specify the source port. You can specify a specific port or
different types of ranges. It’s even possible to use negation (but not with the ‘any’ parameter) to
specify all ports except the one or range specified.
When specifying ranges, the numbers specified are included in the range. Using the range
‘33000:34000’ as an example, the range specified is from 33,000 to 34,000, not from 33,001 to
33,999.
The formats specified here also apply when specifying the destination ports, which is covered on a
later slide.
In situations where a rule uses the two-way traffic flow for the traffic direction field (‘<>’), this port
can represent either a source or destination port.
20
20
Rule Header: Traffic Direction
!
Traffic Direction field defines what
direction packets must be traveling.
!
Two options:
!
-> defines source to destination
!
<> direction doesn’t matter (bi-directional)
alert tcp !10.1.1.0/24 any ->
10.1.1.0/24 any
Traffic Direction field
The traffic direction field allows you to specify the direction the packet must be traveling. Two
options are available, allowing you to specify a specific direction of flow, or that direction doesn’t
matter.
Using the notation that looks like an arrow (‘->’), the packet must be traveling from a source to a
destination. The source information is specified to the left of the arrow, and the destination is on the
right. The packet must be traveling in the specified direction. If it is traveling in the opposite
direction, the packet will not pass the rule header test and will not be inspected any further against
the rule.
If you use the notation that looks similar to a double headed arrow (‘<>’), the packet can be traveling
to or from either address/port pair. For this notation, either address can represent the source IP and
port and the other address/port then represents the destination.
21
21
Rule Header: Destination Address
!
Destination IP field defines where
hostile traffic is going to.
!
Specified in CIDR notation (Classless
Inter Domain Routing)
!
Refer to Source Address slides for
format
alert tcp !10.1.1.0/24 any -> 10.1.1.0/24 any
Destination Address field
The destination address field specifies the destination host the traffic is going to. The address is
specified using the same syntax used to specify the source address. Please refer to the source
address slides for examples of how to specify the source address in CIDR notation and the options
that are available.
In situations where a rule uses the two-way traffic flow for the traffic direction field (‘<>’), this
address can represent either a source or destination address.
22
22
Rule Header: Destination Port
!
Destination Port field defines the
port the traffic must be destined for.
!
Specified as a number or range.
alert tcp !10.1.1.0/24 any -> 10.1.1.0/24 any
Destination Port field
The destination port field defines the port on the destination machine the traffic must be destined for.
The destination port is defined using the same formats used to specify the source port. Please refer
to the slides pertaining to the source port field for the available formats and proper syntax.
In situations where a rule uses the two-way traffic flow for the traffic direction field (‘<>’), this port
can represent either a source or destination port depending on the direction the traffic is traveling.
23
23
Rule Options
This section discusses the rule option portion and the syntax that is used to define it.
24
24
Rule Options
!
Defines ‘what’ is involved.
!
Tells Snort what packet attributes
must be inspected.
!
Forms a signature defining a specific
attack or probe.
alert tcp !10.1.1.0/24 any->10.1.1.0/24 any (flags: SF; msg: “SYN-FIN scan”;)
Rule Header Rule options
The rule options portion is the second half of a rule. The rule options define the ‘what’ portion of a
rule – what attributes of a packet must be inspected and the values they must contain for the packet
to be considered hostile. This portion of a rule is only used if the packet meets the specifications of
the rule header parameters first.
If a packet has met both the requirements of the rule header and the rule options, the rule is then
‘triggered’. Depending on the type of rule, certain actions can take place. The most common action
that takes place is an alert message being written to the alert file and the packet data being sent to the
log files. Other options include, but are not limited to SAMBA messages, logged to a database, or
one of the many new options that are constantly being added.
25
25
Rule Options Syntax
!
Options portion enclosed in
parenthesis.
!
Enclosing parenthesis are NOT
optional.
(flags: SF; msg: “SYN-FIN scan”;)
Enclosed in parentheses
The rule options portion is enclosed in parentheses (‘(‘, ‘)’). It must start and end with a parenthesis,
they are not optional. The parentheses also visually help in separating the two portions, making it
easier to tell them apart.