Tài liệu Lab 2.2.4 Establishing a Console Session with HyperTerminal doc
Bạn đang xem bản rút gọn của tài liệu. Xem và tải ngay bản đầy đủ của tài liệu tại đây (130.63 KB, 4 trang )
1 - 4 CCNA 2: Routers and Routing Basics v 3.0 - Lab 2.2.4 Copyright 2003, Cisco Systems, Inc.
Lab 2.2.4 Establishing a Console Session with HyperTerminal
Objective
• Connect a router and workstation using a console cable.
• Configure HyperTerminal to establish a console session with the router.
Background/Preparation
HyperTerminal is a simple Windows-based terminal emulation program that can be used to connect
to the console port on the router. A PC with HyperTerminal provides a keyboard and monitor for the
router. Connecting to the console port with a rollover cable and using HyperTerminal is the most
basic way to access a router for checking or changing its configuration.
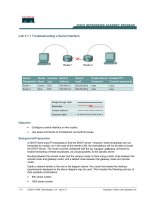
Set up a network similar to the one in the diagram. Any router that meets the interface requirements
may be used. Possible routers include 800, 1600, 1700, 2500, 2600 routers, or a combination. The
following resources will be required:
• Workstation with a serial interface and HyperTerminal
• Cisco Router
• Console (rollover) cable for connecting the workstation to the router
Step 1 Basic Router Configuration
a. Connect a rollover cable to the console port on the router and the other end to the PC with a DB-
9 or DB-25 adapter to a COM port. This should be completed prior to powering on any devices.
2 - 4 CCNA 2: Routers and Routing Basics v 3.0 - Lab 2.2.4 Copyright 2003, Cisco Systems, Inc.
Step 2 Start HyperTerminal program
a. Turn on the computer and router.
b. From the Widows taskbar, locate the HyperTerminal program:
Start > Programs > Accessories > Communications > Hyper Terminal
Step 3 Name the HyperTerminal Session
a. At the “Connection Description” popup, enter a name in the connection Name: field and select
OK.
Step 4 Specify the computers connecting interface
a. At the “Connect To” popup, use the drop down arrow in the Connect using: field to select COM1
and select OK.
3 - 4 CCNA 2: Routers and Routing Basics v 3.0 - Lab 2.2.4 Copyright 2003, Cisco Systems, Inc.
Step 5 Specify the interface connection properties
a. At the “COM1 Properties” popup, use the drop down arrows to select:
Bits per second: 9600
Data bits: 8
Parity: None
Stop bits: 1
Flow control: None
Then select OK.
b. When the HyperTerminal session window comes up, turn on the router. If the router is already
on, press the Enter key. There should be a response from the router.
If there is, then the connection has been successfully completed.
c. Record in the engineering journal the correct procedure for establishing a console session with
the router.
Step 6 Closing the session
a. To end the console session from a HyperTerminal session, select:
File > Exit
b. When the HyperTerminal disconnect warning popup appears, select Yes.
4 - 4 CCNA 2: Routers and Routing Basics v 3.0 - Lab 2.2.4 Copyright 2003, Cisco Systems, Inc.
c. The computer will then ask if the session is to be saved. Select Yes.
Step 7 Reopen the HyperTerminal connection, as shown in Step 2
a. At the “Connection Description” popup, select Cancel.
b. To open the saved console session from HyperTerminal, select:
File > Open
The saved session will now appear and by double-clicking on the name, the connection will open
without reconfiguring it each time.
Step 8 Terminating the HyperTerminal session
a. Close HyperTerminal.
b. Shut down the router.
Upon completion of the previous steps, logoff by typing exit. Turn the router off.