Tài liệu Lab 6.2.2 Basic Switch Configuration doc
Bạn đang xem bản rút gọn của tài liệu. Xem và tải ngay bản đầy đủ của tài liệu tại đây (252.92 KB, 4 trang )
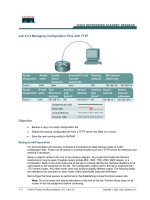
Lab 6.2.2 Basic Switch Configuration
Objective
• Configure a switch with a name and an IP address.
• Configure passwords to ensure that access to the CLI is secured.
• Configure switch port speed and duplex properties for an interface.
• Save the active configuration.
• View the switch browser interface.
Background / Preparation
Cable a network similar to the one in the diagram. The configuration output used in this lab is
produced from a 2950 series switch. Any other switch used may produce different output. The
following steps are to be executed on each switch unless specifically instructed otherwise.
Start a HyperTerminal session.
Note: Go to the erase and reload instructions at the end of this lab. Perform those steps on all
switches in this lab assignment before continuing.
1 - 4 CCNA 3: Switching Basics and Intermediate Routing v 3.0 - Lab 6.2.2 Copyright 2003, Cisco Systems, Inc.
Step 1 Enter privileged mode
a. Privileged mode gives access to all the switch commands. Many of the privileged commands
configure operating parameters. Therefore, privileged access should be password-protected to
prevent unauthorized use. The privileged command set includes those commands contained in
user EXEC mode, as well as the configure command through which access to the remaining
command modes is gained.
Switch>enable
Switch#
b. Notice the prompt changed in the configuration to reflect privileged exec mode.
Step 2 Examine the current switch configuration
a. Examine the following current running configuration file:
Switch#show running-config
b. How many Ethernet or Fast Ethernet interfaces does the switch have?
___________________
c. What is the range of values shown for the VTY lines?
_______________________________
d. Examine the current contents of NVRAM as follows:
Switch#show startup-config
%% Non-volatile configuration memory is not present
e. Why does the switch give this response?
__________________________________________________________________________
Step 3 Assign a name to the switch
a. Enter enable and then the configuration mode. The configuration mode allows the management
of the switch. Enter AL Switch, the name this switch will be referred to in the following
Switch#configure terminal
Enter the configuration commands, one for each line. End by pressing Ctrl + Z.
Switch(config)#hostname ALSwitch
ALSwitch(config)#exit
b. Notice the prompt changed in the configuration to reflect its new name. Type exit or Ctrl + Z
to go back into privileged mode.
Step 4 Examine the current running configuration
a. Exam the current configuration that follows to verify that there is no configuration except for the
hostname:
ALSwitch#show running-config
b. Are there any passwords set on the lines? _______________________________________
c. What does the configuration show as the hostname of this switch?
______________________
Step 5 Set the access passwords (1900: Skip to Step 6)
Enter config-line mode for the console. Set the password on this line as cisco for login. Configure
the vty lines 5 to 15 with the password cisco as follows:
ALSwitch#configure terminal
Enter the configuration commands, one for each line. End with Ctrl + Z.
ALSwitch(config)#line con 0
2 - 4 CCNA 3: Switching Basics and Intermediate Routing v 3.0 - Lab 6.2.2 Copyright 2003, Cisco Systems, Inc.
ALSwitch(config-line)#password cisco
ALSwitch(config-line)#login
ALSwitch(config-line)#line vty 0 15
ALSwitch(config-line)#password cisco
ALSwitch(config-line)#exit
Step 6 Set the command mode passwords
a. Set the enable password to cisco and the enable secret password to class as follows:
ALSwitch(config)#enable password cisco
1900:
ALSwitch(config)#enable password level 15 cisco
ALSwitch(config)#enable secret class
b. Which password takes precedence, the enable password or enable secret password?
_______
Step 7 Configure the layer 3 access to the switch
a. Set the IP address of the switch to 192.168.1.2 with a subnet mask of 255.255.255.0 as follows:
Note: This is done on the internal virtual interface VLAN 1.
ALSwitch(config)#interface VLAN 1
ALSwitch(config-if)#ip address 192.168.1.2 255.255.255.0
ALSwitch(config-if)#exit
1900:
ALSwitch(config)#ip address 192.168.1.2 255.255.255.0
ALSwitch(config)#exit
b. Set the default gateway for the switch and the default management VLAN to 192.168.1.1 as
follows:
ALSwitch(config)#ip default-gateway 192.168.1.1
ALSwitch(config)#exit
1900:
ALSwitch(config)#ip default-gateway 192.168.1.1
ALSwitch(config)#exit
Step 8 Verify the management LANs settings (1900: Skip to Step 10)
a. Verify the interface settings on VLAN 1 as follows:
ALSwitch#show interface VLAN 1
b. What is the bandwidth on this interface?
______________________________
c. What are the VLAN states: VLAN1 is
__________, Line protocol is __________
d. What is the queuing strategy?
______________________________________
3 - 4 CCNA 3: Switching Basics and Intermediate Routing v 3.0 - Lab 6.2.2 Copyright 2003, Cisco Systems, Inc.
Step 9 Save the configuration
The basic configuration of the switch has just been completed. Back up the running configuration file
to NVRAM as follows:
Note: This will ensure that the changes made will not be lost if the system is rebooted or loses
power.
ALSwitch#copy running-config startup-config
Destination filename [startup-config]?[Enter]
Building configuration
[OK]
ALSwitch#
1900:
The configuration is automatically saved to NVRAM within approximately one minute of entering a
command. To save the configuration to a TFTP server, enter the following:
ALSwitch#copy nvram tftp://tftp server ip add/destination_filename
Configuration upload is successfully completed.
Step 10 Examine the startup configuration file (1900: Skip to Step 11)
a. To see the configuration that is stored in NVRAM, type show startup-config from the
privileged exec (enable mode)
ALSwitch#show startup-config
b. What is displayed?
________________________________________________________
c. Are all the changes that were entered recorded in the file?
____________________________
Step 11 Exit the switch
Leave the switch welcome screen by typing exit as follows:
ALSwitch#exit
Once these steps are completed, logoff, by typing exit, and turn all the devices off. Then remove
and store the cables and adapter
4 - 4 CCNA 3: Switching Basics and Intermediate Routing v 3.0 - Lab 6.2.2 Copyright 2003, Cisco Systems, Inc.