Tài liệu Creating Applications with Mozilla-Chapter 12. Remote Applications-P4 docx
Bạn đang xem bản rút gọn của tài liệu. Xem và tải ngay bản đầy đủ của tài liệu tại đây (77.14 KB, 13 trang )
Chapter 12. Remote Applications-P4
Figure 12-5. Downloading a certificate window
After the certificate is installed, it will appear in the Certificate Manager, as
shown in Figure 12-6
. The Certificate Manager can be accessed via the
global Mozilla preferences (Edit > Preferences > Privacy & Security >
Certificates). Mozilla is then ready to run signed remote Mozilla applications
bearing signatures from your certificate authority.
Figure 12-6. Certificate manager with a certs.mozdev.org CA certificate
12.6. Creating Signed Remote Applications
Security in Mozilla's web browser is designed to meet today's advanced
scripting needs in a secure manner. Mozilla is a much more secure browser
than past Netscape 4.x and Internet Explorer releases because it has a better
sense of what remote scripts can and cannot do.
Because of Mozilla's approach toward potentially insecure applications, if
you decide to serve up your own application remotely, remember that you
will not have automatic access to the chrome in the way you do when you
have a registered, locally installed Mozilla application. Unless you sign your
application or have the user turn on a special preference (see Section 12.3
),
services like XPConnect will not be available.
In Mozilla, you can bundle any number of files into a JAR archive (which,
you'll recall from Chapter 6
, is just a zip file with a JAR suffix) and
designate the archive as an object that can be signed. This designation makes
it very easy to produce an entire signed and secure remote Mozilla
application because it stores your application in a single file type that
Mozilla already treats as a separate package.
This section provides an overview of the signed script technology and shows
you how to create signed applications that live on the server but take full
advantage of the user's local chrome, including Mozilla components.
12.6.1. certs.mozdev.org CA Certificate
Before users can load signed applications, a CA certificate must be installed
into their installed copy of Mozilla. Once this certificate is installed in a
browser, all MozDev-signed applications can work with this certificate. This
setup makes things easier on users who access many of these signed
applications because they do not have to install a new certificate for each
one. Also, if the user wants to use applications from other certificate
authorities, they need to install a distribution certificate from that certificate
authority.
Installing the certificate is easy. Just provide the users with a regular link on
a web page for example,
When loading this page, a dialog box pops up and asks the user to install the
certificate. See the Section 12.6.3.2
section later in this chapter for more
information about this process.
12.6.2. Signing Certificates
As a Mozilla application developer, you can obtain a common MozDev
signing certificate and release a signed application that puts your application
on par with other signed MozDev applications. If you consider your
application mission-critical, however, you should go to a trusted CA such as
Verisign. Mozilla already supports the VeriSign Netscape Object Signing
CA, and discriminating users may find it more acceptable. A few other CAs
listed in Mozilla's Certificate Manager may support Netscape Object
Signing, so researching these options further may be worthwhile.
To get a certs.mozdev.org/signing certificate, send email to cert-
In return, you will receive a .cacert file that will
be used to sign your remote Mozilla application.
SignTool (part of the NSS tool sets) takes a directory of files, zips them up
into a JAR archive (refer to the section Section 12.6.3.1
later in this chapter
to see how to do this), and signs the archive using the certificate you specify.
SignTool comes with the latest release of NSS, Version 3.4.1. On
, limited functionality versions of NSS contain
SignTool for Windows and Linux that you can use instead for the
processes in this book.
Use CertUtil to set up a database for SignTool. Next, run some commands to
set up the certificate environment:
C:\NSS\bin>certutil -N -d .
C:\NSS\bin>certutil -A -n
"certs.mozdev.org/signing" -t ",,C"
-i eric.cacert -d .
The first command creates an empty cert7.db file where certificates can
be stored. The second imports your Signing Certificate into the database.
SignTool can use only certificates that reside in a database, which is the
reason for this process.
12.6.3. Creating and Signing the Application
When someone obtains a private key (which is part of a Signing Certificate),
they can encrypt their scripts and produce a public key. The relationship of
the private key and the public key is called a private-public key pair. Using
this relationship, you can create a signed Mozilla application and make it
available to users in three steps:
1. Build the application itself, including the XUL, CSS, JavaScript, and
whatever else you use to create the Mozilla application.
For this section, let's assume that you already created the XUL and
JavaScript for the application and have all the files and directories
together.
2. Archive and sign the application. SignTool takes care of both steps
simultaneously, putting your application files in a JAR with a digital
signature to validate everything.
The signing process described next in Section 12.6.3.1
deals entirely
with SignTool.
3. Distribute your application (see the later section Section 12.6.3.2
).
12.6.3.1. Signing the application
Security is not simple. Security technologists and vendors work hard to
make sure that evildoers cannot abuse their encryption schemes, keys, and
other tricks. Tools like SignTool can hide some of this complexity from you.
When you sign an application, you create a digital signature in the archive
that is based on the relationship of the files being signed, as Figure 12-7
illustrates.
Figure 12-7. SignTool's processes for creating a signed application
SignTool automates these steps for you, so you don't worry about them.
However, knowing these processes and seeing how these transactions take
place can be useful, especially since using signed applications with Mozilla
doesn't always work as expected and long-term directions for signed
applications in Mozilla are uncertain. This uncertainty makes long-term
deployment of signed remote Mozilla applications a risky option.
To start off your remote Mozilla signed application development, you can do
something as simple as place one XUL and one JavaScript file in a single
directory. Then move it into a NSS bin directory such as C:\NSS\bin
and issue the command:
C:\NSS\bin>signtool -d . -
k"certs.mozdev.org/signing"
-p"password_of_database" -Z"myapp.jar" myappfiles/
The -d option is where the certificate database resides and -k is the
certificate name.
12.6.3.2. Distributing the application
Once the file is created from the -Z option (e.g., myapp.jar from the
example above), you can put it online. On the application's web page, note
that the application is signed and put a link to
so users can install the
necessary MozDev certificate if they do not have it.
To access the application online, you must use a special URL format. This
format looks like
jar: and
points into the JAR at the main application file. This URL is difficult to
type, so it may be wise to link it for user access or set up a redirected URL to
that address, as shown in Example 12-12
.
Example 12-12. Sample redirect into a signed application
<HTML>
<HEAD>
<META HTTP-EQUIV="REFRESH" CONTENT="0;
URL=
jar: />>
</HEAD>
</HTML>
12.6.4. Receiving a Signed Application
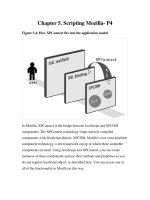
As shown in Figure 12-8, when Mozilla receives a JAR, it must check it for
validity before displaying the contents. A public key in
certs_mozdev.cacert must be used along with the digital signature to
make sure that the contents are not tampered with and that the signature is
valid.
Figure 12-8. Receiving a signed application
//FIXME did we loose content here?
When you are developing a signed remote Mozilla application, clear a
JAR's cache before trying to reload an updated version of it. Clearing
the cache can be done most easily by restarting Mozilla. If you or your
users do not do clear it, the consumer of the application will probably
wind up with a blank screen.
12.7. Expanded Privileges in Mozilla
While the security aspect of signed objects is nice, the ability to make
remote JavaScript do just about anything is even better for web developers
because it avoids the perceived complexity of languages like C++. Also,
JavaScript, along with Perl and PHP, has always been a preferred language
in the web environment.
Knowing that Internet Explorer no longer has a huge advantage when it
comes to remote browser-based applications is also nice, since JavaScript
and XPCOM in Mozilla provide a framework very similar to ActiveX. They
also provide web page scripting in which you can create and use components
from a web page or web application.
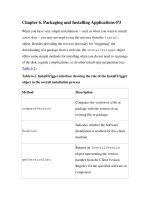
Table 12-1
shows the expanded privileges available to signed scripts. Signed
applications are granted these privileges as a matter of course.
Table 12-1. Expanded privileges available to signed scripts
Privilege Purpose
UniversalBrowserRead
Reads sensitive browser data. This
reading allows the script to pass the
same origin check when reading from
any document.
UniversalBrowserWrite
Modifies sensitive browser data. This
modification allows the script to pass
the same origin check when writing
to any document.
UniversalXPConnect
Gives unrestricted access to browser
APIs using XPConnect.
UniversalPreferencesRead
Reads preferences using the
navigator.preference
method.
Privilege Purpose
UniversalPreferencesWrite
Allows you to set preferences using
the navigator.preference
method.
CapabilityPreferencesAccess
Allows you to read/set the
preferences that define security
policies, including which privileges
are granted and denied to scripts.
(You also need
UniversalPreferencesRead/Write.)
UniversalFileRead
Handles window.open of
file:// URLs. Makes the browser
upload files from the user's hard drive
by using <input
type="file">.
The JavaScript features require expanded privileges and the target used to
access each feature. Unsigned scripts cannot do the following:
• Use an about: format URL other than about:blank; requires
UniversalBrowserRead.
• Use the history object to find out what other sites the user visited or
how many other sites the user visited in this session. Doing so
requires UniversalBrowserRead.
• When using navigator object, get the preference value by using the
preference method. Getting such a value requires
UniversalPreferencesRead.
• Set the preference value using the preference method; getting this
value requires UniversalPreferencesWrite.
• Add or remove the directory bar, location bar, menu bar, personal bar,
scroll bar, status bar, or toolbar. These are done using the window
object and require UniversalBrowserWrite.
• Use the methods and properties in the Table 12-2 under the indicated
circumstances.
Table 12-2. Expanded privileges available to signed scripts
Method / property Description
EnableExternalCapture
Captures events in pages loaded from
different servers. Follow this method
with captureEvents.
Close
Unconditionally closes a browser
window.
moveBy, moveTo
Moves a window off of the screen.
Open
• Creates a window smaller than
100 x 100 pixels or larger than
the screen can accommodate
by using innerWidth,
Method / property Description
innerHeight,
outerWidth, and
outerHeight.
• Places a window offscreen by
using screenX and
screenY.
• Creates a window without a
titlebar by using
titlebar=no.
• Uses alwaysRaised,
alwaysLowered, or z-lock
for any setting.
resizeTo, resizeBy
Resizes a window smaller than 100 x
100 pixels or larger than the screen
can accommodate.
innerWidth, innerHeight
Sets the inner width of a window to a
size smaller than 100 x 100 or larger
than the screen can accommodate.
This snippet of code shows how to use the privilege manager in JavaScript:
netscape.security.PrivilegeManager.
enablePrivilege("UniversalBrowserWrite");
window.titlebar=no;
You can pass any privilege listed in Table 12-1
to the enablePrivilege
method, which is accessed through the
netscape.security.PrivilegeManager object. This object is
recognized globally. In this example, the code hides the titlebar via the
window object.
Security is extremely important, so it is important that some means of
granting special privileges to trusted scripts for accessing Mozilla
components be available. In essence, signed scripts are Mozilla's version of
ActiveX.
The parallels become even more apparent when you consider access to
XPConnect as one of the security model's main boundaries. Just as ActiveX
makes COM available in IE, signing makes XPCOM available in remote
Mozilla applications. Given all that is possible in XPCOM, this chapter
leaves what can be archived with remote Mozilla applications and
XPConnect up to your imagination.