Tài liệu Thiết kế flash với flash cs5 part 12 pptx
Bạn đang xem bản rút gọn của tài liệu. Xem và tải ngay bản đầy đủ của tài liệu tại đây (546.13 KB, 6 trang )
ptg
80 Chapter 3
Using the Polystar
Tool
Draw a Polygon or Star Shape
Click and hold the Rectangle tool
on the Tools panel, and then point
to PolyStar Tool.
The pointer becomes a crosshair
that you can drag anywhere on the
Stage.
Click Options in the Property
Inspector.
TIMESAVER
Press
A
+F3
(Mac) or Ctrl+3 (Win) to open the
Property Inspector.
Click the Style list arrow, and then
select Polygon or Star.
Enter a value for the number of
sides. You can create an object
with up to 32 sides.
For the Star style, you can specify
an additional option for your point
size. You can enter a value ranging
from .10 to 1.0 points.
Click OK.
Click and drag on the Stage, and
then release the mouse.
7
6
5
4
3
2
1
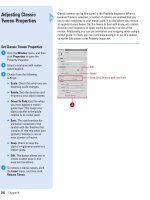
Working in much the same way as the Oval and Rectangle tools, the
new Polystar tool allows you to easily create complex vector shapes.
You can use this tool to create polygons and stars with up to 32 sides.
Choose between creating a polygon or a star. Both styles have charac-
teristics that can be adjusted in the Property Inspector before you draw
the shape. Both the polygon and star style can have up to 32 sides, with
the star style having an additional star point size that can be set.
Experiment with several options to get the kind of shape you want.
5
4
3
1
6
See Also
See “Editing Strokes with the Ink
Bottle” on page 102 for information on
editing an object.
7
Polystar shape
2
From the Library of Wow! eBook
ptg
Chapter 3 Creating Graphics 81
When you create vector graphics in Flash,
they are comprised of distinct elements that
can be selected separately or as a whole with
a variety of selection tools. The type of editing
you need to perform determines which tool
you use. For example, a simple rectangle
drawn is comprised of four line segments that
surround the contour of the shape and one fill
in the center. Each of these five parts can be
selected in tandem or individually with the
Selection tool. Likewise, any stroke that inter-
sects another stroke or fill splits them into dis-
tinct elements that can be selected separately.
In Normal selection mode, holding down
the Shift key adds to the selection any addi-
tional elements you click on. You can change
this option in the General tab of the
Preferences window so that it isn't necessary
to use the Shift key to perform this function.
Double-click any stroke to select other strokes
connected to it or double-click a fill to select it
and any strokes that touch or intersect it. To
select an entire shape (strokes and fills) or
just a portion of it, you can drag a selection
rectangle with the Selection tool or draw a
freeform selection area with the Lasso tool.
These methods work best for very complex
shapes with many intersecting strokes and
fills, or if there is only a portion of the shape
you need to edit.
The Sub-Selection and Pen tools allow you
to select the entire shape (strokes and fills)
simultaneously, making its anchor points and
Bézier handles visible for editing. Use this
method when you need to edit the contours
of the shape with precision.
For information on making selections
using the Object Drawing model, see
“Working with Object Drawing”, on page 74.
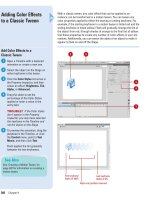
Understanding Selections
Each element (4
lines and a fill) can
be selected
separately.
Shift-select to
add elements to
the selection.
Single line segment.
When two line segments
intersect, four new line
segments are created that
can be selected separately.
Double-click a fill
to select it and any
connected strokes.
Double-click a
stroke to select all
connected
strokes.
Click and drag to
select a portion of
the shape.
Only a portion of
the fill and strokes
is selected.
Selection Examples
From the Library of Wow! eBook
ptg
82 Chapter 3
Selecting Strokes
with the Selection
Tool
Select a Stroke with the
Selection Tool
Click the Selection tool on the
Tools p anel .
The pointer becomes an arrow.
TIMESAVER
Press V to select
the Selection tool.
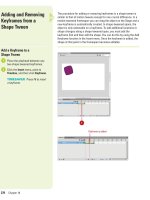
Position the arrow on the edge of
the shape.
Notice that Flash displays a small
curved line icon when you position
the arrow over a Curve point and a
corner line icon when over a
Corner point.
Click on any part of the stroke.
Flash only selects a portion of it.
This is because what appears to
be one whole shape is actually a
series of lines connected by points
and each can be selected
separately.
3
2
1
There are several ways to select objects in Flash. You can select an
object's stroke or fill or both. You can use the Selection tool to select
parts of the object or drag over a portion of it to create a selection rec-
tangle. The Property Inspector displays the properties of what is
selected including Stroke line weight and style, Fill color, pixel dimen-
sions, and X and Y coordinates. When a stroke or fill is selected, a dot-
ted pattern appears over it indicating it has been selected. This makes
editing and modifying graphics simple and illustrates the versatility of
the vector-based graphics model used in Flash.
2
Curve point detected
Corner point detected
See Also
See “Working with Object Drawing” on
page 74 for information on selecting
overlapping objects on the same layer.
3
1
From the Library of Wow! eBook
ptg
Chapter 3 Creating Graphics 83
Select Multiple Stroke
Segments
Click the Selection tool on the
Tools p anel .
The pointer becomes an arrow.
TIMESAVER
Press V to select
the Selection tool. You can
temporarily switch to the Selection
tool from any other tool by
pressing
A
(Mac) or Ctrl (Win).
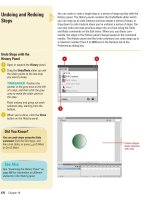
Click on any part of the stroke to
select one segment.
Hold down the Shift key, and then
click other strokes to add them to
the selection.
Select Connected Stroke
Segments
Click the Selection tool on the
Tools p anel .
The pointer becomes an arrow.
Double-click any part of the
segment or stroke to select all
connected strokes.
2
1
3
2
1
3
2
1
Shift-select to add stroke segments
to the selection.
2
All connected stroke segments selected.
Did You Know?
You can turn off the Shift-select
feature in the General tab of the
Preferences dialog box.
When this
feature is disabled, you can add to the
selected segments by clicking them
without the need to hold down the Shift
key. In this mode, holding the Shift key
and clicking a selected stroke segment
deselects that segment.
1
From the Library of Wow! eBook
ptg
84 Chapter 3
Selecting Strokes
and Fills with the
Selection Tool
Select Fills with the Selection
Tool
Click the Selection tool on the
Tools p anel .
The pointer becomes an arrow.
Position the arrow in the Fill area
or the center of the shape and
click.
The fill becomes highlighted with a
dotted pattern to indicate it has
been selected. Hold down the Shift
key to add other strokes and fills to
the selection.
Select with a Selection
Rectangle
Click the Selection tool on the
Tools p anel .
The pointer becomes an arrow.
Click on the Stage above and to
the left of the shape you want to
select and drag to create a
Selection Rectangle, and then
release the mouse when the
bounding box fully encloses the
shape.
2
1
2
1
The Selection tool provides the most simple and versatile procedures
for selecting objects in Flash. The Selection tool selects anything you
click on (provided it isn't on a locked layer). Double-clicking shapes
with the Selection tool selects all fills and strokes that are connected.
Shift-selecting allows you to add to the selection only what you need.
Alternately, dragging a selection rectangle on the Stage with the
Selection tool creates a bounding box that selects anything you drag it
over. This bounding box method is the most reliable technique for
selecting very complex objects with many intersecting strokes and fills.
Selected fill
Double-clicking
the shape selects
both the fill and
the stroke.
Both fill and strokes are selected.
1
2
2
1
From the Library of Wow! eBook
ptg
Chapter 3 Creating Graphics 85
Making Selections
with the Lasso Tool
Select with the Lasso Tool
Click the Lasso tool on the Tools
panel.
TIMESAVER
Press L to select
the Lasso tool.
Draw around the shapes you want
to select.
To comp lete t he sel ecti on, re turn
to the point where you started.
Select with the Lasso Tool in
Polygon Mode
Click the Lasso tool on the Tools
panel.
Click the Polygon Mode button in
the Options area of the Tools
panel.
Click near the area you want to
select. Move the pointer and click
again. Keep clicking until the
object or portion you want to
select is surrounded.
Double-click to complete the
selection.
4
3
2
1
3
2
1
Use the Lasso tool when you want to select shapes that are too close
to shapes you don't want to select. This tool allows you to draw around
the shape, selecting everything contained in the shape you draw. In the
default mode, you can draw a freeform lasso around the object you
want to select. You can also choose the Polygon mode for defining the
selected area with a series of straight-line segments.
Selected shape
Selected shape
2
1
Did You Know?
You can select single or multiple
objects.
Holding the Shift key adds line
segments and fills them. Shift-clicking
selected items deselects them.
1
2
3
Flash draws a preview of the
selection lasso as you draw.
From the Library of Wow! eBook